The standard interior of the VAZ 2109 is quite boring and unattractive. However, by resorting to tuning, you can not only transform it, but also increase the level of comfort by performing sound insulation, reupholstery, and also using modern lighting elements. If desired, everyone can modernize the interior to their own taste, embodying almost any idea.
- Improving the lighting of the instrument panel
Video: installing an LED strip in the instrument panel of a VAZ 2109
- Door panels
- Motor baffle
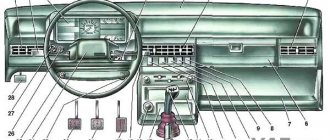
- Photo gallery: tuning the interior of the “nine”
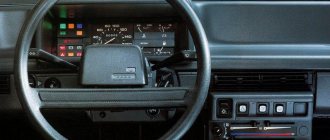
Instrument panel VAZ 2109
1. Speedometer - shows how fast the VAZ 2109 is moving, there is also a mechanical dial for daily and total mileage 2. Fuel level indicator and indicator 3. Coolant temperature indicator. Operating a vehicle with a faulty warning light is undesirable. 4. Tachometer. Shows engine speed
So, where do the work begin?
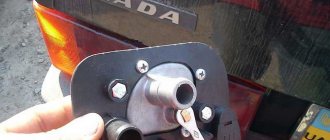
Removing the high instrument panel begins with removing the decorative steering wheel trim. Next, you need to unscrew the steering wheel mounting nut so that its front part is flush with the end of the column shaft. But you should not remove the nut right away. The steering wheel on the “nine” sits very tightly on the splines, and with sudden movements it can jump off the mounts and cause serious injury.
With sharp blows of the hand, the part is knocked off its fastenings and finally removed. Next, unscrew the 6 bolts of the lower column casing. The last part, together with the ignition switch trim, is pulled out entirely. We do the same with the top casing. After this, the base is removed from the shaft and the two wire blocks from the sound signal are disconnected. Then the cords from the windshield wiper and washer are removed along the chain, as well as the turning and lighting lever.
After pulling out the “choke”, the handle is removed from the rod and the instrument panel consoles are removed. Next, remove the cigarette lighter socket, the ashtray, as well as the fan switch and heater control knobs (here you can try prying them off with a minus screwdriver). After this, the hydraulic corrector, lighting switches and other elements are removed in the same way.
After it comes to the instrument panel and the speedometer cable has been removed, remove the red and white pads from the instrument cluster and on-board control system. Then we disconnect the ignition switch along with the ground, the control lamp for opening the damper and the guide rods. The shield fastening screws themselves are located on both sides of the cladding. After removing them, the instrument panel (VAZ-2109 Samara) will be in a position free from the car.
Instrument symbols and indicators on the VAZ 2109 display
1 – “TEST” display (lights up in the signaling device self-monitoring mode); 2 – “STOP” indicator (lights up when one of the indicators is turned on, symbolizing a malfunction, without which further movement is prohibited); 3 – indicator of emergency condition of the service brake system (lights up when the fluid level in the hydraulic brake reservoir drops below o; 4 – indicator of insufficient coolant level; 5 – indicator of insufficient fluid level in the windshield washer reservoir; 6 – indicator of failure of the brake lamp filaments and side lights; 7 – front brake pad wear indicator; 8 – low oil level indicator in the engine crankcase;
Fuel level sensor
Especially for those car owners who want to see accurate data and are looking for a suitable type of sensor, we offer a table for your reference:
The optimal choice would be the sensor number 2108-3827010-01. Its reading is approximately as follows: the middle of the scale indicates a level of 20 liters, and the red zone begins when the tank contains about 5 liters of fuel.
In any case, when you buy a sensor, test it for resistance: the best option for you is a sensor that shows 360 ohms when the tank is empty.
Video review of the dashboard on the VAZ-2109:
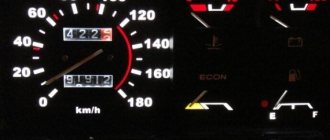
Instrument cluster and icon designations
1 – knob for resetting the daily mileage. 2 – signaling device for turning on high beam headlights; 3 – signaling device for turning on external lighting; 4, 6 – turn signal indicators; 5 – battery charge indicator; 7 – emergency engine oil pressure indicator; 8 – fuel level indicator in the fuel tank; 9 – “Check engine” indicator; 10 – parking brake activation indicator;
Installation of a VAZ 2114 torpedo in a VAZ 2109
I was looking for this torpedo for a long time, because... Our city is small and it’s difficult to find. As a result, I bought it in Yaroslavl for 2000 rubles assembled
. I brought it home and the next day the installation process began. First I brought the frame itself into the salon
and screwed it on, it is attached with 4 bolts, in my opinion (I liked the fact that the fastenings there are metal, unlike the VP)
I screwed it on and tried to “shake” it, it sat as if nailed down). The brain itself attached it like this
This is what it looked like installed =)
Then I started to figure out the wiring, I’ll say right away that I didn’t have much experience before this. First I stuck everything into the CY, everything fit there with no problems, then all sorts of buttons and all that. The process went on without stopping, I was already looking forward to starting it up))) I don’t remember exactly right away or not, I bought a new ignition switch from a VAZ 2110 (I couldn’t attach the old one)). I installed everything, turn the key in the lock... the fuel pump does not turn on, I understand that most likely I did not connect the wiring to the brain, I see that it is. I started looking in the wiring for the connector going to the controller, found something similar (from the diagrams I figured out where it should come from), but for some reason it didn’t fit mine, later it turned out that this is the torpedo wiring from a car with Bosch 7.9.7 (right now I definitely don’t remember). This was the connector from the old wiring
and this one from new
Ryskaya found a diagram on the internet on how to cross these 2 wires. Here is the actual diagram (added)
and here is the pinout diagram of my old block and the new one
I tried it and the fuel pump “buzzed”. The key to start... does not turn the starter. I thought about it for a long time and didn’t understand why, so I gave up) Having arrived home, I started rummaging around on the Internet to solve this problem, as it later turned out there was some kind of problem with the relays, if you plug in the relay from the VAZ 2109, it doesn’t turn and I had to short-circuit the wires directly (right now That's how I go.) the stove connector also didn’t fit, but I easily redid it (I think no one would have any questions HOW when he saw the difference). Another problem was that the color of some wires in the diagram did not match reality (so it’s better to count all the wires, the numbers are the same for all). During the installation I learned to understand more or less electrical issues and use a tester.
Possible faults
What malfunctions are typical for the dashboards of VAZ cars? Check out the main list after watching a video about connecting the shield from a VAZ 2110 to a “nine” (the author of the video is Garage BFS).
- The speedometer does not work. There may be several reasons for this - a broken cable, its incorrect installation or wear of the socket. You should try disconnecting the cable and reconnecting it.
- The odometer, which records the mileage of the vehicle, does not work. This problem is usually resolved by replacing the device.
- One or another indicator does not light up. Perhaps the sensor itself has failed or the light bulb has burned out.
- The instrument panel backlight does not work. This is usually due to burnt out bulbs or bad contacts. There may also be problems in the electrical circuit, but this happens rarely.
- The coolant or oil level sensor is giving incorrect information. For example, the driver is warned about a lack of engine fluid level or boiling refrigerant in the expansion tank, but in fact, with these parameters everything is normal. The problem is usually solved by replacing the sensors.
Dashboard from a foreign car for a VAZ: which panel is suitable for a VAZ-2108/2109?
VAZ cars from the Samara family are still in demand on the secondary market and can often be found on the roads. VAZ-2108/09/099 and the VAZ-2114 created on their basis are quite normal cars, especially for their time.
Of course, their time has passed. But there are more than enough fans of these models. Not long ago I had a publication about converting a VAZ-2109 into a VAZ-2114 - this way the owners “update” their nines, but there are a large number of people who like the old design. The link to the publication will be at the end.
Also, controversy continues about the dashboards of these cars. Which panel is better? Old "low" or more modern "high"? Both sides are right in their own way, but it is worth recognizing that the Soviet “low” panel was more successful. It creaked less and the stove blew hot air well. The “high” panel with the stove has some problems. There is also a large publication about this and see it at the end of the article.
Photo source: www.flickr.com
But there are people who have solved the panel issue radically - they install panels from completely different cars. From foreigners, of course. Installing a panel from a foreign car is a qualitatively different level.
Is it easy to install?
No. Installing a panel from a foreign car is quite a complicated matter. But, if you think about everything well and figure it out, then it can be done. First of all, you need to find a panel that will fit in length.
The process of finding a suitable panel is quite complicated and people share information with each other about which panel will fit without much modification. By the way, in this article you will see the largest list of panels that are guaranteed to fit 09/08/099/14/.
The panel is unlikely to fit in the mounting locations, but this can be solved with all sorts of spacers.
Photo source: www.flickr.com
Another difficulty is to rewire the wiring for a foreign panel. This is all quite complicated. It will be difficult for a person who has not dealt with this. But remember the saying about perseverance and work.
Another challenge is lining up the heater ducts with the new panel. but this can be solved by purchasing plumbing plastic pipes. In some places they can be combined with standard air ducts, in others they can be made from scratch.
Main
The most important question is which panels from which foreign cars fit our Ladas. People have been installing foreign panels for a long time and there has been a fairly large list of foreign cars from which the panel can be taken.
Photo source: www.flickr.com
So, we can safely say that panels from the following cars can be installed on the Samara family as easily as possible:
- BMW E28
- BMW E30
- BMW E36
- Toyota Corolla 90
- Audi 80 B3
- Audi 100 C3
- Mazda 626
- Mazda 323F
- Mitsubishi Eclipse 2
- Mitsubishi Galant 2001
- Mitsubishi Galant 1980-1991.
- Opel Omega A/B
- Opel Vectra A/B
- Mercedes W210
Big list, isn't it? Surely it is not complete and there are still as many panels that can be installed, but I don’t know about them. This list contains only those that were actually created by craftsmen.
Price
Photo source: www.flickr.com
The panels themselves from these foreign cars are quite affordable. For example, I found a panel from a BMW E30 in good condition in my city for 6,000 rubles. This is a fully assembled panel with all instruments. If you need an empty panel, then it costs a ridiculous 1,500 rubles.
If you do it yourself, you can spend another thousand to redo the wiring. But it takes a lot of time. Reinstalling the panel takes a couple of hours, but connecting...
Experts' opinion
Alexander. It is recommended to abandon GPS navigators with external installation: there is no need to mount them on glass, as the view from the driver’s seat is significantly reduced. If the navigator is really needed, then you can create a special niche for it in the dashboard. The VAZ torpedo is quite simple and has a large amount of free space to accommodate various control units and multimedia systems.
Alexei. I installed a new torpedo from another car - a difficult job that required patience, precision and a lot of free time. I’ll say right away that you need to be well versed in the placement of important elements of your car: wiring, air ducts, and so on. Dismantling must be carried out carefully, since the original torpedo may still be needed.