I want to talk and most importantly help all those who have asked the same question, there will not be a bunch of photos here about what to twist where and what to unscrew from where, there will only be my observations and solutions.
To be honest, I’ve read, heard, and watched a lot about the fact that heating chisels from a high panel are, to put it mildly, bad))
I rode on a low panel for 2 winters and I want to say without lying in the winter when it was -25 or even -30 at night, it was hot for me to sit in a jacket... YES-YES! in the cabin I created a comfortable temperature and was in only a sweater, and when my friends whined that it was freezing outside and you couldn’t stand outside for 10 minutes, I laughed at them (although one time Akum died and I had to go to work by minibus, of course I left my hat at work, I don’t care if I drive a car) in short, that day I realized the beauty of the wind at -25) ... well, oh well, that’s not what we’re talking about. After the heater radiator leaked, I understood why Tashkent was so bad, there was always just scalding boiling water coming from the air ducts, it was impossible to hold my hand, but at speed 3 it always seemed to me that the air flow was very weak... in general, the reason for such heat was hidden in the radiator itself (I have no idea what it was, there was no name, I really regret that I couldn’t identify it) it was almost completely clogged with dust, and apparently the air flow could not pass freely and lingered at the radiator longer, as a result the temperature was higher air outlet. After the replacement, the air was blowing much stronger, but the temperature dropped noticeably, if you keep the speed at about 2000 then the norm is lower, it’s warm. I think the radiator is to blame, I still haven’t overcome this problem.
Sitting down in a chisel with a high panel, it was already scary to imagine what would happen in the cold and what kind of down jacket I should buy. But the worries were in vain, it was also very warm in the high panel... BUT! There is one BUT, and it’s very serious... in cold weather there is no way to regulate the temperature of the air flow; it blows either boiling water or cold water. The temperature is regulated only on the middle nozzles, you try to make it cooler, you lower the temperature, in the middle nozzles it’s what you need, and along the edges and into your forehead air blows from the street, that is, the temperature is a little warmer, it’s -20 outside and -15 blows in your face, you either drive with a freezing windshield, or you sweat like a bastard even in a sweater...
Unfortunately, this cannot be treated in any way in the high panel heater, apparently the idiot who came up with this did not drive a vase and had little idea of how it should work at all)
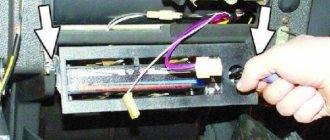
It was decided to extend the heater from a low to a high panel.
Structurally, they only have internal differences (if there is a fear that the radiator in one is horizontal and in the other vertical, then this is in vain; for two years of using a vertical one, I never had air anywhere, although antifreeze flowed constantly, from everywhere, even there no one would have thought, but it still poured, even where there was none, but it still poured, poured from... even from under new hoses, poured everywhere, poured constantly, from everywhere where it didn’t flow, it dripped, where it didn’t drip, it oozed...okay...a sore subject))) They become installed without problems, there are no differences from the outside, everything is identical. The adjustments will of course be different, and at first it will be difficult to get used to.
But now there will be a number of advantages: 1. The air flow to the forehead will increase, air will appear even in the extreme nozzles of the windshield and on the passenger and driver sides. 2. Hot air will also blow into the legs of the rear passengers. 3. It will be possible to smoothly regulate the air temperature. 4. Hot air will come out of all the nozzles and into the forehead. both in the interior and on the sides. Mono will forget about the icy windshield on the driver's side in winter.
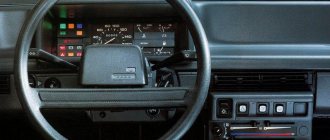
↑ Low instrument panel
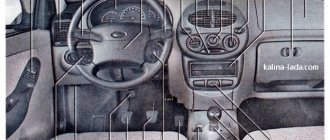
1. Instrument cluster; 2. Ignition switch; 3. Instrument panel; 4. Central nozzles of the interior ventilation and heating system; 5. Side nozzles of the interior ventilation and heating system; 6. Glove box lid; 7. Shelf; 8. Plug; 9. Tailgate glass heating switch; 10. Rear fog lamp switch; 11. Hazard switch; 12. Central switch for external lighting; 13. Control panel for the interior ventilation and heating system; 14. Radio socket; 15. Gear shift lever; 16. Parking brake lever; 17. Ashtray; 18. Cigarette lighter; 19. Switch lever for windshield wipers and washers; 20. Accelerator pedal; 21. Brake pedal; 22. Clutch pedal; 23. Handle for closing the carburetor air damper; 24. Horn switch; 25. Handle for resetting the daily mileage counter; 26. Instrument lighting switch; 27. Headlight hydraulic adjustment handle; 28. Hood lock drive lever; 29. Lever for switching direction indicators and headlights.
↑ Instrument panel
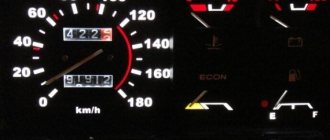
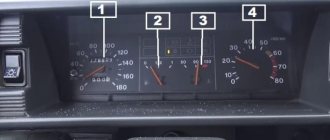
1. Speedometer; 2. Coolant temperature gauge; 3. Voltmeter; 4. Fuel level indicator; 5. Indicator lamp for reserve fuel remaining; 6. Econometer; 7. Daily mileage counter; 8. Total mileage counter; 9. “STOP” indicator lamp; 10. Battery charge indicator lamp; 11. Indicator lamp for covering the carburetor air damper; 12. Indicator lamp for turning on the hazard warning lights; 13. Indicator lamp for low brake fluid level; 14. Indicator lamp for turning on the parking brake; 15. Warning lamp for emergency oil pressure; 16. Indicator lamp for turning on the direction indicators; 17. Indicator lamp for turning on side lights; 18. Indicator lamp for turning on the rear fog lights; 19. Indicator lamp for turning on the high beam headlights; 20. Indicator lamp for turning on the heated glass of the tailgate.
Panel tuning options
If you decide to tune your instrument panel, then most likely you will be interested in knowing what options exist for doing it. The tuning shield, as you know, pleases the driver’s eye, so this issue is relevant for many car owners.
Dismantling the shield
To tune the dashboard, you first need to remove the device itself.
To do this, you only need to disconnect eight fasteners; to do this, you can use a regular knife:
- First, the fastenings on the driver’s side are disconnected;
- then you need to release the latches located there, on top;
- after this you can disconnect the middle part of the tidy;
- the panel itself is dismantled (the author of the video is Artem Volivach).
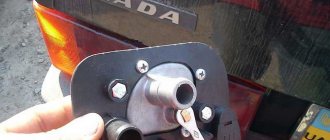
↑ Position of the ignition key in the lock
In the ignition switch, the key can occupy the following positions:
- 0 — all consumers are turned off. The key does not come out. Steering is not locked;
- I — ignition is on. The key does not come out. Steering is not locked;
- II - ignition and starter are on. The key turns fully clockwise, overcoming the force of the spring. The steering is not locked. In this position, the key is not fixed; for the starter to operate, it must be held by hand. Immediately after starting the engine, the key should be released, and it will return to position I under the action of the return spring. The ignition switch has a built-in locking device that will prevent the starter from being turned on while the engine is running. You can only turn the key to position II again after you have returned the key to position 0;
- III - ignition is turned off. The key is removed. When the key is removed, the steering is locked. To turn off the anti-theft device, insert the key into the ignition switch and, turning the steering wheel slightly left and right, turn the key to position 0.
Features of the Europanel
Since 1996, Europanels began to be installed on the VAZ 2109. They have a trapezoid shape with strongly rounded corners, are ergonomic and, as a result, attractive. As in the “high” panel, most of the dashboard is occupied by the tachometer and speedometer, all other instruments - warning lights, indicators - are located around them. Trip counters have been replaced with electronic indicators.
Europanel VAZ 2109
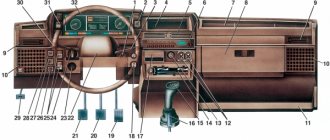
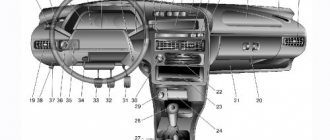
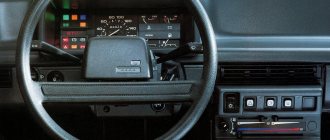
↑ High instrument panel
1. Ignition switch; 2. Hazard switch; 3. Switch lever for windshield wipers and washers; 4. Radio socket; 5. Central nozzles of the interior ventilation and heating system; 6. On-board computer (installed as part of the package); 7. Instrument panel; 8. Glove box lid; 9. Side nozzles of the interior ventilation and heating system; 10. Loudspeaker cover; 11. Shelf; 12. Power window switches (installed as standard); 13. Cigarette lighter; 14. Control panel for the interior ventilation and heating system; 15. Gear shift lever; 16. Parking brake lever; 17. Ashtray; 18. Handle for closing the carburetor air damper; 19. Accelerator pedal; 20. Brake pedal; 21. Clutch pedal; 22. Horn switch; 23. Instrument lighting switch; 24. Hydrocorrector of headlights; 25. Front seat heating switch (installed as standard); 26. Rear fog lamp switch; 27. Fog light switch (installed as standard); 28. Heated tailgate glass switch; 29. Hood lock drive lever; 30. Lever for direction indicators and headlights; 31. External lighting switch; 32. Instrument cluster.
↑ Instrument panel
1. Speedometer. 2. Handle for resetting the daily mileage counter. 3. Daily mileage counter. 4. Total mileage counter. 5. Fuel level indicator. 6. Light panel of the on-board control system. 7. “TEST” display. 8. “STOP” display. 9. Indicator lamp for failure of brake lamps and side lights. 10. Indicator lamp for low brake fluid level. 11. Warning lamp for low coolant level. 12. Warning lamp for front brake pad wear. 13. Indicator lamp for level drop in the washer reservoir. 14. Indicator lamp for low oil level in the engine crankcase. 15. Coolant temperature gauge. 16. Tachometer. 17. Indicator lamp for turning on the parking brake. 18. “CHECK ENGINE” warning lamp for the injection system*. 19. Indicator lamp for covering the carburetor air damper. 20. Indicator lamp for reserve fuel remaining. 21. Warning lamp for emergency oil pressure in the engine lubrication system. 22. Indicator lamp for turning on the right turn indicators. 23. Battery charge indicator lamp. 24. Indicator lamp for turning on the left turn indicators. 25. Warning lamp for unfastened seat belts*. 26. Indicator lamp for open doors*. 27. Indicator lamp for turning on side lights. 28. Indicator lamp for turning on the high beam headlights. 29. “CHECK ENGINE” warning light for the emission control system*.
*Equipment is installed as supplied. If the equipment is not installed, there are plugs instead of lamps.
Which dashboard on the VAZ-2109 is better: low or high?
Despite the fact that the VAZ-2108/2109 is already more than thirty years old, these cars can easily be found on our roads. And you can’t call them bad - they’re completely normal cars. As long as these cars have existed, there has been controversy surrounding their dashboards.
The fact is that there is a “low” panel and a “high” one. The low panel was on the first 08/09, and later, a high panel appeared, which replaced the low one, from about 1997.
And each option has its supporters. Some people remove the low panel and install a high one, while others bought a nine after 1997 and are looking for a Soviet low panel to replace the high one with.
“It’s a matter of taste,” you say, and I agree with that. Really, whatever you like. But low and high panels have their own objective pros and cons.
Photo source: www.flickr.com
Many people don't like the look of a low panel, but these people either leave the low one or install it instead of the high one. Why is that? I was not interested in this topic at all because I was a passenger on a nine with both a high panel and a low one... in my opinion, both rattle. But I wanted to figure out where such disputes come from.
Low panel
The main advantage of a low panel is that the stove heats much better with it, and this is true. In 08/09 with a low panel it is really warm, which certainly cannot be said about a high panel. The ventilation itself is clever and the airflow is correct.
The low panel is stronger and less creaky. This is recognized by the owners of both low and high panels. As I wrote above, I was a passenger on nines with both panels, and so, although both creak, the low one is much less. There's just nothing particularly creaky there.
Photo source: www.flickr.com
With a low panel, the interior appears visually larger. And this is also true. The low panel has plenty of room to put something on it. And if you don’t like it, you can buy a panel overlay and make a tall one from a low one.
But the most important disadvantage is that the low panel does not have a tachometer. But firstly, it is quite possible to do without it, and secondly, no one bothers you to install a separate tachometer.
High panel
Photo source: www.youtube.com
Among the objective advantages, it is worth noting the presence of a tachometer. Also, on the high panel there is illumination of the glove compartment and buttons. There are places for additional buttons. It also looks more modern. But the main thing is that many people simply like it.
The stove is cooler on a high panel. This is due to the ventilation design itself. Due to the fact that there are more parts on a high panel, it creaks more, but this can be solved by gluing it with sound-insulating materials.
Well, in general, if you change the panel, you can install it from a VAZ-2114. It fits in size because it is the same 08/09. Relatively not creaky, with normal airflow and a modern look. True, it is more difficult to redo the wiring there.
Low, high or from 2114 - everyone decides for themselves. The main thing is that the owner likes the panel. If I missed something, write in the comments.
We check and repair the BA3 2109 stove
Interior heating is an important system, which, if it breaks down, can unexpectedly cause discomfort during the cold season. To prevent this, it is necessary that the 2109 stove is maintained in good condition. You should know how we get warm air into the cabin at the exit. Knowing the principle of operation of the engine cooling system and the electric heating ventilation drive, it is not difficult to repair the VAZ 2109 stove with your own hands.
At first glance, the interior heater seems to be a primitive device. Like, the car is driving towards the air flow, air is sucked in, somehow it is heated, and now it is already warm in the cabin. But it is not so. The stove is an auxiliary radiator for the engine cooling system, and air is pumped into the cabin using an electric drive. Therefore, let’s figure out how the stove receives heat from the cooling system and study its electrical circuit. Knowing this, you can identify malfunctions in the heater. Let's find out how to replace the VAZ 2109 stove fan with your own hands.
Electrical diagram of the stove and main faults
In the “nine”, the VAZ heating system operates using an electric drive. The instruction manual for the VAZ 2109 high panel shows an electrical diagram of the stove's operation. The interior heater connection diagram consists of:
- fan motor;
- the ignition switch, which turns on the stove;
- operating mode switch;
- additional resistor;
- fuse mounting block (fuse F4 is responsible for the stove in the “nine”).
When the VAZ 2109 stove does not heat well in the cabin, there can be a lot of reasons for this.
≡ 4 November 2015 Category: Repair
Place of the heater in the engine cooling system
The stove is part of a closed vacuum coolant circulation system. The main purpose of this system is engine cooling. Thus, the design of the VAZ 2109 stove both helps to heat the interior in cold weather and cools the cylinder block when the engine is running. The entire SOD consists of:
- cooling jackets;
- radiator;
- expansion tank;
- water pump;
- radiator fan;
- thermostat;
- heating radiator - VAZ 2109 stove.
When driving, atmospheric air passes through the air intake into the radiator, the pipes of which contain air that is too hot for the engine. These pipes are cooled by a fan, and the already cooled liquid again enters the cooling jacket (cylinder block and cylinder head) through the water pump. The stove in this antifreeze cycle performs the task of additionally removing hot liquid.
The VAZ 2109 heating fan maintains the desired air temperature in the cabin.