Indication symbols
As you know, all the lights on the control panel come on when the ignition is turned on, and then, when the engine is already running, most of them go out. But when one remains on or blinks, this cannot but be alarming, because not everyone can immediately figure out what malfunctions this indicates, which of the systems needs urgent repairs.
Let's look at the designations of the instrument panel of the VAZ 2110. You should know that regardless of whether the panel is new or old on your car, the designations are almost the same, but the indicators may be located slightly differently.
Instrument panel VAZ 2110
Basic designations of icons on the VAZ instrument panel
The presence of icons on the dashboard plays one of the most important roles while driving a car. They are responsible not only for navigation through the vehicle systems, but also promptly inform about the occurrence of any malfunctions, breakdowns or improper operation of the vehicle. That is why every car enthusiast needs to know the location, interpretation and designation of icons on the VAZ instrument panel.
If one or another indicator suddenly appears on the dashboard, you will be able to react in time, which will save you from getting into a difficult situation. Often the indicators only serve as a kind of alarm, but when they go off, it is best to immediately go to the garage for repairs or seek help from a car service center.
Top part
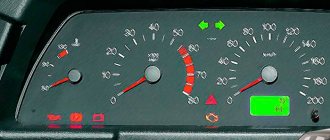
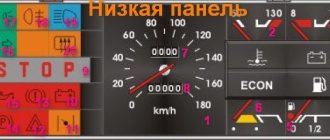
So let's start from left to right. First, the top part of the control panel:
- Side scale from 50 to 130 and arrow. Shows the temperature of antifreeze (antifreeze) in the engine cooling system;
- Almost round scale (0 – 80) and arrow. Tachometer showing engine speed;
- Two arrows at the top, almost in the middle of the control panel - turn signals (right, left);
- Speedometer. Well, this device, probably everyone knows, shows the speed at which the car is moving;
- A side scale with an arrow and, most often, two images of a filling column (white and red). Instead of a red column there may be a yellow light. This is an indicator of the fuel level in the tank. If the red column (yellow light) lights up, it means that there is very little fuel left in the tank - no more than 7 liters, urgent refueling is required.
How are the icons on the installed instrument panel deciphered?
In addition to the instruments, the panel also has various icons that light up when there is a malfunction in the form of electronic indicators. They have the following meanings for the driver:
- ABS sign. This indicator lights up only when the engine starts and immediately goes out. It can also light up if there are problems with the operation of the anti-lock elements in the brake system.
- Front airbag indicator. Will light up when there is a malfunction with the airbags attached to the front panel of the car.
- An indicator that reminds you to put on your seat belt. It will light up when you start the engine and will remain on until you fasten your seat belt.
- Airbag warning light. Lights up when the airbag of the front pair of passengers is turned off.
- Heated rear window indicator. It will light up before turning on the heating on the rear window.
- Low beam icon.
- High beam indicator.
- Sign for turning on the rear fog lights.
- Front fog lamp sign.
- An indicator that turns on when there is a malfunction in the electric amplifier.
- Signal lamp that operates when the doors are not closed.
- Lamp for adjusting the fuel level in the tank. It lights up only if there is fuel for 15-20 minutes of driving.
- Indicator for left and right turn signals of the vehicle.
- An indicator that turns on when the engine cooling system overheats.
- Indicator lamps that turn on when the batteries are low charged.
- A light called “CHECK ENGINE.” Lights up when a malfunction occurs with the engine control system.
- Signal indicators that turn on when the parking brake is used or when a breakdown occurs in the brake system.
- Indicator of low pressure and level of engine oil in the lubrication system.
- The preheating system malfunction light (specifically responsible for the glow plugs).
- A warning light that appears when the electronic engine starting system of a car is blocked.
Advice: if one of the indicators associated with the wheels lights up, then first bleed the brakes on the VAZ-2110. and then check the system again. If the indicator on the on-board panel disappears, it means that the problem was solved by repairing the brake system.
Bottom part
Let's look at the indicators at the bottom of the control panel. If they don’t light up, it means the machine is working normally, and when any of them lights up, this indicates a malfunction in certain components. Most often, this is a signal that repairs are needed, and the sooner the better. From left to right:
- The indicator on the far left at the bottom is the air damper light (if you have a carburetor engine);
- Icon in the form of an oil can. If this light comes on, it means there is insufficient oil pressure in the engine. An alarming signal. You need to stop, find the reason;
- A round icon with the letter P inside on the control panel indicates that you have the parking brake on, which, as you know, should be turned off when moving away;
- Indicator of a fault related to the generator or battery (a symbolic image of the battery is shown on the indicator). Perhaps the battery is not charging from the generator, there is an open circuit, or the generator belt is loose or broken. In any case, your intervention and repairs are needed, otherwise troubles cannot be avoided;
- If the engine is running and the Check Engine indicator is on on the control panel, this is the most unpleasant thing for the driver, since it indicates serious malfunctions in the engine. In general, when this indicator lights up, it is recommended to stop driving and turn off the engine. Most likely it needs repairs;
- Typically there is a red triangle above the Check Engine. It lights up when the “hazard light” is on - an emergency signal sign;
- The headlight light indicates that the high beam is on. Designed to control headlights: when an oncoming car appears, do not forget to switch to low beam;
- A very important indication icon on the front panel (in a red circle) is a signal that there is not enough brake fluid. Perhaps it is leaking somewhere, which it is advisable to find out as soon as possible and, if necessary, carry out urgent repairs and replenish the level;
- The icon of a burning light is a control for turning on the dimensions;
- In addition to the indicated lights, the front control panel has time indicators (and a button for setting hours and minutes) as well as a display that shows the total and daily mileage. On the new panel, this display may be narrow.
Pinout of the dashboard of VAZ2110, 2111, 2112
- fuel reserve warning lamp;
- dashboard lighting lamps;
- right repeater indicator lamp;
- left repeater indicator lamp;
- VAZ plug block;
- coolant temperature sensor;
- indicator lamp for external lighting;
- carburetor air damper warning lamp;
- oil pressure warning lamp;
- handbrake indicator lamp;
- battery charge indicator lamp;
- VAZ tachometer;
- indicator light “CHECK ENGINE”;
- speedometer dashboard;
- brake fluid level warning lamp;
- hazard warning lamp;
- high beam indicator lamp;
- fuel level indicator.
| White block (X1) | Red block (X2) | ||
| 1 | Housing (weight) | 1 | To terminal “W” of the fuel level indicator sensor |
| 2 | Tachometer (low voltage input from ECU) | 2 | Fuse F19 + 12V power supply |
| 3 | Tachometer (high voltage input from coil) | 3 | Housing (weight) |
| 4 | Const +12V from battery (via 6th fuse) | 4 | Instrument lighting switch |
| 5 | Coolant temperature sensor. | 5 | Turn signal RIGHT |
| 6 | Fuse F1 (side light) | 6 | Turn signal LEFT |
| 7 | Throttle valve (“choke”) | 7 | Brake fluid level |
| 8 | Check Engine Light | 8 | To the trip computer |
| 9 | Fuse F19 + 12V power supply | 9 | Speed sensor |
| 10 | Fuse F19 + 12V power supply | 10 | Terminal “T” fuel gauge |
| 11 | Parking brake, terminal “VK” | 11 | Fuse F3 (high beam) |
| 12 | Generator output “D” | 12 | Hazard switch |
| 13 | Oil pressure sensor | 13 | To terminal “50” of the ignition switch |
Additional panel
The additional front panel of the new-style BSK control has indicators:
- An oil can is shown. If the light works, check the oil level;
- An icon lights up, which, with some imagination, can be “identified” as working wipers. This indicates that there is not enough windshield washer fluid in the tank;
- Conventional image of a thermometer over a container with liquid - high temperature of antifreeze;
- A crossed out light, which the arrow points to, is a sign that the brake light or parking lights are not working;
- If the light with the image of a wheel with brake pads lights up, it is quite possible that the pads are worn out and require replacement;
- The sign of a man with a seat belt indicates that the seat belt should be fastened.
Panel BSK VAZ 2110
Instrument panels VAZ VDO (LED)
You can install a more beautiful and convenient panel with LED indicators, the so-called VDO panel. Here VDO is the panel manufacturer.
| Connecting VDO on a Kalina car | ||
| 1 | Pink-white | To electric power steering |
| 2 | Blue and white | To the hazard warning indicator |
| 3 | Gray-blue | To emergency oil pressure sensor |
| 4 | Brown blue | To the parking brake switch |
| 5 | Yellow-blue | To the immobilizer control unit |
| 6 | Black | To the airbag control unit |
| 7 | Yellow | To the outside light switch |
| 8 | Blue | To the right turn signal switch |
| 9 | Blue with black | To left turn signal switch |
| 10 | White-blue | TO ECU |
| 11 | . | To brake pad wear sensor |
| 12 | . | To seat belt sensor |
| 13 | Black | To the traction control control unit |
| 14 | Red-blue | “RESET” key on the steering column switch |
| 15 | Pink-blue | To brake fluid level sensor |
| 16 | Black | To ABS |
| 17 | Green | To the high beam switch |
| 18 | White | To the instrument cluster light control |
| 19 | Brown | Panel weight |
| 20 | White-red | Terminal “30” |
| 21 | Orange | Terminal “15” |
| 22 | Yellow-red | To fuel flow sensor |
| 23 | Orange-white | MK key “forward” |
| 24 | White black | MK key “back” |
| 25 | Black and white | Outside temperature sensor (-) |
| 26 | Yellow-green | Outside temperature sensor (+) |
| 27 | Pink | Fuel level sensor |
| 28 | Grey | Speed sensor |
| 29 | Green-white | Coolant temperature sensor |
| 30 | Brown-red | Tachometer (low voltage) |
| 31 | . | Official. Panel diagnostics. |
| 32 | Brown-white | Terminal “L” of the generator relay regulator |
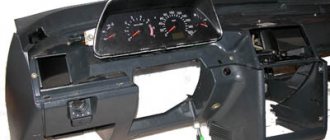
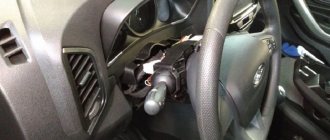
Removal and modification
Here's a quick look at the device and control panel icons. If for some reason she refuses, don’t immediately panic. Most often, the reason is the absence of contacts in some place in the wiring. But of course, if you wish, you can completely change or tune the panel.
For example, remove the cover and replace the light bulbs with brighter LEDs. Such a panel works brighter and the signals sent by the car will be more noticeable to the driver. If desired, you can install a more solid europanel, which will transform the interior.
To remove the panel you need:
- Disconnect the “-” wire from the battery;
- Remove the shield by unscrewing the screws;
- Remove the fastenings of the control panel to the trim, remove the instrument cluster from the socket;
- Remove the glass mask;
- Disconnect the wires from the block;
- Make changes to the instrument panel or replace it with a new one. Reassemble everything in reverse order.
Many car owners would like to replace the VAZ 2112 instrument panel with a Europanel. This replacement brings more comfort and capabilities to driving a vehicle. What a Europanel is and how to install it on a VAZ 2111 and the twelfth model will be discussed in the article.
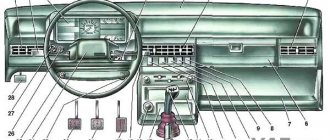
display unit for on-board control system of VAZ 2110 cars | VAZ 2111 | VAZ 2112
Rice. 1-8, on-board control system display unit The on-board control system display unit (Fig. 1-8) informs about the state of components and systems of the VAZ 2110, VAZ 2111, VAZ 2112 vehicle through signaling devices. 1 — the indicator of insufficient oil level in the engine crankcase lights up in orange when the oil level in the engine crankcase drops below the “MIN” mark of the indicator. Before adding oil, check whether there is any oil leakage due to loss of tightness of the lubrication system. 2 - the left front door ajar indicator lights up red when the left front door is not closed. 3 — the right front door ajar indicator lights up red when the right front door is not closed. 4 - the brake light and side light bulb malfunction indicator lights up orange if one of the brake light bulbs or side lights is faulty. 5 — the front brake pad wear indicator lights up orange if the thickness of the linings has decreased to 1.5 mm. 6 - the seat belt warning light lights up red when the driver is not fastening his seat belts. 7 — the right rear door ajar indicator lights up red when the right rear door is not closed. 8 - the left rear door ajar indicator lights up red when the left rear door is not closed. 9 - the indicator of insufficient coolant level in the expansion tank lights up orange when the coolant level in the expansion tank on a cold engine drops below the permissible limit. Before adding fluid to the expansion tank, check the tightness of the cooling system. 10 - the indicator of insufficient washer fluid level in the tank lights up in orange if there is less than 1 liter of washer fluid left in the tank. The display unit of the on-board control system of VAZ 2110, VAZ 2111, VAZ 2112 vehicles can be in the following modes: off; Standby mode; pre-departure monitoring of signaling devices; parameter control. The display unit of the on-board control system of the car VAZ 2110, VAZ 2111, VAZ 2112 is in the “Off” mode if the key is not inserted into the ignition switch. In position 0 (“Off”) of the key in the ignition switch, the display unit of the on-board control system goes into “Standby Mode”. If the driver’s door is opened, the “Forgotten key in the ignition switch” malfunction will occur and the on-board control system display unit will sound for 5-10 seconds. will give an intermittent signal. The signal can be interrupted either by closing the door, or by removing the key, or by turning the key in the ignition switch to position I (“Ignition”). In position I of the key in the ignition switch, the display unit of the on-board control system of the VAZ 2110, VAZ 2111, VAZ 2112 vehicles switches to the “Pre-departure control of alarms” mode, in which to check their serviceability for 2-6 seconds. all light and sound indicators turn on, and then after a pause of 1 second, the display unit of the on-board control system switches to the “Parameter Monitoring” mode and, if there is a malfunction, generates an alarm according to the following algorithm: the indicator light for the parameter that is outside the normal range begins to flash for 5-10 seconds, after which it switches to a constant glow mode until the malfunction is eliminated or the key in the ignition switch returns to position 0 (“Off”); simultaneously with the light indicator for 5-10 seconds. the sound alarm turns on; If at the same time another malfunction occurs, then the sound alarm and light alarm in the blinking mode begin to work for the last malfunction, as a higher priority, and the light indicator of the previous malfunction goes into constant light mode.
Read more: Driving in the far left lane
When using site materials, an active link to car-exotic.com is required!
Description and location of indicators on the panel
After 2006, a new dashboard was installed on VAZ 2112 cars. For reasons that are not entirely clear, any description of it includes the prefix “euro”, probably due to its modernity and quality.
But in order to use it, you need to know the symbols, which are not always easy to understand even from the instructions. You can often only guess what this or that indicator and light bulb mean. To make this task easier for yourself, pay attention to the diagram of the instrument panel below and its explanations.
Description of the panel
- Arrow pointer. Intended to indicate the approximate coolant temperature. The data is obtained from a sensor that is installed between the cylinder head and the thermostat. This allows you to obtain accurate data. The sections have a range of 20 degrees, the lower level is 50, and the upper level is 130.
- Tachometer. Its purpose is known to any driver - to show engine revolutions per minute. Sections of 5 units, digitized every 10 units. To get the real value, add a couple of zeros to the number. Starting from 55, the engine enters the red zone in terms of revolutions.
- Left turn signal indicator.
- A similar indicator for the right turn signal.
- Speedometer. It is of the induction type and receives speed data from the sensor on the gearbox. Unfortunately, it’s definitely not very high; the error can be up to 5 km/h or even more.
- Fuel level indicator. The sensor is located directly in the tank.
- A warning light indicating a dangerously low fuel level.
- Low beam indicator.
- Lamp for monitoring the amount of brake fluid.
- High beam indicator.
- Lever for adjusting the clock.
- Total (odometer) and daily mileage.
- Alarm.
- Failure of electronic systems leading to critical engine failure.
- Clock and thermometer.
- Low battery charging voltage.
- Handbrake warning lamp.
- Critical oil pressure level.
- Fuel mixture enricher indicator.
Pinout of the dashboard of VAZ2105, 2106, 2107
Old panel (with oil pressure gauge)
In addition to the presence of an oil pressure indicator, it is worth noting that this instrument panel does not have an air damper indicator lamp (choke), and the emergency oil pressure lamp is located next to the pressure indicator. Because of this, it contains lamps for low brake fluid levels and fog lamps.
White 6-terminal block X1:
- Gasoline level sensor
- Turn signal indicator lamp
- Battery charge sensor (voltmeter -)
- Gasoline level warning lamp
- Overall plus (+)
- Battery charge sensor (voltmeter +)
White 8 terminal block X2:
- Fog lamp warning lamp
- High beam warning lamp
- Dimensions indicator lamp
- Empty
- Battery charge indicator lamp
- Brake fluid level warning lamp
- Empty
- Parking brake warning lamp
Orange 6-terminal block X3:
- General minus (-)
- Tachometer VAZ
- Instrument lighting
- Oil pressure sensor
- Oil pressure warning lamp
- Coolant temperature sensor
New instrument panel (with econometer)
Here, everything is the other way around - there is no oil pressure indicator (instead there is an econometer), instead of a brake fluid level lamp there is a suction lamp (or an engine management system lamp on injectors), and instead of a fog lamp lamp there is an oil pressure lamp.
White 6-terminal block X1:
- Gasoline level sensor
- Turn signal indicator lamp
- Battery charge sensor (voltmeter -)
- Gasoline level warning lamp
- Overall plus (+)
- Battery charge sensor (voltmeter +)
White 8 terminal block X2:
- Dimensions indicator lamp
- High beam warning lamp
- Oil pressure warning lamp
- Empty, but there is a terminal in the wiring that goes to the brake fluid level sensor
- Battery charge indicator lamp
- Indicator lamp for the air damper (choke) or engine control unit for injectors
- Empty
- Parking brake warning lamp (handbrake)
Orange 6-terminal block X3:
- General minus (-)
- Tachometer (if this contact is empty, then the tachometer is on pin #4)
- Instrument lighting
- Empty, and if not empty - to the tachometer
- Empty
- Coolant temperature sensor
Second connection diagram option
Installation and repair instructions
Replacing the panel, especially if you are installing it on an old VAZ 2112, is a certain difficulty. Older machines do not have some of the functions for which the panel has buttons. The wiring may need to be worked on.
Tools and materials
Standard tools will be required.
But a certain amount of additional materials is needed:
- you will need plugs for extra buttons that are not needed on an old car;
- air duct;
- various inserts, buttons (5 pieces) and pads;
- a new wiring harness suitable for the wiring diagram;
- brackets for mounting the instrument panel;
Algorithm of actions
First you need to remove the old panel. This is done in the same way as on other models of VAZ cars.
When installing, you need to replace the ignition switch with a decimal or Kalinovsky one, depending on how many terminals there are on the block to the lock. You can leave the old one and rearrange the wires, but the new one will work and look better.
The instrument panel wiring needs to be replaced. Also, connect the dimensions with additional two wires in Ш4/13 and Ш3/13 on the mounting block. This applies to older units with 11 relay spaces.
Depending on whether it is an injector or a carburetor, the connection has its own nuances. If you bought a solid factory panel, then instructions should be included with it. Briefly, it can be noted that the injector is not equipped with a speed sensor, please take this into account when installing.
The car's electrical circuit can be of great help. If it is not there, you can find it on the Internet. There are some differences between the VAZ 21124, 2111 and other car variants, so find yours.
If the instrument panel does not work after turning it on, check that the wiring is connected correctly - this is usually the error.
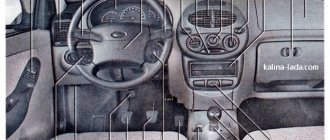
Description and designations of the VAZ-2111 dashboard
Generally speaking, the dashboard of the VAZ-2111 is quite laconic, but at the same time very informative. Dealing with it is not particularly difficult - if we talk about the main points, such as speed, engine speed, fuel level in the tank, and so on. At the same time, many owners of the VAZ-2111, especially those who have just become the owner of this model, are interested in what some of the dashboard symbols mean. It is clear that there are signs that are simple and understandable to every car enthusiast, such as, for example:
- speedometer;
- tachometer;
- fuel level in the tank;
- coolant temperature.
Even a beginner, or a person driving this particular model for the first time, will not have any problems here.
Video “Europanel on VAZ 2112”
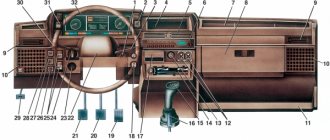
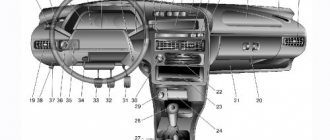
Rice. 1–4. Controls
The location of the controls is shown in Fig. 1–4.
1 – front door glass blower nozzle.
2 – side nozzles of the interior ventilation and heating system.
3 – glove box cover. To access the glove compartment, press the lock handle in the direction of the arrow.
5 – display unit of the on-board control system.
6 – radio socket cover.
7 – cigarette lighter. To use, press the chuck until it locks into place. After about 20 s. The cartridge automatically returns to its original position, ready for use.
8 – front ashtray.
9 – lining of the floor tunnel.
10 – control units.
11 – parking brake lever. By moving the lever up, the brake pads of the rear wheels are activated. To return the lever to its original position, press the button on the end of the lever handle. In case of emergency, the parking brake can be used while driving to slow down the vehicle or used simultaneously with the service brakes.
12 – gear shift lever. The gear shift diagram is printed on the lever handle.
13 – accelerator pedal.
14 – socket for connecting a portable lamp.
15 – brake pedal.
16 – clutch pedal.
17 – ignition switch.
18 – steering column tilt adjustment handle. To install the steering column in a position convenient for steering, release the handle down and, after selecting the optimal tilt, return the handle to its uppermost (starting) position.
19 – hood lock drive handle.
20 – sound signal switch.
21 – mounting block cover.
22 – switch for the trunk lock drive (tailgate). Installed on some manufactured cars. To open the trunk lid (tailgate), press the button.
23 – mounting block lock button.
24 – headlight hydraulic corrector. A device that allows you to adjust the angle of the headlight beam depending on the vehicle load so that oncoming drivers are not dazzled.
25 – lever for switching direction indicators and headlights.
26 – external lighting switch. When you press the button to the first fixed position, the side lights and rear license plate lights are turned on, and before the second, the headlight circuits are additionally energized.
27 – front fog lamp switch. Installed on a car equipped with fog lights, which can be turned on and off by pressing a button.
28 – the indicator lamp for turning on the fog lights lights up when the fog lights are turned on.
29 – instrument cluster.
30 – the indicator lamp for turning on the rear fog light lights up when the rear fog lights are turned on.
31 – rear fog light switch. The fog lamps in the rear lights are turned on by pressing the button in conditions of limited visibility and turn off when pressed again.
32 – the rear window heating indicator lamp lights up when the rear window heating is turned on.
33 – rear window heating switch. Switching the glass heating on and off is done by successively pressing the key.
34 – instrument lighting regulator. Rotating the handle adjusts the brightness of the instrument lighting and the illumination of symbols.
35 – immobilizer warning sensor. Installed on a vehicle with a fuel injection system equipped with an electronic anti-theft system, and is designed to transmit a secret code from the working code key through the immobilizer unit to the engine control controller.
Pinout of the dashboard VAZ2108, 2109, 21099
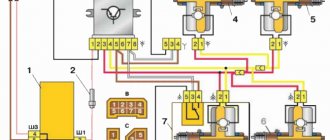
Connection diagram of the instrument cluster before 1996.
1 – relay-interrupter for the parking brake warning lamp; 2 – tachometer with voltage stabilizer; 3 – instrument cluster lighting lamp; 4 – temperature indicator; 5 – BSK control unit; 6 – fuel level indicator; 7 – resistor 50 Ohm, 5 W; 8 – control lamp “CHECK ENGINE” for the toxicity reduction system; 9 – control lamp for high beam headlights; 10 – side light indicator lamp; 11 – backup warning lamp; 12 – warning lamp for unfastened seat belts; 13 – control lamp for left direction indicators; 14 – resistor 470 Ohm, 0.25 W; 15 – electronic voltmeter; 16 – control lamp for right direction indicators; 17 – warning lamp for emergency oil pressure; 18 – fuel reserve warning lamp; 19 – control lamp for the carburetor air damper; 20 – indicator lamp “CHECK ENGINE” for the fuel injection system; 21 – parking brake warning lamp.
Instrument cluster wiring diagram after 1996
1 – tachometer; 2 – instrument cluster lighting lamp; 3 – temperature indicator; 4 – BSK control unit; 5 – fuel level indicator; 6 – control lamp “CHECK ENGINE” for the toxicity reduction system; 7 – control lamp for high beam headlights; 8 – side light indicator lamp; 9 – backup warning lamp; 10 – warning lamp for unfastened seat belts; 11 – control lamp for left direction indicators; 12 – battery charge indicator lamp; 13 – control lamp for right direction indicators; 14 – warning lamp for emergency oil pressure; 15 – fuel reserve warning lamp; 16 – control lamp for the carburetor air damper; 17 – indicator lamp “CHECK ENGINE” for the fuel injection system; 18 – parking brake warning lamp; B1 – resistor 91 kOhm; B2 – resistor 50 Ohm, 5 W.
Errors on the dashboard 2112
VAZ cars have always stood out for their ease of operation and maintenance. Regardless of the type of engine, injector or carburetor, here the user can independently perform diagnostics and read errors without additional equipment. Symbols may appear on the instrument panel.
| Number | Meaning |
| 2 | Critical voltage drops have been detected in the on-board network. |
| 3 | The gasoline level sensor is damaged or does not work correctly. |
| 4 | Likewise for the antifreeze temperature sensor. |
| 5 | The outdoor thermometer is faulty. |
| 6 | There is critical engine overheating. You need to stop and let the engine cool. |
| 7 | The oil pressure in the engine is insufficient for normal operation. |
| 8 | The brake expansion tank is empty and needs to be topped up. |
| 9 | The battery is not charging properly. You will need to check the generator and its wiring. |
| E | BC firmware is damaged. |
Most two-digit codes are a combination of two errors.
What types of overlays are there?
If you just need a Euro pad, then there are two options:
Euro-1 rubber, another name for which is Caprice. It has the same instrument cluster as the VAZ 2110, the only thing is that there is no shelf on the passenger side;
Panel trim VAZ 2110 Euro-1
Euro-2 is practically no different except for the presence of the mentioned shelf.
Panel trim VAZ 2110 Euro-2
There is also a Euro-3 overlay on sale. But it is for later and more advanced VAZ cars - Priora, Kalina. The fact is that this version provides more devices, for example, there is a unit for climate control, which is not observed in the top ten. Although, in principle, if desired, installing this option is also possible.
Panel trim VAZ 2110 Euro-3
Any Euro pad mentioned above is a quality product, unless, of course, it is a cheap fake. It is softer and even, according to manufacturers, less traumatic, like the old one. In addition, after its installation, the supply of warm air to the side windows should improve.
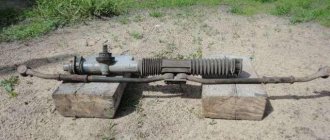
Components
When purchasing, you will receive what is included in the kit, namely:
- Europlate;
- Inserts for switches (buttons) of devices;
- Trim on the instrument panel;
- Since your instrument combination may differ from those whose installation is structurally provided, there should also be six plugs; they can be inserted instead of buttons;
- The buttons themselves and two pads for them: • Double – for low beam and dimensions; • To turn on the fog lights; • Heated rear window.
- Air ducts;
- Block and wiring harness designed to connect a double button for side lights and low beam;
- Brackets securing the instrument panel.
In addition, if you are not entirely satisfied with this combination, and you need more buttons for other devices, then they, as well as the pads for them, can be purchased separately.
Errors displayed on the dashboard of the VAZ 2110 and how to eliminate them.
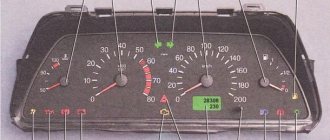
As an example, I will take a screenshot of the dashboard indicators, which I have already shown in this article.
Errors and methods for eliminating them displayed on the dashboard of the VAZ 2110
- If the oil in fuel indicator lights up, we recommend that you check it. To do this, open the hood of the car and look at the horn. If it is in the oil level, then most likely a chip has come off in the instrument panel itself.
- Your parking brake indicator (manual) has come on, most likely the problem is a broken cable.
- The battery charging indicator shows you errors associated with the generator. If it catches fire, I recommend checking your alternator belt (for a break). In general, this icon on the instrument panel indicates a malfunction in the vehicle's electrical system circuit.
- An engine malfunction (Check Engine) tells you that the engine is unstable.
- Additional engine health indicator
- Turning on left turn - information indicator
- Activation of right turn – information indicator
- High beam indicator - information indicator
- This indicator shows the brake fluid level. If a malfunction occurs, check for the presence of a fuel tank in your vehicle.
- This indicator shows the presence of fuel. If it catches fire, you have approximately 5 liters of gasoline left in the tank. I recommend you refuel.
Description of the VAZ 2110 dashboard buttons
Well, let’s immediately move on to the description of the buttons on the dashboard of the VAZ 2110.
Instrument panel of a VAZ 2110 car - the buttons located on it are marked on the arrows
As you can see from the screenshot, there are only 4 buttons on the instrument panel of the VAZ 2110 - let's move on to their description.
- Button to turn on/off the front fog lights.
- Turn on/off outdoor lighting.
- Heated rear window
- Button for turning on/off the rear fog lights.
In addition to the buttons located on the dashboard, there are others that are located under the stove, next to the radio in the cabin. Let's find out their functions:
Instrument panel VAZ 2110 - description of the buttons next to the stove
Many VAZ 2110 owners wonder why these 4 buttons, which are located on the dashboard under the stove, are needed. The answer will seem rather banal to you:
These buttons actually do not play any function; I think the engineers working on the ten wanted to add electric windows to the car, but for some reason they forgot to do this.
Okay, it was a joke! In fact, these buttons are responsible for the following:
- Turning recirculation on/off
- Button for installing additional equipment (for example, power windows)
- Turning the hazard warning lights on/off
- Button for installing additional equipment (for example, power windows)