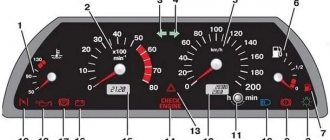
Designation of icons on the dashboard of Lada 2112
For a better understanding of the purpose of the indicators, their interpretation is given.
| Number in photo | Interpretation of lamps and indicators |
| 1 | Coolant temperature indicator; if the light comes on at the top of the scale, the engine has overheated. |
| 3/4 | The turn signal indicators light up simultaneously when the hazard lights are turned on. |
| 7 | Empty tank indicator; if the lamp lights up, stop at a gas station. |
| 8 | External lighting is turned on and operating normally. |
| 9 | The pressure in the brake system has dropped. It is necessary to immediately add fluid to the expansion tank of the system. |
| 10 | The high beam headlights are activated. |
| 12 | The odometer display shows non-resettable mileage. |
| 13 | The hazard warning lights are on. |
| 14 | The engine control system is damaged or not working correctly. |
| 15 | The battery is not receiving a charge. In this case, you should check the battery itself for wear and the generator set. |
| 16 | The handbrake is activated. |
| 17 | The oil pressure in the engine crankcase has dropped below normal. You should add fluid to the specified level and check the operation of the pump. |
| 18 | In a configuration with an airbag, it indicates that the squib drive is turned off. In other versions the light bulb is a backup one. |
Possible causes of malfunction
Setting the rheostat knob
A common cause is incorrect adjustment of the rheostat knob, which is responsible for the amount of light flux all the way to the left.
Solution: can be solved by simply adjusting/returning the rheostat knob to its previous position. Therefore, before you start looking for possible reasons for the sudden disappearance of the backlight, check this particular point.
If adjusting the rheostat did not help, then possible sources of problems could be:
- fuse;
- instrument panel circuit board;
- rheostat contacts;
- wiring;
- failure of light bulbs due to short circuit.
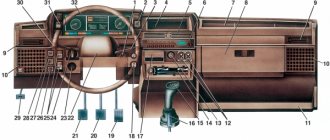
Description of the buttons on the panel
The situation is similar with the control keys for devices and machine components. Even an experienced driver can get lost here. The photo above shows the elements and switches installed in common versions.
| Number in photo | Purpose |
| 10 | Additional equipment control module. |
| 18 | Steering rack position regulator. |
| 19 | Hood lock drive. |
| 20 | Horn button. |
| 22 | Trunk lock actuator button. |
| 24 | Hydrocorrector of headlights. |
| 25 | Switch for turning mode and headlights. |
| 26 | External lighting switch button. |
| 27/31 | Front/rear fog light switch. |
| 33 | Button for turning on the rear window heater. |
| 34 | Instrument lighting regulator. |
| 38 | Exhaust gas recirculation switch. |
| 39 | Air conditioner control buttons. |
| 40 | Heater damper position regulator. |
| 42 | Emergency button. |
| 43 | Switch for wipers and headlight washers. |
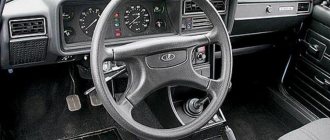
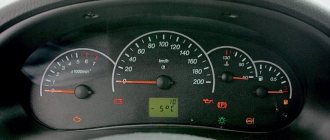
Instrument panel device
Control panel of the domestic “ten”
What to do if the instrument panel does not light up and does not work? How is the instrument panel tuned and how should it be disassembled if necessary? First of all, let's look at its device.
The vehicle instrument cluster includes the following elements:
- tachometer, which allows you to monitor the number of revolutions of the internal combustion engine;
- speedometer showing the speed of movement;
- fuel level controller in the tank;
- temperature controller of the power unit, namely antifreeze in the cooling system;
- control indicators, of which there should be 12;
- diode indicators for the instrument panel suspension of the VAZ 2110;
- a reserve connector into which the control lamp is turned on;
- several terminals for connecting cables.
It should be noted that the red block on the electrical circuit is marked with X2 symbols, and the white block with X1 symbols, so it is impossible to confuse these elements. If we talk directly about the “tens” control panel, then these cars use several types of instrument panels located on the dashboard. In this case, the majority depends on the year of manufacture of the vehicle - the car can be equipped with either an old or a new version of the tidy.
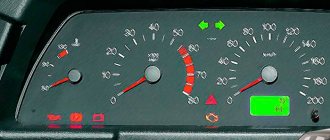
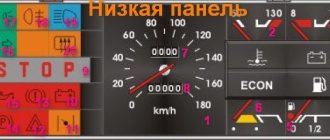
- One of the features of the old dashboard is that all the devices are installed symmetrically.
- In the control panel of the new model, several indicators - the temperature of the power unit and the gasoline level - are located with a slight shift to the right.
Instrument panel wiring pinout
If appliances do not work or light bulbs stop lighting, often the only solution is to disassemble the panels. In practice, certain components may well refuse to work; the disassembly and diagnostic procedure, as a rule, helps solve the problem. However, before repairing the instrument panel of the VAZ 2110, we recommend that you familiarize yourself with the pinout of the panel. This is done in order to understand where this or that wire leads and what function it performs, what safety elements are used, etc.
Errors on the dashboard 2112
VAZ cars have always stood out for their ease of operation and maintenance. Regardless of the type of engine, injector or carburetor, here the user can independently perform diagnostics and read errors without additional equipment. Symbols may appear on the instrument panel.
| Number | Meaning |
| 2 | Critical voltage drops have been detected in the on-board network. |
| 3 | The gasoline level sensor is damaged or does not work correctly. |
| 4 | Likewise for the antifreeze temperature sensor. |
| 5 | The outdoor thermometer is faulty. |
| 6 | There is critical engine overheating. You need to stop and let the engine cool. |
| 7 | The oil pressure in the engine is insufficient for normal operation. |
| 8 | The brake expansion tank is empty and needs to be topped up. |
| 9 | The battery is not charging properly. You will need to check the generator and its wiring. |
| E | BC firmware is damaged. |
Most two-digit codes are a combination of two errors.
Removing the old and installing a new panel
The process of replacing a Europanel does not require inviting highly qualified craftsmen.
Accompanied by preliminary preparation:
- battery power is turned off;
- The steering wheel and the facing part of the column are removed;
- sometimes the seats come out.
Removing the old panel
Dismantling instructions:
- The shields located at the feet of people sitting in front are dismantled.
- The curved plug is removed from under the handbrake;
- The window regulator cover is removed and the cigarette lighter connector is removed.
- The cover is removed from the gearbox lever. The air ducts going to the rear seats are removed.
- The plastic covers of the roof pillars are removed. The radio is pulled out.
- The plugs are removed from the top of the panel. The nuts that appear are unscrewed.
- Then the bolts located along the contour of the lower edge, as well as at the feet of the driver and passenger, are unscrewed;
- The mounting block is dismantled and the plastic casing is removed.
Installation of a new panel sample
Both panels have different dimensions, therefore, installation is carried out using 3 methods:
- a new instrument cluster is adjusted to the existing panel dimensions;
- the panel is being completely replaced with a new sample;
- Installation of the Euro-plate is underway.
The latter method is rarely used. This is due to the fact that installation requires combining the wiring. Work is being carried out on a panel removed from the car.
If the panel on a VAZ 2110 does not work, you need to check the condition of each indicator. Make sure the safety elements are reliable. Next move on to checking the sensors. If a breakdown is detected, repair it. If the unit cannot be repaired, replace it.
The VAZ 2112 instrument panel does not work - reasons
If the panel suddenly stops working:
- When the engine does not start and the dash does not work, inspect the ignition switch. Here the contact often burns out or oxidizes.
- If the machine is working and the panel has failed, you will need to check the corresponding fuse, wiring and lines.
- If the manipulations do not help, you will need to remove the device and test its circuits.
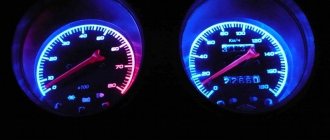
Panel backlight does not light up
There may be damage to the light activation key. It is recommended to check the corresponding fuse.
The panel is blinking
Consequence of deterioration of electrical wiring contacts. The user should inspect the supply wires for cracking or damaged insulation. The contact groups should be disconnected and cleaned of oxides and dirt. Treat the terminals with special oil.
Tidy 2112 stuck
This kind of problem is unexpected, but it occurs everywhere. As a repair, users are suggested to reset the electronic equipment. Remove the terminals from the battery and wait 15 minutes.
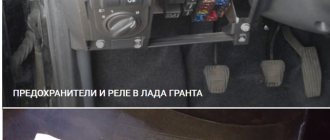
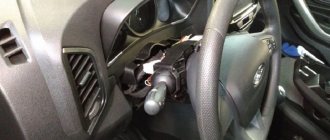
Checking the steering column switch
Checking the contacts in the steering column switch housing
In those cases, switching between the BC readings on the panel should be done with a switch on the steering wheel, but this cannot be done - you should make sure that it is working. This steering column switch is used on the panels: “VDO” 1118-3801010, “Schetmash” 2170-3801010-01 and “Avtopribor” 1118-3801010-02. To check whether the steering column switch is working properly, it must be removed and disassembled.
Disassembling the switch consists only of removing the cover, which is held in place by a small metal latch in the form of a bracket. There are 4 contacts under the cover, which are connected to the Reset button and to the switches. There are yellow and black wires coming from the “Reset” button. There are green and red wires coming from the top switch button. All these contacts must be checked with a multimeter for resistance.
Removing the torpedo on the old model 2112
To completely remove the device from the car you will need:
- Turn off the on-board power supply.
- Remove the screws around the panel.
- Move the plastic cover of the shield aside and disconnect the wires from the buttons.
- Unscrew the panel fasteners.
- Then the device moves away from its seat and is disconnected from the on-board network.
Troubleshooting VDO Instrument Panel Resistor
The problem described below appears only on VDO dashboards manufactured in 2006-2007 under article number 1118-3801010. It was installed from 2004 to 2011 on the Kalina, VAZ 2110, 2111, 2112, 2113 and 2114 models. We can recognize the manufacturer by its logo located under the inscription “km/h”:
Removed VDO instrument panel
This is due to a manufacturing error . On the dashboard board there are two resistors labeled “E6E”. One of these resistors was soldered crookedly . As a result of such defects, over time, cracks form in the solder due to which contact is lost and the on-board computer stops responding to the joystick of the steering column switch.
If the steering column switch is working properly, then this is definitely a problem in the “E6E” resistor!
What is needed to eliminate the VDO instrument disease
To complete the work you need:
- Soldering iron with fine tip.
- Solder (tin).
- Tweezers.
- Magnifying glass.
- Table fork.
- Screwdriver with star tip.
To diagnose this problem, you need to disassemble the dashboard. To do this, the dashboard is removed from the car and disassembled. And then the problem area on the board is inspected and soldered.
Disassembling the VDO dashboard
To disassemble the VDO panel, you need to snap off the front transparent plastic part of the panel, which is held on by six clips along the contour. Afterwards, the four star bolts are unscrewed and then the back cover is removed. After this, you need to snap off the black casing that remains on the front of the instrument panel. It is also held in place by plastic clips. This will allow you to remove the top glass and bottom cover from the dashboard.
Instrument panel with glass and bottom cover removed
To disassemble completely, remove the arrows and then unclip the latches from the board.
Removing the hands
You can use a table fork to remove the arrows on the instrument panel from their seats. Before shooting, it is important to remember their location! The fork must be inserted under the arrow and, by gently pressing and rocking, tear it out of its seat.
To avoid scratching the instrument scale, it is advisable to place some soft cloth or a cotton pad under the plug.
The location of metal clamps in the center of the board and plastic ones at the edges
Then we proceed directly to removing the board from the remaining part of the instrument panel. To do this, you need to snap off the four metal clips in the center, as well as the four plastic clips along the contour. In the photo, these fasteners are circled in black.
Removing the old and installing a new panel
The process of replacing a Europanel does not require inviting highly qualified craftsmen.
Accompanied by preliminary preparation:
- battery power is turned off;
- The steering wheel and the facing part of the column are removed;
- sometimes the seats come out.
Removing the old panel
Dismantling instructions:
- The shields located at the feet of people sitting in front are dismantled.
- The curved plug is removed from under the handbrake;
- The window regulator cover is removed and the cigarette lighter connector is removed.
- The cover is removed from the gearbox lever. The air ducts going to the rear seats are removed.
- The plastic covers of the roof pillars are removed. The radio is pulled out.
- The plugs are removed from the top of the panel. The nuts that appear are unscrewed.
- Then the bolts located along the contour of the lower edge, as well as at the feet of the driver and passenger, are unscrewed;
- The mounting block is dismantled and the plastic casing is removed.
Installation of a new panel sample
Both panels have different dimensions, therefore, installation is carried out using 3 methods:
- a new instrument cluster is adjusted to the existing panel dimensions;
- the panel is being completely replaced with a new sample;
- Installation of the Euro-plate is underway.
The latter method is rarely used. This is due to the fact that installation requires combining the wiring. Work is being carried out on a panel removed from the car.
If the panel on a VAZ 2110 does not work, you need to check the condition of each indicator. Make sure the safety elements are reliable. Next move on to checking the sensors. If a breakdown is detected, repair it. If the unit cannot be repaired, replace it.