As in any car, the instrument panel of the VAZ 2107 combines instruments and indicators that display performance indicators of the engine and other critical components and assemblies. This allows you to notice malfunctions in time and prevent premature breakdown of machine components. To do this, you need to know what each device and warning light on the instrument panel is responsible for, and monitor their readings.
Instrument panels VAZ-2107: diagram, description
The VAZ 2107 car is equipped with a dashboard, which is necessary for the driver to monitor traffic conditions and notice malfunctions in time. When driving a car, the driver is obliged to monitor not only the road surface, but also the condition of the main parts of his vehicle. These main parts include:
- movement speed;
- engine temperature;
- presence of fuel in the tank;
- amount of oil in the engine.
And these are just the main points that the driver monitors while the car is moving. This article will tell you about the main elements of the instrument panel, which will be discussed in the diagram below.
What's new
The main innovation was the replacement of the mechanical functions of the ignition system and preparation of the air-fuel mixture with electronic devices, which are more accurate and efficient. The wiring diagrams of the VAZ 2112 and the Samara family also underwent a similar modernization. Accordingly, the wiring of the VAZ 2107 to the injector received differences from the carburetor version.
Under the hood of the VAZ 2107-20, the absence of a carburetor and distributor is immediately striking
ECM functions
The electronic engine control system (abbr. ECM) took on the following operating parameters of the power unit:
- Controlling the amount of air and gasoline entering the car engine cylinders,
- crankshaft speed
- Spark plug control;
- Adjustment of ignition timing in all operating modes;
- Turning the electric fuel pump on and off,
- Control of the electric fan of the engine cooling system.
The photo below shows a VAZ 2107 wiring diagram for an injector with an M1.5.4N ECM and a January-5.1.3 controller
Injection system VAZ 2107
Electrical diagram
The classic 2107 wiring on cars with an injection system has also undergone changes. In particular, under-hood elements equipped with connectors for sensors and electronic devices have appeared.
Electrical diagram of VAZ 2107 with carburetor
For reference: The developers of Moskvich 2141 followed a similar path. True, they had a more global problem - the lack of their own engine.
Explanation for the electrical diagram of the carburetor VAZ 2107
For reference: The photo below shows the electrical wiring of a VAZ 2107 to an injector with catalog numbers. The differences from carburetor kits are in the engine compartment harnesses.
When converting the engine to an injection system, you should also purchase new wiring
What does the panel consist of?
The panel consists of a large number of elements that are responsible for the operation of certain components of the VAZ 2107 car. The instrument panel is located in the car interior and is directly embedded in the dashboard on the driver’s side. The main elements are located under a special plastic transparent glass, which protects them from mechanical damage. The elements of the instrument panel include the following elements:
- Accumulator charging;
- speedometer;
- odometer;
- tachometer;
- motor temperature sensor;
- ECON – instantaneous fuel consumption indicator;
- additional signaling elements;
- resettable odometer;
- and 10 – fuel level in the gas tank and warning light.
Let's briefly look at the purposes of each of these elements.
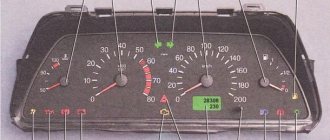
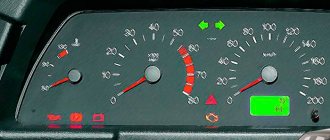
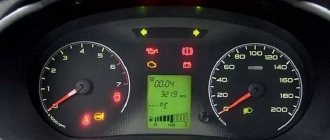
- Speedometer. The device located on the right side of the panel is called a speedometer. Serves as an informant for the driver about the speed of the vehicle. The scale has values from 0 to 180, which indicates the speed of the vehicle. There are two dials on the device that keep track of the distance traveled by the “seven”. One of them has the ability to adjust, but the bottom one does not.
- Tachometer. The device located on the left side serves to inform the owner about the crankshaft rotation speed in relation to a unit of time. Most drivers do not really understand the purpose of this element and rarely pay attention to it. But this element is very important, since it is a direct indicator of the quality of engine operation. The closer the arrow gets to the red mark, the more the motor is overloaded. And when it crosses the red line, the car’s movement should be stopped immediately, since the engine is operating in critical mode.
- ECON flow indicator. The indicator, located in the upper left corner of the instrument panel, performs the function of indicating the consumption of the fuel mixture in instantaneous time while the engine is running. When driving at speeds above 90 km/h, fuel consumption increases and the arrow moves to a yellow position. A very useful feature for the driver to be able to save fuel.
- Temperature indicator. Designed to indicate the motor temperature value. Above 100 degrees Celsius, the needle moves to the red mark, which indicates overheating.
- Fuel indicator. Using this indicator, drivers determine the amount of fuel in the tank, which is transmitted through an electronic sensor and level.
- Battery charge. Indicates how good the battery is; position on the red mark indicates the need to recharge.
These are only the main components of the instrument panel; we will look at all the elements in more detail in the diagrams.
Instrument panel diagrams
So, the operating diagram of the instruments located on the main panel in the cabin includes the following elements and combinations:
- indicator of the presence of engine oil in the engine;
- coolant temperature sensor;
- mounting switching block;
- fuel sensor;
- combinations of turns;
- indicator of the amount of fuel in the tank;
- tachometer;
- coolant temperature indicator;
- turning off the ignition;
- ignition relay;
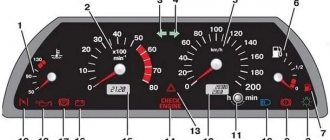
The diagram shows the relationship of the sensors on the instrument panel with the main elements that directly perform the main work. Pointers only read information from operating devices and display it in an understandable form for human perception.
The above diagram makes it clear about the exact location of the instruments on the dashboard, which are important elements in driving the VAZ 2107.
| 1 | Lever designed to switch wiper and washer modes |
| 2 | Buzzer button |
| 3 | Turn signal control lever |
| 4 | Headlight switch (high, low) |
| 5 | Elements for supplying fresh or warm air to the cabin |
| 6 | Hydraulic adjustment of headlights |
| 7 | Lever designed to open the hood |
| 8 | 12V power socket |
| 9 | Turning off the ignition |
| 10 | Turning on the hazard warning lights |
| 11 | Clutch |
| 12 | Brake |
| 13 | Heater switch |
| 14 | Instrument panel lighting switch button |
| 15 | Gas/accelerator |
| 16 | Head unit |
| 17 | Switch panel (outside light, heater fan, heated rear window) |
| 18 | Hand or parking brake |
| 19 | Lamp indicating that seat belts are not fastened |
| 20 | Reserve |
| 21 | Transfer speed switch |
| 22 | Built-in mechanical clock |
| 23 | Cigarette lighter with additional 12V socket |
| 24 | Lamp indicating the operation of the rear window heating |
| 25 | Warning light indicating the presence of brake fluid |
| 26 | Built-in ashtray |
| 27 | Storage box |
| 28 | Shelf for tools and things |
| 30 | Choke or manual gas |
| 35 | Instrument clusters |
Based on the above information, we can say that the VAZ 2107 car has in its set almost all the elements necessary to control the movement of the vehicle. It is important to monitor the operation of each device; if any of them does not function, then operation of the car is prohibited until the problem is corrected.
Another article will tell you how to replace and repair instrument panel sensors. At this point, all the necessary information on instrument panel diagrams for owners of the “Seven” is described and will become useful.
Tuning scales
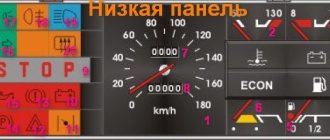
In the basic version, the background of all scales is black. The marks on them look too faded. This style was relevant about 2 decades ago. Nowadays, this design looks rather poor.
A chic, sporty look is achieved by installing white scales with contrasting black markings. They can be made on a color printer using self-adhesive film.
When making improvements at this stage, do not forget to exercise maximum caution - the mechanisms are extremely fragile.
Controls and monitoring devices of VAZ 2107
The location of the controls and control devices of the VAZ 2107 car is shown in the figure.
1 — switch lever for windshield wipers and washers of the windshield and headlights. It is energized if the key in the ignition switch is in position I or III. At lever position:
- I — windshield wiper is off;
- II - the windshield wiper operates intermittently;
- III - the windshield wiper operates continuously.
By moving the lever towards you, the windshield washer is turned on, and if the high beam headlights are on, the windshield wipers and headlight washers are turned on at the same time.
2 — sound signal switch. Constantly under voltage.
3 — direction indicator switch lever. It is energized if the ignition key in the ignition switch is in position I. When the lever is moved to position “A”, the right turn indicators are turned on, and in position “B” - the left turn indicators. When the car enters the straight line after a turn, the lever automatically returns to its original position. This operation can also be performed manually.
4 — headlight switch lever. When you press the external lighting switch 17 to the second fixed position and if the key in the ignition switch is in position I or III, and the switch lever is in position:
- I — low beam headlights are on;
- II — high beam headlights are on.
Crankshaft position sensor
The sensor serves to transmit readings to the computer about the position of the crankshaft and determine which of the cylinders currently has top dead center. The sensor is involved in the formation of sparks. The only sensor without which the car engine cannot be started.
It is located near the flywheel on a special bracket.
Signs of malfunction:
- The engine does not start;
- The engine stalls;
- One of the cylinders does not work;
- Loss of traction;
Description of the instrument panel VAZ 2107
Hello everyone, today I want to look at the instrument panel on a VAZ 2107 car. This article is suitable for those who have just bought this car or are generally a beginner. The instrument panel of the VAZ 2107 consists of indicators that display performance indicators of the engine and other important components of the car. Instrument readings allow you to immediately notice malfunctions and eliminate them in a timely manner. Therefore, it is imperative to know what each device on the control panel is responsible for and monitor their readings.
Helpful information
Due to the unification of many electronic components of the VAZ family, car enthusiasts waste time searching for the required wiring, not suspecting that it may have the index of another model.
The presented list contains indices of some of these products installed on the VAZ 21074:
- Instrument panel wiring – 21053-3724030;
- Instrument panel wiring – 21053-3724035-42;
- Wiring for fuel injectors – 21214-3724036;
- Starter connecting wire – 2101-3724060;
- Ignition system wiring – 21073-3724026;
- Rear wiring harness (flat) – 21073-3724210-10.
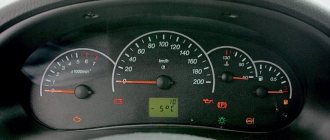
Instruments and indicators of the VAZ 2107 panel
- Voltmeter showing the current voltage of the on-board network.
- Speedometer indicating the speed of movement.
- Odometer is a counter for the distance traveled by a car.
- A tachometer is a device that shows the crankshaft speed. The yellow zone of the device indicates high speeds, the red zone indicates unacceptable speeds.
- Coolant temperature indicator. The green zone is normal temperature, the red zone is engine overheating.
- An econometer is a device that shows how optimal the engine operating mode is in terms of fuel economy.
- Warning Indicators
- Indicator of the “daily” car mileage.
- Fuel level warning light
- Gasoline level indicator in the tank.
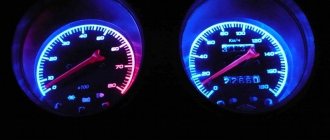
Backlight
LEDs are now commonly used. The beauty of them is that installation is very simple and quick. Plus, there are quite a few colors available. Choosing one of them that best matches the interior design or body paint will allow you to turn your “seven” into a real masterpiece.
As a rule, it is enough to install only a dozen diodes on one panel to radically modernize its appearance. They are connected to each other by a loop of wires. Additionally, they are matted with fine sandpaper - without this operation they will burn too brightly.
Optimal location:
- four pieces in the corners of the dimensional devices;
- one diode for two small sensors;
- the rest is your choice.
After completing the work, connect the panel to power and make sure everything is functioning as it should.
Along with the backlight, it makes sense to install new hands. There will be a lot of work to be done here. Signs can be purchased ready-made or cut out of plexiglass. Do not do this unless you are confident in your ability to disassemble and reassemble the mechanisms.
Warning lamp block VAZ 2107
Now let's take a closer look at the warning indicator block.
- Turn signal indicator (flashes green when turned on).
- Injection engine control malfunction lamp (not available on carburetor “sevens”). When the ignition is turned on, the lamp glows orange and should go out after starting. A burning or flashing lamp on a running engine indicates a malfunction.
- Battery charge lamp. It lights up red when the ignition is turned on and should go out as soon as the engine starts. If it continues to light, the battery is not charged. In this case, it is necessary to determine the source of the problem and fix the breakdown.
- Dimensions indicator. Lights up green when the side lights are on.
- Lamp signaling the inclusion of high beam headlights (lights blue).
- Brake fluid level lamp for the hydraulic brake system.
- Low oil pressure indicator. Lights up red when the ignition is turned on. It should go out after the engine starts. It is unacceptable to operate the machine if the oil pressure light is on.
- Parking brake light that illuminates red when the brake lever is raised.
- Yellow fuel reserve lamp. Lights up when there is less than 5 liters of gasoline left in the tank.
The simplest option
Owners of the “Seven” injector who have a certain amount of money and do not have enough free time should pay attention to ready-made kits containing everything necessary for tuning. Each set comes with instructions, following which it will not be difficult to improve the functionality and appearance of the dashboard.
But for those who are not looking for easy ways and dream of a completely unique design, the method described above is definitely not suitable.
VAZ 2107 dashboard indicators
- The low oil pressure light comes on. You should immediately turn off the engine, stop and check the oil level in the crankcase. If necessary, add oil and then start the engine. If the oil level is sufficient and the lamp is on, you cannot continue driving. The car needs to be towed to the repair site. Otherwise, the bearings (crankshaft bearings) will wear out or rotate and the engine will knock or jam, which will require expensive overhauls.
- The battery warning light comes on. In this situation, you can continue driving, but you should take into account that you won’t be able to travel far, especially at night, as the battery will quickly discharge. You need to start by checking the condition of the terminals. If they are oxidized, clean them. If the terminals are in order, it is necessary to check the functionality of the generator or voltage regulator relay (often the reason for the lack of charge lies precisely in the latter).
- If the brake fluid level warning light comes on, you should stop immediately. It is unacceptable to continue driving with faulty brakes. After stopping, it is necessary to add brake fluid and check the functionality of the brake system. If the brakes work, you can drive to the repair site yourself. Otherwise, you need to fix the breakdown on site or call a tow truck.
- If the coolant temperature gauge needle is in the red zone of the scale, you need to stop to let the engine cool down. When the temperature drops, you can check the condition of the pipes and the coolant level. If the level is normal, then you can try to go to a service station to find out the cause of the breakdown. Most often this is a malfunction of the thermostat or radiator fan. The VAZ 2107 panel is not equipped with an alarm or an additional lamp that lights up when the engine overheats. Therefore, inexperienced drivers often do not notice this problem, which can lead to antifreeze boiling away or even jamming the engine.
Important: do not open the expansion tank or climb into the pipes when the engine is not cooled down. Otherwise you may get burned.
- If the fuel level needle is at zero or the yellow “reserve” light comes on, you need to refuel. The “reserve” range is about 50 km.
Numbering, ratings and purpose of fuses
Each of the fuses in the VAZ 2107 can serve one or more electrical circuits of the car. If a fuse fails, a specific device or vehicle system (or several) will not receive power. As a result, a particular device becomes inoperable.
Fuse failure is not always the cause of a malfunction. In many cases, a blown fuse is the result of a component or system malfunction. Such cases include:
- short circuit in the car's electrical wiring;
- burning of contacts and connectors;
- wear of the fuel pump, electric motors of vehicle system drives (windshield wiper, fan);
- malfunction of the electronic engine control unit.
In the event of a failure of any of the vehicle systems, according to the table below and the fuse location diagram, determine the fuse number and its location in the block. If this fuse is responsible for several systems, you should check the functionality of the other system. If it works correctly, the fuse is most likely good and is not the problem. After this, using a multimeter or other measuring equipment, the functionality of the fuse is checked by measuring its resistance (continuity).
Testing the fuse should only be done on a dismantled (removed) fuse. The resistance of a good fuse is close to zero. In most types of fuses, the thread of its working area is visible through the light or is located outside the body part. You can check the fuse visually, but there are often cases of erroneous inspection when the working area has a microcrack.
Which seats are suitable?
You can replace the seats either by contacting specialists at service stations in tuning centers, or by yourself.
Which seats are suitable:
You can install standard, original, factory seats, but most often car enthusiasts try to replace the old “Seven” seats with seats from foreign cars, sports cars, or anatomical ones. Of course, installing new ones is not a cheap process. Therefore, a frequently asked question among car enthusiasts on various forums is which seats are best to choose or which seats are suitable (preferably with the least amount of intervention in installation).
It is indeed possible to install “foreign” seats on a VAZ two thousand one hundred seven. For example, seats from a Mercedes W210 (preferably one thousand nine hundred ninety six year of manufacture), or from a Toyota Corolla (1993 year of manufacture) are perfect for this purpose. Another option that works well are seats from SKODA and Fiat. In this case, it will be necessary to make two additional holes to install a more reliable fastening.
They also use seats from the Peugeot and Nissan brands, but you will have to deal with some inconsistency and a little work during the installation process. From the Volkswagen brand, these parts fit well without unnecessary modifications. These seats are quite convenient and comfortable, but it is not recommended to install them, since they will be quite high, which will lead to inconvenience. According to experts, any seats can be installed, the main thing is that they fit the dimensions and there is the possibility of welding.
Connecting the tidy
To install the panel, no in-depth knowledge of mechanics or car design is required. At the back of the module there are wiring contact groups responsible for connecting devices. The terminals are made in different housings, which makes it impossible to confuse them.
The VAZ 2107 dashboard is a well-thought-out and elementary module. The panel displays the necessary information and its indicators are intuitive even for beginners.
Specialization : Graduated from the State Automobile University, worked for 20 years at GAZ-56, now I drive a Zhiguli.
Source
Changing the torpedo
Some drivers are not satisfied with the appearance of the torpedo on the VAZ 2107. Sometimes this element from the “five” may be installed on the car. In this case, a purely practical inconvenience is added to the unpleasant appearance. You have to close the glove compartment with a universal “lock”, or rather, seal it with tape. Otherwise it will constantly open. Therefore, you can change the torpedo.
Of our models, the best fit is a spare part from a VAZ 2115. You just have to use polyurethane foam to seal small non-joints. Of the foreign cars, the best fit here is a torpedo from a BMW E30
. She will look much more advantageous.
snyatie-paneli-vaz-210754.jpg
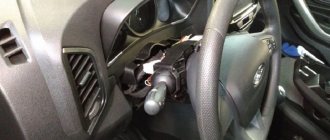
Removing the “tidy” of the presented car is carried out in the following sequence:
1. First, you need to prepare the car for operations (to do this, you should review the corresponding material called “Preparing the VAZ 2107 car for repair and maintenance”).
2. Then you need to disconnect the wire on the car from the negative terminal of the battery.
3. After this, use a screwdriver and carefully remove the handles from the stove control levers.
4. The next step is to unscrew the nut that secures the meter reset handle. We remove the nut together with the washer and push the handle into the space that is located behind the instrument panel.
5. Using a thin screwdriver, carefully pry and then remove the screw plug that secures the instrument panel.
6. Using a Phillips screwdriver, unscrew the fastening screw.
7. Carefully remove the “tidy” of the VAZ 2107.
8. Disconnect the cable after the union knurled nut of the car speedometer drive cable has been unscrewed.
9. After this, remove the vacuum supply hose from the econometric fitting.
10. Carefully disconnect the blocks (three colors) of the wiring harnesses.
11. Now you can remove the panel from the car. After this, you can safely perform the following operations:
-replace the backlight lamps;
-if necessary, replace the control lamps.
Installation of the “tidy” should be carried out in the opposite order of its removal.
Replacing the beard
Between the passenger and driver's seats of the "seven" there is a console where various equipment is located (radio, clock, cigarette lighter socket). This part of the panel is briefly and figuratively called the beard.
Car owners pay increased attention to this element, increasing its originality, visual appeal and functionality.
The standard “beard” of the VAZ 2107 interior looks simple and requires tuning
Improving the “seven” beard involves the introduction of various mechanisms and elements:
- radios with improved characteristics;
- backlight buttons;
- hours;
- switches for low and high beams, side lights;
- electric fan control buttons;
- USB connectors for connecting additional devices;
- devices for monitoring the operation of the electrical network;
- storage places for small items, usually placed below near the gearshift lever.
In addition, the panel is covered with trim from various materials, which performs a decorative function, improving the classic interior of the car.
The “beard” of the VAZ 2107 is trimmed with various materials to give style and individuality
Typically, tuning a “beard” is the manufacture and installation of a new console with provided cells for securing switches, indicators and covering it with decorative finishing materials. The simplest and most affordable material is plywood with a thickness of 6 mm or more. For decorative finishing, artificial leather or carbon fiber of the selected color is traditionally used. Replacing the “beard” can be combined with the trim of the doors, ceiling and dashboard.
The frame of the new “beard” can be made of plywood
To make a tuned VAZ 2107 “beard” you will need the following tools:
- electric jigsaw;
- screwdriver;
- Bulgarian;
- locksmith tools;
- pencil or marker;
- ruler or tape measure;
- glue;
- furniture stapler.
The work is performed in the following order:
- Dismantle the old beard.
- Before you start working with plywood, it is better to create a template from thick cardboard.
- Transfer each mark to the plywood.
- The locations of the buttons and indicators and all the parts are cut out of plywood with a jigsaw.
- Connect the parts using self-tapping screws or glue.
- After waiting for the glue to dry (at least 24 hours), install and secure the manufactured console.
- It is better to fix some buttons and devices on the “beard” in advance, as this may become impossible after installing it.
- Cover the beard with the selected decorative material.
The tuned “beard” differs from the standard one in its excellent ergonomics, economical use of space and stylish design.
The “beard” of the VAZ 2107 after tuning looks stylish, and it is much more convenient to use than the standard console
Key type switches
The VAZ-2107 torpedo trim has special sockets for key switches. Among them:
- External lighting controller. It has three positions. The first indicates that the system is deactivated, the second indicates that the license plate and side lights are on, the third indicates that the low beam is on.
- Automatic rear window defroster switch. You can turn it on after starting the engine.
- Car rear fog light switch. The regulator is activated simultaneously with the low beam headlights.
- Heater fan control. With its help, you can select the desired circulation speed of the air supplied by the heater.
In addition, the VAZ-2107 torpedo is equipped with letter control indicators, namely:
- The “A” indicator indicates that the seat belts are not fastened (illuminates red after the ignition is turned on).
- “B” – lights up in orange, indicating that the rear window heating is operating.
- “B” is an indicator of emergency operation of the machine’s brake unit. Lights up red if there is a critical drop in the fluid level in the hydraulic brake reservoir.
Torpedo two thousand one hundred seven
The installation involves the use of a soldering iron, scissors, and a gas stove. For best functioning, tanks from an engine chisel are installed under the hood of the newest torpedo. When deciding which panel is best suited for the VAZ 2107, you must take into account that the torpedo from the three thousand one hundred ten car model has a different shape. To install it, the corners are removed and additional work is carried out to adjust this structure.
Before deciding which panel can be installed, it should be borne in mind that at any moment the original VAZ 2107 torpedo may be returned. If such a procedure is carried out without the help of others, it is recommended to use a book on repairing classics. It will take a lot of time to complete the work.
When connecting the wires, you must remember that one goes to ground, and the second goes to the panel to the corresponding contact. It is recommended to label which connector goes where. To operate the speedometer, a speed sensor from a two thousand one hundred ten model with six pulses is installed. If the “seven” is armed with an econometer, it is recommended to install a tee from two thousand one hundred six to two sensors, including a pressure sensor from four hundred two motors.
The panel from the BVM also fits the VAZ two thousand one hundred seven torpedo. But not all car owners know which model. It is recommended to use a torpedo from a BMW E30 with some modifications. It will be necessary to install front electric windows. This is due to the fact that with this panel the handles will interfere with closing the doors. Because the gearshift knob in the standard position is not suitable for use with this torpedo, you will have to bend the gearbox lever. The stove also requires certain configurations.
Auto mechanics know everything about the features of the upcoming work. For example, the torpedo from this BMW model is somewhat larger, but when installing it there is no need for severe configurations.
The advantages of the new panel include:
- huge characteristics - the length of the hood has increased by ten cm,
- the height of the car has increased by five cm,
- added about twenty liters. s., from their five l. With. within two days it is necessary to receive new caps on the disks.
Installation highlights
Before deciding which panel you can install, you should take into account that the original VAZ 2107 torpedo can be returned at any time. If such a procedure is carried out independently, it is recommended to use a book on repairing classics. It will take a lot of time to complete the work.
When connecting the wires, you need to remember that one goes to ground, and the second goes to the panel to the corresponding contact. It is recommended to label which connector goes where. To operate the speedometer, a speed sensor from model 2110 with 6 pulses is installed. If the “seven” is equipped with an econometer, it is recommended to install a tee from 2106 on 2 sensors, including a pressure sensor from engine 402.
The panel from the BVM is also suitable for the VAZ 2107 torpedo. But not all car enthusiasts know which model. It is recommended to use a BMW E30 torpedo with some modifications. You will need to install front electric windows. This is due to the fact that with this panel the handles will interfere with closing the doors. Since the gear knob in the standard position is not suitable for use with this torpedo, you will have to bend the gear lever. The stove also requires some changes.
Auto mechanics know everything about the specifics of the work ahead. For example, the torpedo from this BMW model is slightly wider, but when installing it there is no need to make major changes.
The advantages of the new panel include:
- larger parameters - the length of the hood has increased by 10 cm,
- the height of the car increased by 5 cm,
- about 20 liters added. pp., of which 5 l. With. within 2 days it takes new caps on the disks.
Particular attention should be paid to fastening. Small screws are used for this. The nuances of the work also include installing the steering column cover - it will need to be trimmed. Some VAZ 2107 car owners trim the dashboard itself, but adjusting the casing to the required dimensions is much easier. This must be done carefully.