All modern cars, and indeed all vehicles in general, are equipped with various devices that convey to a person information about the condition of the unit being used as a whole. They warn about the instability of the operation of individual components of the mechanism, about violations of specified standards and about the timely implementation of certain measures. And many car owners do not quite clearly understand the symbols of devices and a flashing indicator scares them. Some people, on the contrary, ignore the signals, which leads to dire consequences. The VAZ-2112 is also equipped with various alarms and sensors, which will be discussed below.
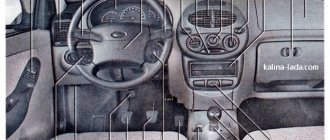
The instrument panel of the VAZ-2112 is no different from other VAZ models, the symbols are similar everywhere, they are only located slightly differently. Conventionally, the instrument panel can be divided into top and bottom.
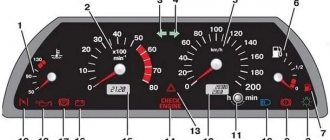
Designation of icons on the dashboard of Lada 2112
| Number in photo | Interpretation of lamps and indicators |
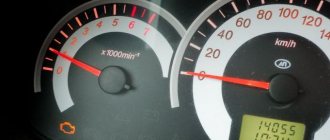
| 1 | Coolant temperature indicator; if the light comes on at the top of the scale, the engine has overheated. |
| 3/4 | The turn signal indicators light up simultaneously when the hazard lights are turned on. |
| 7 | Empty tank indicator; if the lamp lights up, stop at a gas station. |
| 8 | External lighting is turned on and operating normally. |
| 9 | The pressure in the brake system has dropped. It is necessary to immediately add fluid to the expansion tank of the system. |
| 10 | The high beam headlights are activated. |
| 12 | The odometer display shows non-resettable mileage. |
| 13 | The hazard warning lights are on. |
| 14 | The engine control system is damaged or not working correctly. |
| 15 | The battery is not receiving a charge. In this case, you should check the battery itself for wear and the generator set. |
| 16 | The handbrake is activated. |
| 17 | The oil pressure in the engine crankcase has dropped below normal. You should add fluid to the specified level and check the operation of the pump. |
| 18 | In a configuration with an airbag, it indicates that the squib drive is turned off. In other versions the light bulb is a backup one. |
Problems when paying with bank cards
Sometimes difficulties may arise when paying with Visa/MasterCard bank cards. The most common of them:
- There is a restriction on the card for paying for online purchases
- A plastic card is not intended for making payments online.
- The plastic card is not activated for making payments online.
- There are not enough funds on the plastic card.
In order to solve these problems, you need to call or write to the technical support of the bank where you are served. Bank specialists will help you resolve them and make payments.
That's basically it. The entire process of paying for a book in PDF format on car repair on our website takes 1-2 minutes.
7 - the fuel reserve warning lamp lights up if there is less than 9.5 liters of fuel left in the gas tank. To avoid fuel pump failure, do not allow all the gasoline in the fuel tank to run out. 8 - control lamp for turning on external lighting. Lights up when the external lighting is turned on with the corresponding switch (see item 6). 9 — warning lamp for low brake fluid level. Lights up if the brake fluid level in the master cylinder reservoir is below the minimum permissible level. Driving with the low brake fluid level light on is prohibited. 10 — control lamp for turning on the high beam headlights.
Lights up when the headlights are switched from low to high. 11 — reset button for the daily mileage counter. To reset the meter readings, you must press the button. 12 — odometer display. The top numbers show the total mileage of the vehicle, and the bottom numbers show the daily mileage. 13 - warning lamp for turning on the hazard warning lights. Lights up when the hazard warning lights are turned on. Designations of indicator lamps on the instrument panel of the VAZ 2110 - 15. Many car enthusiasts are faced with this seemingly simple question. What do the indicator lights on the instrument panel mean? And what do we know, they all light up together only when the ignition is turned on, and when one of them lights up while driving, it becomes a little uneasy.
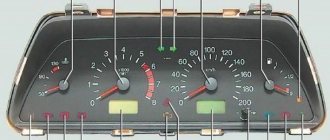
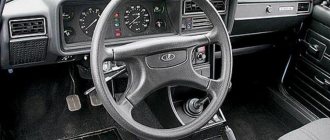
I didn’t know this myself when I switched to the “two” after the “seven”; on the 2107, half of them didn’t light up at all, so I didn’t know what it was and what it was for. And my friend, after the purchase, even bought a whole book on VAZ, due to ignorance of these light bulbs. The symbols on the instrument panels on all VAZs are almost the same, just the location is different. Let's start in order. 1 — Coolant temperature, in degrees Celsius. 2 — Tachometer, engine speed. 3.4 - Turn signals. 5 — Speedometer, vehicle speed in km/h. 6 - Fuel level in the tank.
When there are 5-7 liters left, a yellow light comes on - a warning or an icon with a picture of a gas station. 7 - Actually, this is an image of a gas station, signaling the need to refuel. 8 - Indicator lamp for turning on the dimensions. 9 — The brake fluid level is low, it may be leaking somewhere. 10 - Turn on the high beam. 11 - Clock adjustment knob (hours/minutes - switches when pressed), sometimes this knob serves as the function of switching the total mileage/day mileage (on panels with a narrow display). 12 — The display showing the total mileage/daily mileage is narrow on some models. 13 - Hazard warning lamp - “hazard light”. 14 - Check Engine, often indicated by this icon P - this means a malfunction in the engine, it is recommended to stop the engine. 15 — Display with a clock (can show the outside air temperature if there is a temperature sensor). 16 - Malfunction in the battery charging system: loose or broken generator belt, generator malfunction, open circuit and other problems. 17 - Parking brake indicator. 18 - Insufficient oil pressure in the engine, it is recommended to turn off the engine and find the cause.
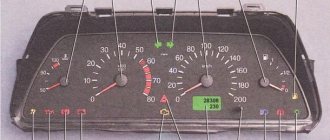
I’ll also add about the lamps on the additional panel in the dashboard of the VAZ 2110 - 12. - The lamp marked with an arrow is a check for faulty dimensions or brake lights. — Below is a brake pad wear indicator, if it lights up, check the brake pads, maybe it’s time to change them. — Seat belt warning light — this is clear from the picture.
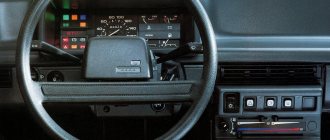
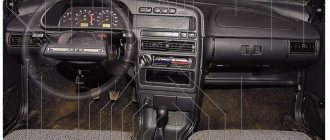
Description of the buttons on the panel
| Number in photo | Purpose |
| 10 | Additional equipment control module. |
| 18 | Steering rack position regulator. |
| 19 | Hood lock drive. |
| 20 | Horn button. |
| 22 | Trunk lock actuator button. |
| 24 | Hydrocorrector of headlights. |
| 25 | Switch for turning mode and headlights. |
| 26 | External lighting switch button. |
| 27/31 | Front/rear fog light switch. |
| 33 | Button for turning on the rear window heater. |
| 34 | Instrument lighting regulator. |
| 38 | Exhaust gas recirculation switch. |
| 39 | Air conditioner control buttons. |
| 40 | Heater damper position regulator. |
| 42 | Emergency button. |
| 43 | Switch for wipers and headlight washers. |
Errors on the dashboard 2112
VAZ cars have always stood out for their ease of operation and maintenance. Regardless of the type of engine, injector or carburetor, here the user can independently perform diagnostics and read errors without additional equipment. Symbols may appear on the instrument panel.
| Number | Meaning |
| 2 | Critical voltage drops have been detected in the on-board network. |
| 3 | The gasoline level sensor is damaged or does not work correctly. |
| 4 | Likewise for the antifreeze temperature sensor. |
| 5 | The outdoor thermometer is faulty. |
| 6 | There is critical engine overheating. You need to stop and let the engine cool. |
| 7 | The oil pressure in the engine is insufficient for normal operation. |
| 8 | The brake expansion tank is empty and needs to be topped up. |
| 9 | The battery is not charging properly. You will need to check the generator and its wiring. |
| E | BC firmware is damaged. |
Most two-digit codes are a combination of two errors.
The VAZ 2112 instrument panel does not work - reasons
If the panel suddenly stops working:
- When the engine does not start and the dash does not work, inspect the ignition switch. Here the contact often burns out or oxidizes.
- If the machine is working and the panel has failed, you will need to check the corresponding fuse, wiring and lines.
- If the manipulations do not help, you will need to remove the device and test its circuits.
Panel backlight does not light up
There may be damage to the light activation key. It is recommended to check the corresponding fuse.
The panel is blinking
Consequence of deterioration of electrical wiring contacts. The user should inspect the supply wires for cracking or damaged insulation. The contact groups should be disconnected and cleaned of oxides and dirt. Treat the terminals with special oil.
Tidy 2112 stuck
This kind of problem is unexpected, but it occurs everywhere. As a repair, users are suggested to reset the electronic equipment. Remove the terminals from the battery and wait 15 minutes.
Noise insulation
The interior of the VAZ 2112 has always been characterized by a high noise level. Here's what is used to improve sound insulation:
- vibroplast. From the name of the material it is clear that its main purpose is vibration damping. It looks like thick rubber. Used to insulate metal surfaces;
- isolon. Another material that is always used in combination with vibroplast (the thickness of the isolon sheets should be at least 7 mm, and it is better to buy it in construction stores, not in automobile stores);
- foam rubber 2 cm thick;
- can of construction mastic;
- bottle of white spirit.
Sequencing
First, the interior of the VAZ 2112 is completely disassembled. Almost everything can be removed: seats, dashboard, steering wheel. Then all surfaces are cleaned of dirt and dust.
Before installing sound insulation, you will have to remove almost everything from the interior
- Glue is prepared using construction mastic. White spirit is added to the mastic with constant stirring. The composition should be viscous and resemble honey in consistency.
- All metal surfaces of the interior are covered with vibroplast (it is most convenient to apply mastic to this material with a small paint brush). First, the space under the instrument panel is covered with material, then the doors are covered, and only after that the floor is covered.
- The second stage is laying the isolon, which is secured with the same mastic-based glue.
- After the isolon there is a layer of foam rubber. For it, either universal glue or “liquid nails” are used (the latter option is preferable because it is cheaper). Foam rubber is used to cover the area under the dashboard and doors. This material cannot be laid on the floor, as passengers will quickly crush it under their feet. It will become thinner and will not interfere with the passage of sound.
Removing the torpedo on the old model 2112
To completely remove the device from the car you will need:
- Turn off the on-board power supply.
- Remove the screws around the panel.
- Move the plastic cover of the shield aside and disconnect the wires from the buttons.
- Unscrew the panel fasteners.
- Then the device moves away from its seat and is disconnected from the on-board network.
The standard dashboard of the Lada 2112 is thoughtful and informative. The symbols on the instrument panel are easy to read and understandable even for beginners.
Specialization : Graduated from the State Automobile University, worked for 20 years at GAZ-56, now I drive a Zhiguli.
Source
Instructions for replacing the tidy yourself
Instructions for replacing the shield yourself:
- First, you need to turn off the ignition and turn off the power to the Tens electrical network; to do this, open the hood and disconnect the terminal from the battery.
- The switches located on the sides of the tidy are removed.
- Then use a Phillips head screwdriver to unscrew the bolts that secure the device.
- Next, you need to dismantle the mountings of the tidy to the trim. After this, the shield can be easily removed from its seat, and the glass can also be removed.
- The next step is to disconnect all the connectors and connectors connected to the dashboard.
- When the connectors are disconnected, the panel is dismantled. It is repaired or replaced with a new one, the assembly steps are performed in the reverse order (the video was filmed by the channel In the Garage).
Understanding the oxygen sensor
It is necessary to determine the sensor articles not by the engine model or even by Euro standards, but only by the ECU unit.
Types of oxygen concentration sensors (OCC)
The number of oxygen sensors can be two or one - it all depends on environmental standards. AvtoVAZ also used two types of sensors - 0 258 005 133, 0 258 006 537 (BOSCH part numbers). The first of them are compatible with BOSCH M1.5.4, MP7.0 and January 5.1 controllers. Newer sensors were connected to the BOSCH M7.9.7 ECU (January 7.2). The two different types of sensors differ even in appearance.
The ECU unit in “Dozens of VAZs” is located under a plastic cover. It is located near the front passenger's foot.
The red arrow marks the first, that is, the main sensor. The top photo corresponds to engine 21124 (1.6 l).
Sensor locations (21124 and 21120)
VAZ-21120 engines (1.5 l) could meet the Euro-3 standard, and then an “extended” catalyst was welded behind the main sensor. The second sensor was located behind it, that is, behind the “can”. Let's clarify:
- The Euro-2 standard corresponds to a design with one sensor (main);
- During the transition to Euro-3 standards, a second sensor was added (blue arrow).
By the way, the 24th engine can meet Euro-4 standards.
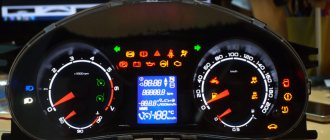
Tuning the instrument cluster
Let's look at the types of instrument cluster tuning in order:
- In many car parts stores, as well as on the Internet, you can easily find special 'inserts in the instrument cluster', with the help of which you can change not only the backlight colors, but also the design of the dials. However, in my opinion, they are unreasonably expensive, although anyone can make them on their own, the only drawback of this method is the need to remove the instrument needles
- The second option for changing the backlight is to replace the backlight bulbs with high-brightness blue LEDs, but this inevitably leads to the disappearance of red elements on the scales
- But if you simply paint the backlight bulbs blue using tsaponlak, this is a bad option, firstly, you will end up with a blue color that is not at all saturated (not bright), secondly, the red elements will disappear from view, and thirdly, the installed insert devices has a filter with a green tint
Let's make a substrate
First, change the backlight bulb to an LED in the odometer screen:
- The green filter should not be touched; it will not change the color or shade of the blue LED
- The action that will need to be performed with the LED is to grind off its bulb (since the bulb has a lens installed that concentrates the light and makes the diode shine directionally, like a flashlight)
- After this, we leave 0.5-1 mm of the inside of the LED (with the contacts on which the light element is attached), add a drop of Super Moment type glue
After this, we move on to the option of making an insert into the shield ourselves:
- It is best to have a template, download it from the Internet and print it, or take a scale from non-working instruments, remove the insert with the scales, scan it in film mode so that the pictograms of the indicator of dimensions, fuel, oil and others are visible
- Next, the CorelDRAW graphic editor will help you vectorize
- A radical change in the design of the scales is simply a waste of time, so you can easily leave the standard design, the main thing is that the readings are perfectly readable
- The base can be printed using a phototypesetting machine, you just need a good density of black color, otherwise you will have the entire panel glowing, and not just its numbers
Tuning trim for instrument cluster
To make a color base there are two options:
- Option one: take a film for a laser printer, print the outlines of the scales, setting the “mirror” mode, it is better to set the outline color to 5%
- We recommend that you first enlarge the contours (slightly) by 0.5 millimeters, in case there are any discrepancies between the tracing paper and the photo output
- We color the tracing paper with paints that are used in silk-screen printing, since such paints dry quickly, they are transparent and give a good rich color
- Option two: you can print the colored substrate on the film of an inkjet printer, however, most likely, you will have to run it several times to achieve a bright, saturated color
- To achieve the invisibility (invisibility) of the symbols of the control lights, we take a transparent film specially for an inkjet printer, print colored squares on it, which we lay according to the sample
- When the control light is not on, the designation pattern is practically invisible, and to achieve a better effect you can glue a piece of tint film onto the base
The final stage in making a “sandwich”:
- Taking into account the fact that the film from the phototypesetting machine came out glossy, we put a matte film as the first layer in order to laminate it, which has a thickness of 25 microns
- We put a base under the film
- The next layer is a laminating film to glue two sheets of paper together, instead of double-sided tape
- Then a colored substrate and again a matte film
- Film layers 1, 3 and 5 will give us additional dispersion, as a result of which we get uniform illumination
- Then we put it all through a laminator.
- Finally, carefully cut out our insert
- We use a punch to cut out holes for the shafts for the arrows
- Just a piece of iron tube of suitable diameter will do; the edge needs to be sharpened
- However, as a result, it quickly became clear that the scales glow, not so brightly, I would like it to be brighter, even worse than before (the power of the standard backlight is not enough), so we move on to a method of radically changing the entire backlight
Inserting LEDs
We take an instrument panel for a VAZ 2112 and carry out tuning by replacing the lamps in the standard backlight with LEDs. Which leads to a brighter and more saturated glow of the scales, in addition, it makes it possible to change the backlight color by simply re-soldering LEDs of a different color:
- To carry out the upgrade, you will need to remove the instrument cluster, completely disassemble it, and make an insert for the dashboard (either make it yourself or modify the standard one)
- Buy 10 mm LEDs in the amount of 7 pieces for the panel plus resistors, a white corrector, colored electrical tape (what is on sale: green, blue, red, yellow, orange you are unlikely to find, although everything is possible), in addition you need a piece of tint film about 8 ×8cm (not too dark), and double-sided tape
We begin tuning the VAZ 2112 instrument panel by disassembling the instruments:
- To do this, it will be necessary to remove the transparent visor from them.
- Remove all lamps along with sockets
- Then comes the removal of arrows
Attention: This process requires the greatest caution, as you can easily damage the axles of the devices, and then do not purchase new devices.
- To remove the arrows we need scissors and paper (thick paper)
- Cover with paper so as not to spoil the insert, and use scissors, slightly shaking from side to side, to pull the arrow up (the arrow will come off with force)
We disassemble the instrument lighting
- Now we need to unscrew the screws on the back of the devices
- Remove the plastic wall, then straighten the frames pressing the LCD
- We work carefully so as not to break it, almost half of the work is already done
Main set of sensors for 16-valve VAZ-2112 engines
The ECU must control many parameters at once. The most important information will be the position of the crankshaft. You can turn off all sensors except the DPKV, and this will not lead to the engine stopping.
Sensors connected to the ECU
Let's list all the elements one by one:
- 15 – DTOZH. A resistor screwed into the thermostat housing. The temperature of the antifreeze is determined;
- 17 – DPRV, also known as DF (phase sensor). The operating principle is the Hall effect. The position of the camshaft is controlled. Check it out here.;
- 20 – TPS. Resistor fixed to the throttle assembly 19. The angle of deflection of the throttle valve is measured;
- 21 – Mass air flow sensor. Sensor connected to the filter housing. Controls air flow; the main signs of its malfunction are discussed here;
- 22 – IAC. Not a sensor, but a regulator (electromagnet). Used in idle mode. About its testing and diagnostics here. About replacing the IAC here.;
- 24 – lambda probe or oxygen sensor (see above);
- 25 – speed sensor. Fixed in the gearbox slot. Operating principle – Hall effect;
- 26 – DPKV. Electromagnetic sensor. The position of the crankshaft is controlled;
- 27 – DD (knock sensor). A piezoelectric element mounted on the outer wall of the cylinder block.