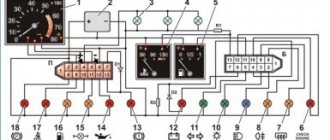
Instrument panel VAZ-2114
1 – headlight hydraulic corrector; 2 – lever for switching direction indicators and headlights; 3 – instrument cluster lighting switch; 4 – steering wheel; 5 – sound signal switch; 6 – instrument cluster;
7 – alarm switch; 8 – ignition switch; 9 – windshield wiper and washer switch lever; 10 – APS status indicator; 11 – external lighting switch; 12 – key switches; 13 – socket plug for installing a trip computer; 14 – signaling unit of the on-board control system; 15 – central deflectors of the heating and ventilation system; 16 – cover of the upper glove box; 17 – cover of the lower glove box; 18 – side deflector of the heating and ventilation system; 19 – magazine shelf; 20 – heater control unit; 21 – location for installing audio equipment; 22 – ashtray; 23 – diagnostic block cover; 24 – parking brake lever; 25 – gear shift lever; 26 – cigarette lighter; 27 – gas pedal; 28 – heater electric fan switch; 29 – brake pedal; 30 – clutch pedal; 31 – steering wheel position adjustment lever; 32 – hood lock drive lever; 33 – socket for connecting a portable lamp.
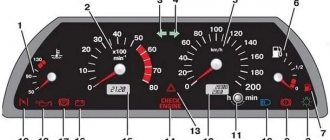
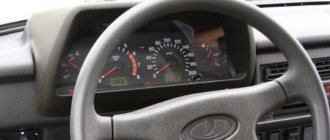
Instrument cluster VAZ-2114
1 – coolant temperature indicator; 2 – tachometer (crankshaft speed indicator; 3 – left side turn signal indicator; 4 – right side turn signal indicator; 5 – speedometer (vehicle speed indicator); 6 – fuel level indicator; 7 – insufficient fuel level indicator in the fuel tank; 8 – indicator lamp for turning on the side lights; 9 – emergency indicator of the working brake system (lights up when the fluid level in the hydraulic brake reservoir drops below o); 10 – indicator for turning on the high beam headlights; 11 – reset button for the daily mileage counter and clock settings; 12 – total (top line) and daily (bottom line) mileage counter; 13 – hazard warning light indicator; 14 – “Check engine” indicator; 15 – “time / ambient temperature” indicator; 16 – battery charge indicator batteries; 17 – parking brake indicator; 18 – low oil pressure indicator in the engine.
When purchasing a new or used car, the first thing the owner must do is figure out exactly how to operate the car and all its systems. To do this, you should know the pinout of the instrument panel on the VAZ 2114, since this is the car we are talking about today.
Dashboard
We bring to your attention a detailed description of the buttons on the VAZ 2114 dashboard, icons, lights and other devices and indicators.
A little bit of history
VAZ 21099 2000 arrived to me. with a 2114 interior. This surprised me, of course, because a friend had a 2109 injection model from 2002, and the panel and interior were 2109. The essence of the problem was as follows. The tachometer needle and the fuel gauge needle are stuck. These two arrows only trembled convulsively when the ignition was turned on. Unfortunately, I didn’t take a photo of this, but it looked something like this.
All the electricians in our city prophesied the death of the dashboard, and shouted with one voice, buy a new one, or look for the same one but used. Seeing that the odometer was alive and normally recording the kilometers traveled, it was clear that the processor was alive. You can verify that the processor is alive using a simple command: with the ignition off, press the reset button for the daily clock readings and turn on the ignition.
If the arrows on the dashboard describe an arc, it means that the test mode has started, then press the odometer button again and see the firmware version, then press it a third time and see the error code.
In self-diagnosis mode, the instrument panel displays the following error codes:
2 – Excessive voltage 3 – Fuel level sensor error* 4 – Coolant temperature sensor error* 5 – Outside temperature sensor error** 6 – Engine overheating*** 7 – Emergency oil pressure*** 8 – Brake defect*** 9 – Low battery*** E – Recognition of an error in the data packet stored in the EEPROM
This is what happens!
If the self-diagnosis mode has started, then the percent is alive, and let’s move on to disassembling the dashboard.
Let's disassemble it completely, we only need the board for work.
Next, we arm ourselves with a soldering iron and a “tin sucker” and solder the faulty motor.
The place where the gearmotor stood is circled.
And here we are holding it in our hands.
We take a scalpel or something very strong and thin and carefully disassemble the motor into two halves.
The photo shows two of the three breakdowns, which can occur and which can be easily fixed. What is circled in blue is a spring that prevents the gearbox gear from going down, and keeps constant resistance for the mechanism to work; it should be in the form of an arch. But the breakdown that brought the wanderer to me is circled in red. You can see how the transmission shaft jumped off its groove, and thus could not set the gearbox in motion. This happened due to the old age of the plastic; over time, the plastic aged and a gap formed between the halves; it can also occur due to excessive force when installing the arrows. Once in the turboflight zone, the shaft jumped off. There are times when wedges are knocked out with wedges. Those. entering this zone again brings life back to the gear motor, but it is clear that this is temporary, and with our roads this will happen indefinitely. But the third reason is a malfunction of the left or right winding, but this cannot be repaired and requires a donor.
And so we carefully clean the grooves under the transmission shaft with an awl or a scriber, put a new lubricant (litol, CV joint) with a match, the main thing is not to overdo it, and apply a small amount of super glue to the places shown in blue.
Now we start assembling, the main thing is that now, due to the glued elements, a gap will not form for a long time.
And we solder it back onto the board, but before that you can check the gearmotor with a 1.5V battery by placing the arrow in its rightful place and connecting the battery according to the diagram given in the picture. If everything is fine, then we solder the gearmotor to its rightful place.
When the instrument panel is assembled and the time has come to install the arrows, we will again need the test mode for proper calibration. We set the arrows, started the test mode, at the end of the test the arrows will drop to zero, you will only need to remove the arrow from the rod and put it in the zero position, and then make sure that it is correct by restarting the test mode, the arrow should make a full move, for example on the speedometer The needle in test mode should move from 0 to 200 km/h, the same applies to other devices.
Make sure that all the legs of this stabilizer are well soldered so that there is no undercontact.
I hope my article will help you. And at the expense of your hands it will save money.
Basic devices and their interpretation
Of course, the most significant instruments on the dashboard are:
- Speedometer;
- Tachometer;
- Coolant temperature indicator;
- Fuel level indicator in the tank.
Instrument cluster
Let's study them in more detail.
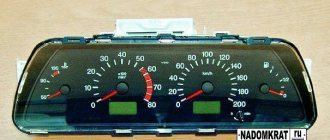
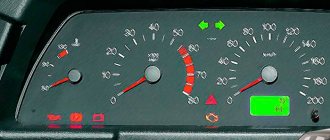
- Speedometer. The VAZ 2114 provides for the installation of an induction speedometer, which receives speed data thanks to a sensor located on the gearbox. The speedometer shows the current speed of the vehicle. The scale is divided from 0 to 200 kilometers per hour in increments of 10 kilometers per hour. Such devices have an error of at least 5 kilometers per hour. At the bottom center of the speedometer is a two-line display. She reports the current mileage, and the second one reports the total mileage completed on this car.
- Tachometer. It is located to the left of the speedometer. The tachometer is an electronic device that receives signals from the on-board computer and reflects the current crankshaft speed. The scale is divided into 5 units. Digitization - every 10 scale units. The maximum tachometer scale is 80. Multiplying this number by 100, we get the number of revolutions. For example, if the scale is 40, then the crankshaft rotates 4000 rpm. The range from 55 to 60 has red shading, and 80 is completely red. These are critical speeds, when the arrow reaches which the engine operates under extreme loads and may fail. At the bottom of the tachometer in the middle the time and air temperature are displayed.
- Coolant temperature indicator. The coolant temperature should be constantly monitored, because for this purpose there is a corresponding indicator on the dashboard. It is located to the left of the tachometer and reports the current coolant temperature. The data comes from the corresponding sensor. The division is made in 20 degree increments. Digitization starts at 50, then goes to 90 and 130. The danger zone begins at 105 degrees. If the arrow is in this zone, the engine must be stopped immediately, otherwise overheating and breakdown will occur.
- Fuel level indicator. It is located to the right of the speedometer. The scale contains numbers and images that mean:
- 0 - tank empty;
- 1/2 - the tank is half full;
- tank full;
- Image of a gas station at the top - the tank is filled to its maximum capacity;
- Image of a gas station at the bottom right with orange backlight - less than 6 liters of fuel left in the tank.
Main elements of the control panel
The most important place in the car is given to such instruments as the tachometer and speedometer; this also includes a fuel gauge and coolant temperature. And it’s worth examining these devices in more detail so that everything is clear in the future.
Tachometer
It is presented in the form of a device with an arrow; its signal comes to the on-board computer of the model. This device displays data on vehicle speed. In total, the tachometer has 5 scales, and every second scale has numbers here, the maximum number of revolutions is 80. In order to determine the speed, you need to multiply the number indicated on the tachometer by 100. Manufacturers on the device indicated the maximum number of revolutions, upon reaching which the car engine can go out of gear. building. Below it there is a small window where the time and air temperature outside are indicated.
Speedometer
The VAZ 2114 has an induction dial speedometer; it is located on the right side of the dashboard. The speedometer also has certain divisions, the number of one division is 10 km. In total, the car can reach speeds of up to 200 km/h. The device will work using a sensor that measures speed, and it is located in the car's gearbox. But all speedometers that are installed on the VAZ 2114 will give an error of 5 km. Below the speedometer there is also an electronic display, where exact data on the car’s mileage is indicated, and you can also see the mileage that the car has traveled over a certain period of time. Usually these numbers are indicated under the total mileage. But the main mileage cannot be adjusted this way; you can only reset the lower readings using the shift knob, which is located nearby.
Fuel remaining indicator
It is located on the right side of the dashboard and also has an element in the form of an arrow, which indicates the amount of gasoline in the car's tank. In total, the sensor has three marks, where the numbers are set, they will indicate the amount of gasoline. If the arrow is at mark 1, then this indicates a full tank. The ½ mark will indicate the middle of the fuel tank. There is also a warning light here that will indicate that the gasoline level is too low, and if the arrow is on it, then it is best to refuel the car.
Temperature sensor
It shows the temperature of the coolant in the car, it also has a specific scale with 20 units. The minimum temperature is 50, and the maximum is 130, but it is better not to reach the maximum, as this is critical for the car. It is worth remembering that when the coolant boils, you must immediately stop the car and turn off the engine, in this case the engine may fail. It happens that the sensor shows an inaccurate temperature or does not show it at all, in this case the electrical wiring is checked. It very often oxidizes and the sensor stops showing correct data; a solvent is used to clean the contacts. But in some cases it completely fails, so it is better to replace it with a new one.
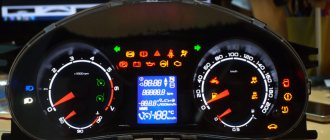
Indicator lights
Now it’s worth discussing such indicator light bulbs that have their own purpose and icons. All light bulbs are installed in accordance with all the rules and regulations provided for in the car. But even here there are certain discrepancies, since everything will depend on the model and year of manufacture of the car.
| Engine oil level indicator. If the oil is at a critical level, then this light turns orange. As soon as it lights up, you should immediately add oil to the system. |
| The washer light will indicate when there is too little windshield washer fluid in the reservoir. In total, up to 5 liters of liquid can be poured into such a tank; the light can light up when there is less than a liter of liquid left. |
| Lack of coolant. An indicator that is responsible for the amount of coolant in the system. It is this that needs to be monitored more carefully. |
| The doors are not closed. Also, the instrument panel of the VAZ 2114 has small lines at an angle; they will indicate that the car doors are not closed. |
| Burnt out light bulbs. There is an indicator here for burnt-out bulbs of brake lights, headlights and others; if a breakdown occurs, the bulb also lights up in orange. |
| Brake pad wear. An indicator indicating high wear on the brake pads; it will light up from the moment you press the brake pedal until you turn off the car. |
| Unfastened seat belt. Some cars of this brand have a warning light that indicates that the seat belt is not fastened. |
All early production cars have several additional badges that are responsible for:
| The letter P is located inside the circle; it will indicate that the handbrake on the car is on. |
| There is a kind of battery sign; if it lights up, then you should charge the battery. |
An exclamation mark may also light up on the dashboard, indicating a low amount of brake fluid in the system. In this case, it is worth checking and adding to the required level. Of course, the dashboard of the VAZ 2114 can indicate problems with the car’s engine; this will be indicated by an icon in the form of an engine. But it happens that this check lights up even when there are no malfunctions, so it is better to immediately contact the maintenance department to carry out diagnostics.
Of course, the instrument panel of the VAZ 2114 shows a lot of the necessary information that will indicate malfunctions in the car, and the driver will immediately understand what exactly is faulty in the car.
Control buttons
In the center where the dashboard of the VAZ 2114 is located, there are also control buttons, they are located in one row and perform the following functions:
Control buttons. First row
First row
- Using this button you can turn off or turn on the side lights of the car; if the side lights are off, it will light up green.
- Also nearby is a button to turn off and turn on the headlights in the car.
- There are turn signals here on the switch lever, and the high beam switch, on the instrument panel it glows blue.
Control buttons. Second row
Second row
- By pressing this button you can turn the front fog lights on or off. But before turning them on, first turn on the dimensions.
- Next is the button to turn the rear fog lights on and off.
- Then the button to turn off the rear window heating on the luggage compartment.
It is worth remembering that the switch will not turn on until the side lights come on, and also when the headlights are on, the side lights will not light up.
Light bulbs, indicators icons
Having a photo of the icons in front of you will make it much easier to understand their designation on the instrument panel of the VAZ 2114.
Icon Description
On a VAZ 2114 with an injection engine of the latest versions, the designations are located at the bottom of the dashboard. We offer a corresponding table with transcripts.
| Image | Designation |
| Canister icon with liquid drop | The image indicates that the oil level in the engine crankcase has dropped below the permissible level and is highlighted in red. |
| Wiper and water fountain icon | Indicates that there is insufficient washer fluid. If there is less than a liter of washer fluid remaining, the icon lights up orange |
| Thermometer icon | Indicates that the coolant level in the expansion tank on a cold engine has dropped below the permissible level. Lights up orange |
| Car icon with open doors | Indicates that some of the doors are not closed. Illuminated in red |
| Crossed out light bulb icon | Reports a malfunction of the dimensions or brake lights |
| Circle icon with strokes on the sides | Talks about brake malfunction, worn out pads |
| Icon of man with seat belts | Indicates that someone has not fastened their seat belts. |
| Two green arrows icon | Signal when the left or right turn signal is turned on |
| Check Engine Icon | Lights up red when engine problems occur |
| Blue light bulb icon | Indicates that the high beams are on |
| Green light bulb icon | Talks about turning on the low beam. |
| Designations provided for VAZ 2114 of earlier modifications | |
| Red canister icon with liquid drop | Indicates a drop in oil, means emergency oil pressure |
| Letter "P" icon in a circle | Indicates that the handbrake is not released |
| Battery picture | Turns on when the battery is low |
Indicator lights
Owners should know the description of the lamps and indicators of the VAZ 2114. This is necessary to assess the condition of their car and notice the problem.
The designation of the light bulbs on the dashboard of the VAZ 2114 includes a battery icon (16). The light comes on when the battery is low. At the top between the speedometer and tachometer there are two green arrows (3 and 4), indicating that the left or right turn indicators are turned on. At the bottom of the panel there is an emergency stop icon in the shape of a red triangle (14). There is also a CHECK ENGINE light (13) on the device, which lights up red when there is a breakdown of the engine automation or in other cases. The panel has a blue light for high beam (10), which lights up when it is turned on, and a green light for low beam when it is turned on.
The designation of the indicators on the dashboard may be in different places depending on the year of manufacture of the car. But these lamps are present on all VAZ 2114. Knowing what the lights on the panel mean, you can notice a malfunction or your own mistake in time. For example, if the driver forgot to turn on the low beam or did not turn off the high beam when an oncoming car approached.
Helpful : Where is the dashboard ground located?
Buttons and their designation
Now we move directly to the buttons, which also have their rightful place on the dashboard of the VAZ 2114.
- The button at the bottom right of the speedometer allows you to switch the temperature and time on the digital display. If you press it for 5 seconds while the car is stationary, the current mileage data will be reset.
- Double button with two switches. The button with two headlights turns on the headlights, and the button with one headlight turns on the low beam.
- A button with angled strokes and a headlight turns on the front fog lights.
- The button with horizontal strokes turns on the rear fog lights.
- The button with a rectangle turns on the heated rear window.
In fact, it’s not difficult to understand all the buttons, indicators and pointers. Our description of the VAZ 2114 dashboard buttons will help you figure this out. But it’s best to get into the car with the instructions and clearly see everything.
The instrument panel of the VAZ 2114 is designed to inform the driver about the condition of the vehicle components. Beginning motorists should find out more about the functions and capabilities of the panel, as it allows timely detection of some serious breakdowns. In addition, some users may be interested in tuning the panel, so below are tips on what should be changed in the interior and how.
Dashboard buttons
The dashboard of a car contains several buttons. Next to the clock and thermometer there is a button that allows you to switch these indicators and reset the current mileage. The following buttons are located in the center of the instrument panel:
- parking lights;
- low beam
- front fog lights;
- rear PTF;
- heated rear window.
Also, many car owners move the hazard warning button here. The backlight of the button allows you to clearly see it in the dark.
Main information devices
The instrument panels of the VAZ 2114 show information about the status of important operating components of the car. The main part is an information block with two round scales and several smaller indicators.
- The speedometer is the right round scale on the panel with marks from 0 to 200 km/h, which shows the speed of the car. The device sensor is located in the transmission assembly and is connected to the display in the cabin. Below the scale there is a window that displays the vehicle's mileage.
Backlight
Often, standard light bulbs burn out due to power surges, and some elements of the dashboard are not illuminated. To replace the backlight, a novice driver will have to partially disassemble the panel, remove it, and replace the bulbs. I've already removed the dashboard 4 times and have adapted to bend my hand so that I can indiscriminately change a light bulb from under the panel. But I recommend that you use the following article: How to replace the instrument cluster lighting?
Using colored diodes, you can achieve the desired result for any car enthusiast. It is also worth considering that when replacing the backlight with another one, you need to use an additional resistor along with the diodes, and you need scattering diodes, and not ordinary ones that shine at one point.
Source
Indicators
The VAZ 2114 injector dashboard indicators play an important role in informing the user about malfunctions. They help prevent errors in the system, so it is important to know which indicator means what. How does the panel work? If any problem occurs, the sensor immediately sends information to the panel, and the driver will see an orange signal light up.
The earlier version of the 2114 instrument panel had some other symbols, such as emergency oil pressure, handbrake engaged, Chek Engine light, and several others that indicate minor operating errors, but which are no longer used.
TUNING OPTIONS
You can perform tuning in several ways:
- cover the panel with leather;
- paint;
- install overlays;
- combine materials.
Before tuning the dashboard yourself, you need to familiarize yourself with the rules and the car’s passport. You cannot use fur or ordinary fabric to cover the panels; the paint must be automotive grade. This is due to the operation of the stove, since as a result of high temperatures, ordinary paint and the described materials will begin to disintegrate and release harmful substances.
Before tuning the dashboard yourself, you need to familiarize yourself with the rules and the car’s passport.
You also need to take the choice of colors seriously. The color of the covers and interior trim are taken into account. If black and white are combined in any way, then when selecting other shades you need to use special tables of color combinations.
PAINTING THE PANEL
One of the simplest and most affordable options for tuning the VAZ 21114 dashboard is painting it. Here you can do everything yourself.
The procedure for painting the dashboard:
- The surface is thoroughly cleaned from dust and dirt. To do this, use a soft sponge and a regular soap solution.
- Sanded with fine sandpaper (P240, P280, P320, P360), this will help improve paint adhesion. The panel is also degreased using a special product for plastic; if this is not available, you can use compositions based on white spirit, dishwashing detergent or wet hand wipes.
- The sealant is applied. This is done at the points where the panel comes into contact with other body elements.
- Painting in progress.
In order to properly paint the VAZ 2114 panel, it must be dismantled
The paint can be applied with a brush, roller or spray. In any case, if the panel is not removed from the car, it is necessary to completely cover all areas that will not be painted. To do this, use masking tape. To properly paint the dashboard, it is recommended to remove it from the car. Although this is an easy way to remodel a dashboard, the work must be done carefully, and if you doubt your abilities, it is better to leave it to the professionals.
PANEL COVER
Another option for tuning the dashboard is covering it with artificial or natural leather or carbon fiber.
The procedure for covering the dashboard:
- The dashboard is being dismantled.
- The pattern is being prepared. To create a pattern for a specific panel element, remove it and cut out the required piece of material in accordance with the shape that will be pasted over, doing this with a small allowance.
The pattern is made in accordance with the shape of the element to be pasted - The dashboard is cleaned of dirt and degreased.
- The panel is pasted over. The adhesive composition is selected taking into account the material used for pasting, so as not to damage it during interaction. It should be taken into account that the panel gets very hot in the sun, so the glue must withstand high temperatures. A one-component polychloroprene adhesive is suitable for this; it must be heated to 60 °C to ensure a reliable connection (“Glue-88”, GTA Boterm, Mah). There is no need to heat polyurethane glue; it can be “Moment” (good for leatherette), Kaiflex K414, “Titan”, “Demoskol”.
Most often, the panel is covered with artificial or natural leather, carbon fiber
VIDEO: COVERING A PANEL WITH RUBBER MATERIAL
INSTALLING COVERS
You can transform the dashboard of a VAZ 2114 using special overlays. They are sold in almost all auto stores. This tuning option allows you to change the color of the backlight. This occurs through the use of transparent elements and light filters of different colors. Such overlays must be installed correctly so that there is no distortion or displacement, otherwise the illumination of the devices will be uneven. It should also be taken into account that if light filters are too dark, the power of the factory light bulbs will not be enough, and they will not be able to properly illuminate the devices through such overlays.
The dashboard can be transformed using special overlays
In addition, you can install soft pads on the instrument panel. Unlike a rigid standard panel, they have better sound absorption, are more scratch resistant and have a shelf for small items. The cost of the instrument panel overlay is 1200–1500 rubles.
You can install a soft pad on the instrument panel
INSTALLATION OF EUROPANELS
Relatively recently, European-style dashboards began to be installed on the VAZ 2114. They have a more modern design and are made of high-quality materials, so they have become very popular among owners of the old-style VAZ 2114.
Europanel has a more modern design and is made of high quality materials
Installing the Europanel is not difficult, since it is designed specifically for the VAZ 2114 and is simply mounted in place of the old panel. The presence of several drawers for small items makes this solution more convenient. Among the disadvantages of the Europanel, owners note that the movement of the heater control levers is rather tight.
VIDEO: INSTALLATION OF EUROPANELS
IMPROVING BACKLIGHT
To achieve a unique visual effect, one of the options for tuning the dashboard is to change the instrument lighting.
Work order:
- Removing the instrument panel.
- Removing protective glass.
- Removing the arrows.
- Removing the standard cover.
- Replacement of standard light bulbs. Green backlighting is installed at the factory. It can be changed so that the illuminated dashboard is in harmony with the rest of the dashboard and interior of the car. Typically, multi-colored LEDs in a plastic socket, a DSM LED or LED strips are used for this. It must be taken into account that the car's electrical voltage is 12 V, and the LEDs operate on a power supply of 2–3.5 V (this depends on the color) and have polarity. If you mix it up, the LEDs will immediately burn out. You can purchase ready-made clusters designed for 12 V, or make such a cluster yourself. To do this, several diodes are connected in series to achieve the required voltage. If you take 3 diodes of 3.5 V, then you also need to additionally set the resistance to 100–150 Ohms.
Changing the dashboard lighting improves its appearance - Reassembly of the structure.
VIDEO: CHANGING INSTRUMENT PANEL LIGHTING
TUNING INSTRUMENT POINTS
It is quite simple to implement this type of dashboard tuning, such as improving the instrument needles. In the standard design, the lighting of the heating equipment is yellow, the buttons are green, and the indicators are orange. Many people don’t like it because it resembles a parrot and makes it difficult to feel comfortable while driving at night.
To improve the instrument arrows, you need to disassemble the instrument panel and install a red, blue or other color LED under each arrow. To prevent light from scattering, a piece of heat-shrinkable tubing is placed over the diode. The wires from the diode are connected to the heater backlight. As a result of such changes, the instrument needles glow with a rich color.
You can make additional illumination of the arrows
Pinout
The VAZ 2114 instrument panel pinout shows the correct order of connecting the wires of measuring and information devices, in other words, this is the electronic circuit of the instrument panel. You will need it if you want to make any changes to the standard panel configuration or carry out repairs and replacement of parts. For each car model and specific dashboard, the diagram will be slightly different; for example, the diagram on the VAZ 2115 has significant differences from the 2114 model.
The circuit consists of 26 connections, which are made according to an electronic circuit. Usually the diagram should come with the car manual. It’s not a problem to get a description of her work now.
There are two pads inside the panel - one red and one white. The devices will be connected to them in a certain sequence.
There is nothing complicated in the pinout if the user has basic knowledge of the rules for connecting wires - plus to plus, minus to minus. If you have a diagram of the instrument panel on hand, you can start tuning individual devices or the entire set so that the instrument panel of the 2114 model becomes more visually pleasing.
Examples of prices for an instrument panel for a VAZ 2114
If the dashboard on the Lada Samara is broken, then this is not a problem. Domestic cars are approximately equally distributed throughout the country and prices for parts are practically independent of the region. So you can buy a new shield with full electronics for 4,500 rubles , or you can buy a used ordinary one, without additional illumination, for only 500 rubles (all prices are taken from the Drom resource). Everything that costs from 700-4000 rubles are options of varying degrees of used and electronic.