To ensure normal operation of an internal combustion engine, its moving parts must be lubricated. Motor oil is used for this. To ensure the circulation of liquid lubricant in the system, an oil pump is used, the failure of which leads to a rapid reduction in engine life. How to replace the VAZ 2107 oil pump is carried out, we will consider in detail in the material.
Location, structure and purpose of the oil pump VAZ 2106/07
The oil pump of any car creates pressure in the engine lubrication system. As a result, friction between the moving elements of the engine (crankshaft and camshaft, piston group, etc.) is reduced and their service life increases. When the pump fails, oil pressure drops sharply, friction increases, and the engine may seize. A complex and expensive overhaul will be required. Therefore, it is so important to promptly detect and correct any oil pump malfunctions.
The VAZ 2106/07 oil pump is located inside the engine in the lower part.
The VAZ 2106/07 oil pump is located in the lower part of the engine under the crankshaft. To provide access to it, you will need to remove the protection and oil pan and install the machine on an inspection hole, overpass or lift.
Operating principle of the oil pump
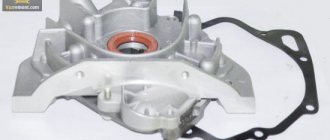
The VAZ 2106/07 is equipped with a gear-type pump with external gearing. It is driven by a chain transmission from the crankshaft of the engine. The same chain rotates the camshaft during operation of the power unit. The pump design is based on two gears, to which lubricant is supplied from the crankcase through the oil receiver. As the gears rotate, they capture oil and supply it under pressure to the engine. Pump performance depends on engine speed and oil viscosity. The design of the pump includes a pressure reducing valve, which is activated when the pressure exceeds the permissible value and directs part of the oil back to the sump.
Dismantling
Depending on the situation, the oil pump can be completely replaced, or repair work can be performed - change gears, return the pump pressure reducing valve to functionality.
But let's talk about everything in order. In any case, work begins with dismantling the oil pump:
- Before you remove the pan to gain access to the pump, you will definitely need to drain the oil.
- To do this, warm up the engine to operating temperature, open the drain hole and wait until all the liquid drains out.
- Draining can also be done when it is cold, but due to its high viscosity, the oil can flow for a very long time and most of it will still remain inside the crankcase.
- After draining the oil, remove the three mounting bolts from the crankcase protection using an 8 mm wrench. The protection blocks access to the flywheel near the crankcase.
- Remove the flywheel guard and then remove the bolts from the crankcase. That's it, now the crankcase can be removed.
- In front of you is the crankshaft and the oil sump where the desired pump is located.
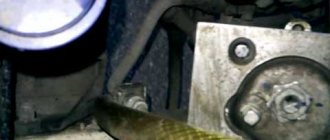
- By unscrewing the three mounting bolts, you can remove the intake from the pump.
- Let's move on to the engine compartment. Lift the hood and remove the plastic cover. This is a guard that covers the timing belt.
- Next, you need to remove the front right wheel to remove the pulley fixing washer, and then remove the pulley itself.
- Remove the timing belt and remove the six mounting bolts that hold the oil pump in place. Here you will need an 8 mm wrench.
- Remove the oil pump from the crankshaft.
Disassembly
If you do not want or cannot yet purchase a new pump, you can try to repair it. Perhaps the problem is a malfunctioning valve or worn gears.
- Remove the gasket from the pump;
- Remove the bolt holding the crankshaft position sensor;
- By unscrewing the six mounting bolts, you can remove the cover from the pump;
- Using a pair of screwdrivers, lift the housing so that the pins on it come out of their holes freely;
- Remove the body, disconnect it from the cover;
- Now you need to remove two gears from the cover. The drive gear is removed first, and then the driven gear is removed;
- Next in line is the pressure reducing valve. You need to unscrew the plug under which the o-ring is located;
- Check the condition of this seal. If the ring shows signs of damage or is too squeezed out, be sure to replace it with a new one;
- Remove the valve spring;
- Now you can remove the valve itself. To do this, gently tap the case on a stand made of pure wood;
- The valve may be stuck. Do not worry. Take any thin, sharp object, pry it up and remove the element. It is better not to use metal objects so as not to damage the surface;
- Check the current condition of the aluminum cover. If there are deep scratches or signs of wear, replace it;
- If the pump body shows signs of wear, do not even try to repair anything. The only correct solution would be to completely replace it;
- You also need to make sure that the gears and the diameter of their sockets comply with the standards;
- The maximum diameter of the driven gear socket is 75.1 millimeters. If it is larger, the case must be replaced;
- Measure the width of the body in the middle. If the indicator is less than 3.4 mm, it is worn out and needs to be replaced;
- As for the thickness of the gears, according to the requirements, the thickness of the drive is at least 7.42 mm, and the driven one - 7.35 mm. In case of deviations from the norm, the gears are changed.
Assembly and installation
If you managed to repair the oil pump, then all that remains is to assemble it and install the unit in place. If you decide to completely replace the device, skip the first part of the further instructions.
- Install the driven gear onto the housing with the chamfers on the teeth.
- Also, the new pump drive gear is returned into place using chamfers on the teeth.
- Be sure to remember to lubricate the gears with oil so that they work more reliably and longer.
- Replace the pump cover and screw back all the fasteners.
- Lubricate a new or repaired old relief valve before installing it in its proper place.
- The valve fits into its seat. Make sure installation is done bottom down.
- Now it’s the turn of the spring and the plug, which is wrapped with an o-ring. Again, these elements are pre-lubricated with engine oil.
- Using the oil pickup tube, oil is poured back into the unit.
- Once assembly is complete, rotate the pump gears several full turns. This will ensure effective lubrication of all surfaces inside the pump.
The unit is assembled and can be returned to its place. For this:
- Return the timing belt to its place by pulling it onto the rollers. Don't forget to set according to the labels;
- Return the plastic belt protection to its rightful place, install the wheel;
- Now you need to crawl under the car to install the oil pick-up on the pump;
- Be sure to treat the crankcase with compounds, removing all fat. Treat with sealant;
- We recommend installing a new gasket on the crankcase, after which another layer of sealant is applied;
- The block is degreased, the crankcase is returned to its rightful place;
- To make it easier to attach it, tighten several bolts at different points, and then screw in all the rest;
- Protection is installed on the flywheel, the crankcase protection is returned to its place;
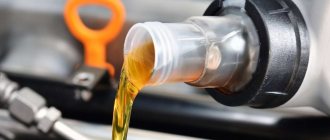
- Pour oil back into the system, start the engine, and allow the oil to distribute throughout the components.
If you carry out all the manipulations correctly and first determine that it is the pump that has failed, the warning light on the dashboard will go out.
The oil pump plays a huge role in the functioning of the engine’s lubrication system, so at the first sign of its breakdown, immediately go to the garage, or entrust the replacement to specialists from trusted service stations.
Didn't find the information you are looking for? on our forum.
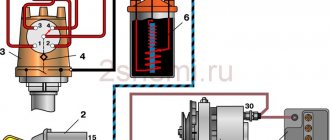
Symptoms of a faulty oil pump
The main signs of problems in the lubrication system are sounds uncharacteristic of engine operation and the oil pressure light coming on. In this situation, you should stop, turn off the car and after a while check the oil level in the engine with a dipstick (you need to wait a little until the oil drains into the sump). If the level is below the minimum, add oil and check the level again (it should be between the min and max marks). If the light goes out when starting the engine, the reason it came on was precisely the low oil level.
A burning oil pressure light indicates a problem with the lubrication system.
If, after adding oil, the extraneous sounds do not disappear and the light continues to light, you should not continue driving. Most likely, there is a problem with the oil pump and will require replacement or repair. You can get to the garage or car service using a tow truck or tow. However, the light may also be on due to a failure of the oil pressure sensor. Therefore, until an accurate diagnosis is made, you should not rush to repair the oil pump and start disassembling the engine.
Filming
- First you need to disconnect the negative cable from the battery.
- Draining the oil from the engine
- We take out the camshaft drive belt
- We take out the crankshaft toothed pulley, then its key, using two flat-head screwdrivers.
- Then remove the oil sump.
- Unscrew the oil intake mount.
- Using a 10mm socket with a ratchet and an extension, unscrew the six bolts securing the oil pump to the cylinder block.
- Remove the unit from the engine.
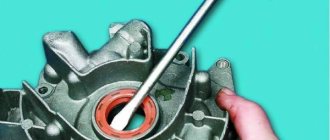
Be sure to wash the new oil pump with gasoline to remove grease for preservation. We fill it with oil before installation so that it does not rotate dry when starting. It is also important to turn the drive gear in order to place the pump on the crankshaft: so that the protrusions on the gear coincide with the groove on the crankshaft. Lubricate the seal lip with oil before putting the pump back. Carefully tuck the working edge of the oil seal onto the shaft journal using a wooden stick. Be careful and attentive when tightening the bolts so as not to strip the threads. Proceed in reverse order, install the remaining parts.
As can be seen from the above, this is not such a difficult job. The main thing for her is to approach it correctly and creatively. After all, proper lubrication is the basis for the longevity of a car.
Main causes of low oil pressure
The main reasons for low oil pressure on classic VAZ models are as follows:
- Using low quality oil or the wrong type of engine.
- Oil filter clogged.
- Malfunction of the pressure sensor (you can check it by measuring the pressure with a mechanical pressure gauge).
- Clogged oil receiver or failure of the oil pump.
- Damage to the oil receiver as a result of mechanical deformation of the oil pan.
One of the reasons why the oil pressure light comes on is a faulty sensor.
All these reasons can lead to failure of the oil pump and its replacement. When purchasing a new pump, preference should be given to original products and trusted manufacturers. Otherwise, the result may be unpredictable.
The actual life of an oil pump is determined both by the quality of the product itself and the quality of the oil and oil filter used. Its failure in most cases is associated with wear of the gears and drive axis. At the same time, the repair is quite simple. On a pump removed from the car, you only need to replace the worn elements with new ones.
Required tools + consumables
Here are the tools and equipment you will need:
- containers for draining used car fluid and antifreeze;
- set of wrenches and sockets;
- jack, winch;
- cardan, ratchet, extension;
- compressor or can of compressed air;
- wooden hammer;
- fine abrasive paper;
- special lapping paste and lubricant for bolts;
- fresh oil, antifreeze;
- new oil pump, filter, gaskets.
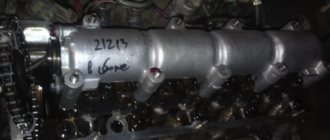
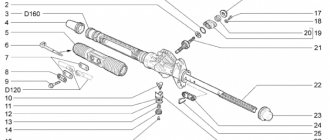
Features of disassembling the oil pump for inspection and repair
The photo below shows instructions on how to disassemble and reassemble the Priora oil pump. This process will be needed if it is necessary to check the parts of the device and replace them.
More details on how to disassemble the Priora oil pump, check it for suitability, as well as assemble and upgrade it will be described in detail in another material. You can find it on our website using the search or site map.
In conclusion, it should be noted that you should not put off checking, repairing or replacing the oil pump on a Priora. This material examined the signs of a device malfunction (both direct and indirect), its design features, purpose, and most importantly, how removal and replacement are performed. Using the instructions, you can perform the dismantling procedure yourself without the need to visit a car service center.
Why us?
Tiptronic car service is an experienced team of craftsmen with all the necessary equipment and tools. Reviews from satisfied customers and an impeccable reputation in the automotive service market speak for us. We will repair the automatic transmission pump or install a new one. Our specialists will cope with tasks of any level of complexity. Our advantages include free diagnostics when ordering repair work, the best price in the capital, a large selection of consumables and spare parts, and an individual approach to customer needs.
Contact us to agree on all the details of cooperation.
Replacing the oil receiver of a VAZ 2112
In this article we will continue assembling VAZ-2112 engine components.
Lubricate the sealing ring of the oil receiver with engine oil
It is advisable to replace the oil receiver O-ring
We install the oil receiver in place and tighten the bolt securing the oil receiver to the oil pump with a torque of 7.0-8.0 Nm (0.7-0.8 kgf m).
We tighten the two bolts securing the oil receiver to the cover of the second main bearing with a torque of 8-10 Nm (0.8-1.0 kgf m)
Cut off the protruding ends of the oil seal holder gaskets.
Lubricate the plane of the cylinder block with grease
Installing the oil pan gasket
If the pan is slightly deformed, it is better to coat the pan gasket with sealant.
We tighten the oil sump mounting bolts with a torque of 5-8 Nm (0.5-0.8 kgf m).
Install the key into the groove of the crankshaft
Installing the crankshaft timing belt
We put the timing belt on the crankshaft pulley
Install the washer on the belt drive pulley
We put on the generator drive pulley and attach the bolt and washer
We tighten the pulley mounting bolt, holding the flywheel on the other side with a torque of 97.9 - 108.8 Nm (9.90 -11.1 kgf.m)
We install the sealing gasket on the water pump and lubricate the gasket with grease.
Install the water pump into the cylinder block so that the factory marking of the pump is directed towards the mating plane of the cylinder block, since the mounting bolts are located asymmetrically.
Tighten the coolant pump mounting bolts to a torque of 7.64–8.01 Nm (0.78–0.82 kgf.m)
After this, install the cylinder head as indicated in the article - “Removing and installing the cylinder head.”
Running in the engine after assembly
The repaired engine is subjected to bench testing (run-in) without load according to the following cycle: 750–800 min -1. 2 minutes
1000 min -1 . 3 min
1500 min -1 . 4 min
2000 min -1 . 5 minutes
After installing it on the stand and starting the engine, check:
– whether there is a leak of coolant or fuel between mating parts and in pipeline connections; – oil pressure and whether there is any oil leakage through the gaskets;
If any unusual knocking or malfunctions are detected, stop the engine, eliminate them, and then continue testing.
If oil leaks through the gasket between the crankcase and the cylinder block, tighten the fastening bolts to the recommended torque.
If the oil leak continues, check the gasket and replace it if necessary.
If oil leaks through the gasket between the cover and the cylinder head, check the gasket and rubber bushings on the studs securing the cylinder head cover.
If necessary, replace the gasket and bushings, following the recommendations outlined in the article “Engine Assembly”.
After engine repair, a certain period of running-in of the working surfaces of new parts is necessary.
This especially applies to those engines on which the pistons, connecting rod and main bearing shells have been replaced, the crankshaft journals have been ground, and the cylinders have been honed.
Therefore, when running in a repaired engine, do not subject it to maximum loads.
Engine break-in should continue with the vehicle at the recommended speeds for the vehicle's break-in period.