Hi all! As I wrote a long time ago, I wanted to improve the power supply to the ignition module. This idea came after I accidentally came across an article by user mcsystem, for which I thank him. An additional fuse box was even installed, but another problem arose. My character does not allow me to get involved in the factory wiring; I like it when everything can be returned to stock without major problems. Therefore, I wanted to find the ignition module connectors and make a removable system. The connector that is inserted into the module was found in the store without any problems, but the mating part is more difficult to find. It was decided to rip the connector out of the dead module. But finding a dead module in my city turned out to be problematic. And paying 2 kilo rubles for a new one is stupid because of the connector. That's why the matter stopped.
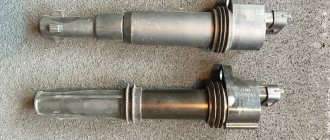
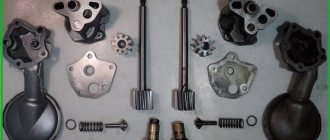
But the world is not without good people, and exclusive33rus sent me a dead module, for which I thank him very much! At the factory I took two wires with a cross-section of four squares, and real four squares, and not those funny wires that are sold in the store. Well, at the same time, two tips, with holes for 6 and 8 mm, since I still didn’t know which one I would put.
I tore the connector out of the module, measured the required length of wires and began soldering. And here’s a surprise - the metal that connects everything in the module is not soldered with anything! The metal is very shiny, like lead, and brittle to bend like aluminum. I was upset, but there was nothing to do, I had to think further. And then the OBD-II diagnostic KKL cord caught my eye, and I saw that the pins were the same! I disassembled it, found unused pins, heated them with a soldering iron and pulled them out. I pulled out solderless pins of unknown metal from the connector and melted the pins from the cord. I soldered it and decided to fill the soldering area with supermoment and soda. It was with great grief that I found superglue at home, but, as they say, it wasn’t diarrhea—it was scrofula, and there was no soda at home. It seems like such a thing that everyone has had for years and practically never used, but I don’t have it. It was late, the shops were already closed, there was no way to buy anything. And then I remember that on the balcony there is soda ash, which I used to make printed circuit boards using the photoresist method. I try it with superglue - everything is great! I fill the connector, and am faced with the second problem - the wire did not fit into the connector, so about five centimeters to the connector I had to slightly reduce the cross-section, from four squares it dropped to about 2.5, but I thoroughly tinned everything, so the losses will be minimal. I put everything in the corrugation and leave the wiring until daylight; it’s not very convenient to install in the dark.
As you can see, there is a relay in the circuit. Those who understand electrics, I think, understood immediately, but for the rest I’ll explain what I can do. So, there are four wires going to the module, two signal wires, through which the ECU gives the command to give a spark to the cylinders (1-4 and 2-3, respectively), and two 12 volt power supply. So the signal signals go directly from connector to connector, but the module’s power now goes to the relay, through which +12 volts goes directly from the battery with a thick wire.
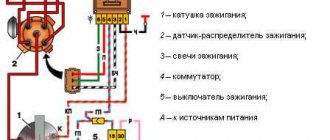
Pinout and diagram of the VAZ ignition coil
Pinout of ignition coil modules for various car models of the VAZ family:
Ignition VAZ 2101
1 – generator; 2 – ignition switch; 3 – ignition distributor; 4 – breaker cam; 5 – spark plugs; 6 – ignition coil; 7 – battery.
Ignition VAZ 2106
1 – ignition switch; 2 – fuse and relay block; 3 – EPHH control unit; 4 – generator; 5 – solenoid valve; 6 – microswitch; 7 – spark plugs; 8 – ignition distributor; 9 – ignition coil; 10 – battery.
Ignition VAZ 2108, 2109
Ignition VAZ 2110
Ignition VAZ 2111
Ignition VAZ 2112
Ignition VAZ 2114
Diagram of a non-contact ignition system: 1 – non-contact sensor; 2 – ignition distributor sensor; 3 – spark plugs; 4 – switch; 5 – ignition coil; 6 – mounting block; 7 – ignition relay; 8 – ignition switch.
General electrical circuit VAZ-2111
- Block lights;
- Sound signal;
- Engine cooling fan electric motor;
- Starter VAZ-2111;
- Accumulator battery;
- Generator;
- Reversing light switch;
- Electric drive for locking the right front door lock;
- Power window relay;
- Starter activation relay;
- Heater motor;
- Micromotor-reducer for heater damper drive;
- Windshield washer motor;
- Washer fluid level sensor;
- Electric drive for locking the left front door lock;
- Right front door power window switch;
- Electric trunk lock;
- Additional resistor for heater fan motor;
- Windshield wiper gear motor;
- Left front door power window switch;
- Electric power window of the right front door;
- Door lock system control unit;
- Outdoor lighting switch;
- Brake fluid level sensor;
- Electric window lifter of the left front door;
- Indicator lamp for turning on the fog light;
- Fog light switch;
- Instrument cluster;
- Rear window heating indicator lamp;
- Rear window heating switch;
- Understeering's shifter;
- Fog light relay;
- Ignition switch;
- Mounting block;
- Illumination lamp for heater control levers;
- Hazard switch;
- Automatic heater control system controller;
- Glove compartment lamp;
- Glove compartment lamp switch;
- Cigarette lighter;
- On-board control system display unit;
- Ashtray lighting lamp;
- Socket for portable lamp;
- Instrument lighting switch;
- Electric drive for locking the right rear door;
- Right rear door power window switch;
- Watch VAZ-2111;
- Electric window lift of the right rear door;
- Brake light switch;
- Electric window lifter of the left rear door;
- Left rear door power window switch;
- Electric drive for locking the left rear door;
- Side direction indicators;
- Parking brake warning lamp switch;
- Luggage compartment lighting;
- Individual lighting lamp;
- Interior lighting;
- Heating system temperature sensor;
- Switches in the front door pillars;
- Switches in the rear door pillars;
- Exterior tail lights;
- Interior tail lights;
- License plate lights;
- Rear window wiper motor;
- Rear window washer motor;
A — Pads for connecting the right front speaker; B — Pads for connecting audio equipment; B - 110: Blocks for connecting the rear window washer motor; G — Pads for connecting the left front speaker; D — Block for connecting the injection system wiring harness; E - Connector for diagnosing electric power steering; Ж - Connector for diagnosing the automatic heater control system; 3 — Pads for connecting the right rear speaker; I — Pads for connecting the left rear speaker; K - socket for connecting the on-board computer; L - to the electric trunk lock; M — Blocks for connecting additional brake signals; H - to the rear window heating element.
How to check the ignition coil of a VAZ
If the ignition coil is faulty, the engine will not start. A characteristic sign of a faulty coil is its increased temperature when the ignition is turned off. This is easy to determine by touch.
Signs of a faulty ignition module may include the following:
- hesitant engine starting or failure to start;
- failures during sudden changes in speed;
- high fuel consumption;
- two cylinders do not work, the engine is feverish;
- lack of dynamics;
- a sharp drop in power;
- drop in power and thrust after warming up.
These symptoms may not only be caused by the ignition module. To determine the malfunction, it is enough to spend a few minutes diagnosing spark plugs, high-voltage wires and caps. This will eliminate the remaining elements of the ignition system and make sure that it is the ignition module that is faulty.
What you need to know when working with the module
Before working with the module, you need to purchase aluminum flux. When replacing transistors, please note that it is very difficult to solder wires to the collector terminals, since they are coated with a special material. And it complicates soldering. To make your work easier, carefully open the spray. Try not to overheat the element. Place it on an aluminum plate so that all the heat goes into it. Otherwise, the semiconductor junction will be destroyed and you will ruin an expensive element.
When soldering wires, make sure that their length is as short as possible. All soldering areas must be coated with varnish, even for nails. After repairs, be sure to check the functionality of the VAZ-2110 ignition module. If it functions normally, then it is necessary to treat everything inside with auto sealant. This will ensure maximum tightness of the unit - neither water nor dust can get into it. And such a device will last for many years. But if the problem does not lie in the contacts or power transistors, it is better to abandon the repair idea and purchase a new module - on a VAZ-2110 it costs about 1,500 rubles.
Advice.
To quickly check the serviceability of the ignition system, you can use a spark indicator for engines with fuel injection. It is put on the spark plug and a high-voltage wire is connected to it. When checking, you must follow the instructions supplied with the device.
Comment.
The 21114 engine uses an ignition coil. The 2111 engine may have an ignition coil or ignition module installed (see Engine Management System). The ignition coil replacement is shown below. Replacing the module is done in the same way.
To do the job you will need a multimeter.
Execution Sequence
1. Prepare the car for work (see “Preparing the car for maintenance and repair”), turn off the ignition.
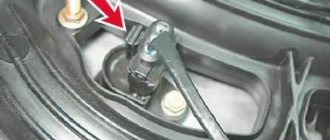
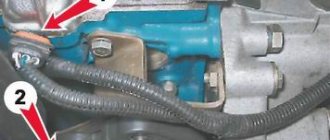
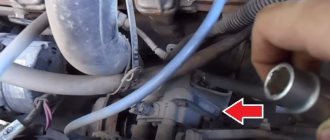
2. Having released the latch, disconnect the wiring harness block (1) from the terminals of the ignition coil (module) (2).
3. Turning on the ignition, use a voltmeter to measure the voltage between terminal 15 and ground (for the ignition coil) or between terminals C and D (for the ignition module) of the wiring harness block.
Warning!
After taking measurements, turn off the ignition.
Comment.
The voltage must be at least 12 V. If the voltage is not supplied to the block or it is less than 12 V, it means that the battery is discharged, the power circuit is faulty, or the ECU is faulty.
the ignition module is faulty
possible by replacing it with a known good one.
The ignition coil
can be checked with an ohmmeter.
4. Disconnect the high-voltage wires from the spark plugs (see “High-voltage wires of engines 2111 and 21114 (8V) - check and replacement”).
13 mm socket wrench
unscrew the two bolts of the upper fastening of the ignition coil (module) bracket.
6. With a 17 mm wrench,
Having loosened the lower bolt of the bracket, remove the bracket together with the coil (module).
7. Disconnect the high-voltage wires from the ignition coil (see “High-voltage wires of engines 2111 and 21114 (8V) - check and replacement”).
8. Using an ohmmeter, we measure the electrical resistance between the central terminal 15 and the housing (bracket). The device should show that there is no short circuit of the primary winding of the coil to ground. We sequentially measure the electrical resistance between the central terminal 15 and the outer terminals 1a and 1b. The resistance of each of the primary windings of the coil should be about 0.5 ohms.
Comment.
When measuring small values of electrical resistance (about 1 ohm), it is necessary to take into account the internal resistance of the device, which can be determined by shorting the ohmmeter probes.
9. Using an ohmmeter, measure the resistance between the high-voltage terminals of the coil 1 and 4, and then 2 and 3. The resistance of the windings should be about 5.4 kOhm.
A faulty ignition coil must be replaced.
5mm hex wrench
unscrew the four screws securing the coil to the bracket and remove the coil.
Comment.
10 mm socket wrench
with a deep head, unscrew the 3 screws securing it
11. Install the ignition coil (module) in the reverse order. We connect high-voltage wires in accordance with the cylinder numbers marked on each wire and on the coil (module) body next to the terminals.
Advice.
Since the numbering of the terminals on the coil (module) installed on the engine is not visible, it is better to connect high-voltage wires to the terminals of the ignition coil (module) before installing it on the engine.
Performs one of the main functions in the ignition system (IS) as a whole. Thanks to this unit, the engine starts optimally, as well as its normal operation in the future. You can learn more about device malfunctions, as well as its replacement, from this material.
Connecting and replacing VAZ short circuit
The procedure for removing and installing the ignition coil on old VAZ models:
- First, disconnect the central high-voltage wire leading to the distributor (ignition distributor).
- Disconnect all power wires from the coil contacts. Since they are fastened with nuts, you will need an 8 wrench for this.
- If you don’t know which wires to connect to which connector later, it’s better to immediately remember or mark them somehow, so that later during installation you can connect them correctly.
- Unscrew the coil housing. It is attached to a clamp (clamp), which is pressed to the car body with two nuts.
- After the work has been done, you can remove the ignition coil and replace it if necessary.
For new type VAZ cars:
- We remove the “minus terminal” from the battery.
- Remove the top protective cover of the engine. If the engine volume is 1.5 liters, then this part is missing and this step is skipped.
- We remove the high-voltage wires from the coil.
- Now, using a 13mm wrench, unscrew the two fasteners.
- Using a 17mm wrench, loosen one bolt securing the coil.
- We take out the module.
- Use a hexagon to unscrew the coil from the holder.
- Assembly is carried out in reverse order.
Particular attention should be paid to the connection, since high-voltage wires must be located in the strict order provided for by the design. If this is not done, the car will stall or the engine may not start at all.
Replacing the ignition coil on a VAZ is quite simple. Even a novice motorist can do this in his garage, and if everything seems too complicated, contact a car service center. Particular attention should be paid to the choice of product, since this will determine how well the engine and ignition system will work.
Modifications of VAZ-2111
- VAZ-21111 with an opening rear door, station wagon with a 1.5-liter carburetor engine.
- VAZ-21110 is equipped with an injection 8-valve engine with a working volume of 1.5 liters.
- VAZ-21112 station wagon with an injection 8-valve engine with a volume of 1.6 liters and a power of 80 hp. With.
- VAZ-21113 with a 16-valve injection engine with a volume of 1.5 liters.
- VAZ-21114 with a 16-valve injection engine 1.6 liters 89 horsepower.
- VAZ-21116 - 04 all-wheel drive station wagon equipped with a 2-liter Opel C20XE engine with a capacity of 150 horses. It featured enlarged wheel arch cutouts, a redesigned bumper skirt with integrated fog lights and an updated aerodynamic shield over the rear.
- VAZ-2111-90 "Tarzan-2" all-wheel drive station wagon built on the basis of the VAZ-2111, produced since 1999. Like the previous generation of Tarzans, the body of the VAZ-2111 car was placed on a frame from the Niva, the rear suspension of the car was independent.
VAZ models 8 and 16 valves
Despite the similarity in engine design, the ignition system of the 1.5-liter injection 16-valve engine differs from the 1.6 16-valve engine. The 1.6 liter engine uses an electronic contactless ignition system with individual coils on each spark plug. Therefore, there was no need for an ignition module. Such a system is more reliable and cheaper to operate, since if one coil fails, there is no need to replace the entire module.
The 16-valve 1.5-liter VAZ 2112 injection engine used the same non-contact ignition system as the 8-valve engine, but a different ignition module was installed. Its catalog number is 2112-3705010. The design of the module remains the same - two ignition coils (for cylinders 1-4 and 2-3) plus switch keys in a single block. The spark is supplied to the cylinders in pairs using the idle spark method. This means that sparking occurs in two cylinders simultaneously - in one on the compression stroke (working spark), in the second on the exhaust stroke (idle spark).
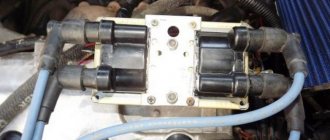
Diagram of the correct connection of wires to the ignition module
If, after checking the wires, you are convinced that they are all tightly connected to the spark plugs, let’s check that the wires themselves are connected correctly. Of course, if no one has climbed into the engine before you, then there is no point in checking. If there was traction and it disappeared, the reason could be both in the coil and in the wires themselves - they could be pierced. But in any case, let's check that the connection is correct. The ignition module shows the numbering of the cylinders to which the wires fit.
- 1 cylinder – central lower outlet
- Cylinder 2 – left output
- Cylinder 3 – top outlet
- 4 cylinder – right output
The diagram is shown for a coil installed on a vehicle.
If after checking no problems are identified, you should consider replacing the coil or wires. It is advisable to change both.
The cost of PVN, depending on the manufacturer, ranges from 300 to 600 rubles per set. The most popular manufacturers:
The cost of an ignition coil is from 1300 to 2500 rubles. Modules from the following companies can be found in stores:
When choosing a module, you should pay attention not only to the manufacturer, but also to the coil itself; it comes in old and new designs. Therefore, it is better to dismantle yours and bring it to the store.
Video on repairing KZ VAZ
Often, when the ignition module breaks down, the car owner immediately runs to the store and buys a new one. But, for the VAZ-2112 there is an alternative method - repair. Of course, without proper knowledge in auto electrics, it will be difficult to understand all the circuits and communications. This article will tell you in the most accessible way how to repair the ignition module with your own hands.
Checking the Ministry of Health with your own hands
There are several options for checking the device yourself at home; let’s look at the simplest one.
To carry out independent diagnostics, you need to know what the wires connected to the module are responsible for:
- red-blue - provides 12-volt power to the device;
- the brown wire is ground, usually connected to the car body;
- white-blue - connects to the spark plugs of the first and fourth cylinders;
- the red-gray wire connects to the spark plugs of the second and third cylinders.
Scheme of the VAZ module
First, you need to check with your own hands that all pulses are sent to the ignition device 2112:
- First of all, you need to turn off the ignition and disconnect the connector.
- Next, the key in the lock must be moved to position I.
- Now you will need a dial voltmeter; it must be connected to the negative terminal of the battery.
- With the second probe, that is, the plus one, you need to find the 12-volt contact on the connector.
- When connected to the control contact, the arrow on the tester will show almost 0.
- If the starter unit starts working, the parameters may increase, but they will not exceed 0.7 volts. Please note that the voltage level at both control contacts must be identical.
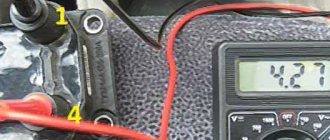
There is another test option - you can diagnose the functionality of the module using a pointer ohmmeter. In this case, we mean a pointer tester, not a digital one. First you need to connect the probes of the device to pins 1 and 4 of the module, and after that to pins 2 and 3. Ultimately, the diagnostics should show the same result.
Please note that depending on the manufacturer, these parameters may differ:
- for devices manufactured by ATE-2 with number 3705010-02, this parameter should be about 5-6 kOhm;
- for SOATE modules with number 3705010-12, diagnostics should show 12 kOhm.
If the obtained indicators differ from those described above, then the module must be replaced. Please note that the inductance of the coils installed inside the MZ is quite high, therefore, connecting an ohmmeter, a spark may slip. Therefore, when diagnosing, we strongly do not recommend touching the probe leads at the same time (the author of the video is Avtoelektika HF).
Module design
Before you begin repairing the ignition module, it is worth understanding what it consists of. So, let's look at the design of this element:
- Two ignition coils that generate a high-voltage pulse.
- Dual channel switch.
If there are problems with the operation of the ignition module, there are reasons for this. It is worth warning that in the event of a malfunction, the “Check Engine” warning light will not light up: engine stops, loss of spark, interruptions in the operation of the power unit, etc.
For diagnostics and repairs, basic knowledge is required not only in conventional electrics, but also in the principles of auto electrics. Also, for a successful process you will need skills in working with a digital multimeter.
Repair process
Often, the high-voltage pulse disappears in cylinders 2 and 3 . So, to begin repairing the ignition module, of course, you will need to dismantle it. To do this, disconnect the high-voltage wires and unscrew the assembly itself from the fastenings. When the preparatory operations are completed, you can proceed directly to the repair process:
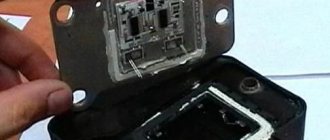
- We tear off the aluminum plate.
Use a screwdriver to open the aluminum plate
Scheme of soldering wires and arrangement of elements on the boards
Diagram of the assembled ignition module
Completely assembled ignition module
Video about repairing the ignition module on a VAZ-2112
The video material will tell you about repairing the ignition module, as well as how to remove it from the car.
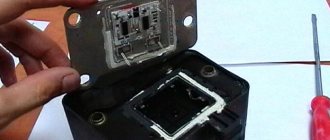
Fuse and relay box
The VAZ-2111 relay and fuse mounting block is located on the left side of the steering column in the instrument panel. To access the unit, press the latch switch and lower the unit down.
K1 - lamp health monitoring relay;
K2 - windshield wiper relay;
KZ - relay-interrupter for direction indicators and hazard warning lights;
Principle of operation
How to check the ignition module? To test this system you need to know how it works. Knowing how it works will help you test all components correctly. You will also be able to notice the problem in a timely manner.
The main task of the module is to generate a high-voltage pulse, which in turn is supplied to the spark plugs. To ensure full engine operation, the module produces 2 sparks simultaneously. One of them enters the cylinder, where the compression stroke ends, the other goes to the other spark plug, where the exhaust stroke occurs. There are usually 2 coils.
The spark plugs of the 1st and 4th cylinders are connected to one of them, the 2nd and 3rd are connected to the other. Power is supplied from the positive wire of the on-board network, the negative is connected from the body. If you look in more detail, you will notice that the coils are high-voltage transformers.
Together with a pair of coils, the same number of control units works. Each transformer has 2 terminals for spark plugs. All components are housed in a plastic case.
The assembled device weighs about a kilogram, it all depends on the specific model. The module is connected to the spark plugs via high-voltage wires. This ensures high-quality transmission of the impulse necessary to generate a spark. Sometimes the module is mounted directly in the engine control unit.
In this regard, sometimes an ECU malfunction is mistaken for a failure of the ignition module. The module can operate in almost any conditions. The permissible temperature range is from -40° to +130°.
conclusions
Thanks to this simple procedure, you can quickly check the performance of the ignition coils on a VAZ-2112 with your own hands, without resorting to the help of special diagnostic stations and specialists.
You will need a 5mm hex key.
If the ignition coil is removed to gain access to the coolant drain hole from the cylinder block, then it is necessary to remove the coil along with the bracket (see “Replacing the ignition module on engines 2111 and 2112”)
I think that there is no need to talk about the fact that VAZ 2110, 2111 and 2112 engines come in both 8 and 16 valves. In previous articles we have already looked at the process of replacing a module with an 8-cell one. motor. Today we’ll look at the example of another power unit - 16V.
On the one hand, this is convenient, and if one of them fails, you won’t have to change everything. On the other hand, maintenance is more expensive when replacing all these parts at once.
It’s quite easy to do the replacement yourself and for this you will need:
- socket head 10
- extension
- ratchet handle
Instructions for replacing the module
If checking the VAZ 2112 ignition module showed that the device needs to be replaced, then you can change the ignition module yourself.
The replacement process looks like this:
- Initially, you should turn off the power to the on-board network; to do this, you just need to disconnect the negative terminal from the battery. Many car enthusiasts neglect this step, although in fact it is very important. If you do not disconnect the battery, a short circuit may occur as a result of moisture or other external influences during repairs. And if this happens, then there is a chance that you will have to completely change the wiring in the car. So, to reset the battery terminal, you just need to unscrew the bolt that secures it with a wrench.
- Having done this, you will need to disconnect all high-voltage wires connected to it from the module. At the same time, you need to remember their location so that during installation you do not accidentally confuse them, which, again, can be fraught with danger for the entire system as a whole.
- After completing these steps, you will need to disconnect the connector with wires from the device itself. To do this, grab the block with your hand and press the latch with which it is attached - the fastener is located at the bottom, you can feel it with your hand. Having done this, you will need to remove the block and put it aside so that it does not interfere with you in the future.
- So, now you have two options - remove the device together with the mount or remove it separately. The first option is usually relevant in cases where, in addition to replacing the MZ, you need to perform other repair actions, for example, to get to the antifreeze drain hole of their cylinder block. Of course, it will be more convenient to dismantle the module separately, but then access to other parts and elements will be blocked. To dismantle you will need to unscrew the nuts with your own hands that secure the device to the bracket. Depending on the car, the nuts can be different; for example, they can be made in the form of hexagonal studs. If so, you will need a hex wrench to unscrew them. In any case, after unscrewing the nuts, it is necessary to dismantle the module from the seat.
- The procedure for installing a new module is carried out in a similar way, only in reverse order. When connecting with your own hands, be careful and be sure to correctly connect all the wires that connect to the module from the spark plugs . If at this stage you mix up the cylinder numbers on the high-voltage cables, the power unit may not work correctly or may not start at all.
Photo gallery “Replacing the MZ with your own hands”
1. Disconnect the wires from the MZ.
2. Disconnect the power plug.
3. Unscrew the nuts and dismantle the MZ.
Price issue
The cost of the device directly depends on the manufacturer. For example, the price for a new MZ from the manufacturer SOATE is about 1,700 rubles. A module from the manufacturer BOSCH will cost around 2 thousand rubles, and from General Motors - about 5 thousand rubles.
Loading …