Cars of the Kalina-2 family are equipped with a steering rack similar in design to the Granta rack. This part transmits force from the steering wheel to the front suspension links. If you feel a knocking sound from the rack while driving, it needs to be adjusted (tightened) correctly. The effect described here can be observed after 10-15 thousand kilometers, and more often it makes itself felt on uneven roads. Next we consider how this problem is solved in practice. And the solution comes down to turning one nut.
A little theory: front suspension design
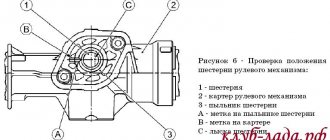
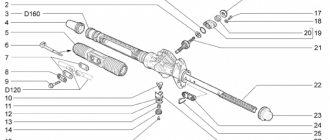
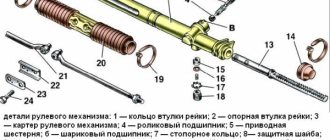
Before attempting to fix any problem, there is a tendency to look at the blueprints or repair manual. It is known that the VAZ-2192 parts catalog contains the following object:
This is what the steering rack looks like in the drawing
Whether the knock will remain in the steering rack of Kalina-2 depends on the following: how accurately element “14” is adjusted. The adjusting nut, marked “14”, looks almost invisible here. But first impressions are deceiving. In the catalog, by the way, the element is called “Stop Nut”.
It is important to know that the thrust nut has external threads. And it spins clockwise. And the words “tighten the rack” mean screwing in the specified nut, and nothing more.
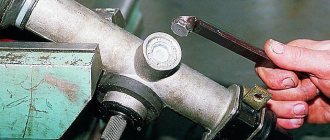
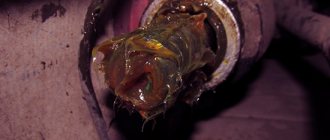
Now let's move on to practice and see what the node in question looks like in reality:
If you remove the rail, it looks like this
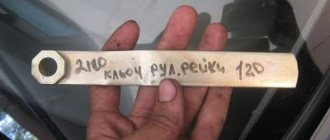
The nut has a non-standard notch, and it can only be rotated with a special tool. By the way, the recess will be closed with a cap. In the catalog it is designated by the number “15”, and now, let’s look at the appearance of the special key:
Rack adjustment key
The thrust nut is turned at small angles. We are talking about values of 10-15 degrees. What happens if you overdo it with tightening the rack? The knocking noise will disappear, but the steering wheel will turn with difficulty. Therefore, if necessary, the nut can be pulled back.
FakeHeader
Comments 15
I didn’t bother with this bushing with crackers, I just stuffed it dry with plastic, I’ve been driving for almost a year without ever tightening the rack, no knocks or rattles
What's wrong with this drawing?
Where did you get this drawing from? Maybe I can ask there? Another option is to look at the store and check the size fit there. I think the seller will not mind.
yes, I dug it up from someone on the drive
I think this is crap
Do you judge by clothes? Talk to a person, ask questions.
I don't want to drill
Is not it so? I personally checked all the dimensions of this drawing. I found it on the prioroforum, but with crooked dimensions. They sharpened it for me twice to different tolerances. The current dimensions are correct.
I also wanted one for the rail - they promised to make it for me for 800 rubles - but somehow the redneck crushed it. The last time I went through it, I installed 2 from the repair kit. One was in its place, the second one followed it, only the convex pips on it were cut off otherwise it wouldn’t fit. To prevent it from falling out, I drilled a couple of thin holes through the rack body to get into the second bushing and screwed short screws into them (so that the bushing would not move to the side). I did the same thing in the spring - until the ride is bouncing (I also threw the SS 20 washer). The steering wheel has actually become a little tighter - but now it’s getting used to it over time and is almost unnoticeable.
So we got to the steering rack. Patience, or as the Americans say, tolerance
mine has come to an end. The knocks from the front are really annoying.
Remove the steering rack. The removal was carried out together with the rods through the left opening. I won’t describe the removal process; I didn’t take any photos. You can read the filming process without photos here: www.drive2.ru/cars/lada/k…/turbo-777/journal/40577/. Or “smoke” the manual for removing the rack in the primer for Kalina.
We bit off all the ties and removed the anthers. We looked inside. And what's there? Yeah, it's dry...
We cleaned everything inside, removed the grease that was previously applied to the steering rack without removing it on site. I wrote about this here: Lubricating the steering rack without removing it on site
I installed a new disc spring, the old one was dented. I didn’t take any comparison photos of the spring, but it looks something like this:
As you can see in the photo, the rack rod is smooth and without development. There is no rust, as some had.
I purchased a key in advance to adjust (disassemble) the steering rack. This key is so squishy that it bent when disassembling the rack.
We didn’t have to ask for it (the key) for a long time; we sawed off the standard handle (6mm rod) and sanded it down to a 15-point key-head. Now this is a real key that inspires confidence))) True, it’s not convenient for them to tighten the rail in place, but more on that later.
A repair kit has been purchased. The bearings turned out to be completely durable, so they were not replaced.
We put all the parts of the rail in their place and filled it with lithol. We put on all the casings, the stitch width was not enough, we had to increase it.
We quickly put together this key. They can crawl up to the installed rail and adjust it. Use the same “head” for 15, which was welded and sawed in half.
The steering tips were very bad, they were quite wobbly. They replaced them too
We install the rack on the car. Instead of the standard rack fasteners, we install USHP - a front panel amplifier. As expected, the knocking disappeared.
In principle, the inspection of the rack could not have been carried out. Limit yourself to only stuffing lithol (well, who likes special lubricants) into the middle part of the rack under the central hoop, as well as installing a disc spring, and of course, tightening the rack itself.
Lyrical digression
In Lada Kalina, the steering rack never makes a knock when we are talking about a new car. This is also true for the break-in period. Let's say in your case this is not done. Then, do not try to repair anything, but go straight to the dealer. According to reviews, the defect in question is covered under warranty, and most car dealers do this: the steering rack assembly is replaced with a new one.
This is what the replacement unit looks like, the rack assembly
There is a logic here. At the factory, adjustments are made correctly (this is true in 99.9% of cases). If a defect appears, the dealer replaces the assembly without expecting that adjustment will solve the problem. The owner does not need to hope for this either. The choice is yours.
Repair, price
A lift is a fairly simple and quick way, but often it is only a partial, temporary solution to the problem. After all, the appearance of play can be caused by various reasons - the boot may be damaged, gaskets may leak and who knows what else, that is, there is a high probability that the steering rack is running dry. In this case, there is a risk that a short time after tightening it may simply jam. Therefore, troubleshooting the rack will be very useful, at least an external inspection, it will make sure that the anthers and corrugated casing are not damaged.
If you suspect the need for repairs, consider whether you can handle it yourself. Get ready for the fact that you will have to spend the whole day in interesting positions, and you will also need an assistant to perform some operations. Do you know how to install the rack so that the steering wheel is level? If not, you risk having to do the installation again.
An alternative is a service station. They will charge you around 3,500 rubles for repairs, 200 rubles and another 200 will be spent on anthers and so on.
The easiest option is to buy a new rack, complete with rods for about 6,000 rubles, there are, of course, racks with bells and whistles (short-stroke, sports, etc.), these cost about 10,000 rubles, the choice is yours.
Love and respect your steering rack and it will love you back!
Making adjustments yourself
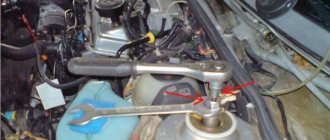
You can access the adjusting nut from the engine compartment, but to do this you will need to remove the battery, as well as the battery mounting pad. It is better to drive the car into a pit and then remove the crankcase protection (engine mudguard). If you look from under the bottom, the required element is immediately visible:
You need to turn this nut
And when you open the hood, you can feel the nut, but not see it. Its location is marked in the figure:
To make adjustments, place the key here
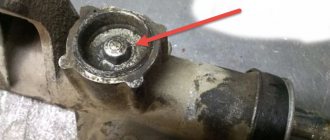
Before adjustment, remove the rubber cap from the recess. Its appearance is shown in the photo:
Remove the cap and install the key
If it is not entirely clear what exactly needs to be done, it is better to contact the service. The key is installed in the recess and then rotated 10-15 degrees.
When looking at the rack from above, turning the key clockwise corresponds to unscrewing it. The handle of the key comes from the center of the car - which means tightening is being done. By the way, the latter is true provided that the handle faces forward.
Adjusting the spring and power steering
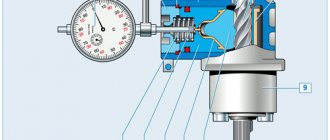
Very often, the cause of a knocking sound when turning the steering wheel is a weakening of the pressure spring. It provides the required force for pressing the steering rack gear against the main shaft gear, which is set at the factory by adjusting and fixing the spring. As the vehicle is used, the spring loses its elasticity and relaxes.
In order to increase the pressing force of the spring, it is necessary to tighten it, which is done after disconnecting the steering mechanism, but without removing the steering rack. Repairing the steering rack in this case consists of setting the required gap between the rack and the shaft gear. The steering rack is installed in the middle position and is secured against movement.
The rubber plug is removed, and the indicator probe is placed in the hole of the stop adjusting nut so that it comes into contact with the rack stop. It is better to use a dial indicator. Then, turning the gear shaft that pushes the stop, the indicator measures the size of the stop's movement. The length of movement should not exceed 0.05 mm.
If this value is exceeded, it is eliminated by turning the adjusting nut. The steering rack is fixed in the position corresponding to the required clearance, and the ease of rotation of the pinion shaft is checked within the entire possible movement of the rack.
The adjustment nut is rotated using a special wrench for adjusting VAZ steering racks. It is not recommended to tighten the nut too much, which can have a negative effect when turning the steering wheel at maximum speed. If there is play when turning the steering wheel, the spring can be tightened by practically selecting the correct force.
In this case, initially the adjusting nut is turned by 20-25°, and the presence of knocking is checked when the rack is turned. If the noise is not eliminated, then tighten the nut again by 10-15°, and so on until the knocking noise is eliminated. If tightening the spring does not help, the steering rack needs to be repaired.
Adjusting Kalina's electric power steering is best done after removing the steering rack, but it can be done without dismantling with some inconvenience. The car is placed on the repair pit so that from below there is access to the mounting of the front part of the amplifier.
The clamping nut is tightened by turning clockwise from below, and when tightening the nut from above, respectively, counterclockwise. For the purpose of prevention, you should check the condition of the oil seal, since when the steering wheel is turned too much, the oil seals quickly wear out. At the same time, all elements are lubricated, especially the steering rod boots.
Preparatory actions, dismantling unnecessary parts
To remove the crankcase protection, you need to unscrew 4 screws located in one row near the bumper. Also, unscrew two screws having a standard size of M6x16. In some configurations, the protection consists of two parts, but in this case they are attached only with self-tapping screws. These words are illustrated by the following photo:
First, unscrew the “10” screws, and then the two “18” screws. In the second case, there will be more screws (eight).
Now let's look at how to remove the battery. First of all, disconnect its terminals. Then, you need to move the additional fuse box to the side. In general, actions are performed according to the photo:
It turns out that the steering rack can be repaired (video example)
The knocking of the steering rack on the Grant was inherited by this car from the younger model - Kalina. In fact, the design of the rack is no different and the catalog number remains the same. As for adjusting the steering rack, you can do it yourself, having the necessary tool at hand:
- special wrench for tightening the rack
- 10mm socket and ratchet (for unscrewing battery terminals)
- 13 mm socket - for removing the battery pad
- Phillips screwdriver
Installation of the Kalina steering mechanism
Before installation, check that the rail is installed in the middle position. To do this, using sliding pliers, use the flat on the gear shaft to rotate the shaft in any direction until it stops, then turn the shaft in the opposite direction two full turns and turn the shaft so that the flat on the shaft is located vertically on the right side along the direction of the car. Otherwise, the installation of the rack is carried out in the reverse order.
Thus, it will take at least 1 hour to replace the steering rack on Kalina. If it is not possible to repair it, then you will have to buy a new one. The steering rack of the Lada Kalina is the same as the rack of the Priora or VAZ 2110-2112 of the new model and has a catalog number: 11183-3400010 (rasp inside 21100-3401068). Price approximately 3500 rub. For Kalina Sport:
- 11183-3400010-10 inside rasp 11183-3401068-00 (3.1 turns)
- 11183-3400010-12 inside rasp 11183-3401068-01
- 11183-3400010-01 without EUR inside rasp 21100-3401068-00 (4.1 turns)
- 11183-3400010-10 with EUR inside rasp 11183-3401223-00
How to tighten the steering rack on a Lada Granta
So, there are two ways you can go:
- The easiest and fastest way is to tighten the rack using a special key, inserting it into the hole where the steering rod passes on the left side of the Granta body.
- The second method is longer - it is suitable if the hand does not fit into the hole in the body from the wheel side. In this case, you will have to remove the battery and its platform to get to the adjusting nut.
So, with the first method everything is clear; as for the second, let’s consider it in more detail. First of all, unscrew and remove the terminals from the car battery.
Then we remove the battery and proceed to dismantling its platform.
Now that the platform has been removed, you need to get to the adjusting nut from the inside of the steering rack housing.
The rack is tightened clockwise, take into account the fact that it is in an inverted state, so the movement will be counterclockwise.
Please note that to adjust the rack on a Grant, you need to buy a special key, which is designed for the VAZ 2110 rack. Its price is no more than 150 rubles, and sometimes they are sold combined: on one side for the rack, on the other for the timing rollers.
Lada Granta was originally created as an inexpensive car. Actually, that’s why it became one of the most popular cars on the roads. The manufacturer tried to introduce both proven and new elements into the design. But they have their drawbacks. The Lada Granta steering rack can present various surprises during operation. It is useful for the owner of a domestic car to understand the structure of many components.
Correct fault determination
Before starting work, you need to read the provided operating instructions for the vehicle, which explains how to disassemble a faulty steering rack.
After this, you can proceed to direct diagnostics:
- The right edge of the rack should shine, otherwise a steering rack repair kit is needed.
- The presence of even the slightest traces of rust, which will act as an abrasive material, is not allowed.
- You should check the integrity of the bushing: if it knocks or shows signs of wear, it needs to be replaced.
- It is necessary to carefully inspect all the fasteners: if places with loose clamps are found, tighten them.
You need to be very careful with the last factor. Excessive physical force will only do harm here. If you decide to diagnose and replace it yourself, you must use lubricant and a wrench. A heavily threaded bolt or nut simply requires the use of oil. In some cases, it can be moved 1-3 divisions, but do not despair. This is enough for a visual inspection.
If no signs of physical wear or rust are detected, you can return the nut to its place with your own hands. This will require a wrench and extreme concentration. Carefully pull the element to the desired level and fix it. There is 1 practical tip associated with the mentioned element: when driving intensively, you need to tighten the steering rack nut every 6 months.
There shouldn’t be any difficulties, because information on how to tighten the part is contained in the vehicle’s operating instructions.
Steering of Lada Granta
It is designed to control the car while driving. Structurally, it consists of the following main elements:
The work of the mechanical part is that the driver acts on the steering wheel, the impulse through the steering mechanism and rack transmits force to the front wheels through the levers, and the car turns in the desired direction. A characteristic feature of a passenger car steering wheel is its smaller diameter (compared to a truck). The design of the mechanism also differs. The steering of the Lada Granta is complemented by an electric booster. The steering wheel can be adjusted in height. Unfortunately, there are no settings for departure.
The steering mechanism of the Lada Granta is rack-and-pinion type, the simplest and most inexpensive option.
The drive is mechanical, structurally consisting of levers, rods and hinges. For more efficient and convenient control, the Lada Granta is equipped with an electric amplifier. This is a complex mechanism that provides force through the use of electricity. An electric power steering, or simply EPS, is used to improve dynamic characteristics and controllability. And, according to some data, it allows you to save fuel by increasing the vehicle’s maneuverability.
Steering rack adjustment
The unit knocks for various reasons. In fact, this is a real disease of the control mechanism, inherited from the Lada Kalina, since the components are identical on these cars. You can adjust the rack yourself.
To do this you will need a minimum of tools:
- steering rack calibration key;
- socket heads for 10 and 13;
- shaped screwdriver.
To tighten the slats, you can use two methods. The first involves using a special key that can be inserted into the gap of the arch on the left side. The second method is more labor-intensive and is suitable if it is not possible to stick your hand into the gap. To do this, you will need to dismantle the battery and its platform; this is the only way to get to the nut for tightening the gearbox. The first method is simple, so it’s better to consider the second option.
Causes of extraneous sounds, removing the rack
Situations often arise when, when turning the steering wheel of the Lada Kalina, you can hear something knocking and rattling. Such extraneous sounds can be heard constantly or appear after a long period of parking. If something rattles in the steering mechanism, then you should find out the causes of these noises. They often occur due to wear on the ball joint. Such a defect may result in the impossibility of traffic movement, and the part will need to be replaced in a timely manner.
The cause of knocking or squeaking of the steering wheel is sometimes damage to the grenade. If the steering racks are faulty, in addition to knocking, the steering wheel kicks back or signs of the steering wheel biting appear. In this case, the steering rack will need to be adjusted or repaired, and possibly replaced. Noises appear when the shock absorber bushings wear out. The knocking noise may be caused by loosening of the bolts securing the crankcase.
The design of the Kalina steering system is such that tightening the steering rack and adjusting the spring can only be done after removing the rack. It is removed in the following order. The front part of the car is raised using a lift or trestles. From the interior side, the bolt for the splined fastening of the steering column is turned out.
The mounting location is located below the pedal block. The front wheels of the car are removed. Then the nuts of the rotary cams are unscrewed and removed. The battery is removed from under the hood along with the platform. The heat reflector is removed. Finally, the nuts securing the steering rack to the body are unscrewed. After this, the rail can be removed out.
When disassembling, adjusting and repairing the Kalina steering rack, you will need the following tool:
- special key for adjusting the VAZ rack;
- dial-type gap indicator;
- screwdriver, pliers, set of socket wrenches and wrenches;
- hammer;
- mallet;
- steering wheel end remover;
- calipers;
- chisel;
- brush.
Any extraneous sounds when turning the steering wheel should make the driver wary. It is necessary to immediately find out the reasons for their appearance. Repairing and adjusting the Kalina steering rack can improve driving safety.
Steering wheel tuning on Lada Granta
There are few options for upgrading the steering wheel on the Lada Granta. The most popular of them is installing a sports version. Such a steering wheel will not only make the interior more attractive, but will also increase the comfort of control, especially if it is selected correctly. You can install a multi-steering wheel, but only if the configuration is maximum, in other cases there will be nothing to control with its help.
The sports version must be injury-proof, that is, in the event of an accident it must be deformed without causing damage to the driver. Among the shortcomings, it can be noted that although there is an airbag in the standard steering wheel, the sports one does not have it. You can also modify the steering wheel by installing braid. More advanced ones install a heating thread under it.
To install the sports steering wheel, you will need to carry out the following operations.
- Align the front wheels straight (you can drive a little forward and back so that the trajectory is straight).
- Disconnect the battery terminals by de-energizing the vehicle's on-board network.
- The airbag control module must be disabled (if the Granta equipment is equipped with it). If you do not turn it off when removing the factory steering wheel, it may shoot out.
- Remove the steering wheel and install a horn on the adapter. The wiring must be stored in the adapter; to do this, carefully inspect all contacts.
- Connect the adapter to the shaft, but do not secure it with a nut.
- A sports steering wheel is installed on the adapter and secured with special screws.
You cannot throw away or sell the factory product; the sports version will raise questions when passing inspection.
How to replace the EUR on Kalina
The electric power steering is attached to the steering column and removed along with it.
Procedure for replacing the EUR:
- Disconnect the car battery terminals.
- Align the front wheels straight.
- Remove the lower cross member of the instrument panel.
- Disconnect the wires from the electric power steering control unit and the switches that are installed on the column.
- Lower the steering wheel to the floor.
- Unscrew the nut of the bolted fastening joint that connects the lower cardan shaft and the PM gear shaft.
- Disconnect the hinge connection.
- Using a flat-head screwdriver, remove the intermediate cardan from the pinion shaft of the Kalina steering mechanism and remove the column along with the EUR.
- We install a new EUR for Kalina and assemble it in the reverse order.
To ensure safety, spare parts for such critical components as the steering mechanism should only be replaced with original ones from the Lada Kalina manufacturers.
Until the malfunctions of the steering mechanism of any vehicle are eliminated, further operation is prohibited.