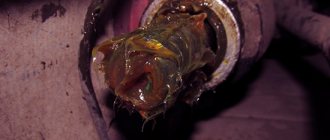
Car : Lada Kalina. Asks : Petrov Sergey. The essence of the issue : When driving on a rough road, a knock appeared in the steering rack!
Hello! I had this problem! When driving on an uneven road or, for example, when driving on crushed stones or just stones, a knock appears in the steering rack! I can just feel how everything is going into the steering wheel. Tell me how to fix this and is it possible to somehow fix this problem?
Malfunctions of RM Kalina and ways to eliminate them
Even the most reliable mechanisms wear out, especially if they are not protected from dust, dirt, water and aggressive environments. Although the steering rack of the Lada Kalina is located under the hood of the car and is protected from below by a pallet, during operation, especially in off-road conditions, it is exposed to all of the listed factors. The main malfunctions of the PM can be grouped into three groups:
- large free play of the steering wheel;
- knocking, noise and creaking in the mechanism;
- tight steering wheel.
Increased play, squeaks and knocking of the Kalina PM can be caused by:
- loosening the tie rod nuts,
- wear of their tips and silent blocks,
- loosening the PM fastening nuts,
- large gap between the rack and the adjusting nut.
These faults are easy to fix: you need to tighten the nuts and pin them where necessary, and replace the silent blocks with new ones.
Difficulty turning the Lada Kalina steering wheel can be caused by more serious reasons:
- wear of the bearings of the upper support of the steering column upper universal joint,
- damage to the rack support bushing,
- failure of the telescopic strut of the front suspension,
- faulty electric power steering or low tire pressure.
Many Lada Kalina owners are interested in whether it is possible to replace the standard rack with a mechanism of a different design. It's possible, but not necessary. The manufacturer does not structurally provide for the replacement of the rack and pinion steering mechanism with other types. Worm or screw PMs simply won't do. To facilitate steering wheel rotation, an electric power steering is installed on all Kalina models.
Design Features
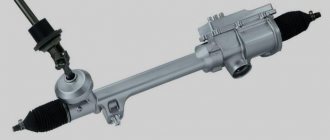
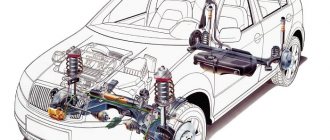
The steering system of the Lada Kalina includes an electric power steering and a steering column that is adjustable in height and tilt. The steering mechanism is a steering rack with a variable transmission ratio. The rack engages with the engine crankcase through a gear having helical teeth, the pitch of which varies along the length of the rack. The figure shows the design of the Kalina steering rack.
The steering rack on Kalina is pressed against the gear by a spring. Friction is reduced by a plastic insert. The spring pressure is changed with an adjusting nut (the factory-set gap between the rack and the shaft is 0.1 mm). The second end of the rail rests against a plastic sleeve. Adjusting the gap helps eliminate knocking noises.
The steering system shaft is installed in bearings (one in the column bracket, the other in the electric booster housing). The column bracket is attached to the pedal bracket (front) and to the body bracket. The column bracket with the pipe is connected in the form of a hinge of two plates, which allows you to change the position of the steering wheel, and the range of movement is limited by the slots in the plates.
To fix the position of the pipe, there is a lever connected to the adjusting sleeve. It is screwed into a coupling bolt located in the slots of the plates. When you turn the lever, the bushing rotates, loosening the fixation of the plate, which allows you to change the position of the steering wheel. Springs between the plates and the bracket pull the pipe up when the fastening is loosened.
The steering system of the Lada Kalina has two tie rods and swing arms. The rod consists of external and internal tips and an adjusting threaded sleeve, which, when rotated, changes the length of the rod. The required adjustment of the rods is fixed with bolts. The rod is connected to the swing arm using an external tip that has a ball-type joint.
Kalina's electric power steering reduces the force applied to the steering wheel. It is assembled on the basis of an electric motor with a gearbox located under the steering system casing. The amplifier is controlled by an electronic unit that receives signals from sensors of vehicle speed, shaft rotation and steering torque.
The principle of operation of the amplifier is based on the fact that when the car is stationary, the torque on the steering shaft is the greatest, and when moving, it decreases with increasing speed. There is a power steering indicator on the dashboard.
Causes of bearing failure
The main cause of support bearing failure is dust and water, which inevitably penetrate inside. The lack of lubrication does not have the best effect. Sharp blows to the rack will not add to the service life
It is worth taking into account the quality of roads, because they have a direct impact on the natural wear of the support bearing. That is why with us, a part can wear out faster than its manufacturer claims
Dirt and sand are some of the hardest impacts on a bearing. We remember that a journal bearing is a type of rolling bearing, and it does not have any protection mechanisms against harmful factors. Driving at high speeds and harsh brakes, especially on bad roads, also do not add to the service life of the part in question. However, not only the bearing itself suffers from this, but also all other suspension elements as a whole will soon require repair.
Pressure spring
As you can see, the steering rack (“Kalina 2117”) has a very simple design. Therefore, adjusting and replacing it should not pose any difficulties. In general, this is true, but the Kalinovskaya rack has one small part in its design - a pressure spring, which regulates the force of contact between the device and the gear. This spare part is a kind of cone, but during operation it quickly loses its elastic properties, and the functionality of the spring is significantly reduced. Therefore, there is a need to periodically tighten this mechanism in order to restore the necessary forces. By the way, this spring can only be seen from the inspection hole, which greatly complicates the work of adjusting it.
The tightening itself is done using a special key, but due to the design features of the model, this is very difficult to do, since it becomes necessary to dismantle the steering rack. Below we will look at how this is done.
Diagnostics of the condition of components and troubleshooting
After carrying out a visual inspection of the suspension of the Lada Kalina, which will allow you to find out the cause of the knocking, you can proceed to dismantling the faulty elements. For example, car shock absorbers. Diagnostics are carried out by placing the car over an inspection hole or using a jack
Particular attention is paid to elements adjacent to the body or car frame
Diagnostics involves a thorough examination of the suspension elements, the presence of various damages, cracks and breaks on them. If a breakthrough is detected in the rubber protection of the steering tip, it must be repaired. Rubber seals are inspected for mechanical damage and those areas where there are breaks and cracks are identified.
As a result of a muffler breakage, a knock will be heard in the suspension. To identify the cause of such sounds, which may lie in the exhaust pipe, the muffler should be rocked in different directions. This is a quick way to diagnose the front suspension. After this is completed, you can proceed to suspension repair.
The front suspension consists of: 1 — nut for securing the upper strut support; 2 - bolt; 3 — upper support of the front suspension strut; 4 — bearing of the upper support of the strut; 5 — upper insulating gasket of the spring; 6 — front suspension spring; 7 — protective casing; 8 — telescopic stand assembly; 9, 10 — nuts securing the strut to the steering knuckle; 11 — bolt with eccentric; 12 - bolt; 13 — steering knuckle; 14 — front wheel drive shaft; 15 — stabilizer bar; 16 - stretching; 17 — lever; 18 — ball joint; 19 — hub; 20 — hub fastening nut; 21 — brake disc; 22 — front suspension compression buffer; 23 — upper spring cup; 24 — compression stroke limiter of the upper strut support; 25 — travel limiter of the upper strut support; 26 — stabilizer strut mounting nut; N - reference size
It is possible to eliminate various malfunctions that occur in the front suspension of the Lada Kalina car if their cause is known. If there are faulty front suspension struts that can knock, they should be replaced. In some cases, they can be repaired.
If during the diagnosis it was revealed that the bolts that secure the stabilizer bar that provides lateral stability to the car body are loose, then they need to be tightened. Worn rubber or rod pads are replaced.
If the fastening of the upper support of the Lada Kalina suspension strut is loose, then it is necessary to tighten the nuts securing this unit. If the front suspension exhibits destruction of the rubber support of the strut, then it must be replaced. If the rubber-metal hinges (silent blocks) are worn out, new ones should be installed.
The presence of a malfunction in the stabilizer bar struts requires replacement. If the front suspension spring settles and the front suspension spring breaks, it should be replaced. If the compression stroke buffer is destroyed, it is dismantled and a new one is installed. If there is increased wheel imbalance, you should contact a tire repair shop so that specialists can eliminate the identified malfunction.
Replacement
Replacing the front support bearings is quite simple. The main thing is to find a really high-quality part, because not all manufacturers can provide supports with a high degree of wear resistance. So, we arm ourselves with the following tools:
And, of course, the prop himself. We will carry out the replacement procedure as follows:
- Jack up and remove the wheel.
- Remove the two nuts securing the front strut to the hub.
- Unscrew the nut from the shock absorber rod, while holding it with a hexagon.
- We remove the stand.
- Compress the spring and remove the support bearing.
- We again clamp the hexagon on the rod and unscrew the nut.
- We remove the bearing, install a new one and repeat all the steps, only in reverse order.
The cause of knocking while turning may be a malfunction of the steering rack, steering shaft or steering cardan. Therefore, after replacing the support, the problem may not disappear. In this case, all of the above systems should be checked.
Video on replacing the support:
Many of us, when purchasing a new Lada Kalina, probably noticed that when driving over small irregularities on the asphalt, and especially on a dirt road, there are small annoying muttering sounds reverberating through the body of the car. These sounds are especially audible when the window on the driver's side or on the right side is open.
I wondered how to eliminate this shortcoming? After looking through the entire Internet and reading several forums, I began to experiment with the upper support of the front suspension strut: 1. I noticed that the cup of the upper support (limiter) did not fit tightly to the damping rubber of the support itself.
I concluded that it needed a better fit and placed a rubber gasket under the cup of the upper support, cut in the form of a ring, and the cup (limiter) began to fit tightly through the rubber to the support body. The first trip showed a SEVERAL TIMES INCREASE in the VIBRATION TRANSMITTED TO THE BODY FROM THE SHOCKER. 2.
I thought that things wouldn’t work out that way and began to figure out what was going on. It turns out that the cup of the upper support (limiter) should structurally touch the damping rubber only during rebound, i.e. when the wheel falls sharply down and has reached the limit of the stroke of the shock absorber rod, that is, during normal operation, the rubber damper to which the shock absorber rod is attached should work and the cup should not touch the rubber. 3.
New Lada: How to find out the color code and paint name of my LADA? | Motorring online store
In short, I thought about it and decided to do this: I placed a 2 mm thick washer under the cup of the upper support (limiter), it turned out that now the cup does not touch the upper support and the gap between the cup and the rubber is about 2 mm. The trip showed that all sorts of knocks and noises from the front suspension when driving on a bad road immediately decreased. So let's get down to action:
1. Unscrew the nut securing the front strut shock absorber.
2. Take out the metal cup (LIMITER - according to the KALINA parts catalog).
3. WE START ASSEMBLY BACK, BUT before that we place (put) a washer on the shock absorber rod (under the cup) with a thickness of 2-3 mm. Before placing the washer, you need to sharpen the edges, otherwise the edges of the rubber will be eaten by this washer or find hemispherical washers.
The dimensions of the washers are as follows: outer diameter 25-34mm, inner diameter 14-15mm. I installed hemispherical washers, they are located on the “classic” - on the top bolt of the front suspension, they press the silent blocks. Outer diameter - 38.5 mm, inner diameter - 14mm. ,thickness 2mm. Sold in all auto parts stores. The issue price is 10 rubles/piece.
You can also do this experiment, find something like a seal and cut a soft washer around the edges of the cup:
4. Put the cup (limiter) back and tighten the nut securing the front strut shock absorber rod!
5. The cup (limiter) will rise by 2-3 mm and will not touch the rubber of the upper support of the front strut.
THOSE. THE NORMAL OPERATION OF THE SHOCK ABSORBER IS RESTORED WHEN ALL VIBRATIONS ARE DAMPENED AND ARE NOT TRANSMITTED TO THE KALINA BODY BY THE RUBBER DAMPER OF THE UPPER SUPPORT AND ONLY WHEN THE REBACK IS COMPLETE, THE CUP (LIMITER) COMES INTO OPERATION.
You can also experiment with the thickness of the washer, it may turn out to be the case. that the optimal thickness is 2-5 mm.
According to experimental data from potassium ducts, the best result is achieved when you put washers of these sizes: outer - 25mm, inner - 14.5mm, thickness 2.5mm. On my Kalina I have washers from “classic” silent blocks.
Non-standard cases
It may not be the suspension or steering parts that are knocking. Shocks and body pecks lead to the movement of units. If they “sit” loosely and there is metal-to-metal contact, clinking cannot be avoided.
- Single dull knock when starting off. See rubber-metal engine or gearbox mounts, transmission driveshaft. For example, when starting, the motor may tilt and hit the spar.
- Rattling on small bumps and in turns. Listen to see if there is a knocking sound in the steering wheel when braking; if there is, the brake caliper guides are worn out.
- Intermittent impact sound, more common when turning at low speeds. Malfunction in the differential of a front-wheel drive vehicle.
Tighten the key bolts and nuts more often, refuel only at gas stations with high-quality gasoline, and remember: a worn CV joint does not knock, but crunches, and does this with the wheels turned out.
Alarming symptoms
No matter how often you change the steering rack lubricant, unfortunately, it cannot extend the life of all parts of the mechanism indefinitely. Therefore, if the following factors are detected, it is recommended to immediately stop using the vehicle and contact a service center.
- Increased steering play.
- Turning the steering wheel requires more effort than before.
- Traces of steering rack lubricant leakage were found.
Knocking and extraneous sounds in the steering mechanism. They usually appear when making a sharp turn or turning the steering wheel, or when hitting protruding parts of the road. To make sure that the cause is in the rack, you need to:
- place the car on a flat surface;
- get out of the car and open the hood;
- unscrew the wheel until it stops in both directions;
- Listen carefully to where the sound comes from when you turn the steering wheel sharply.
Timely diagnostics will protect your car from possible future serious breakdowns and sudden expenses.
All lubricants have a different set of characteristics (composition, properties, cost). And if the question arises about which lubricant to use, then it is better to give preference to lithium. The best on the market are considered to be Litol-24, Fiol, Tsiatim and Severol. They are moisture-resistant, have a long processing interval, reduce vibration, do not wash off, and contain antioxidant and wear-resistant additives. Steering rack lubricant must have a high load-bearing capacity to avoid extrusion.
If a low-quality lubricant is used in operation, which does not meet the listed qualities, then this will soon lead to wear of individual parts and assemblies of the steering mechanism
It is important to always listen to your car, pay attention to warning signs in time, carefully choose which lubricant to lubricate, lubricate the steering rack in a timely manner and be responsible in choosing a lubricant.
Dismantling and disassembling the electric amplifier
Before removing the amplifier, you need to remove all the steering column switches. Remove the steering rack cover and dismantle the devices, remembering to disconnect the connectors from the power supply.
How to remove the EUR with your own hands:
- After removing the switches, you will need to dismantle the lower cross member of the dashboard. To do this, you need to press the fasteners that secure the connector with wires, and then disconnect the wiring from the control module. Once these steps are completed, you can disconnect the connector from the switches.
- The system bracket is secured with nuts; you will need to unscrew them with a wrench.
- After this, the steering rack will need to be carefully lowered down. To do this, you will need to find the bolt that secures the driveshaft to the booster shaft. This bolt must be unscrewed, but when unscrewing, you will need to fix the nut, this will prevent it from turning. When the bolt is removed, the fastening will need to be loosened, after which the intermediate shaft will be carefully removed. At this stage, we recommend marking the position of the shaft and gears; you can use a marker for this. This step is very important because doing it will prevent possible installation problems in the future. If the marks on the shafts do not match, this may cause problems with the amplifier. When dismantling, be careful not to damage the wiring, as this will also lead to the inoperability of the ESD.
- When the unit is dismantled, it will need to be disassembled and the failed elements replaced. Further editing is done in reverse order (the author of the video is Murzik Bely).
How to remove the steering wheel from a Lada Kalina
When the steering wheel on Kalina sticks, you need to disconnect the negative terminal of the battery and wait about 10 minutes for the airbag activation capacitor to discharge. The two latches and cushion latches should be released.
There are holes on the sides of the steering wheel. If the steering wheel was not removed, they are sealed. After removing the seal, use a flat tool to find a stop with a spring in the vacated opening. Squeeze the latch with one hand and pull the pillow toward you with the other until it clicks. If the cushion does not return to its place, the latch has become loose. Do the same on the other side.
The released cushion should be moved slightly. A pair of audio signal wires are disconnected by using a flat object, maybe a knife, to pry off the small yellow clip from the orange connector of the airbag. It is moved forward, the connector is removed, the pillow is released and set aside.
Steering wheel mounts
Then you need to find a small arrow on the shaft and make a mark opposite it for the correct orientation of the steering wheel. Loosen the steering wheel nut, but do not twist it all the way, leave about two turns. Using the method of swinging towards yourself, tighten the steering wheel until it stops against the nut. Align the wheels of the car and ensure that the steering wheel is installed straight. Remove the pin, connect the marks and insert it into the switch block under the steering wheel.
Under no circumstances allow the steering wheel to move, otherwise it can be broken off along with the base of the block, unscrew the nut. Pull the wires through the outlet and remove the steering wheel on Kalina.
We now know how to remove the steering wheel. When reassembling, all steps are performed in reverse order. Don't forget about the little things that are so important for proper installation of the steering wheel.
How to tighten the steering rack on a Priora
Lada Priora is a Russian-made car that is highly popular among our compatriots due to its low price and attractive appearance.
However, even despite this, the Lada Priora has one vulnerability associated with the poor quality of the road surface - the steering rack or, in the language of specialists, the “power steering/power steering gearbox”.
Fortunately, you can tighten it with your own hands.
When does the steering rack need to be tightened on a Priora?
The steering rack is a vulnerable point for the Lada Priora. The first sign indicating the need to adjust the rack is the appearance of a knocking sound when driving over small uneven surfaces.
The knocking will be felt especially clearly when driving on country roads. In this case, the driver will feel shocks and vibrations on the steering wheel, which will also be transmitted to the entire car body. In addition, if the steering wheel adjustment nut is loosened when driving on the highway, the car will “float” a little, and additional steering will be required from the driver, which will also immediately become noticeable.
Experts also say that a tightening is necessary if the driver begins to notice the appearance of a clearly audible crunching sound in the area of the steering column, as well as an increase in the amplitude of the steering wheel rotation.
When tightening doesn’t help and the mechanism needs to be changed
It’s worth thinking about replacing the rack when tightening it does not in any way affect the car’s behavior on the road, and also does not help get rid of the unpleasant knocking noise.
A failed steering rack will cause significant play in the steering wheel. Moreover, it may begin to jam (this happens extremely rarely, but similar cases are known).
If the rack begins to jam, then it is better to stop using the car, as this can lead to the most dire consequences.
You cannot do without a replacement even if after tightening it you managed to get rid of knocks and vibrations, but they reappeared later.
What is needed for work and how to tighten the steering
To tighten the steering rack you will need special wrenches. To carry out the tightening you will need the following tools:
To make the work more comfortable and faster, it is recommended to drive the car into a special inspection hole or overpass, and also use an assistant, whose role even a child can handle.
The lower rack fastening nut is not easy to unscrew
To get to the rail, you should perform a number of simple steps:
After this, you will have access to the nut responsible for adjusting the thermal gap in the rail.
Next, you need to put your hand under the steering rack and try to put the rack wrench on the nut.
It is necessary to tighten the nut clockwise, but since the rack itself is located upside down, from the outside it may seem that the nut must be tightened counterclockwise.
It is also necessary to listen to the sounds coming from the steering wheel - if there are no knocks when turning the steering wheel, and there are no other noises, then the rack is tightened correctly, and you can put the battery and rubber plug in their place.
The nuances of working on a car with EUR and power steering
According to experienced auto mechanics, the process of tightening the steering rack on cars with electric steering and power steering is practically no different, so this guide can be called universal.
It is worth noting that the complete replacement process is also identical in the case of electric steering and power steering, with the exception of one point - in cars with power steering, before replacing the rack, it is necessary to drain the fluid from the power steering tank, and in cars with electric steering, remove the terminals from the battery.
Tips for use
A complete replacement and repair is a series of actions, for the implementation of which you need to have not only special knowledge, but also a considerable amount of free time, so if the car owner does not have either the first or the second, it is preferable to go to the nearest service station.
It is better to entrust steering rack repair to service station specialists
At the same time, in order not to become their regular guest, you should know some secrets for operating the steering rack, which can significantly extend its service life.
From time to time you need to undergo a full maintenance, which will allow you to eliminate faults in advance, which can cause irreversible consequences, injury to yourself, your loved ones and other road users. And also, if problems are detected in the operation of the car, it is better not to take risks and go to the nearest car service center as quickly as possible.
Element design features
For cars such as, for example, Kalina, constant repair of any components and assemblies is a normal condition. Even the most reliable part tends to fail sooner or later, so all owners will need to have their steering rack repaired. "Kalina" has the following structure of this mechanism:
- The steering wheel transmits rotational motion through the column to the drive gear.
- The latter, having a movable connection with the rail, transfers this energy to it and makes it move.
- The ends of the rods that turn the wheels are attached to the steering rack.
Removing the steering rack from the car
The rear wheels are fixed by rolling back, the front wheels are lifted with a jack. Inside the car, on the driver's seat side, the column spline bolt is unscrewed. The difficulty in disconnecting is that it is located where the pedals are grouped.
After removing the front wheels, the cam nuts are removed and the space under the hood is prepared. The terminals from the battery and the battery itself are removed, along with the mounting plane and the heat reflector. The body mount of the rack is removed with a nut, it is released and placed on a flat surface for further work with it.
Diagnostics for the presence of play is carried out as follows: the rack casing is clamped in a vice and swung with force from side to side. If you feel any play, you should try to tighten the spring nut no more than 10 degrees. Check the play again, and so on until the problem is resolved. Tightening is prohibited, as the steering wheel will become very difficult to rotate, even if an electric booster is installed.
A steering rack repair kit can be purchased at any automotive store. But before you use it, you need to examine the old spare part. If this is not done, the part may need to be removed again.
Electric power steering for Kalina
Some drivers have learned to make adjustments without removing the rack. This method helps save time and effort. To perform this type of work, the car is placed in a pit and the location of the part in the front part is determined. The spare part is pulled clockwise if you can only get to it from below. If you can feel it from above, then the tightening goes counterclockwise. Actions are carried out in the sequence described above.
It must be remembered that replacement does not always solve the problem; the rack continues to make noise and squeak when turning the steering wheel. To double the service life of the steering rack of a power-assisted vehicle, constant oil monitoring, checking the technical condition of the steering rod boots and their timely replacement are important.
Grenade change
The grenade, or CV joint, is one of the main parts of the vehicle's chassis. It ensures safe driving on the roads. The grenade is located in the drive of the drive wheels, which allow the steering wheel to move. It is rare to see this hinge on a rear-wheel drive car. The CV joint can be internal or external.
The grenade is out of order and needs to be replaced if the car starts to click and squeak when moving back and forth, and you can hear a creaking noise when you turn the steering wheel.
Tool for work:
- socket heads;
- hammer;
- scrap;
- wrench.
Use a reliable jack
The car is lifted with a jack, the wheel is removed, and you need to try to knock out the steering rod with a hammer. Unscrew the lower ball nuts and use a crowbar to push the steering knuckle away. The bolts are unscrewed and the steering rod is removed. The old snap ring is discarded because it is included with the new CV joint. Lubricate the spare part with a special granite-based lubricant and put on the boot. Reassemble in reverse order.
Front suspension repair
The cost of the parts themselves when eliminating the described reasons is most often small, but the price of replacing them in car services sometimes causes bewilderment. In such cases, it is better to repair the suspension yourself. This requires special devices and tools.
To remove the tips and ball joints of the steering wheel, pullers are needed that, during dismantling, preserve the integrity of these parts.
Silent blocks are replaced using a long threaded rod or bolt with a corresponding nut and a set of bushings and washers. The bushings should rest on the lever cage, and the washer should match the diameter of the rubber seal. Tightening the nut squeezes the silent blocks out of the lever, and then presses a new one in its place.
Dismantling the shock absorber strut is done with two ties that compress the spring. This makes it possible to unscrew the mounting bolts, remove the support bearing and remove the shock absorber and spring. The new spring is also completely compressed by the ties, then the entire assembly is assembled.
A knock when turning the steering wheel should not make the driver nervous. However, as soon as you have time, you should immediately start troubleshooting the problem. Today on the Internet you can find videos from professional craftsmen and amateurs about repairing suspensions of different car models and for various malfunctions. It is better to spend time studying their experience and then repair everything efficiently and quickly.
The steering, along with the car's braking system, are the most important elements that ensure safe driving at any speed and on any road. Therefore, when knocks, clicks and other extraneous noises begin when turning the steering wheel, in any case, you need to sound the alarm and immediately look for the cause of the problem in order to eliminate it. Now we will tell you why a knocking sound may appear when turning the steering wheel while standing still or in motion, and what problems does it indicate?
First of all, you need to clearly localize the place where the knocking is heard, as well as determine the conditions under which it occurs, this will greatly help you in finding the breakdown, the symptom of which is the knocking. In addition, different steering systems may knock in different situations and such a knock will indicate different breakdowns. We list the main causes of knocking when turning the steering wheel:
- wear of the constant velocity joint;
- wear of the ball joint;
- wear of the support bearing of the stabilizer link;
- wear of steering tips;
- the appearance of play in the steering rack and leakage of working fluid from it;
- loose steering wheel nut;
In principle, these are the most common causes of knocking and other noises when turning the steering wheel. But there are also less common breakdowns that cause similar sounds. But we can talk about such special cases only using the example of a specific car model in which such knocks began.
A knocking sound, or rather a crunching sound, when turning the steering wheel, as a rule. This indicates that it is time to change the CV joint or constant velocity joint. Although, it is not always necessary to replace this unit. Often, it is enough to replace the boot on the CV joint and replenish the lubricant. By the way, a special lubricant is needed; ordinary grease is not suitable here. CV joints can be external, which is what usually needs to be changed, as well as internal. The inner CV joint fails in serious traffic accidents, or in the event of a sudden failure of other components, for example, the ball joint of the wheel. The constant velocity joint can knock for quite a long time, but still, it is better to replace it as quickly as possible so as not to worry about every trip.
Basic work on adjusting the mechanism
The main type of repair work on the steering mechanism is considered to be its adjustment, while if the steering rack on Kalina can be adjusted independently, then adjusting it on a sports modification of the car is quite problematic.
Repair of the Kalina steering mechanism may be necessary for the following reasons:
- loosening of the steering rack fasteners;
- wear of steering racks or gears;
- poor pair engagement adjustment;
- high degree of wear of the bushing in the place where it connects to the rack and steering rods.
The rack is tightened in order to use this procedure to reduce or completely eliminate backlash in the mechanism for controlling the direction of movement of the car.
This allows you to significantly improve vehicle control in different road and weather conditions. In addition, it may be necessary to tighten the steering rack even if it was initially configured incorrectly. To do this, they usually loosen the tightening of the adjusting screw, which makes the steering wheel easier to move and makes it easier to control the car.
In addition to adjustments, if difficulties are identified in its operation, it makes sense to lubricate the steering mechanism. You can find out how to do this and how to adjust the steering rack from. In addition, it indicates the type of lubricant recommended by the manufacturer and describes the design of the steering rack.
In this case, there are 2 ways to carry out the operation of adjusting the steering mechanism:
- with dismantling the rack;
- directly by car.
The steering mechanism is usually dismantled in the event of a serious breakdown, that is, when it directly occurred. Usually, some parts of the mechanism need to be replaced, and not all car owners can carry out this procedure on their own.
In the same case, when it is necessary to carry out relatively simple procedures, for example, eliminating play and knocking, as well as tightening or loosening the rack, this can be done independently, without removing the steering mechanism from the car. You can involve a more experienced car owner for consultations.
The serviceability of the steering system of any car is an important safety requirement on the road. Repair of the steering rack on Kalina must be carried out when any suspicious sounds occur. As practice shows, many car enthusiasts are calm about the fact that when turning the steering wheel there is a knocking or creaking noise, but this may indicate that the steering rack is knocking. Repairing the steering rack on Kalina is best done at a service station, but you can do it yourself.
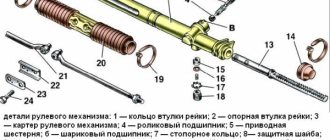
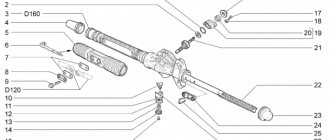
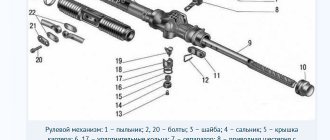
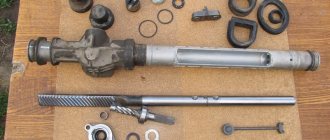
Steering mechanism: 1 – boot; 2, 20 – bolts; 3 – washer; 4 – oil seal; 5 – crankcase cover; 6, 17 – sealing rings; 7 – separator; 8 – drive gear with bearing; 9 – steering rack; 10 – left protective cap; 11 – rod support; 12 – bracket; 13 – plug; 14 – stop nut; 15 – stop spring; 16 – retaining ring; 18 – rack stop; 19 – stop liner; 21 – locking plate; 22 – cover plate; 23 – clamp; 24 – protective cover; 25 – right protective cap; 26 – steering gear housing
Preparatory actions, dismantling unnecessary parts
To remove the crankcase protection, you need to unscrew 4 screws located in one row near the bumper. Also, unscrew two screws having a standard size of M6x16. In some configurations, the protection consists of two parts, but in this case they are attached only with self-tapping screws. These words are illustrated by the following photo:
First, unscrew the “10” screws, and then the two “18” screws. In the second case, there will be more screws (eight).
Now let's look at how to remove the battery. First of all, disconnect its terminals. Then, you need to move the additional fuse box to the side. In general, actions are performed according to the photo:
You also need to remove the mounting platform itself, for which you unscrew 4 screws. You will need a 13mm wrench, as well as a 10mm spanner. We will repeat the entire sequence again:
- Unscrew the nuts holding the battery terminals using a 10 mm wrench;
- Remove both terminals;
- Move the fuse box to the side by unscrewing 2 fastening screws;
- Unscrew the nuts with a 10mm wrench and remove the battery;
- Unscrew the screws with a 13mm wrench and remove the metal plate.
Just in case, here is a look at the fuse box mountings:
Mounting screws are located under the casing
We adjust the Kalina-2 steering rack to eliminate knocking
Cars of the Kalina-2 family are equipped with a steering rack similar in design to the Granta rack. This part transmits force from the steering wheel to the front suspension links. If you feel a knocking sound from the rack while driving, it needs to be adjusted (tightened) correctly. The effect described here can be observed after 10-15 thousand kilometers, and more often it makes itself felt on uneven roads. Next we consider how this problem is solved in practice. And the solution comes down to turning one nut.
- A little theory: front suspension design
- Lyrical digression
- Making adjustments yourself
- Preparatory actions, dismantling unnecessary parts
- It turns out that the steering rack can be repaired (video example)
A little theory: front suspension design
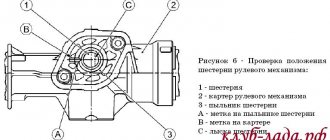
Before attempting to fix any problem, there is a tendency to look at the blueprints or repair manual. It is known that the VAZ-2192 parts catalog contains the following object:
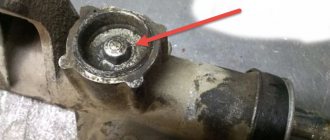
Whether the knock will remain in the steering rack of Kalina-2 depends on the following: how accurately element “14” is adjusted. The adjusting nut, marked “14”, looks almost invisible here. But first impressions are deceiving. In the catalog, by the way, the element is called “Stop Nut”.
Now let's move on to practice and see what the node in question looks like in reality:
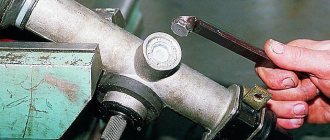
The nut has a non-standard notch, and it can only be rotated with a special tool. By the way, the recess will be closed with a cap. In the catalog it is designated by the number “15”, and now, let’s look at the appearance of the special key:
The thrust nut is turned at small angles. We are talking about values of 10-15 degrees. What happens if you overdo it with tightening the rack? The knocking noise will disappear, but the steering wheel will turn with difficulty. Therefore, if necessary, the nut can be pulled back.
Lyrical digression
In Lada Kalina, the steering rack never makes a knock when we are talking about a new car. This is also true for the break-in period. Let's say in your case this is not done. Then, do not try to repair anything, but go straight to the dealer. According to reviews, the defect in question is covered under warranty, and most car dealers do this: the steering rack assembly is replaced with a new one.
There is a logic here. At the factory, adjustments are made correctly (this is true in 99.9% of cases). If a defect appears, the dealer replaces the assembly without expecting that adjustment will solve the problem. The owner does not need to hope for this either. The choice is yours.
Making adjustments yourself
You can access the adjusting nut from the engine compartment, but to do this you will need to remove the battery, as well as the battery mounting pad. It is better to drive the car into a pit and then remove the crankcase protection (engine mudguard). If you look from under the bottom, the required element is immediately visible:
And when you open the hood, you can feel the nut, but not see it. Its location is marked in the figure:
Before adjustment, remove the rubber cap from the recess. Its appearance is shown in the photo:
If it is not entirely clear what exactly needs to be done, it is better to contact the service. The key is installed in the recess and then rotated 10-15 degrees.
Preparatory actions, dismantling unnecessary parts
To remove the crankcase protection, you need to unscrew 4 screws located in one row near the bumper. Also, unscrew two screws having a standard size of M6x16. In some configurations, the protection consists of two parts, but in this case they are attached only with self-tapping screws. These words are illustrated by the following photo:
First, unscrew the “10” screws, and then the two “18” screws. In the second case, there will be more screws (eight).
Now let's look at how to remove the battery. First of all, disconnect its terminals. Then, you need to move the additional fuse box to the side. In general, actions are performed according to the photo:
You also need to remove the mounting platform itself, for which you unscrew 4 screws. You will need a 13mm wrench, as well as a 10mm spanner. We will repeat the entire sequence again:
- Unscrew the nuts holding the battery terminals using a 10 mm wrench;
- Remove both terminals;
- Move the fuse box to the side by unscrewing 2 fastening screws;
- Unscrew the nuts with a 10mm wrench and remove the battery;
- Unscrew the screws with a 13mm wrench and remove the metal plate.
Just in case, here is a look at the fuse box mountings:
Tightening process, video
There are several ways to tighten. One of them is the method of removing the slats. The removed rail is clamped in a vice and then, using a special wrench, the nut is tightened 10-15 degrees by turning it counterclockwise.
This is followed by a check for backlash and, if necessary, the procedure is repeated, since the backlash can be more or less. It is not advisable to overtighten, it will be difficult to rotate the steering wheel. The advantage of this method is the ease of adjustment, but the disadvantage is that you have to remove and then put the steering rack back in place, and this requires time, certain knowledge and skills.
The second method is simpler, it does not require removing the steering rack, you just need to remove the battery and the platform under it with four bolts, but it is much easier and faster than removing and installing the steering rack. This way we gain access to the steering rack and steering rods.
We take hold of the rod with our hand and begin to shake it with force. A characteristic knock will immediately indicate the presence of play. The stop nut is located on the rack behind the left link from the bottom; you need to feel it with your finger. Now the task is to get the wrench into the nut and then turn it counterclockwise. We check for play and, if necessary, tighten it further.
But in the video there is another tightening option, even without removing the battery:
Steering wheel sticks when turning with ignition on
That is, it does not return back, but remains, as it were, bitten in the extreme left or right position. And this, even at a very low speed! Moreover, if the ignition is turned off, this situation is natural for any car. But when turned on... Agree, this can lead to irreparable consequences.
In this case, the problem of why the steering wheel sticks when turning is to blame for the faulty switch block, the steering column. You may have to deal with the ignition switch itself. Therefore, if you are not an automotive electrician, it is best not to take risks, since it is very difficult to carry out this work yourself without appropriate training. So, we turn on the emergency lights and slowly and carefully crawl to the nearest service station, where there is an appropriate specialist. And be careful when turning: enter them smoothly, without twisting the steering wheel to extreme positions, so as not to bite again.
Recommendations
Comments 15
I didn’t bother with this bushing with crackers, I just stuffed it dry with plastic, I’ve been driving for almost a year without ever tightening the rack, no knocks or rattles
What's wrong with this drawing?
Where did you get this drawing from? Maybe I can ask there? Another option is to look at the store and check the size fit there. I think the seller will not mind.
yes, I dug it up from someone on the drive
I think this is crap
Do you judge by clothes? Talk to a person, ask questions.
I don't want to drill
Is not it so? I personally checked all the dimensions of this drawing. I found it on the prioroforum, but with crooked dimensions. They sharpened it for me twice to different tolerances. The current dimensions are correct.
I also wanted one for the rail - they promised to make it for me for 800 rubles - but somehow the redneck crushed it. The last time I went through it, I installed 2 from the repair kit. One was in its place, the second one followed it, only the convex pips on it were cut off otherwise it wouldn’t fit. To prevent it from falling out, I drilled a couple of thin holes through the rack body to get into the second bushing and screwed short screws into them (so that the bushing would not move to the side). I did the same thing in the spring - until the ride is bouncing (I also threw the SS 20 washer). The steering wheel has actually become a little tighter - but now it’s getting used to it over time and is almost unnoticeable.
I also installed bushings made of fluoroplastic on the gearbox (the drawing is also lying around somewhere at work - it really was a mistake - the washers turned out to be exactly 2 mm thicker than necessary (bullshit, I thought I’ll sand it right now - that’s not the case - the fluoroplastic doesn’t sharpen for the life of me - In the end, it took a long time and tediously to cut off a little bit with a stationery knife.) I also like this thing.