VAZ-2110 owners are well aware of cases when antifreeze disappears from the expansion tank for unknown reasons, stains appear under the hood for no apparent reason, or the interior does not warm up properly. There may be several reasons for the occurrence of such phenomena, and one of them is related to the stove radiator. Think about how long ago you cleaned your car's heater? But such a procedure must be performed periodically. To wash the stove on a VAZ-2110 you need to tinker a lot, spend more than one hour of your time and perform many different processes.
Self-cleaning of the stove on a VAZ-2110
VAZ-2110 owners are well aware of cases when antifreeze disappears from the expansion tank for unknown reasons, stains appear under the hood for no apparent reason, or the interior does not warm up properly. There may be several reasons for the occurrence of such phenomena, and one of them is related to the stove radiator. Think about how long ago you cleaned your car's heater? But such a procedure must be performed periodically. To wash the stove on a VAZ-2110 you need to tinker a lot, spend more than one hour of your time and perform many different processes.
Causes and symptoms of malfunctions of the seven injection nozzles
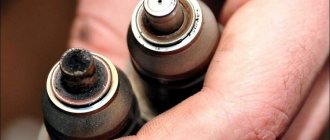
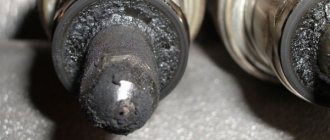
Injectors are one of the most important parts of the fuel injection system. If it fails, which happens extremely rarely, the operation of the engine is disrupted. Most often, fuel injectors become clogged, which occurs due to contact with aggressive media. An aggressive environment is not only the fuel, but also the burned fuel assemblies. Before cleaning the injectors on a VAZ 2107, you need to determine by the signs that diagnostics of these particular parts is required:
- At idle, unstable operation of the internal combustion engine is observed.
- When trying to move away, the engine stalls.
- Reduced power and agility.
- When moving, jerks and dips occur.
- Excessive amount of exhaust gases from the muffler.
- Increased fuel consumption.
- Extraneous sounds and noise are observed when the engine is running.
If these signs are detected, you will need to check the condition of the injectors. The reason for their clogging is low-quality gasoline, which causes deposits to form on the walls. If your car has a faulty or missing fuel filter, then the need to clean the fuel nozzles arises quite often.
After removal, you will need to check the devices, or rather their condition. How to check the injectors on the seven, we will figure it out in the next section. If diagnostics show that they are unsuitable for use, they will need to be replaced.
Device diagnostics
To make sure that the injectors need to be cleaned or replaced, you will need to first perform some diagnostic procedures:
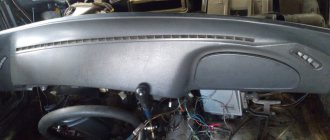
Removing the radiator
- We drain the coolant from the heating system by unscrewing the plug on the drain hole and the cap on the expansion tank. Prepare a container in advance to collect the liquid that will be drained.
- To eliminate the possibility of a short circuit, be sure to remove the negative terminal on the battery.
- We remove the frill, and to do this you will need to unscrew the screw, which is located under the brake cylinder. In addition, the frill is screwed on with four screws and is also held in place by two clamps. In addition, it will be necessary to unscrew a couple of left screws and only after this will it be possible to dismantle the frill along with the wind cover.
- We find the coolant level sensor, remove the terminal and the hose through which air enters the cabin from the expansion tank.
- We remove the windshield wipers, which are attached to four screws, and also remove the hose from the windshield washer.
- Access to the stove radiator is blocked only by the fan housing, filter and other elements of the heating system. All we have to do is disconnect the existing hoses and we can start flushing the radiator.
The procedure for modifying the heater
If the VAZ 2107 stove does not heat well, remove the casing in the passenger compartment on the bottom of the stove, on which the fan is mounted on top. The latter is completely removed due to its uselessness. After this, one of the aerodynamic ridges is carefully cut off, which supplies warm air towards the feet of the driver and the passenger sitting next to him. This is especially true when installing a fan with a VAZ 2108, since its motor is slightly longer. The impeller can be completely removed, and its functions can be transferred to a five-blade standard fan.
The hole for this purpose increases slightly in diameter so that a new shaft can be installed into it. It is important to ensure that the updated structure is “fitted” into place tightly and securely. Immediately before installing a new fan, you need to directly connect it to make sure it is working.
Cleaning the stove
To clean the stove on a VAZ-2110, you need to prepare some tools and available materials. This list includes:
- a pair of hoses;
- clamps;
- FUM tape;
- compressor;
- vacuum cleaner;
- pump;
- container for collecting liquid;
- products that are used to clean radiators (acid, anti-scale, etc.).
When everything is prepared and at hand, you can begin to wash the stove. If you follow the plan outlined below, even a novice motorist will not have any problems.
- We release the hoses that extend from the stove and dismantle all elements that may interfere with the work process. All fasteners must be set aside and care must be taken that they do not fall apart. This will make it easier to assemble the car.
- The hoses that we have freed must be expanded with additional hoses. These could be watering or plumbing hoses, parts from a washing machine. In a word, you can use everything that is convenient for you to work with. It is necessary to take care of the tightness of the connections. For this you will need clamps and FUM tape. If the seal is insufficient, any careless movement can lead to contamination of the interior.
- Prepare a container to collect liquid. The lower hose must be lowered down, and the upper hose must be raised above the heater level, or even better, above the instrument panel. To completely empty the stove of liquid, you can use a compressor or a regular vacuum cleaner. When there is no liquid left in the heating system, you can start flushing.
- Raise the lower hose up and pour cleaning fluid into the stove. Plain water or boiling water, various acids (acetic, hydrochloric and others), antiscale, “Silit”, and other cleaning solutions can be used. To soak dirt and scale from the inside, you need to leave the cleaning agent inside the stove for a while. If a potent agent is used, then 15 minutes will be enough. But weaker substances can be left even overnight. When using acids, be prepared for a violent reaction with the formation of foam. Depending on the degree of contamination and aggressiveness of the substance used, the flushing procedure may have to be repeated several times until liquid flows out of the radiator with the same color as before filling.
- Now you need to rinse the stove radiator using water pressure. It is ideal to use a Karcher sink, but if you don’t have one, a regular hose with high water pressure will also work. At this stage it is necessary to use a compressor or pump. The radiator must be flushed on both sides. If you have a deep-well pump, it can also be used for these purposes.
This method is not the easiest, but it allows you not only to flush the stove, but also to diagnose the heating system, replace some of its components, tighten bolts, check clamps and eliminate minor defects.
What if you don't remove the radiator?
Many car owners are interested in: how to clean the stove on a VAZ-2110 without removing the radiator and whether this is possible in principle. Yes, this method is also practiced. To implement it you will need to perform the following steps:
- raise the hood;
- remove the plug located on the expansion tank;
- pour the prepared solution into the system;
- start the car and leave it for 15 minutes;
- turn off the car and drain the coolant from the system;
- fill with water and turn on the engine again for a few minutes
- drain the water and add antifreeze.
Automotive stores sell a large number of solutions that are intended for cleaning the stove. You can and even should use them, but you must beware of counterfeits, since they can greatly harm the heating system.
Flushing the stove on a VAZ-2110 is a troublesome task and not as fast as we would all like. But this procedure is necessary, because driving a car should be accompanied by comfort and pleasure. Therefore, you can take the time to clean the stove several times a year.
Why is flushing necessary?
Failure to flush the cooling system in a timely manner can lead to the radiator becoming clogged over time. Refrigerant wear products, corrosive residues, scale that appears as a result of using water instead of antifreeze - sooner or later this will contribute to a decrease in the performance of the radiator.
Failure of this element will result in problems with the operation of the engine, which, of course, will affect the functioning of the car as a whole. So flushing the engine cooling system is a process that should not be neglected, at least in order to protect your radiator. The procedure should be carried out at least once every two years, and the recommendations of the car manufacturer should be taken into account. By observing this frequency, you can prevent the formation of refrigerant wear and corrosion in the system.
HVAC System Cleaning Methods
How to clean the air ducts in your car and eliminate the unpleasant smell? The most popular way is to purchase a gas can containing antiseptic. You need to use it like this. First of all, you need to turn on the recirculation mode in the cabin, then turn on the fan at 50% of its power. Thus, we monitor where the unpleasant odor is coming from.
You can use a lighter to determine the air flow. Then you need to direct the balloon into the area so that the outgoing flow enters the air duct. Then we open the bottle. Then you need to close the car doors and wait 10 minutes for the cleaning process to take place.
What can you say about this method? Speaking on the positive side, this method will not take much energy from you. Disadvantages - this type of cleaning is not effective enough and will not completely eliminate the problem.
Dismantling
Now let's talk about how you can disassemble the stove in order to replace or repair it. A disassembly procedure will be required in order to find the source of all problems and solve the problem of heater failure. This is especially important to do if it is very cold and driving without a heater will be very uncomfortable.
Dismantling process
- First, disconnect the negative terminal from the battery. This is a primary task that is carried out during almost any intervention in the car’s structure.
- Remove trim, soundproofing and trim from the windshield frame.
- Remove insulation material from the engine shield.
- Next, the plastic trim located under the windshield is dismantled. We are talking about the so-called frill.
- Now the wiper mechanism, that is, the windshield wipers, is removed.
- The next step is to remove the left and right heater covers.
- If a resistor is one of the main suspects, be sure to check the condition of this element. The resistor is located on the right when looking at the engine compartment, standing in front of the bumper. The fastening is carried out with a screw, so there will be no special problems with removal. The only caveat is that to replace the resistor you will have to dismantle the vacuum amplifier.
- The cabin filter is located on the left in the opening leading into the car. No tools are required to remove it. Everything is done by hand.
- Replace the filter if necessary. Just keep in mind that the old and new samples are not interchangeable, so buy only the filter that is available now.
- To replace the heater, and along with it the faucet, be sure to drain the coolant from the system.
- To dismantle the element, disconnect the two pipes secured with clamps, as well as the hose responsible for the steam outlet. Check the condition of the pipes. If they are damaged or showing signs of wear, it is best to replace them. Otherwise, they may soon cause a leak, which means the entire dismantling procedure will have to be repeated.
- The stove itself is not fixed in any way. It is held in place by a cover that is pressed against the heater body.
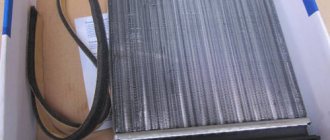
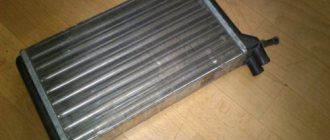
- Replacing the radiator of the stove, that is, the stove, in fact, can be done with aluminum or copper. Due to the high thermal conductivity of the material, a copper radiator provides better heating of the interior. Aluminum analogues will last longer, they are cheaper, but the efficiency is lower. Therefore, choose what is more important to you.
- A pair of hoses are disconnected from the tap. They can be accessed from the interior by removing the glove compartment.
- The stove tap is secured using a pair of 10 mm nuts.
- Before dismantling the crane, be sure to disconnect the drive cable (electric motor).
- When replacing a faucet, be sure to replace the old rubber seals with new elements. These are consumables, so it is better not to use old ones after repair.
Reassembly nuances
There are several important points that you should pay special attention to when dismantling and replacing an old stove with a new one.
- When working with an old-style stove, when reassembling the fan housing, which is made of plastic, make sure that the pedal fits into the groove. If it is not seated tightly, the damper may not function properly. This will lead to repeated dismantling activities.
Fan
- When disassembling the stove, a fairly large number of bolts and fasteners are formed. Make sure there is nothing left and all fasteners are back in place. Otherwise, the elements may not be fastened tightly enough. As a result, there is a lack of heat in the cabin and coolant leaks.
- If possible, replace the plastic flap with a metal one. The metal element has a longer service life, plus you minimize the risk of jamming.
- When completely replacing a radiator, give preference to a copper product. Although they are more expensive, the level of reliability is significantly higher, plus you will receive noticeably more heat from such a radiator. This is especially true for residents of northern regions with harsh winters.
- To avoid the need to repeatedly carry out repairs or carry out very complex dismantling work with the stove, we strongly recommend that during the dismantling process you change all the clamps and hoses used on the old equipment. Rubber is not durable, so don’t be lazy to spend a few minutes on this issue.
Be prepared to dismantle the stove yourself in advance, as this process can take at least 4 hours. It will take even more for a beginner. But this way you will significantly save on the services of specialists from a service station. But most importantly, you will gain invaluable experience in disassembling and assembling one of the most complex components of the VAZ 2110.
Method using foam antiseptic
This product should be used as follows: first, you need to remove the cabin filter and direct the entire pressure of the foam into the ventilation and air conditioning systems. After this, you need to start the car and warm up the cooling system. Such actions will allow the foam to expand, thereby allowing it to penetrate deeper. Then you need to wait until the foam settles for about 10 minutes.
The next step is to turn on the heater so that the foam begins to evaporate and the antiseptic vapors enter the system.
Let's look at another effective way
, you have to disassemble the ventilation system, clean the radiator, namely the evaporator fins, as well as plastic housing parts. In order to clean aluminum parts you will need a special mixture called chlorhexidine. To clean plastic, you can use ordinary household chemicals.
The cause of the smell as organic matter (dust, insects, etc.) is difficult to extract.
Do no harm
Independently flushing the heater radiator without removing it from the car or with removal is not the point; it must take into account the properties of the material from which the element being washed is made. Under no circumstances should you use alkaline solutions to clean aluminum heaters. The metal will instantly begin to oxidize, and the situation will only get worse. The same thing will happen if you pour acid into a copper radiator. Therefore, for aluminum - acidic agents, for copper - alkaline.
Universal remedies include Coca-Cola or Fanta heated to a boil, as well as whey, which has a “mild” destructive effect on scale.
If special liquids for flushing the cooling system have instructions for use, then with household powders, citric acid and soda you need to be extremely careful and know the proportions for preparing the solution.
A few tips for eliminating odor
First, you need to monitor your cabin filters. They must perform their task well. If desired, remove unnecessary debris and dirt from the filter between filter replacements. You should not skimp on the filter, as a cheap one may have gaps through which some of the unpurified air can get in. Such a filter will only cause harm. I think you have received the answer to the question of how to clean the air ducts in a car. There is one more recommendation.
Final Rule
. It is always necessary to dry the evaporator before the vehicle is left idle for a long period of time. To do this, you need to turn off the air conditioner in advance, for example 6 minutes. The fan does not have to be turned off. Since hot air will help the evaporator dry, thereby preventing bacteria from multiplying in a dry environment.
For quietness
For this purpose, the built-in resistor is replaced, the main task of which is to ensure relatively silent operation for the fan. Moreover, the new one - with a VAZ 2108 - creates a lot of noise due to the larger amount of distilled air flow. The best replacement option is the resistor that is installed on the same eighth model. In addition, when upgrading, it would not be a bad idea to replace the fan switch by installing a model from the same car as the entire structure, for example, from 2108. This is done because the VAZ 2107 stove gets very hot during prolonged operation, as a result of which, after a certain time, standard power buttons simply melt. The noise from the modernized and updated device, of course, will be a little more than the factory one, but this drawback in cold winter times after the heater has been modified is almost unnoticeable.
Cleaning the crankcase ventilation system on VAZ 2110, VAZ 2111, VAZ 2112
Welcome! The crankcase ventilation system is needed so that the atmosphere is not clogged and the exhaust gases are allowed to burn out again, this system was implemented in many cars, starting from the VAZ 2101 and ending with cars such as Lada Priora, Lada Granta, etc., but when the engine is worn out, this system is removed by the people themselves by removing all the hoses of the crankcase ventilation system, usually into a bottle, or just outside, we will analyze this in this article, so if your car has already covered quite a lot of mileage, then this article will be useful to you benefit.
Note! We will only disassemble cleaning the ventilation on 16 valve engines; if you have an 8 valve engine, then go to the article: “Cleaning the crankcase ventilation on a VAZ 2114”, in this article this engine is described; to clean the crankcase ventilation of a 16 valve engine, you will need stock up on: Small pliers, screwdrivers with different heads and all kinds of wrenches; in addition, you will need sealant for the cylinder head cover and a new gasket!
Summary:
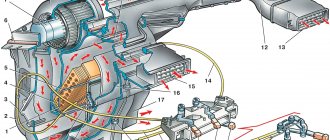
What does the crankcase ventilation system consist of? From the hoses, from the oil separator, from the oil deflector, all these parts can be seen in the diagram below, all of this gets dirty over time and therefore the crankcase ventilation system needs to be disassembled from time to time and cleaned inside from dirt and oil, then the engine will work normally and everything the dirt that is in the ventilation system will not fly into the engine to burn out again, but for engines that have traveled quite a long mileage (200 thousand km and more), we recommend simply putting this system in a bottle so that it does not choke the engine of the car and he was driving more or less, and to bring the crankcase ventilation into the bottle, you will need a screwdriver and a suitable (Small) container, for more details on how to do this, see the video clip which is located at the end of the article, it shows everything in detail.
Heater modernization
All car enthusiasts know that the design of the VAZ 2107 stove is imperfect, and at the same time it operates with noticeable noise even in the cabin. Therefore, this part of the car heating system is very often modernized. Many people try to improve the operation of the stove on their own, but most often this does not produce the desired effect. With your own hands, even knowing how to remove the VAZ 2107 stove, you can only seal the joints of the air ducts and nozzles, as well as redistribute the hot flows. However, this causes the temperature in the cabin to remain largely the same. To keep your car warm and cozy during the winter cold, you need to increase the amount of heat supplied by the radiator. The whole problem is that it is too small and does not create the necessary air flow. In this regard, as a rule, the first step is to replace the fan of the VAZ 2107 stove.