A car may not operate correctly for a number of reasons - today we will talk about a dirty injector and nozzles, since this problem is extremely popular when identifying improper engine operation.
Most owners of cars with injection engines begin to worry if the car behaves suspiciously. The first alarm bells are the engine shaking strangely at idle. Popping noises are heard and the tachometer needle may jerk up and down randomly. Then you feel that when driving the car no longer accelerates so quickly, and the fuel from the tank seems to evaporate. Many continue to drive and put up with the unsatisfactory condition of the car. It’s worse when the engine shakes so much that vibrations go through the car body. Such a malfunction is difficult not to notice. But experienced motorists know that flushing the injector would quickly eliminate the problems and also bring the engine into a healthy state.
The cause of engine malfunctions is contamination of the fuel supply system. Dust, sand, and water that enter the tank are easily retained by the fuel filter. But after replacing it, the situation may not change. Then we can confidently diagnose contamination of the injectors and intake manifold.
Injector system design
This system includes:
- Computer. Serves to select the optimal operating mode and the quality of the supplied mixture based on the performance of all sensors of the machine. In addition, the computer detects possible problems in the injector elements themselves.
- Sensors They provide the computer with all the information about the state of the engine at a particular moment. We are talking about a fuel flow sensor, an air flow sensor, a lambda probe, a knock sensor, and so on.
- Injection system. Modern engines are distinguished by two types of injection. First of all, mono-injection is when one nozzle works on all cylinders, and the prepared fuel mixture has the same characteristics. This type of injection is becoming less and less popular today, as it is ineffective. In a distributed fuel injection system, unlike the first, a separate injector is installed on each cylinder, and it is responsible for regulating the amount of fuel supplied.
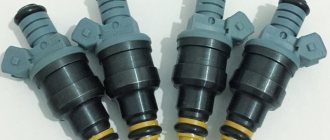
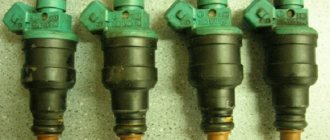
- Injectors. They can be called the “workhorses” of the injection system, because they are responsible for the main work of mixing air and fuel, and supplying it to the combustion chamber.
The injectors, in addition, turn off the supply of the fuel mixture, say, during a descent from a mountain with the gear engaged.
This part of the injector system is specifically subject to the greatest wear, primarily due to microparticles of dirt that can wear out the injector channels and the locking mechanism.
Due to wear, the injector will begin to supply more fuel to the chamber than required. This affects the stability of the engine and power is lost.
Check Engine Error
When such signs appear, the “Check Engine” indicator lights up on the instrument panel.
Your first action in this case is to contact a service center where they can carry out diagnostics.
If it is determined that any of the injectors is not working correctly, the question of replacing it will arise.
In order not to bring the injectors to a state of wear when it becomes necessary to replace them, it is necessary to carry out their preventive maintenance at a certain time. Preventive measures include the fact that the injectors need to be washed in some way.
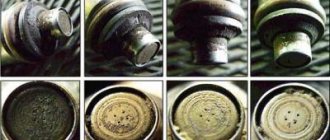
Why do injector nozzles become clogged?
The main element of the injector is the nozzles, which supply fuel to the engine cylinders.
Thanks to these devices, fuel is dispensed and atomized. If the nozzles are clogged, the injector efficiency will be reduced. What is the reason?
Today, there is an increasingly common opinion that the injector becomes dirty due to the use of low-quality gasoline, which contains foreign elements or even sand. In practice this is not entirely true.
The car's fuel system is well thought out. It provides several degrees of fuel purification, which prevents dirt from getting to the injectors, so the risk of injector contamination for this reason is minimal.
The system filters foreign elements, ranging from large fragments to small contaminants.
What causes the pollution? The main culprits are heavy fuel fractions that remain on the walls of the nozzles (nozzles).
Most often this happens after the ignition is turned off, when the body of the product heats up from the engine, and the cooling system no longer performs its functions.
At high temperatures, light fractions evaporate, but heavy fractions remain in the nozzle channels, gradually contaminating them.
Over time, the thickness of the deposits increases, which leads to a decrease in the cross-section of the nozzle and a deterioration in its performance. As a result, engine performance decreases.
The presence of heavy fractions in the fuel composition is a situation that is typical for low-quality fuel.
Such gasoline is obtained through direct distillation and performance improvement using high-octane additives.
Errors in fuel storage also lead to an increase in the volume of heavy fractions. The result is contamination of the injectors, and the car owner inevitably faces the question of how to clean them.
Cleaning injectors on VAZ 2113, VAZ 2114, VAZ 2115
Welcome! Fuel injectors are needed to spray the fuel that comes from the gas tank into the car engine, and to be more precise, they pour fuel directly into the cylinders so that it mixes with air and ignites the fuel-air mixture, if you don’t already know , but on a given mixture (namely, a mixture of fuel with air), the car’s engine works, if one thing is removed (Air, for example), then the engine will no longer start, because there will be no oxygen due to which gasoline should ignite (But pure gasoline it doesn’t burn), that’s why people (Scientists) gave this mixture the name “Fuel-air mixture” on which the engine runs and thus the car drives.
Note! To clean the fuel injectors, take with you a suitable tool, these include: A set of all kinds of wrenches in which there must be wrenches, as well as take screwdrivers, buy the liquid at the auto store “For cleaning carburetors” it’s called, but you still have when purchasing with talk to the seller, because if the liquid turns out to be too toxic, it can simply damage your injectors when you clean them from the inside, and you will also need wires that will have to be led from the battery and connected to the injectors (two thin wires of normal length will do just fine or better yet, a big one so that it’s enough, about 1 meter will suit you perfectly)!
Summary:
Where are the fuel injectors located? They are located on the fuel rail, but there is one But! As cars of the Samara 2 family were produced, they were equipped with completely different engines which, in principle, are similar to each other in operating principle, but different in spare parts (Although most of the parts in them are also similar) and therefore fuel rails on the same models (VAZ 2114 for example) may be completely different, but they all have the same location, namely under the receiver they are located, so that you can understand in more detail where it is, see the photo below, on which the location of the ramp itself is indicated by an arrow.
When should you clean fuel injectors? As soon as they become clogged due to poor-quality gasoline, they need to be cleaned, just clean them, for example, every 30,000 thousand km, we do not recommend that, as some auto repairmen claim, because if high-quality gasoline was poured into the car, then even after 50,000 thousand km, they will not be clogged and remember once and for all, if the car is still driving normally, without interruptions, and also has a smooth idle, then there is no need to get into the engine at all, by the way, about the fuel injectors , they only need to be cleaned when they become clogged, because cleaning does not lead to anything good, and there are even cases when after cleaning the injectors become unusable (In a word, cleaning the injectors harms them and therefore it should be carried out only when absolutely necessary), symptoms that the injectors the following will be clogged: The car will not drive properly, jerks will be noticeable when driving, and there will also be an uneven idle, the car may still have difficulty starting, and it may simply stall at idle, well, that’s all, these are the most striking symptoms that will happen to a car when the injectors are clogged.
How often should you clean the injector, and is it necessary to do it?
Against the background of the above, the conclusion suggests itself about the need to periodically check the condition and efficiency of the injector. The question is in what time frame this work is required.
Let us highlight the following trends:
- 30000 km . If the car owner fills the car with low-quality fuel during the initial period of operation, the injectors gradually become clogged with tarry deposits, which leads to deterioration in engine performance. In such a situation, it is worth figuring out how to clean the injector, and when it needs to be done for preventive purposes.
- 30-50000 km . In the absence of action on the part of the owner, the efficiency of the sprayers decreases by 5-7%, and the “gluttony” of the vehicle increases (on average by 2-3 liters). To eliminate existing contaminants, you cannot do without cleaning the injector.
- 50-80000 km . Further the situation worsens. After this period, the performance of the sprayers decreases by 12-15%, and the power unit itself begins to operate unevenly. Over time, the plunger damages the seat, causing the nozzle diameter to become larger. At the same time, contamination of the system occurs. How to clean the injector in this case? The only solution is considered to be a full-fledged flushing, but due to the increase in the diameter of the nozzles, this is not worth doing. And in general, replacing the part should be preferred over cleaning.
- 80,000 km or more . In this case, the efficiency of the nozzles decreases and the sprayers operate unevenly (deviations reach 30-50%). The issue of cleaning the injector becomes irrelevant, and the optimal solution is to install new parts, regardless of the condition of the latter.
It is worth noting that the nozzle is a consumable item, so you should not be afraid of replacing it. Each product has its own resource, after which a new element must be installed.
Manufacturers of many cars recommend replacing them at intervals of 100-120 thousand kilometers. This is true even with apparently normal operation of the products.
Do injectors need to be cleaned? Given the use of low quality fuel, the sulfur content of which is tens of times higher than EU standards, this is necessary.
The main thing is not to delay this process and do the work from the perspective of prevention, not “treatment.”
Experts recommend performing this work once every 25-30 thousand kilometers, but to get results it is important to understand how to clean the injector, what methods exist, and what their features are.
Chemistry
We want to flush the injectors, and the liquid will be intended for flushing the carburetor. Sometimes they write CARB & CHOKE on the can, but there is no difference. The Lavr brand, in turn, is doing well: here we see an inscription about injectors.
Aerosol packaging LAVR
Let's compare four main brands:
- LIQUI MOLY is the most versatile option. Cleans gently, but some deposits may remain. The price, oddly enough, is not the highest;
- Wynn's is the most aggressive drug. Deposits are removed completely. Not suitable for cars manufactured before 2002-2003.
- “Lavr” is the same as Wynn’s, but a little weaker. But the price is a record.
- Hi-Gear is the golden mean between Wynn's and LIQUI MOLY. Resinous deposits are removed well.
There are a lot of suitable brands: MANNOL, Abro, Horse, GUNK... And also 7CF, Valve, Johnsen's and SNAP. Choose any - you won't go wrong.
Main signs of malfunction: when to clean injectors?
Many car owners skip the period when it is necessary to flush the injector. In fact, there are several signs by which it is easy to recognize the problem:
- Increasing the “gluttony” of the vehicle. If previously the car consumed 8-9 liters in mixed mode, and now this figure has increased to 11-12 liters, this is a signal to action - the injector needs to be cleaned.
- Reduced engine power, as well as jumps in speed when operating at idle. Depending on the neglect of the situation, fluctuations in the range of 700-1400 rpm are possible.
Additional signs of malfunction include failure of the accelerator pedal, deterioration in dynamics and the appearance of jerking during acceleration, premature failure of the lambda probe and catalyst.
In addition, problems with injectors are often indicated by difficulties starting the engine and an increase in exhaust volume (excessive smokiness of exhaust gases).
It is worth noting that the problems listed above may occur against the background of other malfunctions. It is possible to find out the exact answer after a complete diagnosis of the system and restoration (replacement) of the injectors.
How to wash injectors without removing them from the engine
There is also a method in which the injectors are washed directly in the internal combustion engine system. To do this, disconnect the fuel system from the engine. Then the washing liquid (100 grams per 500 grams of its volume) is poured into a plastic bottle (a volume of 2.5 liters is sufficient).
Gasoline is also poured there (about half the volume of liquid). Instead of a cork, a hose is placed around the neck of the bottle. There should be a fuel pump embedded in the hose. When such a system is assembled, the engine must be started. This is done several times to relieve pressure in the system.
Then you need to remove the hose through which gasoline is supplied to the injectors, connecting the assembled circuit instead. First, after warming up the engine, you should remove the fuse located in the fuel pump circuit.
Another operation is to insert a plug into the return hose (you can use a bolt 10 millimeters in diameter).
After checking the tightness of the connections, you need to start the engine. After 5 minutes of operation, you should also stop for 5 minutes. During these minutes, the deposits in the nozzles will become wet. Then the internal combustion engine starts again and continues to work for about half an hour.
Basic methods for cleaning an injector
Today, there are several options for cleaning the injector with and without removing the injectors, they differ in their operating principle and efficiency:
- Application of automotive chemicals (special products). This method is good because it is accessible, because car stores are stocked with many types of fluids for restoring injectors. How to clean the injector this way? It is enough to select the appropriate option, add the product to the fuel tank (taking into account the manufacturer’s instructions), refuel and continue to operate the car. What are the features, pros and cons of the method, we will consider below.
- Using the capabilities of ultrasound. This option is more advanced and high-tech, and therefore gives better results. The difficulty is that the work is carried out using expensive equipment that is available only in specialized workshops. The operating principle is based on the use of ultrasound. When compared with other methods of cleaning the injector, this technique is the safest and most effective.
- Chemical method (washing). This cleaning option is good because it covers the injectors and the fuel system as a whole. Here a special washing stand is used, which is connected to the fuel system of the machine. Before performing work, the fuel tank is turned off. As a result, the flushing fluid cleans the pressure regulator, intake valves, injectors and even the fuel rail. PHOTO 6 But there are many ways to clean the injector (nozzles) using a chemical method at home.
Some options for self-washing the injector offered by drivers.
Things to take note
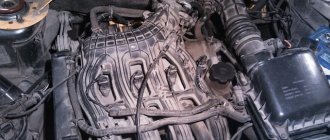
To repair the fuel system yourself on a VAZ, you will need to remove the receiver.
This is carried out in several stages:
- First, remove the throttle controls from the receiver, then loosen the retaining clamp and disconnect the vacuum hose.
- The fuel pipe holder is being dismantled.
- The bracket-clamp of the throttle drive cable is removed.
- The 5 fastening nuts are twisted and the pressure adjustment hose is disconnected. After this you will be able to remove the receiver from the studs.
This is the only way to gain access to the fuel rail.
Injector cleaning options and basic tools
Now let's take a closer look at how to clean the injector, and what tools can be used to solve such a problem.
Automotive chemistry
As noted above, the simplest option is to use a special additive, which is added to the fuel tank, mixed with fuel, passed through the system and cleans the injectors. This product is recommended to be used as a preventive measure, once every 5000 km. In addition, it should be used in “young” cars with low mileage.
What is the reason for such a requirement? If the vehicle's fuel system has not been cleaned for a long time, a large number of deposits accumulate in it.
If the car owner decides to clean the injector using additives, the latter cause the dirt to fall away from the walls, after which the main elements of the system become clogged. The first thing that gets dirty is the fuel pump.
The main representatives of auto chemical products include:
Liqui Moly (Liqui Moly) Injection Reiniger High Performance series.
According to the manufacturer, this product can help out even with serious contamination.
Its use eliminates the consequences of using low-quality fuel. After cleaning, engine power increases, fuel consumption decreases and the volume of harmful emissions into the atmosphere decreases.
How to clean an injector using Injection Reiniger High Performance? The packaging contains instructions according to which it is recommended to add 300 ml of liquid to a full tank of fuel from time to time.
Regular use of the product helps to avoid contamination, keep the system clean, and increase the efficiency of intake valves and injectors.
The use of the composition is recommended in case of problems with starting, a decrease in engine power, deterioration of exhaust gases, as well as in the event of other malfunctions associated with contamination of the injector.
Liqui Moly (Liqui Moly) series Langzeit Injection Reiniger.
The product also fights existing stains and prevents the formation of new deposits. Used to clean injectors, intake valves and other elements of the fuel system.
Regular use of the product allows you to maintain engine power, reduce the risk of failures in its operation and extend the service life of the catalyst.
To clean the injector, just add 10 ml of liquid per 10 liters of fuel. The additive mixes itself with gasoline and performs a cleaning function.
Liqui Moly (Liqui Moly) series Injection-Reiniger.
Another modern product that provides quick cleaning of injectors and other elements of the fuel system.
The use of the additive guarantees the removal of carbon deposits and deposits that appear on fuel lines, intake valves, dispensers and other components.
Periodic use of the fluid ensures smooth running, engine response, better combustion of the combustible mixture, reduction of harmful emissions, and reliable protection against rust.
Features of the product include compatibility with catalysts, as well as the possibility of use on all types of gasoline engines with an injection system.
According to the manufacturer, the anti-corrosion characteristics of the additive are maintained for 2000 km.
To clean the injector using this product, just stir it in a ratio of 1 to 230.
So, 200 ml of additive is enough to prepare 70 liters of fuel. The tank should be 75% full when adding.
Liqui Moly (Liqui Moly) Injection Reiniger Light series.
This is a mild cleaner that is suitable for gasoline engines with various injection systems. Used as preventive maintenance and periodic cleaning of the fuel system.
The manufacturer claims that the cleaner does not lift dirt from the fuel tank and does not clog fuel lines. Existing contaminants are dissolved and removed from the system.
If you clean the injector in a timely manner using Injection Reiniger Light, engine starting is improved, the volume of harmful emissions is reduced, and reliable protection against corrosion is provided.
The peculiarity of the additive is that it has no negative effect on the catalyst.
To clean the injector, you need to add 0.25 liters of additive to a full tank of fuel. The volume of gasoline should be no more than 70 liters.
Liqui Moly (Liqui Moly) Injection Reiniger Effectiv series.
This composition is suitable for cleaning injection power systems in the presence of obvious symptoms of contamination - engine problems, engine failures, and others.
The best option is to use the product every 2000 km. The additive is especially useful when low quality fuel is poured into the car.
To clean the injector, 300 ml of additive per full tank of fuel is enough. The product is mixed with gasoline, cleans the fuel system, protects it from corrosion and deposits in the future.
JET 100 ULTRA XADO.
Universal cleaner for injector and carburetor.
Its advantages include high efficiency, as well as the ability to remove all types of contaminants (dust, deposits, gasoline films, varnishes and others).
The use of the additive helps restore the factory characteristics of the injector, remove existing dirt from the fuel system, as well as the line through which the air flow is supplied.
The advantages include safety for catalysts, reduced fuel consumption, and restoration of the previous engine power.
Before cleaning the injector, it is recommended to start the engine and spray the mixture onto the throttle valve.
After this, the engine should run at high speeds for 4-5 minutes.
You can clean the injector in another way - spray the composition directly into the fuel tank. In this case, 20 liters of fuel requires spraying for 12-15 seconds.
The advantage of this method is the possibility of comprehensive cleaning of the system - intake valves, fuel tank, gas lines, injectors and other elements.
XADO MaxiFlush.
Concentrated additive containing highly effective elements. Purpose: cleaning the fuel system of gasoline engines.
The result of using the additive is to normalize engine operation, eliminate problems with idling, and reduce the volume of harmful emissions in the vehicle exhaust. Used in injector cleaning installations.
The advantages include quick removal of contaminants, cleaning of the combustion chamber, fuel nozzles and other elements.
If you clean the injector using XADO MaxiFlush, you can reduce fuel consumption, restore the spray pattern and optimize the fuel combustion process.
Regular use of the additive helps to increase the reliability of the system and increase the efficiency of injectors by 3-4 times.
To completely clean the system, 300-350 ml of product is required. If the composition is used in professional installations, mixing is carried out in the ratio of 300 ml of additive per 700 ml of gasoline.
If you need to clean the injector without additional equipment, you should add the product to the tank at the rate of 300 ml of additive per 40-80 liters of gasoline.
Features of the composition include a mild effect on catalysts and lambda probes. Cleaning frequency is every 15-20,000 km for prevention.
EGR Verylube XADO.
A modern product for cleaning the recirculation system valve, as well as the injector flap. Can be used for carburetor engines.
The use of an additive helps restore factory parameters. To clean the injector valve, it is recommended to heat the engine and spray the mixture onto the throttle valve, after which the engine should run at high speed for 4-5 minutes.
XADO VERYLUBE.
A universal composition designed for cleaning carburetor and injection engines. Its advantages include high speed of action and increased efficiency.
As a result of application, it is possible to clean the injector, remove carbon deposits, films and deposits from the elements of the fuel system.
The use of the composition as a preventive measure helps maintain engine performance and injector efficiency throughout the entire service life of the vehicle.
As a result of use, the volume of harmful emissions into the atmosphere is reduced. The product has a loyal effect on oxygen sensors and catalysts.
To clean the injector using this additive, you need to warm up the engine and spray the composition onto the car's throttle valve. The engine should run for another 4-5 minutes at high speeds.
An option with complex cleaning is possible, when XADO VERYLUBE is added directly to the car tank. In this case, the intake valves, pipelines, spark plugs and other elements are cleaned.
To achieve the result, it is enough to spray the additive into a tank with 20 liters of fuel for 12-15 seconds.
Ultrasonic cleaning, its features and disadvantages
An excellent option is to clean the injector using ultrasound. In this case, the injectors are removed from the engine, after which they are diagnosed on a special stand, and then, if necessary, placed in a bath with a special liquid.
After this, the part is exposed to ultrasonic waves. The ultrasound source is located at the bottom of the container into which the sprayers are lowered.
The following happens: under the influence of ultrasonic waves, the water in which the nozzles are located begins to vibrate. But since the liquid cannot vibrate at a frequency equal to the frequency of the ultrasound acting on it, microbubbles are formed and explode.
During microexplosions, water under high pressure acts on the nozzles, clearing them of contaminants.
As a result of such manipulations, the nozzles and the outer part of the nozzles are cleaned of contaminants.
It is worth noting that removing contaminants from the inside of the nozzles is only possible by opening and closing the nozzles directly in the bath. Otherwise, you will only be able to clean the outer part of the part.
In general, the use of ultrasound is most effective, because even the most persistent contaminants are eliminated. The disadvantage of this method is that it costs a pretty penny for the car owner.
The principle of ultrasonic cleaning is simple. First, the injectors are removed from the machine, they are inspected and installed in a special stand.
At the initial stage, the quality of the spray is checked, after which the sprayers are cleaned in an ultrasonic bath in a gentle mode. Once this work is completed, the check is performed again. If the result cannot be achieved, cleaning is carried out a second time.
If required, a new filter and o-rings are installed. Then the injectors return to their place.
According to experts, it is possible to clean the injector using ultrasound even after 100 thousand kilometers. But here everything depends on the degree of contamination of the part.
As for the disadvantages of this method, there are two of them - high price, as well as risks for nozzles, which may fail during the cleaning process.
There is a danger that the car owner will spend a lot of money on cleaning, but there will be no result.
Chemical method (liquid washing)
Another way to clean the injector is to use special chemical compounds.
The bottom line is that cleaning equipment is connected to the injector using adapters. In this case, it is not fuel that is supplied to the injectors, but a flushing composition (for example, Liquid Moly, Carbom Clean, Vince). The washing mixture is supplied using tubes.
Thanks to the use of a fitting, the fuel pump, filter, tank and fuel line are not involved in cleaning.
The mixture of gasoline and cleaner is supplied under pressure, which is set taking into account the manufacturer’s recommendations. As a result, contaminants are broken down and released through the nozzle holes, after which the residues are burned in the cylinders. The procedure takes 30-50 minutes.
Despite its apparent effectiveness, this method does not always guarantee results. It is rarely possible to clean the injector 100%, because a small amount of the flushing compound remains in the injectors and oil system. Therefore, immediately after completing the work, it is recommended to drive 12-15 km in forced mode, and then change the oil and filter.
The disadvantage of this method is its high time and financial costs. The method is suitable for cars that have traveled a short distance, and dismantling the sprayers is associated with great difficulties.
Let's look at liquids that can be used to clean injectors:
- WYNNS - a German product intended for cleaning the injector. It is versatile and suitable for all types of gasoline engines (with direct injection and carburetor). As a result of the application, it is possible to clean the fuel system, reduce the volume of harmful emissions and improve the characteristics of the injector. There is no need to change spark plugs after cleaning is completed. The frequency of application is once every 20-30 thousand kilometers.
- Runway — flushing liquid for injector, sold in 0.3 l container. Its action is aimed at flushing the injector, maintaining and normalizing the injection quality. The composition lubricates the system and protects fuel injectors from contamination. Regular use guarantees improved vehicle response, reduced emissions, and reduced fuel consumption. The advantages include the absence of soot and deposits after use. To clean the system, just pour the liquid from the bottle into a tank with 50-60 liters of fuel. The frequency of manipulations is once every 3-5000 km.
- WYNNS Injection System Purge — flushing liquid for removing deposits and contaminants in injection engines. Using the product, it is possible to clean the combustion chamber, valves and their stems, injectors and other elements of the injection system. The result is restoration of injector efficiency, normalization of engine operation, improvement of compression ratio and other parameters. The cleaning liquid is safe for catalysts and spark plugs. Used once every 20-30 thousand kilometers.
- KENT - a powerful carburetor and injector cleaner. Available in 0.5 liter bottles. This is a fast-acting composition that has the following advantages - versatility, high drying speed, safety for catalysts, removal of various contaminants (varnish, glue, grease), as well as ensuring uninterrupted operation of the engine.
- Toyota D-4 Fuel Injector Cleaner - a composition with which it is possible to clean various types of fuel systems from the accumulation of carbon deposits. The use of the composition helps remove moisture, provides protection against corrosion and the appearance of ice “plugs”. Use for preventive purposes ensures cleanliness and maximum efficiency of injectors. Recommended for use on Toyota vehicles.
The use of a cleaner is important when fuel consumption increases, engine malfunctions at idle, and “dips” appear during the acceleration process. It is not recommended to use the composition on carburetor engines. The optimal time to clean the injector is during the oil change period. To do this, just add Toyota D-4 Fuel Injector Cleaner to a half-empty tank. Immediately after mixing, fuel must be topped up to 100%. One bottle of the composition is enough for 70 liters of gasoline.
Logbook VAZ 21074 (2006)
Do-it-yourself: Cleaning VAZ-2107i injectors with Laurel ML101
Hello everyone, this fall I decided to replace the fuel filter during off-season maintenance, and at the same time wash the injectors, which I have never cleaned since the purchase, fortunately an acquaintance brought me a bottle of Lavra from work, the same brand had previously decoked the rings when changing the oil.
So, there were no special comments on the operation of the injectors, only the tachometer needle moved a little at idle, I filled up with gasoline at a proven network of gas stations, but I decided to clean it as a preventive measure. The previous owner also cleaned them regularly, using an old pump that was connected under the hood to a pipeline; I don’t have one, so I decided to make do with the standard one from the gas tank. Since the wash cannot be diluted, I had to disassemble the tank and pull out the pump, dip it in the product and let the motor run on it.
It looks like a greenish liquid with ammonia odor. The smoke from the exhaust was a little smoky, but the engine ran smoothly as usual.
Everything was done according to the instructions.
The remainder of the product was then poured into the gas tank.
At the same time, I checked the mesh on the pump - it was as clean as it was when I cleaned the gas tank a year earlier.
Then I put everything back together and replaced the fuel filter with a new one, since all the crap from the fuel lines should have accumulated in it.
I also replaced the air filter - I change it once a year before winter. Old and new.
So, after washing, the oscillation of the needle did not change much, it also “walks” a little + -50 rpm.
But the low-end thrust and engine response have noticeably increased, acceleration has become more dynamic, in 4-5 gears this is no longer so noticeable. Perhaps this was also influenced by the replacement of filters, or the catalyst was also cleaned), I don’t know. But there is an effect from this procedure.
Also, apparently, the float was bent a little during assembly and disassembly - the fuel level light began to light up only when there were already 2-3 liters left in the tank, because of this, then it almost stopped on the road.
How to clean the injector yourself: the best ways
Now let's look at methods for cleaning injectors that can be used in a garage and will give the expected result.
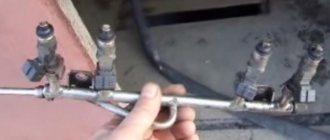
The first method of cleaning injectors (using the example of a VAZ-2110)
The work is performed according to the following algorithm:
- Start the engine, then remove the fuel pump power fuse. This is necessary to reduce the pressure in the fuel supply line. The engine will stall on its own;
- Discard the terminals from the sprayers, as well as the two hoses (cordless and reversible);
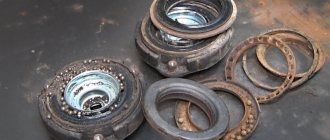
- Unscrew the tablet with nozzles and remove the sealing rings.
Now you can clean the injector. To complete the work, you will need carburetor flushing fluid and a device that allows you to blow the composition through a nozzle under pressure.
As an option, it is possible to use a plastic bottle combined with the hole at the nozzle inlet, as well as a container filled with cleaning liquid. Now connect a pair of wires from the battery to the terminals of the injector nozzle.
Next, open and close the circuit to achieve the closing and opening of the injector, respectively. At this moment, flushing liquid passes through the nozzle under high pressure. According to car owners, after 3-6 passes it is possible to achieve optimal spray. If it was not possible to clean the injector, it must be replaced.
Second method (using the example of Mazda 5)
The appearance of soot on the spark plugs, soot on the valves and piston crowns, as well as a decrease in engine power indicates the need to flush the system.
To do this you will need:
- WYNNS fluid, which allows you to clean the fuel system and not change the spark plugs after that;
- Hoses and clamps;
- Crocodiles for fixation.
The following is the algorithm:
- Assemble the cleaning unit. In this case, the tube from the pump to the ramp should be 28 cm shorter than the return. This is a necessary condition, because the tubes used are two-layer, so they are difficult to bend.
- After preparing the system, it is necessary to remove the fuel pump relay (located in the safety box in the engine compartment).
- To find an approach to the return pipe, you will need to dismantle the fastening of the electro-pneumatic valve strip. Move the part back a little and remove the original Mazda hose. Next, put on the clamp.
- To remove the supply tube, remove the rubber corrugation that connects the throttle valve unit and the air filter.
- Remove the electro-pneumatic valve of the exhaust gas recirculation system.
- Press the lock on the left and right and remove the supply hose. Next, put on the supply tube from the prepared device.
- Return it to its place and tighten the corrugation. Next, pour 0.5 liters of liquid into the jar, turn on the electric pump, start the engine and let it work out all the available composition at idle. This takes 10-15 minutes. To speed up the process, remove power from the ignition coils and crank the starter, forcing fluid into the cylinders.
- All that remains is to clean the knots after soaking. To do this, you need to fill in 0.5 liters of clean liquid and let the engine run under different loads.
- Collect everything using the reverse algorithm. Pay careful attention to the quality of the hose connections (there should be no leaks).
How to clean injectors by removing them (method No. 3)
To complete the work, you will need carburetor cleaning fluid, a non-latching button, a 5 cc syringe, wires with four terminals and a charging power supply.
To clean the injector, proceed as follows:
- Insert a thin tube into the outlet of the syringe (make a seal so that it holds tightly);
- Place the nozzle on the other side of the syringe;
- Assemble the diagram. Embed the button that was prepared before starting work into one of the power supply wires;
- Connect the terminals to the injector and turn on the charger power to the outlet. Press the button several times and make sure that the nozzle opens when power is applied;
- Connect the bottle cap to the other side of the thin tube coming out of the “nozzle” of the syringe. The place of twisting can be sealed with something;
- Press the spray button several times, then press the button 2-3 times. First place a transparent container under the nozzle outlet to be able to analyze the spray quality.
- Repeat the procedure as many times as necessary.
Fuel rail of a VAZ 2107 car – removal – installation
We remove the fuel rail from the VAZ 2107 car to check or replace the injectors, as well as when removing the intake manifold pipeline. To check the injectors you will need an ohmmeter.
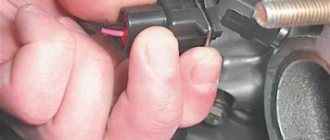
Removing the fuel rail and injectors from a VAZ 2107 car 1. We prepare the VAZ 2107 car for operations (see “Preparation of the VAZ 2107 car for maintenance and repair”). 2. On a VAZ 2107 car, we relieve the pressure in the engine power system (see “Relieving pressure in the power system of an injection engine”). 3. Disconnect the wire from the negative terminal of the battery (see “Battery VAZ 2107 - removal and installation”). 4. Having released the latch, disconnect the injector wiring harness block from the engine harness.
5. Using an ohmmeter, we check the resistance of the injector windings by connecting one probe to terminal E (“ground”) of the wire block, and the other - alternately to four terminals (F, G, B, C), measuring the resistance of each injector, which should be within 12 -14.5 Ohm. 6. Remove the receiver from the VAZ 2107 car engine (see “Receiver - removal and installation”). 7. Using a 17 mm wrench, unscrew the fitting of the fuel drain tube from the fuel rail, holding the hose tip with a wrench of the same size.
About prevention
Here I would like to talk about a cleaning method in which special additives are added to the gas tank. Unlike others, this method has not been scientifically proven. In addition, an additive that is suitable for a certain type of engine may not be suitable for another.
The additive is added to the gas tank, so its chemical elements will affect the entire fuel system.
If anyone decides to use the additive as a means of prevention, carefully study the reviews, as well as the manufacturer’s recommendations. The main thing is not to harm the engine.
And the most reliable and inexpensive way to prevent the fuel system is, oddly enough, to fill in with high-quality fuel, use the same fuel filter and change it in a timely manner.
Traditional methods
You shouldn’t stop at just these methods. Some car owners like the way additives work. Others say that they pour a little kerosene into the tank and are not aware of such problems. Still others say that using additives is a lottery, rather than washing injectors without removing them from the engine. Advice from experienced car owners confirms that the most effective method is cleaning with a bottle and a separate fuel pump.
It is important for all drivers to ensure the smooth operation of the car engine. Injection machines require special attention. Such engines should have their injectors flushed periodically. Poor quality fuel clogs the injector. And already at idle speed problems appear. To eliminate them, drivers will need a skill such as cleaning injectors without removing the injectors from the engine.
Results
As you can see from the article, you can clean the injector in several ways - at a service station or at home. The main thing is not to start this process and begin prevention after 5-7 thousand kilometers.
If the fuel system has not been cleaned for a long time, there is no need to rush - you should undergo diagnostics at a service station and listen to the recommendations of specialists. Otherwise, serious consequences are possible.
You can clean the injector of a new car using auto chemicals (special additives). They are recommended to be used at intervals of 5 thousand kilometers. If the car has traveled 100-110 thousand kilometers, it is advisable to use professional washing methods on a special stand or using ultrasound.
If the car has driven more than 150,000 km, it is useless to clean the injectors. In such cases, the part is so dirty that replacement is the only solution.
Purification process
You need to press and hold the spray can. Then he presses the button that serves as a switch - once every 5 seconds with a press delay of 0.3 seconds.
- There should be 5 presses in total. The nozzle is removed and put aside, waiting until washing dissolves the internal blockages.
- The remaining injectors are also washed in this way. The washing procedures are completed when all parts are sprayed equally.
This happens in 3-4 cycles of repetitions. You also need to blow out the nozzles with compressed air by pressing the button; if necessary, the sealing rubber bands are replaced and installed on the machine.