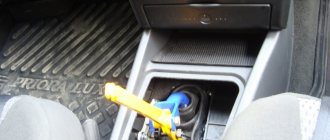
Removal
2. Use a screwdriver to pry off the cover.
. and, turning the handle left and right, we pull it up together with the cover, and also remove the polyethylene tube and foam ring from the lever.
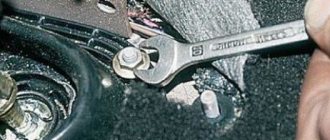
3. Hold with a 13 mm
the bolt securing the rod to the lever from turning, use a second wrench of the same size to unscrew the nut.
4. Remove the bolt and remove the lever from the traction fork.
5. Remove the plastic centering bushings.
6. Remove the steel spacer bushing from the lever hole.
7. To make it easier to remove the rod, remove the floor tunnel lining (see “Floor tunnel lining - removal and installation”).
8. From below the car with a 10 mm
Unscrew the four fastening nuts and remove the screen.
9. Mark the relative position of the drive rod and the hinge.
10. Hold with a 13mm
clamp bolt, use a second wrench of the same size to loosen the nut.
11. Unclench the clamp with a screwdriver and move it along the rod.
12. Apply penetrating lubricant to the connection between the rod and the hinge.
13. Unclench the rod with a screwdriver.
14. Disconnect the rod from the hinge.
15. Inside the car, remove the rubber seal from the hole in the car body.
16. Push the seal and rod down through the hole.
17. From the inspection hole, remove the rod assembly with the seal.
18. Remove the seal from the rod.
19. To remove the lever, remove the right trim of the instrument panel console (see “Instrument panel - removal and installation”).
20. 13 mm
Unscrew the two rear mounting bolts for the lever bracket.
21. Remove the bracket assembly with the lever.
Adjustment
1. Move the gear shift lever to the neutral position.
2. Loosen the tightening of the drive rod clamp of the gear shift mechanism (see above, paragraph 10).
3. Inside the car, an assistant sets the lever almost vertically (moving it slightly back) and holds it in this position.
4. 13 mm
tighten the nut of the coupling bolt of the drive rod mounting clamp, holding the bolt from turning with a wrench of the same size.
5. Check that all gears shift easily. If necessary, repeat the adjustment.
Note: When engaging third or fifth gear, your hand should not rest on the instrument panel console. When engaging reverse gear or fifth gear, the gear shift lever should not fall onto the front seat cushions (set to the middle position).
Source
Adjusting the gear shift drive
Adjustment may be required after removing and reinstalling the gearbox, as well as in case of unclear gear shifting during vehicle operation.
You will need: keys “13”, “17”, screwdriver.
1. From below the car, loosen and unscrew the nut of the clamp bolt on the transmission control rod by 3–5 turns.
2. Use a screwdriver to slightly widen the groove of the clamp and the groove at the end of the rod to ensure free movement of the rod relative to the gear selection rod, and set the rod to the neutral position.
3. Inside the car, remove the gear shift lever cover from the floor tunnel housing, lift the cover up along the lever and install the lever so that its lower (non-bent) end is approximately vertical.
4. From below the car, using light hand movements (so as not to move the gear selector levers), select the axial play of the rod in the rearward direction and its angular play in the counterclockwise direction.
5. Tighten the nut of the clamp bolt, placing the clamp at a distance of 1–3 mm from the end of the rod.
Varieties of backstage
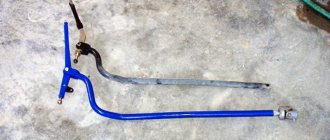
All existing models can be divided into two large groups: long-stroke and short-stroke. Within these groups, various designs with their own characteristic features are allowed.
- Long-stroke scenes are usually called standard. These are the parts that the manufacturer installs on various VAZ models (from 2109 onwards).
- Short-travel rockers are more common in Kalina cars. However, the design of both parts is very similar.
What then is the difference between these devices? It's their size. The short-stroke rocker is smaller, so its big advantage is the convenient lever travel. Gear shifts with higher precision. Perhaps the most serious drawback of this device is its price. As a rule, a short-stroke link costs much more than a long-stroke one. In addition, some car owners note that after replacing a standard part with a short-stroke one, they have to use more force to change gear. So, how to adjust the rocker on a VAZ 2115?
For novice motorists: repair and maintenance of the VAZ 2105 gearbox
The first VAZ 2105 models were produced with a four-speed gearbox. Later, the gearbox was modernized by adding a 5th speed. The main advantage of the new box is reliability and ease of use. It has a long service life, allowing it to operate for a long time without repairs with minimal maintenance. A big plus is good repairability and availability of spare parts. You can do transmission repairs yourself in the garage with a standard set of keys.
Transmission unit maintenance - oil change
In order for the gearbox to work properly, it is necessary to carry out regular maintenance in accordance with the regulations. Transmission oil is intended only to lubricate the parts included in the assembly. Therefore, the lubricant is replaced after 60 thousand kilometers.
Backstage adjustment
This procedure can be carried out using the following simple steps:
- The nut located on the clamp needs to be loosened.
- Adjust the position of the lever - move it to the reverse speed position, and then tighten the nut on the clamp.
- Check how the gears are engaged: if the reverse gear has moved too far to the left, you need to loosen the clamp a little and smoothly turn the cardan counterclockwise. If the speed goes to the right, the cardan must be rotated clockwise.
How to check whether the adjustment was carried out correctly? To do this, the lever must be installed in the center. If the transmission is in neutral, then everything was done correctly.
Important reminder: The lever must be positioned so that it can move freely without impacting the passenger seat (in fifth gear) or the driver seat (in reverse). Otherwise, the lever must be readjusted.
Cardan wings from Kalina on VAZ 2115
The cardan installed by the manufacturer on the VAZ 2115 is characterized by small backlashes. To get rid of the associated vagueness in switching, you simply need to replace the “native” part with a cardan from Kalina. The experience of many motorists shows that it is more reliable and can last much longer than the standard one. It is worth considering that the Kalinovsky cardan is slightly longer than the standard one. For this reason, it must be shortened before installation. For this procedure you will need the following equipment: a grinder, a clamp, tape and a grinding tool. And, of course, it is important not to forget to first remove the “native” cardan. How to make the driveshaft from Kalina shorter:
- Compare the sizes of the standard and Kalinovsky universal joints, and wrap the part that needs to be cut with tape.
- Install the cardan into the clamp and get rid of the excess length using a grinder.
- Go over the finished part with a sanding tool. This will make it easier to install.
The following are the steps on how to install a prepared cardan on a VAZ 2115:
- Check how accurately the cutting was done - to do this, the part must be inserted into the hole allocated for it. If the cardan fits in without problems, then the trimming was completed successfully.
- Install the backstage boot.
- Place the newly shortened cardan and secure it with a wrench.
- Pull the previously installed boot completely onto the cardan.
It is important to remember that the oil seal may also need to be replaced. So during the process of replacing the cardan, it is worth inspecting the oil seal for damage.
Replacing the universal joint
Most often, faults occur in the cardan, and not in the rocker itself, so it is this that needs to be replaced. Even the slightest displacement of the cardan can cause failures in the entire gear shift mechanism.
- Step 1. Release the clamp on the drive rod and pull it off the rod.
- Step 2. Remove the boot and knock down the cardan. This must be done carefully, with light blows of a hammer. If cuts or other damage is found on the boot, it is best to replace it with a new one.
- Step 3. Install the new universal joint. In this case, you need to do all the steps in reverse order, but do not tighten the clamp. After this, it is necessary to adjust the system (the sequence of actions is described in the corresponding subtitle of the article).
In this guide, we talked in detail about adjusting the shift link on the VAZ 2115, listed the types of this part, suggested how it can be modified, and also described the process of replacing the gear shift link.
Source
Let's sum it up
As you can see, if problems arise with shifting gears, replacing the rocker on a VAZ 2110 is a last resort. In fact, problems can often be resolved by setting up and adjusting the rocker, as well as overhauling the mechanism and replacing individual worn parts (you need a VAZ 2110 rocker repair kit).
We also recommend reading the article on how to replace the cover on the gearshift lever. From this article you will learn how to remove the gearshift lever cover and replace this element with a new cover.
Before starting disassembly, it is important to make sure that the gears are difficult to engage precisely because of malfunctions of the backstage. The fact is that malfunctions of the clutch or the gearbox itself can also have similar symptoms. For this reason, it is important to make sure that it is the gear shift mechanism that needs revision or replacement.
How to adjust the rocker on a VAZ 2114, varieties, repairs
The VAZ-2109, 2114 rocker is a simple mechanism with which gears are changed. The driver, applying force in one direction or another, acts through the rocker on the gearbox. This switches on the required speed. Very rarely, the mechanism breaks down and requires partial or complete replacement. Most often the cardan shaft fails. Changing it won't be difficult. But if the rocker itself is broken, you can think about a little tuning - make a short-stroke one. This will require less effort to engage the desired gear.
1-gearbox housing, 2-gear selection mechanism housing, 3-gear selection mechanism, 4-clutch housing, 5-rod lever, 6-gear selection rod, 7-rod hinge, 8-gearbox control rod, 9- rod protective cover, 10-shift lever, 11-spherical lever pin, 12-ball lever support, 13-clamp, X-distance between the ends of the clamp and the link
Dismantling
All gearbox repair work involves its removal. They pass on an overpass (you can park the car over the pit). For dismantling you will need a set of keys and screwdrivers. If possible, it is better to carry out dismantling together. This speeds up the process significantly.
- The power is turned off and the battery is removed. The oil is drained from the box and the starter is removed. The wires and protection are removed from the unit and 2 nuts from the bottom and one nut from the surface of the starter are unscrewed.
- The connecting cable between the clutch release fork and the gearbox is removed.
- The wires on the speed sensor are disconnected.
- The reverse sensor wires are disconnected.
- Remove the torque rod bracket bolts.
- Jet thrust is removed.
- The wheel drives are dismantled. The left wheel drive is completely removed. The right wheel drive is disconnected and placed next to the gearbox on the housing.
- Remove the bolts securing the steering knuckle from the left ball joint.
- The gearbox mount to the engine is dismantled. On the lower right side, the brackets are removed from the studs.
- Remove 3 bolts of the housing cover from the clutch housing.
- The bolt is unscrewed from the lower left gearbox mount.
- Unscrew the engine fixing nuts from the left and rear supports.
- The bolts securing the gearbox to the rear engine mount are unscrewed.
- The rear engine mount is removed.
- The box moves backwards from the guides. To do this, place a screwdriver in the hole between the cylinder block and the clutch housing and, pressing, move the gearbox. The rear part of the gearbox should go above the suspension extension, the input shaft should be disconnected from the clutch.
- The box of the VAZ 2114 is carefully removed from the car.
Varieties of backstage
Despite the different design models, only two types can be distinguished:
- Long-stroke (standard, previously installed on cars of model 2109 and similar).
- Short-wheel drive (installed on Kalina cars).
Structurally they are very similar, only different in size. The advantage of short-throw ones is that with their help, gears are engaged easier and faster.
True, many myths have formed around the gear shift: some claim that the dynamic characteristics of the car are significantly improved. This is all wrong; there is no connection between the dynamics of the car and the view of the backstage. But still, the short-stroke one has advantages over the standard one.
Why change the backstage
There are situations when it is necessary to intervene in the gear shift mechanism due to the failure of a component. But there are cases when an extreme measure is required - replacing the VAZ-2109, 2114 rocker.
In these cases, replacement is required:
- An oil leak appeared due to damage to the oil seal. Only the oil seal can be replaced.
- Complete failure of the scenes.
- You have realized the advantages of a short-stroke design and you have the funds for this kind of tuning.
Symptoms of gear shift mechanism failure:
- Increased gearshift lever play. Please note that this behavior may also be caused by a loose cardan. Sometimes the bolt securing it gets screwed out, so to reduce the backlash it is enough to tighten it, and first apply a drop of thread locker.
- Difficult to shift into gear. Sometimes extraneous sounds are heard.
- Gear shifting is not possible.
- Inconsistency between the position of the lever and the selected speed. For example, the back one disappears, and the first one is in its place.
If a slight play appears, it is advisable to carry out diagnostics and identify the breakdown of the unit. Make repairs immediately, otherwise one or more speeds will disappear at the most inopportune moment.
Do-it-yourself short-throw scaffold
A similar device can be installed on any VAZ car (both classic and front-wheel drive) with your own hands; below are examples of how this is implemented.
Short-stroke link for classics
For production in this case you will need:
- a piece of pipe with a diameter of fifteen millimeters;
- nut from a classic ball nut;
- RPP from 2108;
- backstage repair kit 2108 (axle and two bushings);
- cardan from the steering mechanism 2104, 2105 or 2107.
The work is performed as follows:
- The ball from the bottom is cut off from the RPP;
- The lower part is sawed off so that a pipe can be inserted into it and scalded;
- The nut is welded to the pipe from below;
- The ball is placed in a convenient place;
- The cardan is attached to the gearshift lever.
The described process is illustrated by the following photographs:
Short-stroke rocker VAZ 2109
One of the main parts will be a cardan from Kalina, which will help avoid play in the lever.
Next you need to complete the modification, as shown in the photographs:
Then two pieces of metal are welded
After finishing the work, you need to clean all the seams and paint them in the desired color.
The short-throw shifter, which you install yourself on many VAZ car models, has its pros and cons, but it allows you to reduce gear shifting time and makes it easier to control the car. Whether to do it or not is everyone’s personal choice, but it cannot be denied that such a modification is perceived by many as necessary and useful.
Rate the usefulness of the article!
- Why do brake pads squeak when braking and what to do about it
- Replacing engine mounts on VAZ and other cars
- Car rental: what you need to know when choosing
- What does the braking distance depend on and what formula can it be calculated by?
- How well do you understand car emblems?
- How to remove the outer CV joint and replace a torn boot
- How to independently replace the internal grenade on VAZ cars
- Wheels for rotating the car in place 360 degrees
- In 3 years, diesel engines will become a luxury
- Review of the most expensive Hyundai Solaris ever
- Test drive Lamborghini Huracan from Mikhail Petrovsky
- Electrical equipment
- Engine
- Brake system
- Other
- Steering
- Transmission
- Suspension
- Tuning
VAZ 2110
- Other
- Engine
- Steering
- Electrical equipment
- Transmission
- Brake system
- Suspension
- Tuning
How to replace the universal joint
In most cases, it is not the rocker itself that fails, but the cardan. Due to its displacement, even a small one, a failure occurs in the gear shift mechanism.
Standard VAZ-2109,2114 scenes are rarely installed during repairs; similar parts from Lada Kalina are used. The replacement looks like this:
- Using two keys set to “13”, unscrew the clamp securing the cardan to the rod.
- Using a screwdriver, pull the boot towards the box housing. If desired, you can remove it completely, and if it has cuts or other damage, replace it with a new one.
- Unscrew the fixing bolt with a “10” key.
- Knock down the cardan with a hammer, strike carefully so as not to damage anything.
- The Kalinovsky universal joint is much more durable and reliable, so install it instead of the standard one.
- Reassemble the entire structure in reverse order. But do not rush to tighten the bolt on the clamp - adjustment is necessary.
Price issue
If you decide to replace the rocker seal at the same time as installing the rocker itself, this can be considered absolutely the right thing to do. Additionally, replacing the driveshaft will not cost much, but the efficiency of such a comprehensive repair will be much higher.
Short walker
Actions on your own, you only have to purchase the necessary parts and ordinary consumables. If you contact a car service, the minimum cost of the service will be 800-1000 rubles. That is, the savings are obvious.
The curtain itself costs about 400 rubles. From here it becomes clear why we did not advise buying a repair kit, but rather completely replacing the part. There will be no savings as such, but the difference as a result of the repair will be significant.
Backstage adjustment
There is nothing complicated in the procedure; you can do it yourself, but you will have to run from the pit to the salon.
Yes, it is advisable to do this work in a pit or overpass. You need to act approximately according to this principle:
- Loosen the nut on the clamp.
- Set the gearshift lever to the reverse gear position.
- Set the box rod to the reverse speed position. This is difficult to achieve, so adjustments will have to be made.
- Check how the gears shift. If the rear one is too far to the left, loosen the clamp and turn the cardan counterclockwise. If the fifth speed (including reverse) has gone too far to the right, then the cardan rotates clockwise.
By adjusting the position of the gearshift rocker, you will notice that when the lever is installed in the middle, neutral speed will be engaged. When turning on the fifth gear, the lever should not catch the passenger seat, and when moving in reverse, the driver's seat should not interfere with the movement of the lever.
GEARBOX DEVICE OF THIS MODEL
First, we need to understand why this happens, where the vibration comes from, and why it’s actually not that bad on this particular car. To do this, we need to remember which drive is here and how the engine and gearbox are located. The car is front-wheel drive, so the gearbox is located perpendicular to the direction of travel, that is, the lever in the cabin does not fit directly into the box; a rocker is used. In the classic series with rear-wheel drive, the lever is directly inserted into the box, and if it starts to rattle there, then this is a sure sign of problems with it.
