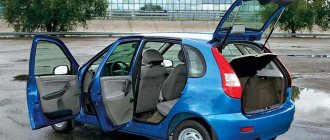
Priora door glass seal for VAZ 2110
Window seals are a very important element of the car. They perform a number of important functions. These include suppressing wind noise, preventing water from entering the cabin, pressing windows, and the like. As part of this publication, we will talk about how to install seals on Lada Priora cars and on a VAZ 2110 car.
It is important to note the fact that seals are divided into two main types:
1. Velvet seals are seals that lie in a horizontal plane at the bottom of the window opening of the car door. 2. Edging is the seals that go along the perimeter of the glass.
How to install Priora velvet guards on ten?
During operation, the original VAZ 2110 velvet covers become clogged, accumulate dust and dirt, as a result of which they begin to scratch the car glass.
In this case, the best solution would be to install new velvet covers, and it is better to buy velvet covers from Lada Priora.
When buying velvet covers from Lada Priora, you should focus on the identification numbers of this spare part:
2170-6103290-01: velvets for the front window located on the right 2170-6103291-01: velvets for the front window located on the left 2170-6203290-01: velvets for the rear window located on the right 2170-620-3291-01: velvets for the rear window located on the left
The cost of original Priora velvets is about 500 rubles for a complete set.
To dismantle old velvets and install new ones in their place, use the following simple instructions:
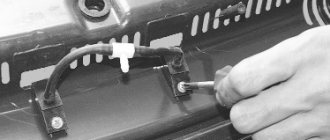
1. Lower the glass all the way down. 2. Insert a small minus screwdriver into the groove of the velvet and, pressing down, move it towards the glass, thereby removing the velvet from the mount. 3. Carry out the procedure of the second step along the entire length of the velvet cloth.
Let us recall that in the previous article we looked at how to replace the timing belt on a Lada Largus with your own hands.
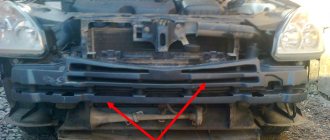
How to install Priora edging on a VAZ 2110?
The main advantage of the Priora edging is their shape, which allows air to flow around them without any obstacles. Well, if we talk about installing them on the top ten, then there shouldn’t be any problems, because the Priora
and VAZ 2110 are absolutely identical.
As in the case of velvet velvets, you need to select the edging based on identification numbers.
21700-6103298-00: frame for right front window 21700-6103299-00: frame for left front window 21700-620-3292-00: frame for right rear window 21700-620-3293-00: frame for left rear window
To change the old edging to a new one, you should use the following instructions:
1. Lower the glass all the way down. 2. Hook the edging onto the lock, bend it inside the interior and lift it up to remove the edging. 3. Carry out the procedure of the second point for all windows.
As you can see, there is nothing complicated in changing VAZ 2110 seals to Priorov ones, but streamlining and noise insulation improve significantly.
Replacing velvet covers on Prior
We recommend watching on the topic of how to remove the internal velvet cover of a Priora - it’s interesting for us. Free video lesson on car repair, watch with pleasure. How to repair a car yourself at home. We will help you with repairs and repair the car yourself. We know how to restore a car with minimal investment. I have attached video instructions.
Category: Auto repair article
Laughter on topic: The hydrometeorological center has given hope: there will be more snow in the summer.
Published by Admin: at the request of Sofron
Criticism of the car owner: I liked the car right away, except that at first it was hard to get used to sitting low after the SUV). The seats are comfortable and your back gets especially tired. It takes turns well and you don’t get too tired behind the wheel. In Nexia, my neck hurt after 200-300 km. The track holds well, the car moves confidently. I bought a car with 86 thousand mileage, now the mileage is 124 thousand in 2 years. During operation, I changed the engine oil, changed the spark plugs once, the alternator belt and tension roller, the front brake pads and the cabin filter. Due to breakdowns, I replaced the outer grenade on both sides and bought it to order. This year I changed the front struts, mine were also relatively normal, I could still drive.). The price for spare parts is quite reasonable, the only thing in our city is that there are few Opels and that’s why you have to order spare parts. The gearbox shifts are clear. I also liked the noise insulation, you can hear everyone in the cabin well). Acceleration is good. Once I was driving to my parents in the village and wanted to overtake a VAZ 2114, I overtook it and then I saw that I was going 170 km an hour and I got scared. I had two adults in the back and two children in the cabin, and there were two passengers sitting next to the VAZ. After that I didn’t accelerate the car like that). But outside the city 130-140 goes well, without strain. The air conditioning works well outside the city, but in the city the engine lacks a little power. Conder blows well. Passengers have enough legroom on the Daewoo Nexia, it was cramped. The trunk is larger than on the Golf 3. There were no crickets in the cabin, as there were creaks in the back of the plastic from the trunk in the cracks, I sealed it with 2-sided tape and it was gone.) There were crickets on the driver’s side on the panel in the winter when it’s cold after warming up in the cabin it disappeared this year, it’s not audible. The standard music plays well, the acoustics are good, clear sound, there’s only no connector for a flash drive, it’s a pity that it only reads discs. I wanted to change the radio, then I thought suddenly the multifunction steering wheel would stop working, a very convenient thing. ). I mostly listen to music through a modulator. Gasoline consumption is pleasing in the city 7-7.5 outside the city 5.5-6.0 liters per 100 km. I filled the tank with 52 liters and forgot about it.
Removal
When you have purchased the required number of seals, you can begin to work.
The first step is to remove the old rubber elements, after which the installation of new parts begins.
Let's tell you more about the dismantling procedure.
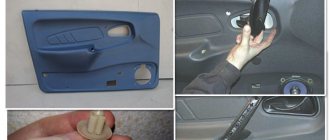
- Remove the plastic trim panels installed on your vehicle's door sills. To do this you will need a thick screwdriver. Remove carefully, being careful not to damage the plastic caps. But it’s better to buy new ones in advance if you can’t carefully dismantle the threshold.
- Now remove the old pieces of rubber from the seats. Simply tear off the sections that are torn off by hand.
- Remaining rubber can be cleaned off with any available tool. Only be careful with sharp objects so as not to damage the metal and paint layer.
- Very small residues and traces of glue are removed using solvents. Make sure that the solvent you choose will not damage your paintwork.
- Go over the doorway with a vacuum cleaner, remove all dust and dirt. Take special care to clean the bottom part. If wet cleaning was used, wait until everything is thoroughly dry.
Upcoming work
Installation
This process cannot be called complicated. You are not required to have any special training or extensive experience. Although you should at least be able to handle glue.
Working with the back door
Each stage is performed consistently and carefully to achieve the desired result and create comfort inside the cabin.
- Even if you have already measured the required length of the seals for your doors, we advise you to do it again. Anything can happen.
- Cut the required length, plus leave a couple of centimeters of reserve. Although if we are talking about a ready-made set of rubber bands, you won’t have to cut or leave anything. Skip the first two points.
- Insert a tube made of silicone or polymer inside the sealing tape. They are sold everywhere, so there should be no problems finding them.
- The length of the tube must match the length of the rubber. This tube will serve to create the necessary elasticity and allow the elastic to press more tightly to the door. This way, ventilation gaps will not appear, and the cabin will become much quieter.
- A shaped side rubber seal is glued to the bottom.
- If the tape is solid, you can start putting it on from either side, as is more convenient for you.
- If it is a measuring rubber band, then start from a point between the door overhangs, or 30 centimeters from the bottom of the threshold. Moving up or down is a personal choice for each master. There is no difference here.
- Push the figured profile all the way down. To do this you will need a rubber or wooden hammer. He's a mallet.
- When the seal is installed around the entire perimeter, an extra piece will be revealed. Cut the tube straight and end-to-end, and make the elastic itself seem slightly deformed. It's like you tore it off by hand. This will avoid the unpleasant phenomenon of siphoning through the joint.
- Replace the pistons; if some were damaged during removal, replace them with new, intact ones.
- Replace the plastic cladding removed from the threshold.
- The second contour of the seal is glued along the edges carefully, but as tightly as possible, after which time is given for the glue to dry completely.
Almost immediately you will feel the difference between the old and new seal. This is a useful exercise that allows you to get rid of unpleasant sounds, knocking, whistling and cold air flowing directly onto your feet.
Blowing from the doors of a VAZ 2110
Today we are talking about seals. I turned the spit slowly for probably a month or so. There is a lot of different information on the Internet, for example, sticking door D-shaped seals, installing Priora, 3-chamber, gazelle, silicone hose, etc. The best option for me is the Priorovsky ones. I did just that, bought a set of seals 2170 for 4 doors. The trunk has the original 2112 and the original gutters. I installed the driver's one first for testing.
Pros:
- looks more solid from the outside; - presses better; — two-circuit; — principle of operation of the accordion; — the composition looks, feels, compresses/decompresses better.
Minuses:
— wide, fits into the spacer with the door trim (the trim is not standard). On any bumps or irregularities the creep is significant; — does not quite fit the ceiling trim, parts of the interior trim. The body is visible from above, the side of the seal sticks out, which should lie down and cover the interior elements.
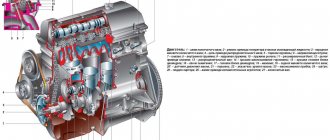
Operating principle of seal 2170. The outer part/second chamber is pressed, working. The first chamber is in the form of a hose, a return amplifier. It is compressed by an accordion at the bottom of the reinforcing hose of the first chamber. More air layers are obtained, more material, more pressing forces. We get warmer, quieter, resource.
The disadvantages turned out to be significant for me specifically. Overall, it was bad, I didn’t like it... A week later I went back to the market and replaced 3 2170 seals with 4 original 2110 ones.
What is bad about 3-chamber seals (type 2109) in my opinion, not counting the fact that they are unlikely to block the ceiling lining. With strong compression, excessive deformation; cramming more does not mean better. Everything has its own elasticity threshold. While new, everything is great, but the resource will be small. Moreover, it depends on the execution, form, location. The outer part should not be stronger than the inner, or be equal. Shapes of working angles, thickness, etc. The outer chamber takes the shape of the door more, the inner chamber increases the pressure/return with slight deformation. Which is what was done at Prior. This can be seen after a little use, when the seal presses a little, and not when it comes from the store.
Since the native 2110 is logical that they lose to the 2170, it cannot be otherwise. AvtoVAZ, although it is moving in small steps, is still moving. It was necessary to somehow strengthen them... The idea was born immediately.
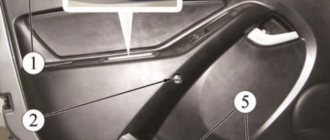
In the corners of 2110 there are trimmings of seals/porous rubber from the factory so that there is no breaking bend in the upper corner of the door.
The intended angle itself is marked with a dot of paint.
I took my photos with these angles and points. Then I sent it to my phone, but suddenly the body died. I had to take photos from IvanVRN36.
Since such a sealing harness/cord made of porous rubber is classified as a rubber-technical product, finding it at least in our city is practically equal to 0. By the way, I asked a question about this harness/cord, there is also a photo there: www.drive2. ru/communities…orum/465065382076482147?m
First I wanted to insert the silicone hose without any extra hassles. I bought a couple of meters, first testing it in a chest freezer at -22, I was disappointed. The hope was not justified. The hose becomes “Wooden”. You need a frost-resistant silicone composition, and this is again a product... Only this time it’s silicone-technical, not at the household level. There is almost no chance of getting it either. So come to the store and buy a couple of meters.
I started looking in stores for what I could use. Call different offices in the city for all kinds of sealants, products, etc. It was necessary to have something like a cord shape, elastic, frost-resistant. At first everything was unsuccessful, I was already desperate and wanted to install it as is. Then, once again, while looking for a suitable material in the store, I accidentally “stumbled upon” Vilaterm!
Of course, this is not exactly what we would like for an ideal, but as an analogue it was 100% suitable.
"Vilatherm"
- an environmentally friendly material, made using modern technologies from foamed polyethylene, for insulating and sealing joints of prefabricated elements of building envelopes. High-quality, elastic material, which, due to its increased (for this type of material) density, can withstand multiple cycles of tension and compression, which allows it to work perfectly in expansion joints of various designs. Fine-celled, lightweight white material with closed pores, made from high-density polyethylene by foaming with a butane-propane mixture. It is characterized by a unique combination of physical-mechanical, thermophysical and acoustic properties. It is produced in the form of bundles and round pipes of various diameters, 3 meters long.
Of course, everything is beautifully described in the advertising description, but after excessive compression/overcoming the elasticity threshold of the tourniquet, you understand that it will not withstand prolonged heavy loads for long. What they honestly write about in the technical specifications, and the tubular version exists only in large sizes.