A couple of decades ago, a car bumper was designed to perform protective functions.
It was entrusted with the role of a kind of bump stop, which in the event of a collision could minimize damage to the body and mechanical impact on the car’s engine. That is why the part was made of metal and had very high strength characteristics. Today the situation has changed. Nowadays, bumpers are made of polymer materials and serve only as an element of the design of the car. If this part is damaged, only the appearance of the machine will suffer, so it is still necessary to repair or replace it. You will learn how to do this on a Lada Priora hatchback from our article.
Tool
Dismantling a buffer in a garage does not require special knowledge or outside assistance. One person can successfully handle this job. In order to remove the front bumper on the Lada Priora, you need to prepare the following tools:
- a Phillips-head screwdriver;
- 10 mm ratchet wrench.
They will be needed to dismantle the fasteners holding the part to the car body. A screwdriver will be used to unscrew the screws, and a wrench will be used to unscrew the engine protection bolts. For ease of work, you will need to install the car on an inspection hole or overpass. If there are no such structures nearby, then you can raise the front of the car using a jack and securely secure it in this position.
Procedure for replacing the front body kit
To remove the old bumper from a Lada Priora car with your own hands and install a new one in its place, you need to have a simple set of tools:
- Phillips screwdriver;
- socket head size 10 mm;
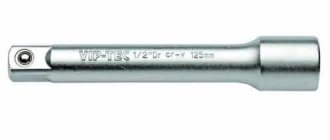
- crank with ratchet and extension.
Note. Instead of a wrench, you can use a regular 10 mm socket wrench, but working with it will not be as convenient.
It’s good when you have an inspection ditch in your garage, it’s more convenient to unscrew the bottom screws from it. However, the presence of a hole or overpass is not necessary; you can do it on a regular flat area. When removing and replacing a part, be sure to involve an assistant to support it from the other edge. If you accidentally drop and hit a plastic element on the ground, you can knock off the paint around the edges.
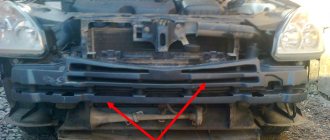
These 3 screws on each side are unscrewed first.
The body kit is attached in different places with screws and self-tapping screws for a Phillips screwdriver and 10 mm wrench nuts. The disassembly procedure is as follows:
- Secure the car with the handbrake and remove the negative terminal from the battery, since you will need to turn off the fog lights.
- Unscrew the 3 screws located in the front part of the wheel arch and connecting the bumper to the fender liner. For ease of access, it is recommended to turn the wheel slightly. Repeat the operation on the side of the second wheel.
- Open the hood and unscrew the 4 screws holding the horizontal plastic trim (above the headlights on each side). Remove the covers from the car without losing the washers.
- Disconnect the fog lamp connectors. They are accessible from above, from the engine compartment.
- Unscrew 5 nuts and 3 self-tapping screws on each side to secure the lower part of the body kit.
Types of restyled bumpers and their prices
Today, buying a new bumper for a Priora is not a problem at all. The fact is that the VAZ-2170 and its modifications are the most popular model for tuning. Taking advantage of this popularity, a large number of enterprises produce many varieties of bumpers and other body kit elements for Priora.
At the same time, you can buy them either as blanks (unpainted, without seats for additional headlights), or ready-made (painted in the desired color, with spaces for headlights, or with built-in headlights). Here are just a few popular models:
Tuning bumpers can be made of ordinary polyethylene, ABS plastic, fiberglass or fiberglass. Prices for such products vary between 3000-5000 rubles . A stock bumper (catalog number 2170-2803015) produced by AvtoVAZ will cost from 2400 to 4000 rubles .
Recommendations for choosing new parts
When choosing bumpers for Priora, you should adhere to simple rules:
- if the car has been in an accident where other body parts were damaged, then it makes sense to buy a black body kit and paint all the elements the same color;
- pay attention to the elasticity of the plastic, it should not be too hard;
- additional stiffening ribs provided inside the element are only a plus;
- when buying a tuning bumper, make sure that it has seats for installing fog lights and openings for tow hooks;
- Inspect the attachment points of the body kit to ensure there are no cracks or other manufacturing defects.
In specialized stores you can purchase the front and rear bumpers of the VAZ 2170, already painted in one of the most popular colors. Take this opportunity to purchase and install a beautiful radiator grille with a nickel finish instead of the usual black one.
Front bumper price for Priora
Below is a table of the cost of front bumpers on the Lada Priora, depending on the year of manufacture (restyling or pre-restyling). The price is indicated without bumper amplifier.
| Information | Modification | Price, (rubles) |
| Painted and prepared | Restyling | from 4350 |
| Painted and prepared | Before restyling | from 3200 |
| Not painted | Restyling | from 2600 |
| Not painted | Before restyling | from 2600 |
Removal and installation
To begin work, we prepare the necessary tools and materials that will be needed for removal.
Required tool:
- Crosshead screwdriver;
- Open-end wrench 10mm;
- A large rag (needed for laying under the bumper after dismantling it, to preserve the paintwork);
Step-by-step instruction
- If the car is equipped with a PTF, it is recommended to remove the negative terminal from the battery to protect against short circuits.
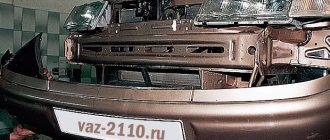
- We unscrew the 10 screws securing the bumper from its upper part (from the engine compartment) as shown in the picture.
- Next, move to the bottom of the car and unscrew the 5 nuts securing the engine crankcase protection. These nuts do not need to be completely unscrewed, but simply loosened.
- Unscrew the 6 screws from the fender liners on each side, 3 screws, as shown in the picture.
- Next we move to the wheels, on each side we unscrew 3 screws securing the end part of the bumper to the fender liner.
- Then you need to pull the side of the bumpers towards you. This is necessary to disengage the bumper from the wing. We carry out this procedure on the left and right sides of the car. Do not be afraid of the applied force, as it often happens that the bumper is engaged with the wing quite tightly.
- Next, remove the bumper by pulling its front part away from the car. It is recommended to place a rag under the bumper so as not to damage the paintwork.
- The bumper removal process is complete. Installation is carried out in reverse order.
As you can see, this procedure will not take even 10 minutes of your time if you follow these step-by-step instructions for removing the front bumper on a Lada Priora car.
| Share on social networks: | Rate this article: |
Repairing some elements of the body of the Lada Priora can be quite successfully done with your own hands. Front and rear bumpers are designed to protect the car; even in small accidents, they are easily destroyed, as they are made of plastic. To quickly remove bumpers, simply follow the step-by-step instructions and some tips from repair experts.
Removing the front bumper of Priora
Most often, it is necessary to dismantle the front bumper after it is damaged or for preventive measures against corrosion. Before starting work, we recommend that you thoroughly wash the body and clean the engine compartment. Just in case, disconnect the battery.
Tool
Tools you will need:
- crosshead screwdriver;
- set of socket wrenches;
- anticorrosive
Typically, repairs do not require brute physical force. Difficulties can arise with factory screws only if they are heavily rusted. Therefore, if necessary, treat the connections with a special solvent and continue working after some time.
Step-by-step instruction
- Open the hood and remove the engine splash guard.
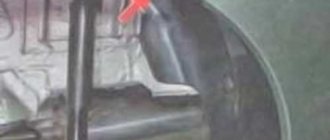
- Having gained access, unscrew the screws that secure the bumper to the wing casing.
Unscrew the screws that hold the wing casing - Remove the 4 bolts that connect the bumper and the front cross member of the body.
Unscrew the four bolts with a spanner wrench - Remove the two headlight covers by unscrewing the screws.
- We unscrew the last bolts near the wheel arches of the Priora.
Remove the bolts near the wheel arches with a Phillips screwdriver - Pull the front bumper towards you and open access to the 3 lower mounting bolts.
- We remove the bolts that secure the bumper to the beam; you will have to work from below.
- We remove the bumper.
Tip: It is not necessary to work in a pit or overpass; you can remove the lower fastenings simply by lying under the hood.
Video hint for removal
Why do you have to change bumpers?
The obvious answer to this question is after the car gets into an accident, when the body kits literally fall apart. It is impossible to repair and paint broken parts, so in this situation you have to buy new ones. Fortunately, the price of the products is quite affordable and it is possible to select elements by color or buy them unpainted.
Reference. An unpainted front bumper of a VAZ 2170 costs about 40 USD in the Russian Federation. e., painted - 50 USD. e. Prices for rear body kits are approximately the same, plus or minus 3 USD. e.
The nickel-plated grille on the front bumper looks better than the stock one.
There are other reasons why Prior owners resort to removing or replacing these parts:
- During operation, the bumper received multiple cracks or the paint peeled off, and the owner does not have the time or desire to repair and paint the elements.
- If a car enthusiast still wants to repair and paint the body kit, then it will still have to be removed.
- As a result of the impact, the plastic latches of the bumper broke off or the fastening screws were torn out in such a way that the material cracked.
- When you need to gain access to other parts and parts of the car body. For example, install new headlight units.
- Cars sold as standard were at one time equipped with black budget bumpers. They have to be removed to paint or exchange for painted ones.
- If the owner of a VAZ 2170 decides to start tuning his car and install beautiful body kits that differ from the standard ones in shape.
Note. To replace the headlight unit in a Priora, it is not necessary to dismantle the entire bumper; just unscrew it from the sides and bend the edges. But for convenience, many motorists still remove the element completely.
How to disconnect the rear
The same tool is used to remove the rear bumper. The procedure is as follows:
- Unscrew the two fastening bolts located at the bottom.
Remove the two bolts that hold the rear bumper to the body - We remove two bolts that connect the bumper to the wings and another one near the mudguard.
Unscrew the bolt on the mudguard and two bolts on the wheel arch - Pull the bumper towards you and remove it from the engagement.
Tip: In some versions of the Priora, the number of bolts may be greater (hatchback or station wagon, for example). Therefore, if the bumper does not extend, check all existing mounting bolts and screws.
After dismantling the front and rear bumpers, treat the body with corrosion protection, since even small cracks get moisture and dirt that destroy the metal.
Video: how to film on a Lada Priora sedan
If the bumpers on a Priora are damaged, do not rush to go to a car service center. The body elements are secured with just a few bolts, which can be removed without any special skills. If you work carefully and follow the instructions, dismantling the bumpers will take very little time.
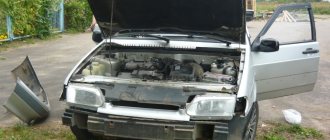
The most replaceable part in a car is its bumper. And to properly repair it, you will first have to remove this bumper. Each brand has its own characteristics of this process. Today we will pay attention to the domestic automobile industry and find out how to remove the bumper on the Lada Priora, test drive it here.
So, to solve this problem we will need the following tools: a 10mm socket wrench and a Phillips screwdriver. Now about the entire dismantling process in detail.
Types of repairs
The recovery technology depends on the type of damage. The following types of repairs are distinguished:
- Renewing the paint layer.
- Replacement of brackets and fastenings.
- Elimination of deformation (dents).
- Removal of through damage (cracks, breaks, holes, breaks in material) by welding.
The last option is considered the most labor-intensive. Therefore it costs the most.
There are three types of painting:
- Point (used in the presence of cracks).
- Partial (a specific area is processed).
- Complete (the entire part is covered with the dye).
How to remove the front bumper?
Initially, you need to disconnect the negative terminal wire from the battery. You also need to remove the engine splash guard and the protecting engine compartment, because they limit access to some units and components. Next, you need to unscrew the screws that hold the bumper with the protective cover of the wings. In total, you need to unscrew 3 screws on each side.
Next, the Priora bumper is attached to the cross member on top of the front end of the body with four screws, which also need to be removed. The screws of the left and right headlight housings are also unscrewed. Then you need to unscrew 4 screws from the side of the wheel arches and 2 screws securing the bumper with the front fenders.
Only after this can the bumper be pulled forward and removed by unscrewing the 3 bolts with which the bumper beam is connected from below to the body cross member. And then we remove the beam itself.
Now you know how to remove the front beam, and if you repeat these steps, but in reverse order, you can install the repaired bumper back, or a new one.
Tips and tricks
The Priora's bumper is attached on the sides only to the fender liner, as in many foreign cars. At the joints the element simply fits into the grooves. This greatly simplifies the dismantling process. But sometimes you additionally have to remove the protection from the motor. After unscrewing the bolts, simply pull out the bumper.
To unscrew the lower screw that holds the fender liner in place, it is better to unscrew the wheel to the side in advance. If this is not possible, you can reach the hard-to-reach area using a small short screwdriver. When the bolts do not budge, they must be pre-treated with WD-40 lubricant.
The bumper contains upper and lower radiator grilles, as well as headlights. If replacement is necessary, all these elements can be easily removed. The grille is held on by metal latches. These latches can be pryed with a screwdriver and removed using pliers. The grille will then detach. The headlights are held on by self-tapping screws and can be easily unscrewed in one or two minutes.
Location of the radiator grille to bumper mounts
Metal elements under the bumper can quickly rust, so it is recommended to remove it along with the body kits. Parts must be cleaned of dirt and thoroughly washed in warm water. To avoid the formation of rust, it is advisable to treat the body with a protective compound. To do this, its surface is cleaned with a solvent, after which the anticorrosive agent is applied with a brush.
How to remove the rear bumper?
Let's start removing the rear bumper; for this we will need all the same tools.
First of all, again, disconnect the negative terminal from the battery. Then you should unscrew the nuts that secure the bumper from below. The same actions must be carried out with the upper fastening bolts located on both sides. The Priora's bumper is also attached to the wings with two screws and one screw to the mudguards, which also need to be unscrewed. After which the rear bumper can be removed by pulling it back.
As you can see, only at first glance the question of how to remove the bumper on a Priora is difficult and is a complex procedure. But in practice this process is simple, as can be easily seen.
Video
I recommend reading:
Cleaning the throttle valve of a VAZ 2114. How to install an automatic engine start? How to remove the front bumper on a VAZ 2114? Replacing the Nissan Qashqai air filter.
Remove rear bumper of Priora
During operation, the bumper received multiple cracks or the paint peeled off, and the owner does not have the time or desire to repair and paint the elements. It is very difficult to get out of the seat. You can make a break when removing it.
Lada Priora station wagon: replacing the tabs in the headlights
Dismantling of this part is carried out in the same way as the front element. Installing the bumper is carried out in the reverse order. Before carrying out the work described above, novice drivers need to understand how to remove the bumper correctly. I'll show you how to change the light bulbs in the headlights of a Priora station wagon.
rear bumper modification for Priora 2
If the bumper is so damaged that even the amplifier (beam) has become unusable, then it will also have to be replaced with a new one.
Lada Prirra rear bumper removal
Install the new bumper in the reverse order and screw it in the same places, and do not forget to connect the fog lights. Before assembly, it doesn’t hurt to check the joints of the wings with other body parts, hidden by the body kit, for corrosion. If rust is detected, the affected areas must be cleaned, coated with primer and painted. Rear bumper VAZ 2170 “PRIORA” (unpainted). 21700-2804015 Bumper…
Replacing a reflector on a Lada Priora
At this point, the disassembly of the unit is completed, all that remains is to grab the edge of the bumper near the wheel arch with your hands and carefully remove it from engagement with the body, pushing it first to the side and then forward. The assistant repeats the same actions on the other side of the car, after which the part is simultaneously removed from the car.
How to remove the front bumper on a Priora
Now the bumper is not fixed by anything and sits only in its place in the sides of the body. Gently prying it from the edge with your hands, we remove it from the engagement under one part. Video review on replacing, removing and installing the front bumper on Lada Priora cars. Visual material…
Replacing a flashlight on a Priora
When replacing the front bumper on a Priora, the body kit is removed (decorative grille, boot, etc. If necessary, the parts are transferred to another structure. Replacing the headlight on a Priora.
Installation of painted Priora sabers
As a result of the impact, the plastic latches of the bumper broke off or the fastening screws were torn out in such a way that the material cracked. The installation of painted “sabers” (hood moldings and trunk lid) on a Priora is shown. You can order sabers...
LED reflectors in the rear bumper of Lada Priora SE sedan and hatchback |
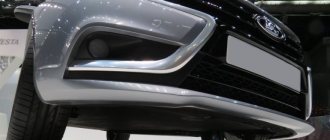
The front bumper of the Lada Priora is additionally equipped with fog lights, a radiator grille and a boot. The lower part is made in the form of a spoiler, which reduces the air flow under the bottom of the car. There is a place in the center for attaching a license plate. When completely dismantling the structure, all attached parts are removed. Demonstration of LED reflectors for the rear bumper of Priora 2. Buy online store…
replacing the rear wing on a Prior. glass hood
To ensure that the Lada Priora has an original appearance, tuning is carried out. In this case, you can install a restyled bumper, skirt or spoiler. pull the wing. glass barrel. cook a new wing. and painting.
Body Repair LADA PRIORA, how to remove the parking sensors of a Priora, motorbike.Body Repair LADA PRIORA
And we do the same with the second side, after which the bumper can be completely removed from the car, since it is no longer attached to anything. Installation of Priora bumper 2 parking sensors,
More on the topic
How to remove rub in on a bumper
How to change the hood hinge on a Priora
How to install a bumper on a Hyundai Elantra
How to cover the hood of a Priora with film
How to open the hood of a Lada Priora
How to remove the rear bumper of a Nissan Almera Tino
How to open the hood on a Volkswagen
How to remove breathers in the field under the hood
How to disassemble the rear bumper of a Getz
How to open the hood of a 2107 without a key
Repair of the front bumper on the Lada Granta
How to remove a bumper on a Renault Sandero video
Categories
Content
What to do after replacing the bumper
When parking or driving in a traffic jam, you can easily damage the headlights or scratch the body. Therefore, it is better to install the bumper in its old place as soon as possible. Until the repair is completed, the motorist has the right to drive without a bumper. Traffic police officers can impose a fine only if the person has removed the part permanently and deliberately changed the design of the car. They have the right to fine you if you don’t have a rear bumper, since it must hold license plates.
Installation of a repaired old or new bumper is done using self-tapping screws. If a skirt or a tuned bumper is added, these elements are secured with screws. Before installation, it is important to ensure that there is a thread for the towing eye. Cars produced since 2011 have such a thread. The eyelet can be used either the original one or any other one that is suitable in size.
Removing the bumper on a Priora
The need to remove the front or rear bumper from a vehicle arises if it is damaged in a traffic accident, or for some other reason. For reasons in order to remove the bumper on a Priora, it is best to seek help from employees of a specialized car service center, but you can try to carry out this procedure yourself if it is not possible to resort to specialist help. The question of how to remove the bumper on a Priora is more than relevant for the owners of the majority of this vehicle, since according to statistics, the bumper is the most frequently replaced part of any car.
To carry out high-quality repairs of a damaged bumper, you will first have to dismantle it from the car, taking into account that each car model has its own specific implementation of this procedure. So, for example, in order to remove the bumper on a Priora, first of all, you need to prepare all the necessary details and tools: a size 10 socket wrench and several sizes of various Phillips screwdrivers. And also rags, everything and other mats that may be useful for this procedure, since this car is prone to the formation of all sorts of difficulties where you least expect them. However, any and as an ill-conceived technique.
Removing the front Priore onto the bumper
Before removing the Priore from the bumper, be sure to remove the battery cable from the negative terminal and the mudguard protecting the engine and the engine compartment.
This will allow some to gain access to the units and assemblies of this flagship by unscrewing, and in the automotive industry, three screws on each side, securing the bumpers with the protective cover of the wings. Upon completion of the procedure, you should unscrew the 4 screws securing the bumper to the cross member of the body located on top of the front end, and then unscrew the screws of the right and left headlight housings. Then you should unscrew the 2 screws securing the bumper to the front fenders, and the 4 screws on the wheel arches. Having completed this procedure, it appears that you can push the bumper forward and unscrew 3 more bolts that ensure the connection of the bumper beam with the cross member of the car body, after which you can safely dismantle the beam. Front bumper Remove!
rear bumper removed
In order to remove the rear bumper on this miracle of the automotive industry, you will need all the same tools, as well as remarkable patience and self-control. For those motorists who need to remove not only the front, but also the rear bumper at the same time, all this will be needed in at least double quantity; dismantling the rear bumper on a Priora provides a simplified procedure. First of all, you need to disconnect the battery, then tighten the 2 nuts securing the bumper from below.
After that, tighten the existing bolts of the upper screw on both sides, 2 fastenings providing fastening to the wings and 1 bolt for the mudguards to fastening. Then you should extend the bumper completely and remove it from the car backwards. The number of mounting bolts for the bumper is determined by the manufacturer. But if you purchase a repair kit for a given car, then it is quite possible that the number of mounting bolts and other fastening parts will be increased. It should be especially noted that if the Priora modification includes turn signals or fog lights in the front of the bumper, headlights, by dismantling, you should disconnect all the corresponding cables, as well as the hose nozzles, in the car if headlight washers are present.