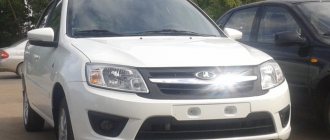
Hi all. The love of automakers for chrome is as great as the dislike of many of us. Chrome today is not something outlandish, has not attracted attention for a long time and, by and large, is a complete problem.
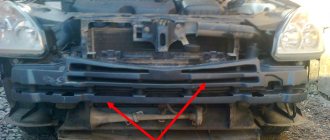
Bad chrome on plastic, and this is exactly what it is on all AvtoVAZ models, fades over time, cracks and generally peels off. After which not a trace remains of the former gloss; in the end, instead of attracting, it only repels. In general, the replacement of chrome-plated sabers with Lada Priora front and rear has become widespread due to the fragility of chrome. Therefore, I consider the topic of replacing these elements at home, that is, with your own hands, to be very relevant.
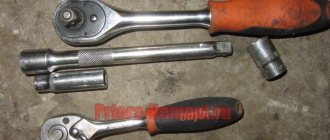
To implement your plan, you need to buy ready-made body parts painted in the desired color or paint it yourself. You will also need an “8” key, a screwdriver, in general, a minimal tool. If everything is prepared, you can start.
Design and features of bumpers on Lada Priora
Previously, bumpers were made of metal; they were durable, but easily scratched. Nowadays, metal elements are installed mainly on SUVs and sports cars. The basic configuration of the Lada Priora uses plastic bumpers, which serve more of a decorative than a protective function. Therefore, the likelihood of damage is higher.
The front bumper is fixed at sixteen points, the rear bumper at only ten. The original part is marked 217 04-280 30 15-10. Starting from the second release of the Priora, it comes without an internal grille. Therefore, instead of a built-in grille, the original spare part should have a burr-free slot. Another difference from analogues is that all the holes for the bolts coincide with the slots in the body.
On Priora 2, the original grille comes with black honeycombs. There is no reinforcement for the brand logo badge that was present on older models. If dismantling is carried out, the bumper is often removed along with the amplifier - an additional metal beam that gives the structure strength. This part is always curved and must match the shape of the grille. The design of the amplifier depends on the year of manufacture; if desired, it can be removed and not put back. However, it performs a protective function and reduces damage in the event of an accident.
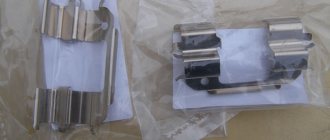
One of the types of amplifiers for the front bumper of a Priora
Bumper replacement is required in the following cases:
- after an accident;
- in case of cracks in the plastic caused by severe frosts;
- bad parking;
- tuning cars.
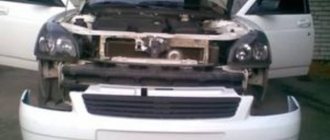
How to remove the front bumper on a Priora
The operation is simple, it will take no more than ten minutes; Naturally, provided that the bolts and screws are not stuck. On sedans, station wagons and hatchbacks, removal is carried out in a similar way. If the element is severely worn, dismantling the amplifier may be necessary.
The first step is to disconnect the negative cable from the battery. If fog lights are installed, disconnect their wires before carrying out the operation. To do this, you need to find a plug in the engine compartment. There are such plugs near each headlight; they need to be pulled out.
To turn off the fog lights, you need to remove the plug with wires from each of them
The Lada Priora of the latest configuration has parking sensors. Parking sensors are installed in both bumpers. Therefore, you will have to turn them off on both sides.
Removal begins with the fender liner, unscrewing three screws on each side. During this process, it is recommended to turn the left wheel to the right and the right wheel to the left to make it easier to unscrew the lower bolts.
Next, the hood opens and two plastic trims located above the headlights are unscrewed. They are held in place by 4 bolts. Then the pads are removed.
Removed trim
Next, you need to unscrew the two central screws from the protective casing in the radiator fan area.
Advice! You can unscrew these two bolts not completely, then after all subsequent manipulations it will rest on them and will not fall when the lower bolts are unscrewed. Then all that remains is to unscrew these bolts and calmly remove the bumper.
Next, you need to go down under the car and use a 10mm wrench to unscrew the 5 nuts that hold the bumper on the bottom of the body.
Finally, all that remains is to unscrew three screws on each side located under the front wings.
Now you need to carefully remove the bumper. It is recommended to start from the side of the fender liners, carefully moving the bumper in this part towards you. Once this part is disengaged, the bumper can be easily removed.
Advice! It is not recommended to snap off the bumper using rough and sharp objects such as screwdrivers, pry bars, steel rods, etc. It is recommended to do everything by hand. If you cannot manually snap off the bumper, it is recommended to wrap the screwdriver with a cloth or electrical tape so as not to damage or scratch the car’s paint.
Useful video instructions:
Replacing the front saber on Lada Priora
Now you need to repeat the same thing only in relation to the front saber.
- Raise the hood cover. We move the insulation aside, and then use an “8” key to unscrew the 2 nuts that secure the saber.
- Carefully pry it out of the fastenings. It may be dirty under the lining, although this is not the worst thing; it is worse if there is rust waiting for you there.
- As in the first case, we transfer the fastening bolts to the new saber, and then install it in place. We press lightly, but “wisely” so as not to damage the latches.
Now all that remains is to tighten the nuts.
How to remove the rear bumper on a Priora: hatchback, sedan, station wagon
The steps are approximately the same as when removing the front bumper. The main dismantling method is described below.
First, use a screwdriver to unscrew the fender liners, which are held on by three screws: 2 at the bumper and 1 at the mudguard.
Next, you need to open the trunk and, depending on the type of body, unscrew a certain number of fasteners.
- For the Priora sedan, you need to unscrew 6 bolts: 4 in the center and 2 on the sides (in some models - only two, on the sides).
- In the Priora Hatchback, you will need to unscrew 4 bolts: the 2 central ones are unscrewed with a 10 key, and the two outer ones with a 13 key.
- For the bumper on a Priora station wagon you will need to unscrew 5 bolts.
Next, you need to move under the car and unscrew 2 nuts on the sides of the bumper and 4 more screws along its length (the number of nuts and screws may vary depending on the version of the car, but they are all located there).
Everything is unscrewed, all that remains is to take the rear bumper on either side of the wheel arches and, as in the case of the front, pull it towards you.
To make everything go faster, you can use the following tools:
- Screwdriver. Use it to unscrew the bolts at the rear wheel arches.
- Head with extension. She unscrews the bolts of the upper bumper fastenings. They also unscrew the nuts on the bottom.
Useful videos with examples of rear bumper removal:
Tools and materials for work
Anyone can handle the task of removing the rear bumper on a Priora, and you don’t need to have the relevant experience to carry out the work correctly. The only thing you need to carry out such manipulations is tools and materials. These include:
- wrenches “10” and “13”, which depends on the type of car body;
- crosshead screwdriver;
- pliers;
- a screwdriver with an oblong shaft, which may be needed to disengage the bumper from the body part bracket.
When carrying out work, it may be necessary to remove the rear wheels in order to be able to unscrew the fasteners. If you have a flexible shaft screwdriver or an angle wrench at your disposal, they will eliminate the need to remove the rear wheels. Having prepared the necessary tools for the work, you can begin to implement the process.
This is interesting! Depending on the reason for removing the bumper on a Priora, additional tools and materials may be needed.
Tips and tricks
The Priora's bumper is attached on the sides only to the fender liner, as in many foreign cars. At the joints the element simply fits into the grooves. This greatly simplifies the dismantling process. But sometimes you additionally have to remove the protection from the motor. After unscrewing the bolts, simply pull out the bumper.
To unscrew the lower screw that holds the fender liner in place, it is better to unscrew the wheel to the side in advance. If this is not possible, you can reach the hard-to-reach area using a small short screwdriver. When the bolts do not budge, they must be pre-treated with WD-40 lubricant.
The bumper contains upper and lower radiator grilles, as well as headlights. If replacement is necessary, all these elements can be easily removed. The grille is held on by metal latches. These latches can be pryed with a screwdriver and removed using pliers. The grille will then detach. The headlights are held on by self-tapping screws and can be easily unscrewed in one or two minutes.
Location of the radiator grille to bumper mounts
Metal elements under the bumper can quickly rust, so it is recommended to remove it along with the body kits. Parts must be cleaned of dirt and thoroughly washed in warm water. To avoid the formation of rust, it is advisable to treat the body with a protective compound. To do this, its surface is cleaned with a solvent, after which the anticorrosive agent is applied with a brush.
Removing the front bumper upper grille
You will need: pliers, long and short straight screwdrivers.
- Remove the 6 screws of the upper bumper mounting;
- Bend the upper part of the bumper along with the grill towards you;
- Remove the fixing washers (on Priora SE, remove the screws) of the upper bumper grille by inserting your hand with a short screwdriver through the resulting hole;
- Remove the upper bumper grille by pulling it towards you.
It is worth noting that those with large hands may not be able to get their hand through or may break the upper part of the bumper. Mounting diagram for the upper and lower bumper grille:
Front bumper of Priora
The front bumper of the Priora is a plastic structure made in the shape of the front of the car.
It covers the energy-absorbing beam, which, in fact, protects the engine, and also partially protects the radiator grille, horn and headlights. In addition, it has seats in which fog lights can be installed.
The design of the Priora's front bumper is not particularly durable, which is why it often has to be repaired or replaced. The plastic of the bumper is quite thin and can be damaged even from minor mechanical impact. With a strong impact, it is easily deformed and cracks along the bend line.
If you damage the bumper, but the damage is not critical, it can be restored by soldering and painting. If it has completely fallen apart and cannot be repaired, you can buy a new bumper, and not necessarily a stock one.
Dismantling
Let's figure out how to remove the front bumper on a Priora with your own hands. To ensure safety when carrying out work, it is necessary to disconnect the negative terminal of the battery.
To make it convenient to work, the wheels must be turned left or right, depending on the side of dismantling.
- Removing the front bumper on a Priora begins with unscrewing the screws securing the structure to the fender liner;
- the buffer is secured with 3 screws on each arch;
- after that, unscrew 4 screws on each side that hold the plastic covers protecting the headlights;
- then unscrew the 2 screws that secure the upper part of the part to the cross member of the engine compartment;
- if there are fog lights, it is necessary to disconnect the contact connectors of the electrical wires;
- the headlights are removed along with the entire structure;
- Having finished removing the bumper under the hood, they perform work under the car body;
- additional lighting will be required for further operations;
- use a socket wrench to unscrew the 5 nuts securing the buffer to the engine protection;
- after this, it remains to unscrew 3 screws on each side that hold the wings of the part;
- When all the fasteners are removed, it is necessary to disengage the side parts of the Priora bumper. The action is carried out first on one side and then on the other.
When replacing the front bumper on a Priora, the body kit (decorative grille, boot, etc.) is removed. They are fastened with self-tapping screws and clips. If necessary, parts are transferred to another structure. If you know how to remove the bumper correctly, you can complete the work yourself in 15-20 minutes.
How to put the bumper back
After installing the body kit and preparing another buffer, installation can begin. Before starting work, the accessible part of the body is inspected for cracks and rust. It would be a good idea to lubricate the joints of the body parts with mastic.
Installation of the front bumper on a Priora is carried out in the reverse order of removal. The structure slides into place along the existing grooves. There is no need to apply excessive effort during installation. A correctly positioned buffer should snap into place without effort. After this, it is bolted to the housing bracket. Having installed and secured the structure, its side edges extend beyond the edge of the wing casings.
How to remove a saber on a Priora
Typically, the bracket and brace are changed after they are deformed as a result of shock loads that occur during emergency situations or during operation on bad roads.
In some cases, it is impossible to visually determine the bent of the extension until it is removed.
In order to replace the bracket and brace, you need to use a trestle or lift.
We prepare the car for the job.
Loosen the front wheel bolts on the corresponding side.
Raise the front of the car. Unscrew the wheel mounting bolts and remove it.
At the rear end of the stretcher there are washers for adjusting the longitudinal inclination of the wheel steering axis.
Unscrew the nut securing the brace to its front hinge and remove its front washer
We unscrew the nut securing the stabilizer link to the lever, holding the bolt from turning, and remove the bolt.
We unscrew the nut securing the extension to the lever, holding the extension with a wrench so that it does not rotate in the rubber-metal hinges
We remove the special washer
We unscrew the nut securing the lever, holding the bolt from turning, remove the spring washer and remove the bolt.
We remove the end of the lever from the bracket on the body and, by turning the lever on the ball joint, remove the extension from the front extension joint.
Then we remove it from the front suspension arm by removing the remaining adjusting washers from the extension.
We carefully inspect the stretch. If there are any defects in the parts, we replace them
Behind the large washer at the front end of the extension there are adjusting washers for the caster angle of the wheel rotation axis (in our case there are two washers).
The longitudinal extension has a catalog number: - 2108-2904270.
The longitudinal tension bracket assembly has a catalog number - 1118-2904049
We carry out the assembly in the reverse order, while in order to maintain the longitudinal inclination of the wheel rotation axis, we install the same number of adjusting washers at each end of the extension.
When installing the adjusting washer, it is necessary that the chamfer on its inner edge faces the extension.
Rear bumper
To carry out body work or replace damaged elements (reflectors, parking sensors), you need to remove the bumper on the Priora. This work is simple and differs from dismantling the front structure only in the number of fastening screws.
In some cases, difficulties arise when removing the side wings from the grooves, especially at low air temperatures. Doing these steps may cause the plastic to crack. The same problems arise on Kalina 2. Due to the unique shape of the buffer, it can be difficult to push it out. However, if you follow all the requirements of the vehicle’s operating instructions, dismantling can be carried out without difficulty.
How to remove the rear bumper from a Priora
For cars of different versions, the dismantling of the buffer differs only in the locations of the fasteners. For example, on a sedan the screws are screwed into the trunk frame vertically from top to bottom, while on a Priora station wagon - horizontally. Due to the shortened end part of the hatchback body, it is difficult to reach the structure fasteners in the arches.
For comfortable work, it is recommended to remove the rear wheels.
To remove the rear bumper on a Priora you must:
- Unscrew the 2 fastening bolts on the trunk frame, and then the 2 nuts connecting it to the body at the bottom of the car.
- The wings of the structure are held in place by 3 screws located in the wheel arches.
- After dismantling the fasteners, the buffer is removed.
- Inside it there is a structural reinforcement, which is fastened with self-tapping screws.
- The reflectors are screwed on with one nut.
Installation
If the structure being installed does not have an amplifier and reflectors, then use the corresponding elements from the removed part. Installation of the bumper on the Priora body is carried out in the reverse order of removal. The work is easy to do with your own hands. After the structure is installed in place, it is secured with bolts and screws.
When installing the SE bumper, problems arise with the installation of the amplifier. To secure it to the structure, it is necessary to cut off the upper horizontal shelf of the attachment to the body. The amplifier located inside the buffer is attached using self-tapping screws. Some car enthusiasts do not install this part. Lastly, screw the wings to the arch and install the wheels.
The front bumper on the Priora, like on any other car, serves as a protection. Its main task is to take the impact of a frontal collision and soften it as much as possible. With minor impacts, this component remains safe and sound, but when made from fragile plastic or in the event of serious accidents, it often cracks. What to do in such a situation, buy a new part or repair an old one, is decided by the car owner. The main question he asks himself is how to remove the front bumper.
Removing the front bumper
Another reason why a component needs to be replaced is bumper tuning. If you need to replace the rear bumper of a Chevrolet Lacetti (sedan) or a similar component of a domestic Lada, please note that if you have the time and skills, you can do the work yourself in the garage. This saves money and requires only one skill - the ability to unscrew fasteners with a wrench and a screwdriver.
In what cases is it necessary to dismantle the bumper on a VAZ-2170 Priora
There are a number of reasons why it becomes necessary to remove the plastic rear bumper on a Priora. These include:
- Repair of the product due to its damage (including painting). If the damage is minor, you can carry out repair work yourself.
- Installation of parking sensors.
- Replacement of the product due to damage to its integrity if it cannot be repaired.
- Replacing the bumper on a pre-restyling Priora with restyled devices. It is important to know that you need to buy not only a new product, but also an amplifier for it.
- Repair of the car body part located under the bumper, for example, treatment with anticorrosive agent, Movil, etc.
- Replacing reflectors. Practice shows that in this case it is not at all necessary to completely remove the rear bumper, since the procedure can be carried out without dismantling. However, access to the devices in this case will be limited, which will complicate the process of removing them.
The bumper on the car is also removed in case of preparatory work for painting the body. There is no need to dismantle the device to install the tow bar on the Priora (link), since the trailer hitch is installed without the need to remove the rear bumper.
If there is a need to remove the device on the Priora, then first you need to prepare the appropriate tools. What you will need for this is described in the next paragraph.
Work algorithm
To understand how to remove the bumper on a Priora, take the following tools:
- Phillips screwdriver;
- 10mm socket wrench.
The algorithm for how to remove the front bumper on a car is as follows:
- Provide access to screw fastenings. To do this, disconnect the negative terminal wiring from the battery. Remove the splash guard located on the engine.
How to remove the front bumper
- Since the front bumper on the Priora is located on a transverse mount at the front of the body, to dismantle it, unscrew two bolts on both sides.
- Remove the screws located on the right and left optics casing (4 pieces), two fasteners each - near the wheel arches and a pair of self-tapping screws that are used to secure the bumper on the Priora.
- Pull the accessory towards you. You will see 3 more bolts securing its beam to the body cross member. You need to unwind them.
To unscrew the screws at the bottom, you will need to crawl under the car (first lay cardboard or rags there). This is just as convenient and less labor-intensive than putting the vehicle on an overpass or lifting it on a jack. Installing the bumper yourself is done in the reverse order. In order not to confuse the places where the fasteners are located, you can first draw up their location diagram on a sheet of paper, and put the screws and self-tapping screws themselves in separate boxes.
A couple of decades ago, a car bumper was designed to perform protective functions. It was entrusted with the role of a kind of bump stop, which in the event of a collision could minimize damage to the body and mechanical impact on the car’s engine. That is why the part was made of metal and had very high strength characteristics.
Today the situation has changed. Nowadays, bumpers are made of polymer materials and serve only as an element of the design of the car. If this part is damaged, only the appearance of the machine will suffer, so it is still necessary to repair or replace it. You will learn how to do this on a Lada Priora hatchback from our article.
Types of restyled bumpers and their prices
Today, buying a new bumper for a Priora is not a problem at all. The fact is that the VAZ-2170 and its modifications are the most popular model for tuning. Taking advantage of this popularity, a large number of enterprises produce many varieties of bumpers and other body kit elements for Priora.
At the same time, you can buy them either as blanks (unpainted, without seats for additional headlights), or ready-made (painted in the desired color, with spaces for headlights, or with built-in headlights). Here are just a few popular models:
- "I am a robot";
- "Tokyo";
- "Fan" -2;
- "Boxing ring";
- "Ring"-2;
- "Sniper";
- "Strike".
Tuning bumpers can be made of ordinary polyethylene, ABS plastic, fiberglass or fiberglass. Prices for such products vary between 3000-5000 rubles. A stock bumper (catalog number 2170-2803015) produced by AvtoVAZ will cost from 2,400 to 4,000 rubles.
Replacement
To replace the front bumper of a Lada Priora, there is no need to contact a specialized center. All this can be done at home, and the process itself will take no more than half an hour. Tools you will need:
- socket wrench or socket “10”;
- large screwdriver with Phillips bit;
- jack.
Using a jack is not necessary if you can get under the front of the car to remove a few nuts. For greater convenience, it is advisable to have an assistant.
Work order:
- Place the vehicle on a level surface and secure it with the parking brake.
- Open the hood, remove the negative terminal from the battery.
- Using a screwdriver, unscrew the 3 screws securing the protective fender liners to the sides of the bumper on the side of each of the front wheels.
- In the engine compartment, use a screwdriver to unscrew the screws securing the plastic covers above the top of each headlight (4 pieces each). Remove the pads;
- Using a screwdriver, unscrew the two screws securing the central upper part of the bumper to the body;
- From the bottom, using a wrench (head) set to “10”, unscrew the 5 nuts with which the bumper is secured to the engine protection, and then 3 more side nuts on each side;
- Pull the bumper towards you, being careful not to tilt it to the side. If you can get an assistant, ask him to help you.
- If it is necessary to dismantle the energy-absorbing beam, unscrew the three bolts securing it to the body with an “8” wrench (head) and remove it.
- Install the new bumper in the reverse order, starting with attaching it to the engine protection.
- Before installing a new bumper, it is advisable to get rid of dirt and dust on the body elements covered by it. In addition, it is recommended to clean the engine radiator fins.
Installing and removing the saber (chrome lining) of the hood on a Priora
The first step is to open the hood of the car. After this, place the stop so that it is securely fixed. Next, using a puller or a regular flat-head screwdriver, we pry up the clips-retainers of the hood trim to move its upper part to the side.
And it is under it that the saber fastening nuts are located on the inside. I think this is clearly visible in the photo. Now, using a 8mm socket, unscrew all the nuts securing this cover.
Then you need to squeeze the plastic clips and at the same time press on them from the inside out, thereby removing the saber.
The result is clearly shown below.
And we completely remove it, eventually replacing it with a new one:
Installing a new one occurs in the reverse order and will not take more than 5 minutes. The price of a part for a Priora ranges from 300 to 350 rubles for the original.
Typically, the bracket and brace are changed after they are deformed as a result of shock loads that occur during emergency situations or during operation on bad roads.
In some cases, it is impossible to visually determine the bent of the extension until it is removed.
In order to replace the bracket and brace, you need to use a trestle or lift.
We prepare the car for the job.
Loosen the front wheel bolts on the corresponding side.
Raise the front of the car. Unscrew the wheel mounting bolts and remove it.
What to do after replacing the bumper
When parking or driving in a traffic jam, you can easily damage the headlights or scratch the body. Therefore, it is better to install the bumper in its old place as soon as possible. Until the repair is completed, the motorist has the right to drive without a bumper. Traffic police officers can impose a fine only if the person has removed the part permanently and deliberately changed the design of the car. They have the right to fine you if you don’t have a rear bumper, since it must hold license plates.
Installation of a repaired old or new bumper is done using self-tapping screws. If a skirt or a tuned bumper is added, these elements are secured with screws. Before installation, it is important to ensure that there is a thread for the towing eye. Cars produced since 2011 have such a thread. The eyelet can be used either the original one or any other one that is suitable in size.
Design features of the front bumper on Priora
The front bumper on the Priora completely follows the shape of the body and is made of polymer materials. The part provides an impressive design of the car, and also provides protection against damage to the radiator grille, sound signal and optics. On its surface there are special seats for mounting fog lights (which are installed at the request of the car owner or are sold as standard in the Priora Lux modification).
The front bumper is mounted directly on an energy-absorbing beam designed to protect against damage and vibration from the car engine. The domestic manufacturer uses rather thin and fragile plastic to make the part, so it may well fail in the event of a collision or a strong impact during repair work.
The integrity and appearance of the bumper can be restored only in case of minor damage - chips or scratches.
If cracks appear on it, then it is better to replace the part, since it is not possible to repair it.
How to replace a bumper
How to remove the front bumper on a Lada Priora? To perform this operation you will need a jack, a Phillips screwdriver, and a socket wrench or 10mm socket. If you have the necessary tools, just follow these steps:
- disconnect the negative terminal from the battery to stop supplying voltage to the on-board network;
- on the side of the front wheels, unscrew the screws connecting the bumper to the fender liners;
- remove the covers located above the front headlights of the car. They are held in place with screws and are made of brittle plastic, so be extremely careful not to damage the parts;
- Using a Phillips screwdriver, unscrew the screws holding the bumper on the central part of the body in its upper part;
- unscrew the 5 nuts with which the part is attached to the energy-absorbing beam;
- unscrew three more nuts on each side of the body, and begin to remove the bumper. To do this, you need to carefully pull it towards you, avoiding distortions to one side.
After this, all you have to do is install the new part, doing all the above work in reverse order. We strongly recommend that you carefully prepare the seat for installation - remove dust and dirt from all body components that are hidden under the bumper, and also put the radiator grille in perfect order.
It is absolutely not necessary to install a “native” bumper on the Priora. Many owners of this car model often select restyled parts produced by both large enterprises and private companies. You can choose a model that fully meets your appearance requirements and completely change the design of the machine. Basically, manufacturers offer to buy either unpainted bumpers with prepared seats for optics, or completely finished products that are made to order.
Replacing the radiator grille
Usually, to remove the grille you have to dismantle the bumper, but we are not looking for easy ways - we know them! Therefore, we can do without removing the bumper!
- The grate is more difficult to attach, so you will have to work a little here. First of all, we unscrew the bolts located in the upper part, they are also the bolts that secure the plastic covers on the headlights.
- We put the “headlights” in the parking lot, after which we bend the front trim, carefully, it bends well, but if you bend it, as they say, it can break. By bending the cover we gain access to the grille fasteners. The fasteners are washers with spikes inside. It’s unreliable and inconvenient, but VAZ’s designers apparently know better or are more comfortable. Removing them is inconvenient; you need to bend the teeth or bite through the old washers and install new ones.
- We replace and assemble everything in reverse order.
After all the events have been completed, you can begin to admire the appearance of the updated car. The work is done, we compare how it was and how it turned out.
That's all, I hope the article was useful to you!?
Step by step guide
1. Unscrew 3 screws on both sides in the wheel arch.
2. Unscrew the top plastic covers on both sides near the headlights and remove. They are secured with four screws each.
3. Unscrew 2 more screws securing the bumper in the area of the hood lock.
4. If you have built-in fog lights, then disconnect the power connectors from them.
5. Next, in the engine protection area, unscrew five nuts by ten.
6. At the corners of the bumper, unscrew three screws on each side.
7. Pull the bumper off the latches starting from the arch.
After all the latches have opened, remove the bumper.
When replacing a bumper, you need to replace the radiator grille, lower plastic grille and fog lights (if equipped) with a new one from the old one.
The radiator grille is secured with eleven metal latches. The latches are removed using a screwdriver.
The lower plastic grille is secured to twelve metal latches, the same as those on the grille mount.
The fog lights are secured with Phillips screws.
When removing the bumper, it is advisable that you have an assistant.
Video lesson
Recommendations for choosing new parts
When choosing bumpers for Priora, you should adhere to simple rules:
- if the car has been in an accident where other body parts were damaged, then it makes sense to buy a black body kit and paint all the elements the same color;
- pay attention to the elasticity of the plastic, it should not be too hard;
- additional stiffening ribs provided inside the element are only a plus;
- when buying a tuning bumper, make sure that it has seats for installing fog lights and openings for tow hooks;
- Inspect the attachment points of the body kit to ensure there are no cracks or other manufacturing defects.
How to replace a bumper
How to remove the front bumper on a Lada Priora? To perform this operation you will need a jack, a Phillips screwdriver, and a socket wrench or 10mm socket. If you have the necessary tools, just follow these steps:
- disconnect the negative terminal from the battery to stop supplying voltage to the on-board network;
- on the side of the front wheels, unscrew the screws connecting the bumper to the fender liners;
- remove the covers located above the front headlights of the car. They are held in place with screws and are made of brittle plastic, so be extremely careful not to damage the parts;
- Using a Phillips screwdriver, unscrew the screws holding the bumper on the central part of the body in its upper part;
- unscrew the 5 nuts with which the part is attached to the energy-absorbing beam;
- unscrew three more nuts on each side of the body, and begin to remove the bumper. To do this, you need to carefully pull it towards you, avoiding distortions to one side.
After this, all you have to do is install the new part, doing all the above work in reverse order. We strongly recommend that you carefully prepare the seat for installation - remove dust and dirt from all body components that are hidden under the bumper, and also put the radiator grille in perfect order.
It is absolutely not necessary to install a “native” bumper on the Priora. Many owners of this car model often select restyled parts produced by both large enterprises and private companies. You can choose a model that fully meets your appearance requirements and completely change the design of the machine. Basically, manufacturers offer to buy either unpainted bumpers with prepared seats for optics, or completely finished products that are made to order.
Replacing the rear saber on a Priora
- First of all, we remove the cover trim; it interferes with access to the fastening elements.
- The license plate saber itself is secured with four “8” nuts, which, as you understand, need to be unscrewed. Unscrew carefully so as not to lose the nuts and washers in the depths of the body.
- Carefully remove the saber. Then we prepare the new one for installation. If you decide to repaint your sabers, then there is no need to rearrange anything. If you install new ones, you will have to move the bolts from the old to the new. For practicality, the edge of the lining was taped with anti-squeak.
Then we put it in place in reverse order.
Bottom line
Obviously, the process of replacing a bumper on a Priora will not cause difficulties even for a person who has never done anything like this. However, it is important, upon completion of installation work, to check how tightly it fits and whether there are any gaps between it and the front fenders.
If they are present, loosen the fasteners and adjust the bumper. If this is not done, moisture and dirt in these crevices will manifest themselves as corrosion over time.
Sources
- https://avtoskill.ru/remont-obsluzhivaniye/kak-snyat-peredniy-i-zadniy-bamper-na-lada-priora-hatchback-sedan-universal.html
- https://mylada.net/remont/kak-snyat-perednij-bamper-na-priore.html
- https://oshipovka-service.ru/remont/snyatie-perednego-bampera-priora.html
- https://kalina-2.ru/remont-vaz/kak-snjat-perednij-bamper-na-lada-priora
- https://ladaautos.ru/lada-priora/kak-poshagovo-snyat-perednij-bamper-na-lada-priora.html
- https://umelyeruki.info/avto/snyatie-perednego-bampera-lada-priora/
- https://1ladapriora.ru/raznoe/kak-snyat-i-zamenit-perednij-i-zadnij-bamper-na-lada-priora.html
- https://enginehack.ru/kak-snyat-perednij-bamper-priory/