Despite the fact that these two units are inextricably linked with each other, in our material we will consider them separately. This will allow you to understand in detail all the nuances and features of the operation and repair of the two devices.
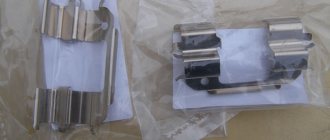
I – main cylinder body; 2 – low pressure sealing ring; 3 – drive piston of the “left front-right rear brake” circuit; 4 – spacer ring; 5 – high pressure sealing ring; 6 – pressure spring of the sealing ring;
7 – spring plate; 8 – piston return spring; 9 – washer; 10 – locking screw;
II – drive piston of the “right front-left rear brake” circuit; 12 – connecting sleeve; 13 – tank; 14 – brake fluid emergency level sensor; A – gap
Rear brake cylinder: replacement procedure using the example of a VAZ 2110 car
On VAZ cars of the “tenth” family, a brake system with diagonally separated circuits is installed. This means that 2 wheels are controlled by one hydraulic drive, and 2 by another. This scheme helps to increase the level of security. After all, if one circuit fails, the second one comes into operation. However, driving with such a malfunction is strictly prohibited (if only because you will only have the left rear wheel and the right front wheel blocked). Therefore, today we will look at how to replace the rear brake cylinder yourself.
Which cylinder is best to buy for replacement?
Rear brake cylinder from Kraft.
If you definitely decide for yourself that you will not go to a service station for repairs, then the spare part necessary for repairs will need to be purchased at a car store. Since spare parts for domestic cars are inexpensive, there will be no problems when purchasing.
When purchasing, you can buy both the original, which has the article number 21050-3502040-00 , and a “non-original” from another company. Unlike spare parts for foreign cars, where the original spare part is always better, the situation with spare parts for VAZ is the opposite. It often happens that non-original spare parts turn out to be of higher quality than the original.
How does it work?
The operating principle of the system is to use a hydraulic drive. When the driver presses the pedal, pressure is generated in the system. The rod presses on the piston. This, in turn, transfers forces to the liquid.
Traffic safety depends on the proper operation of this system. Therefore, you need to be able to diagnose a malfunction in a timely manner. How to do it? Let's look further.
Instructions
So, how to replace the rear brake cylinder yourself? The VAZ needs to be placed on a flat area and the rear part must be jacked up, having first removed the wheel bolts. Next, remove the wheel itself. Getting to the brake cylinder is quite difficult. To do this we need to remove the drum and also remove the pads. In addition, the brake fluid hose is unscrewed.
How to remove the drum? Before dismantling it, you need to thoroughly clean it with a wire brush, removing all rust and dirt. After this, unscrew the 2 guide pins with a wrench. Next, remove the drum from its seat. This is done using a special puller. If this is not available, you can use 2 M8 bolts 6-7 centimeters long. We evenly tighten them with a wrench into the holes. This way the drum is compressed from the hub.
Now we need to remove the rear brake cylinder itself. So, remove the plastic protective cap and unscrew the bleeder fitting itself. To do this we need a key “8”. To remove the tube, you must use a 10mm socket. We break the tightening on the fitting and unscrew the element. Be careful - brake fluid will flow out of the tube. Wear protective rubber gloves when working. Next, unscrew the bolts securing the rear brake cylinder itself.
Front wheel brake
Rice. 6-20. Pressure regulator performance test diagram: Pi
— pressure at the inlets to chambers A and D (see Fig. 6-18) of the pressure regulator, MPa (kg/cm 2 );
Pr
—pressure at the outlet of chamber B, MPa (kg/cm2);
Re
is the pressure at the outlet of the chamber C, MPa (kg/cm2);
1 - nominal pressure value Pr;
2 - upper limit of pressure
Pr;
3 - lower limit of pressure
Pr;
4 - the pressure
of the Re
manometer Mg) should fit into the shaded area (Fig. 6-20).
The readings of pressure gauges Мз and Мг (see Fig. 6-19) should not differ by more than 0.4 MPa (4 kgf/cm2) in the pressure range from 0 to 10 MPa (from 0 to 100 kgf/cm2) at regulator inputs.
Front wheel brake
Withdrawal. Raise the front of the car, place it on stands and remove the wheel. Unscrew the pipeline fitting and disconnect the flexible hose from the line; Plug the holes in the hose and tube to prevent brake fluid from leaking. Remove the hose from the guide bracket.
Installation
Installation of the new element is carried out in the reverse order. Before installation, you need to thoroughly clean the brake mechanism from dirt using sandpaper. Degrease the seat with white spirit.
So, first you need to open the hood and add brake fluid to the maximum level. It is not recommended to mix different classes of products. Cars of the “tenth” family are filled with RosDot-4 class fluid. Please note that during pumping the level in the tank will drop. As soon as it drops 1.5 centimeters, you need to top it up again. Next we need an assistant. He will press the brake pedal at your command. So, unscrew the cap from the bleeder fitting and put the hose on it. We put its second end into a plastic bottle. We give the command to the assistant. He must press the pedal 5 times and at the last stage press it “to the floor”. At this time, you will observe how aired liquid flows out of the fitting.
Replacement of TZ
The first thing you should think about when changing brake fluid is your own safety. The fact is that the hydraulic composition includes chemical components that have a high degree of toxicity. If brake fluid gets on your skin, chemical burns will be inevitable.
Plus, the liquid poses a potential danger to wiring, since it corrodes its protective casings without any problems. If it was not possible to avoid contact with car parts, immediately try to wipe the liquid off with rags. There is no need to rinse with water. If skin burns occur, wash with water and go to hospital immediately.
Let's hope that there will be no problems with your safety issues and that you will work carefully. And to work you will need a set of tools:
- Spanners;
- Durable rubber hose;
- Any transparent container with a volume of 3 liters or more.
Well, now you can proceed directly to the procedure for replacing the brake fluid on your VAZ 2110.
- Unscrew the brake fluid reservoir cap. It is located on the left on the domestic “ten”.
- Place the cap on a clean rag as there may be particles of brake fluid on it. Be sure to wear gloves.
- Drain the fluid from the hydraulic cylinders located behind. This is due to the distribution pattern of brake fluid throughout the vehicle. The front wheels are connected first, so if the car is in a normal position, the fuel fluid will not drain from the rear cylinders.
- For convenience, lift the rear wheels with a jack and turn off the locking regulator, that is, the sorcerer in the people. A screwdriver is inserted between the sorcerer's piston and the plate, which will not allow the element to move.
- Clean off any dirt that has accumulated on the hydraulic cylinder valves at the rear and remove the cap from one of them. It is made of rubber.
- This will release the fitting onto which the pre-prepared hose is attached. It is recommended to use a transparent rubber hose, as this will allow you to monitor the drainage of the liquid.
- The other end of the hose is placed in a transparent container.
- Have someone in your garage do the bleeding while you hold the brake fluid container.
- Bleeding is done by sharply pressing the brake pedal. The pedal should be pressed all the way about 6 times in a row. After 6 presses, the pedal rests on the floor and is held.
- Now unscrew the cylinder air valve half a turn. Due to this, the liquid will begin to be squeezed out of the container and enter the container through the hose.
- As soon as the entire circuit is cleared of brake fluid, the brake pedal itself will fall to the lower position.
- Wait until the liquid has completely drained, then be sure to tighten the outlet valve.
- A similar process is repeated on the second rear wheel, after which the front wheels are pumped out.
- The procedure for draining the hydraulic solution from the front wheels is similar to working with the rear wheels. At the same time, check the condition of the hydraulic cylinders. They may need repairs.
- Determining the serviceability of a hydraulic cylinder is not difficult. If the working stroke of the rod is smooth, there are no distortions or sudden jumps, then everything works well and replacement is not needed.
- If there are problems with the hydraulic cylinder, the easiest way is to replace them with new ones. But it can be repaired. Act according to the situation.
- Filling with new hydraulic solution is carried out by pumping each wheel separately.
- Once you have filled and bled all 4 wheels, be sure to fill the brake fluid reservoir to the maximum level. For this purpose, the corresponding MAX symbol is marked on the body.
- The last step is to check the functionality of the new brake fluid inside the system. If the replacement of the hydraulic solution was carried out correctly and without disturbances, the braking force will be distributed evenly, the pedal will clearly respond to pressing without delay and without increased sensitivity.
- If the pads do not respond to braking at the same time, you will simply skid when you press the brake pedal. Therefore, this should not be allowed under any circumstances.
Replacing brake fluid on a domestic VAZ 2110 car is not difficult, even without the help of specialized service stations.
For a successful DIY procedure, you will need:
- Compliance with personal safety rules;
- Availability of an assistant;
- High-quality brake fluid;
- Actions according to the instructions and operating instructions for the VAZ 2110.
Put all this together, and you can easily change the hydraulic fluid in your car's brake system yourself.
Loading …
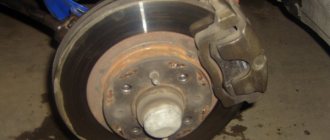
Operating principle of the rear brake cylinder
Rear brake cylinders are elements of the brake system that are directly responsible for acting on the pads, pressing them against the inner surface of the drum.
The main working parts of the rear brake cylinder are a body, two pistons, and two rings - a sealing ring and a thrust (adjusting) ring. When you press the brake pedal, the pistons move out of the housing, pressing the pads against the surface of the drum. They return back under the action of the tension spring of the pads. The purpose of the thrust ring is to limit this movement, so that the gap between the friction linings and the drum is maintained at the same level. The O-ring, in turn, prevents brake fluid from leaking through the cavities in which the pistons are located.
1 — block stop; 2 — protective cap; 3 - cylinder body; 4 - piston; 5 - seal; 6 - support plate; - 7 - spring; 8 - crackers; 9 — thrust ring; 10 - thrust screw; 11 - fitting; A - slot on the thrust ring
Thus, it is the rear brake cylinder that is responsible for transmitting braking force to the pads and for maintaining the distance between the surface of the drum and the friction linings as the latter wear out. Below you will learn how to check the rear brake cylinder.
Vacuum booster
1 – vacuum booster housing;
2 – amplifier housing cup; 3 – rod; 4 – adjusting bolt; 5 – rod seal; 6 – sealing ring of the master cylinder flange; 7 – diaphragm return spring; 8 – amplifier pin; 9 – tip mounting flange; 10 – valve; 11 – hose tip; 12 – diaphragm; 13 – amplifier housing cover; 14 – sealing cover; 15 – piston; 16 – protective cover of the valve body; 17 – air filter; 18 – pusher; 19 – pusher return spring; 20 – valve spring; 21 – valve; 22 – valve body bushing; 23 – rod buffer; 24 – valve body; A – vacuum chamber; B – atmospheric chamber; C, D – channels The rubber diaphragm 12 together with the valve body 24 divides the cavity of the vacuum amplifier into two chambers: vacuum A and atmospheric B. Chamber A is connected to the engine inlet pipe through the check valve of the tip 11 and a hose.
The 24 valve body is plastic. At the exit from the cover, it is sealed with a corrugated protective cover 16. The valve body contains the main cylinder drive rod 3 with a support sleeve, rod buffer 23, valve body piston 15, valve assembly 21, pusher and valve return springs 19 and 20, air filter 17 , pusher 18.
When you press the pedal, the pusher 18, the piston 15, and after them the valve 21 move until it stops against the seat of the valve body. In this case, cameras A and B are separated. As the piston moves further, its seat moves away from the valve and through the resulting gap, chamber B is connected to the atmosphere. The air entering through filter 17, the gap between the piston and the valve and channel D creates pressure on the diaphragm 12. Due to the difference in pressure in chambers A and B, the valve body moves along with the rod 3, which acts on the piston of the main cylinder.
When the pedal is released, valve 21 moves away from the body seat and through the resulting gap and channel C of chambers A and B communicate with each other.
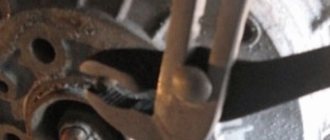
Symptoms of rear brake cylinder failure and checking them
To check the operation of the rear brake cylinder, you need to identify the symptoms. Symptoms of rear brake cylinder failure can vary. Indirect reasons for concern may be:
- a slight but stable drop in the level of brake fluid in the reservoir;
- insufficient braking force on the rear axle or uneven braking of the left and right rear wheels.
However, the above may also be caused by other problems. The “well-being” of the cylinders can certainly only be assessed by visual inspection. This is usually done when replacing rear brake pads.
Damage to the sealing ring may be indicated by leaks of brake fluid on their surface. A fairly serious reason for concern about the condition of the cylinders may be their excessively oxidized surface. In this case, the pistons may no longer move so quickly in the housing. You can check this with an assistant, who should smoothly press the brake pedal or monitor the stroke of the pistons and hold the pads while you do this. You need to “brake” very carefully, otherwise the pistons may come out of the cylinder completely.
Source
Main causes of malfunction
The VAZ 2110 caliper is structurally an element that holds the brake pads and is responsible for the degree of their pressure on the brake discs. It is also responsible for uniform wear of the brake pads and guarantees the driver reliable braking in extreme situations.
Thus, the importance of the caliper in the operation of the car is difficult to overestimate
If by this time you have a completely reasonable question, what can happen to the caliper on a VAZ 2110 (2112), we will be happy to answer you. The main cause of malfunctions is “acidification” of the moving elements, coating them with an oxide film, clogging due to the destruction of protective boots or the use of improper lubricant, namely:
- acidification of the main piston mechanism;
- acidification of guides.
Piston mechanism and caliper guides VAZ 2110
A clear sign of problems that the caliper can cause on VAZ cars is uneven wear of the brake pads and an increased braking distance. In this case, the VAZ pads must be changed, and the caliper mechanism itself must be subjected to comprehensive diagnostics:
- check the condition of the piston, its degree of freedom, the presence of moisture, metal oxide, oxide formations and build-ups, the condition of the protective boots;
- Similarly, check the condition of the guides, make sure that there are no uncharacteristic scuffs, abrasions or deformations of the rod on the surface.
We must also not forget about regularly replacing the brake fluid in the system. This should be done approximately every 40 thousand km. mileage of VAZ-2110.
Since brake fluid is hygroscopic, it easily absorbs moisture, thereby oxidizing the piston mechanism and causing it to fail. The piston stroke becomes difficult and uneven wear of the brake pads and wheel wedge occurs.
Principle of operation
Hydraulic dual-circuit brakes with diagonal distribution are predominantly efficient and reliable. This is due to the fact that if one circuit fails, the second will allow your car to brake.
The circuit system is arranged as follows - one of them is responsible for the left rear and right front wheel, and the second circuit is responsible for the left front and right rear wheel.
This way, you will be able to brake without damaging the brakes or causing other problems with the system.
Braking system design
The most important component of the VAZ 2110 brake system circuit is a vacuum booster and a dual-circuit regulator. The latter is responsible for creating pressure in the rear brake devices.
The brake drive is equipped with a piping system, which is divided into two circuits, brake devices and hoses. They allow the front and rear wheels to brake.
To activate the braking system, a special pedal is located inside the passenger compartment at the driver’s feet. In the VAZ 2110 car it is located in the middle. The main elements of the hydraulic drive are:
- Vacuum booster . Its design helps create pressure directed towards the master cylinder piston.
- Pressure regulator drive . Through it, the brake fluid is directed to the rear devices of the braking system.
- Direct brake pressure regulator VAZ 2110 . Its function is to be responsible for the force of pressure. The unit reduces or increases this indicator, depending on the load on the rear axle of the car.
- Master cylinder with reservoir and pistons . On the filler neck of this tank there is a sensor that monitors the emergency level of brake fluid.
- Front wheel brake . Its design includes cylinders, pads and a disc, plus a special alarm that warns of wear or malfunction of the lining.
- Rear wheel brake . Here the system is not disk, but drum. At least, this is the design the factory envisages. Some VAZ 2110 owners believe that drum mechanisms are not reliable and efficient enough, and therefore install disk devices in their place.
conclusions
The process of replacing a brake cylinder is a simple procedure. The main thing is not to tear off the tubes and fittings.
In this article, you need to determine the cause of the brake cylinder failure on the VAZ 2110 car, and it will also be replaced. A good cylinder will last a long time, but you need to find one first. There are a large number of defective parts on the market that often break. To find out what condition the brake cylinders are in, you first need to remove the brake drum. If there are small leaks on the cylinder, then in any case it needs to be replaced and further operation is prohibited.
It is best to change both cylinders at once, because if one of them is worn out, the second one will soon fail in any case. You should never drive with faulty brakes and should always keep them in working order.
Checking the brake cylinder on VAZ 2112, 2111, 2110 is carried out only when the drum is removed. An assistant sits in the cabin and presses the brake pedal, the second one carefully holds the pads and watches how the pistons move apart. After such interventions in the system, in any case, it will be necessary to bleed the brakes so that all the air leaves the system and the rear brake pressure regulator drive must be re-adjusted.
The quality of the brake fluid plays a huge role in operation, but brake fluid will also play an equally important role.
Now you directly need to move on to replacing the elements themselves, you need to start with the front brake cylinder. The car is placed on a viewing hole or a lift, and the rear wheels are fixed. We remove the front wheels, unscrew the fastenings of the brake caliper connections. We squeeze the caliper in a vice, unscrew the fastenings of the connecting tube, and disconnect it. Use a screwdriver to press on the latch, which fits into the side groove of the caliper. We carefully slide the cylinder along the guide grooves, and in this case the latch should always be in the pressed position. We remove the standard brake cylinder and install a new one, and assembly proceeds in the reverse order. Now you need to fix the front wheels and remove the rear ones. Using a rubber hammer, you need to pull out the brake drum of the VAZ 2112, 2111, 2110 from its place. The end of the upper spring tie must be carefully pulled out, which until this time was connected by the brake shoe. The parking brake handle must be lifted all the way, then the brake pads will move apart and are much easier to remove. You also need to unscrew the brake pipe from the cylinder. The rear brake cylinder was removed; if necessary, it can be replaced with a new one, and the assembly procedure is reversed. Don't forget to bleed the brakes again.
Why do you need a pressure regulator?
Not every owner of a domestic “ten” will understand why the brake pressure regulator on a VAZ 2110 needs to be replaced. Simply, this name is not familiar to everyone. A popular designation for a regulator is a sorcerer.
This very sorcerer is located on the rear suspension of your car. It has a lever with a movable position. Depending on the moment of load on the spring, its position changes.
The voltage generated during actuation is directed and distributed to the brake piston. Pressing the piston pedal reduces the load on the rear pads. If the brake system is working properly, the loads are distributed evenly.
In order for the unit to function efficiently and without errors, it is necessary to adjust the brake pressure regulator on your VAZ 2110. This way you can prevent untimely wheel locking.
Improvement of the braking system
Many VAZ 2110 owners agree that the factory brake system is far from perfect. Therefore, they decide to modernize and improve the unit using technical tuning.
A popular solution to the issue of brake efficiency is to replace drum mechanisms with disc ones. Of course, in the case of the “ten” we are talking about the rear wheels. When replacing brakes, be sure to take into account the fact that the rear wheels must brake more softly and somewhat later than the front wheels. This way the car won't skid and you won't fly off the road.
Another option is to remove the factory brake master cylinder and vacuum booster. Instead, units from Priora are excellent. Such tuning will eliminate vibrations and also allow you to use the brake pedal effectively and without excessive effort.
Regardless of the changes made to the brake system, after each modification it is mandatory to pump the brakes.