Comments: no Published: 01/06/2016
Rating:
Tags:VAZ 2108/2109/21099Replacement spar
The problem of a spar failure on a VAZ 2108/2109 is an unpleasant situation, but this does not mean that it cannot be corrected. There are many ways to fix the problem: replacement or welding, do-it-yourself repair or in a workshop. You will learn further how to make the right choice.
Content
From the author
About 1.4 million copies of VAZ-2109 cars were produced and it, along with classic VAZ models, became a truly people's car. Last but not least, this was achieved thanks to the high maintainability of the “nine”
In this article I would like to dwell on such an important problem as replacing side members on VAZ-2109 and 2108
Replacing side members on a VAZ-2109
Welding of the spar is used in two cases:
- When fatigue cracks started to appear. Then it makes sense to put a patch over the crack and weld it using semi-automatic welding.
- When there are small pockets of corrosion. In this case, the metal is cleaned, treated with a rust converter and primed. If necessary, small patches are applied.
If the car was involved in an accident in which the side member was significantly deformed or rotted, then a complete replacement would be advisable. It is necessary to understand that you need to repair the spar if you have sufficient skills in body work and welding. For an inexperienced person, this process will be quite complicated, so if you are not confident in your own abilities, then it is better to trust the professionals.
Required tool:
- Semi-automatic welding.
- Bulgarian.
Semi-automatic welding
- Electric drill.
- Wire brush.
- Spars for VAZ-2109.
- Mastic, primer, solvent.
Dismantling of the spar must be carried out on a slipway or with the machine turned over on its side. In addition, you need to completely remove all the trim and soundproofing of the trunk. After this, we clean the weld seams. Next, we will need to find all the resistance welding points of the spar and drill them out using a 7-mm drill. At the end of this process, we need to completely cut off the old spar. We clean the place of its attachment from rust and paint. This is done using a metal brush on an angle grinder and a rust converter. If necessary, we cut out the rotten body elements and put patches in their place.
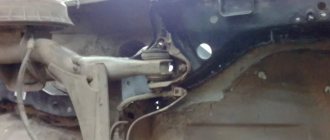
Removing the rear side member
Before installation, the mounting area is degreased and primed. The new spar also needs to be cleaned of transport soil, primed and holes made in it for welding points. If everything is done correctly and the geometry of the body is not damaged, then the new spar will fit into its seat without any problems. We weld the spar at the welding points to the body and cross member. At the end of this process, coat the seams with automotive mastic.
The front spar is more loaded than the rear. This is because it bears the entire weight of the engine and gearbox. If we add to this operation on bad roads and aggressive driving, then its service life will be only about 4-5 years. In some cases, a special repair insert, which is welded into place of the damaged fragment, can save you from the labor-intensive process of completely replacing the spar.
Before you begin replacing the spar, you need to remove the entire front suspension and engine, and partially disassemble the interior
When disassembling the front part of the car, pay attention to the condition of the remaining body elements, such as glasses, radiator frame (most likely, the frame will have to be changed along with the side members, because
it serves as a structural reinforcement), mudguards. It is possible to partially replace the front spar. In this case, the old one is cut off, and a new one is welded in place of the cut out part. However, next we will look at the process of completely replacing the front side member.
Preparatory work
If you nevertheless decide to repair the spar on a VAZ yourself, first you will need to acquire the following tools for the job:
- welding machine;
- metal hacksaw or plasma cutter;
- grinding machine;
- metal spatula.
Since spar replacement and repair are carried out using the same technology, the set of tools will also be the same. First you will need to dismantle all electrical equipment, parts, engine components and chassis.
The next stage is heating the parts. But first you will need to get rid of the old coating, remove the sealant, sound insulation and primer. Now you can cut off the heated spar. Please note that if the wheel arch is also being replaced, there is no need to separate it first.
Please note that it is better to purchase spars complete with other parts. This way you will be sure that they will fit each other perfectly and will not spend so much time installing them.
Replacing the front spar
Beam for front side members of VAZ 2110
To fully replace the side members, the following tools and spare parts are required. Without them, you can get yourself into trouble in the form of the inability to dismantle the old part and install a new one:
- Wing;
- Bolts for fastening the steering gearbox, if it is on the left side, or for fastening the pendulum, if it is on the right.
- Bolts, washers and nuts of the steering gear, three pieces each;
- Bolts responsible for fastening the beam;
- Bolts for attaching the upper arm;
VAZ 2110 front side members
- Bracket with number 2121-2904242;
- Nuts required to fasten the beam;
- The spar itself and the mudguard;
- Ball joint fasteners (set).
VAZ 2110 front spar
You can purchase the spar and mudguard as a set or individually for each part. When trying to save money, they often decide to purchase separately and cook it themselves. This results in wasted time during installation and welding.
Left front side member of VAZ 2110
To clearly understand further actions, you need to examine the engine shield. This is that part of the car, or rather its body, that separates the engine compartment from the interior. It is to the engine shield that the engine splash guard must be attached. If it is in a condition that does not evoke positive emotions, it will not be possible to weld the mudguard, which will significantly affect the rigidity of the body.
Front right side member VAZ 2110
Small corrosions that do not have a significant effect on the condition of the engine shield are not scary. To bring it into proper condition, you can use patches. They are made of metal, which you will also have on hand. In order to unscrew the upper ball joint, which simply needs to be dismantled, it is advisable to purchase fasteners for this ball joint. If the bolts are in poor condition, a lot of time will be lost. Tools that should be:
- Grinder (angle grinder)
- Impact screwdriver
- Regular screwdriver
- Chisel
- Welding
- Ties (needed to compress the spring)
The process of replacing the spar begins with removing the door (see Repairing VAZ doors: how to do it correctly) using an impact screwdriver and removing it until the process is completed. Next you need:
- Raise the mats
- Remove noise and thermal insulation from the work area
- In the area of the engine splash guard and its connection to the shield, clear the surfaces of flammable products and those that are prone to smoldering
- Remove the wing
- Fix the front part of the VAZ using adjustable stands
- Fix the front axle beam well to avoid displacement
- Tighten the springs
- Unscrew the 3 bolts from the upper ball joint
- Remove the upper arm
- If the bolts connecting the spar and the bridge beam are jammed, cut them off with a grinder or remove them in any other way.
- Unscrew the brace that secures the spar and beam
- Cut off the mudguard
- Divide the spar into two parts
- Separate from the body by first sawing behind the beam
- Thoroughly clean the fastening points and install a new spar
- It is necessary to carefully tighten the two bolts protruding from it on the new spar
- Weld the bottom part
- Weld the engine splash guard to the engine shield
The front spar of the VAZ 2110 burst
Unfortunately, it is not possible to bring in a new spar in its pure form. The reason is the welded front panel into which it must be inserted. To eliminate this discrepancy, you need to saw off the tip of the spar. Having installed the spar in place, the tip is inserted into the front panel, and then welded with a continuous seam, which restores the integrity of the part. So:
Reassembling the front suspension in reverse order
- The cavities are filled and coated with an anti-corrosion agent
- Wing being mounted
- The door is mounted
- The brakes are being pumped
For those who have a desire to repair and transform a car with their own hands, the step-by-step instructions given above will be an excellent assistant in their work. The cost of parts is not high, and you can save a lot on repairs without resorting to expensive services. Photos will help you better understand the location of each detail, and the detailed video, which is located here, will be a clear example for anyone who has decided to act.
You can also find out about replacing the rear spar on our resource.
Causes of damage
As we have already found out, the spar absorbs the bulk of the shock absorption when driving; manufacturers specially develop special designs for this part so that it absorbs all the kinetic energy and takes on the entire impact force in an accident. But even if the car has never been in an accident, the spar may crack over time from driving on our roads.
If you notice that the car is starting to pull sideways, or the doors are not closing well, the rubber is rubbing against the body - these are the first signs that the spar is cracked or misaligned. But don’t panic, how to pull out the spar is described in this article, and you can solve this problem yourself or turn to the services of a car repair shop. In today's article we will look at the method of drawing out a spar with our own hands using the example of a VAZ car.
To damage or bend the spar, it is not necessary to make a head-on collision at “crazy speed”; this can also happen in a light collision, as a result of which the entire car body changes its geometry.
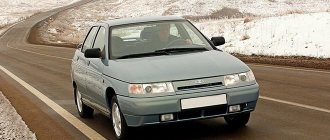
VAZ-2112
Since 1999, VAZ began producing the VAZ-2112 with a hatchback body that was shortened by almost 10 centimeters compared to the station wagon and sedan and a luggage compartment volume of 400 liters. Thanks to the short wheelbase, it was possible to achieve a clearer response of the car to turning the steering wheel. The 2112 has sportier handling, more aggressive ride quality and improved performance. In addition, the “twelfth” is characterized by increased driving comfort. Despite its excellent performance and technical characteristics, model 2112 was discontinued early - already in 2008.
Since 2000, production of a cheaper modification began - VAZ-21122. This model combines all the design features of the 2110, including its “filling”. The rear seat was “borrowed” from 2111. The following modifications were produced: 21120 with a sixteen-valve engine producing 94 hp. With. and a volume of 1500 cubic meters. cm (maximum speed – 185 km/h); 21122 with an eight-valve power unit with distributed fuel injection and version 2112i (injector).
The vehicle configuration options are as follows: 21120 – “norm” (“01”) and “luxury” (“02”); 21122 – “standard” (“00”), “norm” (“01”) and “luxury” (“02”). “Norma” includes front electric windows, central locking, immobilizer, athermal glass and electric trunk lock. In luxury cars, in addition to all of the above, heated front seats, an on-board computer, velor seat upholstery and fog lights are added, and if the car has sixteen valves, then alloy wheels. All cars, regardless of version and configuration, are equipped with a rear wing and a brake light integrated into the spoiler.
In the period from 2003 to 2006, the assembly of one-piece three-door hatchbacks was carried out - VAZ-21123 “Lada 112 Coupe”. Initially, the model had a unique M series bumper, uncharacteristic for the “tenth” family, and was equipped with a powerful sixteen-valve engine with a capacity of 1600 cc. see and had a luxury package. In addition to convenience and compactness, the body of the three-door car, compared to other modifications of the “tenth” family, turned out to be more rigid.
Do you want to buy a new car, but can’t sell your old one? Have you tried everything, but standard methods do not bring any results? Don’t be upset about this, because there is a website that will help you with the urgent purchase of a car.
Technical characteristics of VAZ-2110/VAZ-2111/VAZ-2112:
| 2110, 21102, 21103, 21104 | 21110, 21111, 21113 | 21120, 21122 | |
| Years of manufacture | 1996-2008 | 1997-2008 | 1999-2008 |
| Dimensions (L x W x H), mm | 4265 x 1680 x 1420 | 4170 x 1676 x 1430 | |
| Wheelbase, mm | 2492 | ||
| Body type | 4-door sedan | 5-door station wagon | hatchback |
| Number and arrangement of cylinders | 4 | 4 | 4 |
| Engine capacity, l | 1.5, 1.5, 1.5, 1.596 | 1,5 | 1,5 |
| Curb weight, k | 1030 | ||
| Total weight, kg | 1505 | ||
| checkpoint | fur. | fur. | fur. |
| Engine power, l. With. , at rpm | 72, 78, 91, 96 | 56 kW, , 69 kW | 94 |
| type of drive | front | front | front |
| Steering type | distributed vpr. | ||
| Supply system | distributed injection | distributed vpr. | disc, ventilated, drum |
| Brake system | disc, ventilated, rear drum | disk, ventilated | |
| Front suspension | independent, spring, McPherson, with stabilizer. | independent, telescopic, with hydraulic shock absorbers, with coil springs | independent, telescopic, with hydraulic shock absorbers, with coil springs |
| Rear suspension | semi-dependent, spring, on trailing arms | ND | ND |
| Maximum speed, km | ND, 170, 185, 185 | 160-165 | 170-185 |
| Acceleration dynamics 0-100 km/h, s | ND, 14, 12.5, 12 | ||
| Fuel consumption per 100 km, l | 7.5 (average) | 7.5 (average) | 9.8 (city) |
Replacement procedure if you decide to do it yourself
- Raise the entire car on a rack lift, or just the damaged side.
- The VAZ 2109 spar is attached using spot welding, it must be drilled out. Anything that cannot be drilled out, cut off with a grinder.
- If some elements of the part are inaccessible to you, then remove the suspension (the wheels will have to be removed in any case).
- If, after all that has been done, you still cannot remove the spar, cut it off with a chisel.
- Let's try on a new part. If it is larger, then we will cut off the excess part.
- In the new case, we make holes in the places where you will weld it.
- We attach the part to the body by welding.
- We clean the welded points with a grinding machine.
- We prime the new part and paint it in several layers.
- If desired, you can carry out anti-corrosion treatment.
As you understand, you can’t joke with the spar. And if you are not an expert in body repair, then all defects need to be repaired at an auto service center. Well, and lastly, a funny video of how our compatriots decided to quickly straighten the side member of a VAZ 21099.
Replacing the spar
VAZ 2110 spar burst
To replace the spar you will need:
- standard set of wrenches;
- grinder with multiple disc variations;
- drill with drills;
- sledgehammer;
- file;
- chisel.
Spar repair options
The spar is made of an extremely strong steel alloy, which is almost impossible to deform; its strength is incredibly high. However, as everyone knows from junior school physics classes: force is speed multiplied by mass. For example, a light car collided with a KAMAZ, as a result the passenger car was completely deformed, and the body of the KAMAZ was only partially, but still deformed. It should be objectively understood that even a very strong material can be deformed, it all depends on the force that acts on it. The point of direction of the force, as well as the degree of its application, determine the nature of the damage. Any significant traffic accident almost always damages the spar, sometimes completely. In this case, you have to completely replace it.
Note. If there is no confidence in the objectivity of the assessment of the exact nature and extent of damage to the car, then the most rational option would be to seek help from a car maintenance service.
The spar in the VAZ 2110 burst
If the spar is only partially damaged, for example, in the form of a crack, then you can try to eliminate this defect by welding. However, it is also necessary to objectively understand that not every defect can be eliminated by using welding. For example, if the attachment of the spar to the body of the vase is damaged, then most likely welding will be ineffective. The only way to eliminate the defect is to make a complete replacement.
What is better to eliminate the existing spar defect or completely replace it?
Of course, the best option would be to weld a new spar instead of the old one, and also pre-strengthen the body. However, it all depends on the repair budget; the more financial resources are invested, the more effective the repair will be. Each motorist has different financial capabilities, so this nuance must be taken into account objectively. Therefore, the option of repairing the spar cannot be immediately discarded.
Fuselage power kit
Typically, longitudinal parts of the frame, such as stringers and spars, extend the entire length of the aircraft. They are presented as a bent profile with different cut sections. The main task of the stringer is to distribute loads. As for the spars, they provide overall structural rigidity.
The transverse parts of the frame consist of simple and reinforced frames. They allow you to maintain the shape of the fuselage under external and internal influences. Reinforced frames are installed near large cutouts in the hull or at the point of attachment of components.
The skin of aircraft is made of sheet metal, which forms the surfaces of the fuselage. The aircraft skin is attached to the load-bearing frame. The joints of the sheathing sheets are located on the transverse and longitudinal parts of the load-bearing frame. In modern aircraft manufacturing, composite materials are increasingly being used to reduce the weight of aircraft.
Replacing the spar
Replacing the spar
If the spar has burst, then there is no point in pulling it out. In this case, only overcooking the spars will help. Since it is attached by welding, it needs to be overcooked. It can be replaced either completely or partially. The old spar or part of it is cut off with an angle grinder, and then a new part is installed. Before welding the side members, all adjacent body parts are dismantled. After installing a new part, anti-corrosion treatment is carried out. Typically, primer is applied and then paint. It is also advisable to treat the spar from the inside.
Article on the topic: Shift Lock Release, manu, hold, o/d off, power and other buttons
Preparation for work
Considering the long-term use of the VAZ 21099 sedan, the condition of the vehicle’s structural frame may not be the best. Therefore, if you need to replace the rear side member of a VAZ 21099, you need to purchase all the necessary spare parts.
Replacing the rear beam
It is equally important to decide how the replacement will be carried out. If you do everything in a garage, you will need a lift and the necessary equipment. If you are replacing the rear side member yourself, you need to perform a number of preparatory work before lifting the car on the lift.
- Seats, carpets and interior floor coverings must be removed. This is done to comply with fire safety and maintain the quality of materials.
- Considering the welding work, it is advisable to dismantle (or at least protect with special material) the fuel tank with gasoline residues. And after the car is on the lift, be sure to disconnect the negative terminal from the battery.
Further operations are carried out in the following sequence:
- drive the car onto a lift, remove the wheels from the hubs;
- release the rear beam with suspension elements, otherwise it will be impossible to carry out work;
- clean the rear spar to determine the mounting points.
It should be borne in mind that the spar is usually secured by spot welding, so it is important to locate all such places. For better cleaning, use a wire brush. We clean the welding areas using an angle grinder.
Design Features
So, we figured out that the spar is a simple pipe with a rectangular cross-section. Depending on the engineers’ ideas, they:
- are located in front and behind the car.
- extend along the entire length of the housing structure.
Due to the fact that various forces are constantly pressed on the side members, they must withstand serious loads: this includes the weight of the engine, the weight of people in the car, as well as a host of other automotive parts.
Also, this part is constantly subject to shock load, which is transmitted from car wheels while driving. If you look at the photo of the inside of the car, you will see that the frame frame looks like a ladder frame, similar to the letter "P", including the rear one. Ladder frames are commonly used for SUVs, crossovers, and trucks. Passenger cars are most often equipped with a load-bearing body structure.
Purpose and location of the spars
To answer the question of where the side members are located, you should study a little the principles of the layout of modern cars. So, side members are special body elements that are installed under the bottom and serve as a kind of reinforcement of the car body. The functional responsibilities assigned to the spars include:
- support, thanks to which suspension elements are attached to the body;
- thanks to them, the body receives additional rigidity, and the geometric integrity of the car is also ensured;
- spars ensure passive safety of the machine;
- act as fastenings for chassis elements;
- They also secure parts of the fuel, brake and exhaust systems.
Since the side members bear great responsibility for the condition of various vehicle systems, including the safety factor, the driver must carefully monitor their condition, including carrying out the necessary inspections from body repair specialists. In some cases, car owners can independently carry out certain operations to repair side members. And even if they don’t have the necessary experience, today you can use a video to learn how to weld the rear side members.
About the purpose of the spar
The spar used on the VAZ 21099 is a kind of integrated frame that runs along the entire length of the body and carries several specific functional loads:
- support for mounted body elements;
- imparting rigidity to the body, ensuring its geometric integrity;
- ensuring passive safety in the car;
- fastening of chassis parts;
- fastening of fixing elements (brackets, etc.) for fuel, exhaust, and brake systems.
The main reasons for the destruction of the front spar
As noted above, the submarine bends from impact and rusts over time. The following also have a destructive effect on this body element:
- constant engine vibrations, especially if the engine or gearbox mounts are loose;
- driving a car on bad roads;
- extreme driving.
Since the side members are practically the skeleton of the body, a large load falls on them. All vibrations and shocks are transmitted to these elements; as a result, the body parts cannot withstand, become deformed, and cracks appear on them.
Origin of the spar
First, it’s worth figuring out what it is - a car spar and how it came to be
Only after this we can move on and continue our acquaintance with this important part of the car. The spar is the strongest part that performs a load-bearing function.
In a car this is a very strong box beam, metal profile or rectangular pipe. A large number of parts and mechanisms are attached to it.
The first cars had a frame, the longitudinal parts of which were called spars. To give the structure strength, lintels were added, making it look like a ladder. This technology is still used today. It can be seen on any truck. Passenger cars do not have a separate frame. The longitudinal spars became part of the body.
A car cannot exist without this part. You can't see it at all behind the wheels, but it's definitely there. You can see what the spar looks like; to do this you will need to lift the car on a lift. Spars come in different types; we will return to this issue later. If each of you understands what a spar is in a car, then you can move on to studying the functions that are assigned to this part.
The history of the creation of the spar is closely connected with the history of the development of the body frame structure. Initially, the frame was the main and only load-bearing (by the way, wooden) structure in the car. Over time, the car frame was improved and spar elements appeared in its composition.
In the 20s of the last century, Auburn engineers created a spar frame equipped with a cross member in the form of the letter X. This design consisted of two spars located parallel to each other and several transverse beams. In appearance, this design was similar to a staircase, for which they received the name “staircase”. These days, all trucks are equipped with a ladder frame.
Gradually, car creators began to integrate the spar frame into the body, or more precisely, into the floor of the car. So the side members became an integral part of the car body. Nowadays, spar frames are included in the design of all machines, and its presence does not depend on the type of supporting structure.
What to do if the spars are rotten
These days, most cars have a fairly high mileage range. This is explained by the fact that many of these cars are quite old. Therefore, they often have problems with various body elements, including side members.
Unfortunately, the quality of the metal from which our cars are made meets the highest standards. Because of this, the body does not withstand high humidity, which is quite common in our latitudes. The side members mounted under the car body also suffer.
How is the repair carried out?
Since the front side members are much more susceptible to deformation than the rear ones, their repairs are required much more often. Deformation corrections are carried out at a special stand. The repair work is labor-intensive and time-consuming, as it requires disassembling a significant part of the vehicle.
Partial replacement of the spar is justified if its main elements are not damaged. When carrying out the work, gas welding technology is used. In case of severe deformation, even replacing the spar may be pointless, so you will have to replace the entire body.
MBS specialists recommend not postponing a visit to a car service center if there are signs of spar deformation. This is the only way you can make your car use safe!
What functions do spars perform?
Based on the foregoing, it becomes clear that side members in passenger cars are the main strength element in the design. But if in trucks it is a load-bearing part, then in cars it only strengthens the body. But at the same time, its functions are very important, since it takes on all the loads acting on the body. And they are multidirectional, so the spar works in very harsh conditions.
What is a car side member?
In addition to reinforcement, these elements also serve as shock absorbers, ensuring as even a distribution of vibration effects as possible throughout the entire body, and not just in a certain part of it.
In an accident, the main impact force in the body falls on the side members. Therefore, their design is such that they not only absorb shock loads, but also absorb them. For this purpose, so-called “deformable” areas are made in the front part of the spar, where the thickness of the metal is less than in the rest of the element. They are needed so that during the impact of an impact load during an accident, deformation of the spar occurs, ensuring a reduction in the kinetic energy of the impact.
Often, in the manufacture of spars, so-called folds are used, the purpose of which is to prevent rupture of the spar. In the event of a strong impact, the spar with folds will simply fold into an “accordion”.
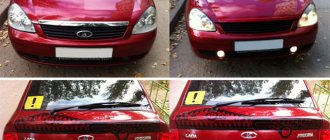
VAZ 2111 – Specifications, photos, description, price
The same VAZ 2110 that we all know, but in a station wagon body, which is currently produced by the Bogdan company in Ukraine, this is the VAZ 2111.
This car appeared in 1998, and its production at AvtoVAZ was discontinued in 2009, and it immediately went into production at the Bogdan company.
This car remains the same inside as the VAZ 2110 and in fact it just has a little more space, since the body is a station wagon.
Type Volume Power Torque Acceleration Maximum speed Number of cylinders
| Petrol | 1.5 l | 73 hp | 109 H*m | 14 sec. | 165 km/h | 4 |
| Petrol | 1.5 l | 78 hp | 109 H*m | 14 sec. | 170 km/h | 4 |
| Petrol | 1.5 l | 93 hp | 128 H*m | 12.5 sec. | 185 km/h | 4 |
| Petrol | 1.6 l | 81 hp | 120 H*m | 14 sec. | 170 km/h | 4 |
| Petrol | 1.6 l | 89 hp | 131 H*m | 13 sec. | 180 km/h | 4 |
More details This car was equipped with only one type of engine, a 1.6-liter engine producing 89 horsepower. This is an injection 16-valve engine. Above is a table of all power units with detailed technical characteristics.
The problems with the engine of the VAZ 2111 are still the same. The car is in most cases front-wheel drive, but versions with all-wheel drive were produced, which are difficult to find. A relatively good suspension, considering the cost of the model. There is an independent spring system at the front and a semi-independent spring system at the rear.
Despite the fact that the brakes are simple - discs at the front and drums at the rear - they generally do a good job.
Salon
The interior decoration here is not bad compared to older models. Fabric covering is used, the build quality is also not at a particularly high level. A simple 2-spoke steering wheel is installed, behind which there is an instrument panel with analogue gauges and a small on-board computer.
The center console has small air deflectors in the upper part, and heater controls are located below them. This block consists of two simple twisters. Below there is a dial clock, and already under it there is a place for a radio tape recorder. Afterwards we can notice an ashtray and a cigarette lighter next to it.
The tunnel is as simple as possible; it contains the gearbox selector, the parking brake lever and the power window buttons. There is quite enough free space, and the trunk has a volume of 426 liters, although this is not much. The trunk can be increased to 1420 liters by folding the rear seats.
In general, this is still the same top ten and there is nothing to tell about this car, if anyone needs more information, for example, about the interior, then see the review of the VAZ 2110. Otherwise, this is a good inexpensive family car that is suitable as a car for traveling to the country.
Manufacturers and prices
How much electronic tinting costs depends not only on the volume of purchase, but also on which company in which country produces this product. On the market you can most often find American and Chinese films, the second is much cheaper.
Electric drive for smart films
Many companies mainly focus on producing tinting for cars, but it is quite possible to order a film of the desired size that is suitable for home glass or an office partition. Some manufacturers sell the material in rolls; the buyer can cut the desired shape according to the pattern. This is convenient if you are going to mount the film yourself or if you have to do a large amount of work.
If you need inexpensive electronic tint, China can offer quite a large selection. You can search for suitable products, for example, on the Aliexpress or Tao Bao trading platform, where a large number of sellers from all over the world gather. Mostly Chinese companies are represented on the trading platform, some of them have a warehouse in Russia, so you won’t have to wait long for a purchase. The convenience of such a service is that it guarantees the security of the transaction. You do not take risks when purchasing goods, for example, through the Aliexpress trading platform, since the site acts as an intermediary and guarantor of the safety of your funds. Many sellers provide a guarantee for the product and agree, in case of problems with it, to exchange it or make a significant discount.
Trunk of VAZ-2111
However, the main parameter of the “eleventh”, which is why car enthusiasts generally choose it, is, of course, its carrying capacity. Here the VAZ-2111 has practically no equal among the products of the domestic automobile industry. In this case, Largus should be taken out of the equation, since, firstly, it is a foreign car produced in Togliatti, and secondly, it is a slightly different class of car.
Now let's look at slightly different numbers. In particular, the total length of the luggage compartment is 1,630 millimeters. Another quite important parameter. The height of the rear door opening is 890 millimeters. And finally, let's look at the following parameters of the car. The width of the compartment between the wheel arches is 930 millimeters.
A rather interesting experiment was carried out by the publication “Behind the Wheel” back in 2000, when the VAZ-2111 was compared with the “nine”, “Svyatogor”, Izh-2126, GAZ-310221 and with the classic VAZ “four”. As a result, “eleventh” confidently took second place. The winner was the Volga, which, as is known, belongs to a higher class. Note that cubes of 5, 10 and 20 liters were used to test the trunk capacity.
If we talk about specific indicators, we get the following picture. First place - GAZ-310221, with a result of 1,510 liters. In second place, as already mentioned, is the VAZ “eleventh”. At the same time, the gap from the leader was quite decent - 1,215 liters. Well, “Svyatogor” took an honorable third place. Its indicator is 1,100 liters. The remaining 3 participants showed more modest results. In particular, all of them lacked 30 to 80 liters to reach the 1,000 mark.
Detailed characteristics of VAZ 2111
in numbers, among the most important ones that people most often pay attention to are the price in rubles at the time of appearance in car dealerships and fuel consumption in various conditions: in the city, on the highway or mixed, as well as the full and equipped weight. Also important are the dimensions and volume of the trunk, ground clearance, maximum speed, acceleration to 100 km in seconds or the time spent covering 402 meters. Automatic, manual gearbox; rear-wheel drive, front-wheel drive or all-wheel drive, or even switchable
Main indicators of VAZ 2111 2004 Station wagon characteristics of VAZ 2111
With such an engine capacity of 1500 cubic meters, a decent number of horses under the hood is guaranteed, although the consumption will not be very high.
A drive that requires special driving skills and getting used to in the case of driving with a different type of drive. For such a low price, cars are considered budget
since you just get a car to drive and nothing more, but in some cases this is the only purpose without any beauty. You don't need more to get around the city. Perhaps the slogan for such a vehicle is not “The miser pays twice.”
There are other names or misspellings:
Body repair is a harsh thing, or use a chisel to “CHISEL”
For everything about garage welding of rotten cars, see the new book on car repair from Khoma
In August 2009, a nice young lady approached me with a small request - to weld a hole in the side member of a VAZ-21093 car, in common parlance - “chisels”, they say, the husband is a diagnostician, “fumbles” with engines at 10c plus, but there is no one to do auto body work.
Well, helping your neighbor is a sacred thing, I thought and invited them to the show. The initial examination raised a lot of questions, ranging from year of birth to:
WHERE IS THE CAR'S FLOOR? Brief questioning of the owner revealed the following: the car was produced in 1996, stupidly stood in a pit for three years, after which it was bought outbid, hastily patched up, coated with various mastics and successfully sold off to the current owners, and since the diagnostician husband figured out that the engine was in good condition, he didn’t bother with the condition of the body…..But in vain!
The young lady was offered the following options:
– replace the floor, sills, rear side members
– completely change the body (the engine is excellent)
– cover it up again and sell it off to other less fortunate buyers at an even lower price (there was no recycling program at that time).
Ultimately, the decision was made - COOK!
Disassembling the interior took two hours, they opened the Shumka and “rejoiced”:
the floor of the car was practically destroyed by corrosion (see photos 1, 2, 3) The place of the “happy” driver, who almost ran along the “path with his own legs” (photo 4) looked especially impressive
Since the floor tunnel miraculously survived, only the “trough” was replaced
After cutting off the rags, cleaning off mastics and other offal, drilling out resistance welds on the side members, and carefully marking them, welding of the floor began.
By the way, everything was cooked using a domestic carbon dioxide semi-automatic PDG-165.
Next in line were the rapids.
After opening the outer panels, a view appeared no less gloomy than the appearance of the floor (photo 9, 10)
In order not to take risks, stretchers were installed in the body for rigidity (see photo 26, where the car looks quite naked) and this measure, I think, was not unnecessary - it’s better to be overdressed than underdressed.
The remains of the side members and jacks brought tears to my eyes... (photo 11, 12)
Having mercilessly chopped off pieces of old metal with a grinder and a chisel, we got to the living metal of the body. We welded in the amplifiers, connectors and front jacks. Buy a new book on auto repair from Khoma. We decided to wait a while before installing the doors to install the external sill panels in order to prevent the appearance of unnecessarily large gaps.
Finally, the turn came to the spars. This “hole” was what the sweet girl wanted to seal (photo 14)
The same photo shows that the edges of the wheel arches still have the same deplorable appearance. Removing the rear bumper and examining the trunk for integrity forced me to take up the camera again:
The left trunk well (see photo 21) and the rear panel (see photos 15, 32) also suffered from terrible rot. For further repairs, we had to remove the gas tank and the rear beam (photo 28). While they were filming, the soured brake pipes were told to live to death for a long time (see photo 23). There was no time to mourn for them, so the chisel, grinder and drill were used again. The edges of the arches were trimmed, the side members were drilled out, and the rear panel was cleaned down to bare metal. First, new spars were installed, and then new edges freshly cut from millimeter sheet metal were welded to them by spot welding, as well as parts of the rear panel (see photos 24, 25, 27, 16). At this point, the welding work was completed, but the owner expressed a desire , taking the opportunity to “make noise” of the interior, and treat it with anticorrosive... No sooner said than done, especially since the customer supplied the materials himself, with the exception of body iron.
So, the hidden cavities were treated with Movil, the interior was glued, the bottom was treated with bitumen mastic (the rear panel, of course, also got it) see photos 18, 19, 20.
Replacing the rear right side member 2109
The condition of the rear spar is determined by external inspection; if the body element has traces of severe corrosion and is thoroughly rotten, it must be replaced; in many cases its repair is impractical. Even before performing work, it is necessary to inspect the car body itself; often the iron on the 2109 rots to such an extent that there is practically nothing to weld to.
To carry out repair work you will need:
- welding machine;
- electric drill with drills;
- screwdrivers;
- a set of keys;
- hammer;
- core;
- chisel;
- cleaning wheels.
You must first buy the floor spar itself (LP), the average retail price of the body element in auto stores is from 1800 to 2500 rubles, catalog number is 2108-5101372. This spare part is suitable for model 2108-09-13-14, with minimal modifications it can be installed on VAZ cars 21099 and 2115. Since when replacing a spar you basically have to work under the car, you need to think about how to make it easy to get to below. There are several options here:
- use a car lift;
- carry out work in the inspection pit, hanging the rear part of the body on “goats” or other stands;
- turn the car over on its side, using a reliable support.
Before you start drilling out the old spar, you need to partially disassemble the car and remove:
- rear seats;
- gas tank;
- rear floor trim;
- rugs;
- rear beam (you will have to disconnect the handbrake cables and brake hoses).
After disassembly, you can begin to directly remove the rear LP; to do this, you need to find the attachment points, drill them at the spot welding points using a drill clamped into the drill chuck. After dismantling the body part, it is necessary to thoroughly clean the metal under the spar and prime it, remove the shipping primer from the new part (it can be removed very effectively and quickly using sandblasting). In order for the right side member to fit exactly in place, you should use measurements (there are control points for attaching units), there must be a certain distance between the elements of the front and rear suspension (between the fastening of the rear beam and the front wishbone).
After determining the control points, the spar is tacked by welding in several places, the correct installation is checked, then the part is finally welded to the seat. The final stage of repair consists of the following steps:
- cleaning welding scale with a grinding wheel;
- degreasing the metal surface;
- application of primer and anti-corrosion coating.
Very important conditions when performing welding are an intermittent seam, a maximum length of 4-5 mm. A continuous weld is unacceptable; with such welding, the body loses its elasticity and becomes very rigid. The left rear lip on the “Eight” or “Nine” changes in exactly the same way as the body element on the right side, the procedure for performing the work and the installation principle are the same.
Installation process
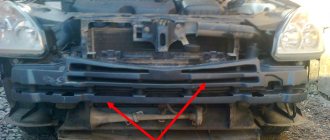
Let us describe the process of replacing the front side member on VAZ 2108/2109 cars:
- Using a plasma cutter, in the absence of which you can use a hand hacksaw for metal, you need to cut off a new spar. Its size must be identical to the size of the damaged VAZ part.
- Once you have everything you need to make the repair, you can begin installation. The spar is connected to other parts, using guide templates, you can achieve precise installation.
- Now you can start welding parts 2108 / 2109, but first you need to check everything carefully. Only after this will it be possible to secure the part in several places. She welds the joint to the joint using arc welding.
- Fix the side member on the front panel of the VAZ. The method of spot or through welding is used here. Please note that if you replace the spar, the second option is more reliable.
- All you have to do is go over the welding areas with a grinding machine. It will be enough to tap the new contact points between the spar and the wheel arch with a hammer to secure the result. Finally, apply primer, soundproofing and sealant to 2108 or 2109.
Body geometry of the VAZ 2108/2109
If you have completed all stages of the work, you can be proud of yourself! But remember that doing the repairs yourself is quite difficult. If you have doubts about your skills, it is better to contact a car service. It may cost a little more, but the car will serve you for many years.
Author: Ekaterina
When is it necessary to repair or replace the spar on a VAZ 2109
The decision to straighten or replace a side member on a damaged car depends largely on the length of the deformed zone, the degree of deformation, and also on the qualifications of the repairman. If there is slight deformation of the spar over a long length, even if there is a small fold, the spar does not need to be replaced. Using a jack or square, you can restore the original shape and position of the spar while maintaining its characteristics. On the other hand, if there is significant deformation, the spar must be replaced, since straightening will cause a change in the metal structure and strength, which will lead to a change in the characteristics of the body itself.
If the metal is rotten, then the side members (front and rear) cannot be repaired or restored. Even if you weld, the rot will continue around it. In addition, welding on soft metal can disrupt wheel alignment, tires will begin to wear out faster, transmission parts will begin to break, and body deformation may occur. Such repairs will be enough for a couple of weeks.
If possible, it is always better to purchase a new part, which costs more than temporary repair work. But, even with a limited budget, in some cases you cannot save. Therefore, replacement is much cheaper, but if the crack is the result of an impact or collision with a VAZ, welding will be sufficient.
When repairing a spar, you should never lose sight of the fact that it is a reinforcing element of the body and largely determines its rigidity. At the same time, it is not recommended to strengthen the spar during partial replacement, mainly in the front and rear parts of the body, since this increases the strength of the area intended for crushing, i.e. for depreciation. If the depreciation of this zone turns out to be insufficient, then in the event of an impact, the deformation of the body will pass further, to the car cabin, which should not be deformed.
Tips for replacing the rear side members of the VAZ-2108-09
- When replacing the LP, almost all craftsmen cut off the old body element with a gas cutter, but it is better to drill out the part.
- When installing a new spar, it is very important to correctly find the control points, not to disturb the geometry of the body, otherwise the work will have to be redone, and difficulties will arise.
- It is recommended to grab the spar at three or four points; before thoroughly welding the part, it is recommended to try on the rear support - the fasteners must match the studs.
- Before installing the body element, the seating space must be painstakingly cleaned of rust and primed; if the alloy is rusty, new plates must be welded.
- It is not allowed to weld with a continuous seam, this will weaken the body alloy.
Replacing the rear side members is a difficult job; if you are not confident in your own abilities, you should not undertake it; it is better to use the services of experts.
Source: avtobrands.ru
Diagnostics and repair
The damaged element is subjected to a drawing process on an appropriate measuring stand. The quality of work is checked at control points, according to the recommendations of the manufacturer. It is interesting that the necessary data, diagrams, devices, as well as qualified and specialists are not available in every branded service. Of course, restoring a car with your own hands in a garage is generally a futile endeavor. At best, it will only be possible to return the superficial, original appearance, but not to return the previous factory geometry.
Before undertaking repairs to the spar, it is recommended to first perform a wheel alignment. This simple procedure, which should definitely be carried out when purchasing a car, will show whether restoration work is necessary and how labor-intensive it will be. In most cases, deviations from symmetry, the visible absence of smooth lines along the body, unstable gaps in the doors, hood, and trunk indirectly indicate, at a minimum, that the car was disassembled and, probably, repaired.
The spar is drawn out on a robotic slipway. A bracket is welded to the defective unit, using which the hood is pulled using a hook, chains, and a winch. In a garage workshop, instead of a lifting mechanism, you can get by with a cable and a fixed support, for example, wood. The tinsmith sits behind the wheel and, by smoothly slipping, tries to pull out the part. If the damage is critical, only replacing the spar will help. It is worth considering that with a new part, probably, due to existing damage, you will have to change the subframe, suspension elements, engine mounts, etc.
see also
How to wash your car in winter
- 5 0 4k
Anti-scratch for cars
- 8 0 15k
Could the spar be moved by an impact from the front side?
- 0 2 1k
Body polish
- 87 5 119k
Rust converter for cars. Which one is better to choose?
- 31 0 44k
The problem of the failure of the VAZ 2108/2109 spar is not a pleasant situation, but this does not mean that it cannot be corrected. There are two methods to fix the problem: replacement or welding, repair with your own hands or in a workshop. You will learn further how to create the right choice.