Replacing the steering wheel of a VAZ 2110
Almost every motorist is familiar with the phenomenon of steering wheel play. Usually, if the reason is in the steering wheel, then the steering wheel is replaced on a VAZ 2110. This article presents step-by-step instructions that show how to replace the steering wheel on a VAZ 2110, which aims to change the steering wheel to a more comfortable one.
Diagnosis of steering problems dozens
Every car has weaknesses. For VAZ 2110, this is the tie rod end. This part is an integral part of the car's steering system. The tie rods on the tenth generation VAZ end with tie rod ends. Rods are rarely changed, but tie rod ends must be replaced every 40 thousand kilometers of the car.
But this is an average and approximate figure. The service life of the steering tip depends on the driving style of the car owner and the conditions in which the car is operated.
Any driver of a vehicle can notice a problem with the steering. The main signs of the need to replace steering tips on a VAZ 2010 are as follows:
- difficulty driving, especially when turning;
- strong noise and knocking from one or both sides in the front, more pronounced when turning;
- The tread on the tires wears unevenly.
In the latter case, most likely the problem is not only with the tips. It is necessary to diagnose the front suspension as a whole. Perhaps replacing the tie rod end won't do the trick.
The steering tips in the VAZ 2110 car are a hinged joint. Wear in the tip joint leads to a malfunction in the steering. You can check the steering tips on the VAZ 2110 yourself.
First of all visually. To inspect the tip on the left side of the car, you need to turn the steering wheel all the way to the right; to inspect the right steering tip, turn the steering wheel to the left.
You should pay attention to the rubber boot that protects the tie rod end. If it is torn or cracked, then it is time to replace the tips. Through the hole in the boot, dust and dirt enter the hinge, which leads to faster wear of the steering tip.
Through the hole in the boot, dust and dirt enter the hinge, which leads to faster wear of the steering tip.
To carry out the second stage of diagnosis, it is necessary to jack up one of the sides of the car so that the wheel is freely suspended in the air. Tug the tip with your hand, if there is any play, then you need to replace the steering tip. The tips should be changed on both sides. It is not worth saving and changing one tip; it is better to save on the services of a service station technician and carry out the replacement procedure yourself.
Which steering wheel should you choose?
If you decide to replace the steering wheel, then you need to decide what part you need to purchase. It is worth noting here that for this car, in addition to the standard ones, sports parts are also offered. The sports steering wheel has a smaller diameter. It also has special metal linings that perform a decorative function. Please note that you will have to get used to the small disassembly of the steering wheel for some time.
It is also possible to select a steering wheel from another model. For example, we may be talking about a part intended for Lada Kalina, in which case there will be no problems with installation. There are also other suitable analogues. When choosing, pay attention to the size of the splines; the depth of seating of the steering wheel on the column is also important.
You should choose a steering wheel to replace based on your preferences.
You should be comfortable, in which case you will not experience any problems during the management process. It is also worth considering some legal requirements. Some types of steering wheels cannot be installed, as you will not be able to pass a technical inspection. Be sure to take these nuances into account.
Reassembly
If you have selected a new steering element suitable for your VAZ 2110, there should be no problems with reassembly.
In this case, it is very important to turn the turn signal switch ring so that the pin on the wheel hub fits into the groove of the ring. This ring will return the turn signals to their original position when the car exits a bend or turn.
Otherwise, simply follow the dismantling instructions, working in reverse order. This will allow you to install the new element that you have chosen for yourself without any problems. To be more precise, for your car.
If you find an error, please select a piece of text and press Ctrl+Enter.
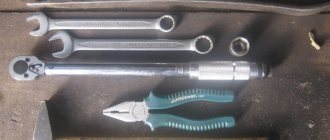
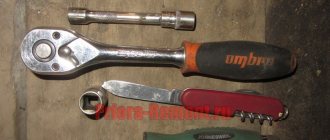
Required Tools
To work, you will need a number of tools that will help you in the process. In fact, the list of necessities is small, but it is better to have everything you need on hand in advance. This will make your task easier.
For dismantling you will need:
- Phillips and slotted screwdrivers;
- Head 24;
- Hammer;
- Soft metal drift;
- Pliers.
Nothing more is needed. In general, you can cope with the task only using the listed devices. Sometimes drivers wonder if they need an assistant for this job. In principle, you can cope on your own. But sometimes difficulties may arise during dismantling. In this case, you will need help, but this happens very rarely. As a rule, with the right approach, this repair occurs without any problems or complications.
Installing the rack
Through the opening of the left wheel we return the steering rack to the engine compartment, install the seal in its place and begin the most difficult operation - installing the rack on the car.
Ideally, one person will hold the rack against the engine bay while another person connects it to the steering shaft flange. I did this without an assistant, so I lightly tightened the nuts securing the rack to the body and pressed the rack to the body with this lever:
Not without difficulty, I installed the steering rack shaft and flange in their original position (picture on the left), but this was the second time, and the first time I incorrectly aligned the rack and worm shaft (picture on the right).
After the first assembly of the rack, the flange bolt, with the steering wheel in a straight position, did not fit into the recess on the shaft, so when trying to tighten it, I also damaged the thread on it. I had to replace the bolt and rebuild the rack again.
Once the steering rack shaft axle and splines are aligned with the steering column flange, you can screw the rack to the body. Here the ratchet wrench will help us again, but remember that using excessive force is unacceptable. Hold the key literally with two fingers.
When the shaft is in place, with the steering wheel turned 45° to the right, it will all look something like this:
To ensure that the flange is completely seated on the steering rack shaft, you can grab the steering wheel and push it away from you. It will turn out like this:
After this, you need to tighten the flange coupling bolt, but this must be done by hand, without using keys, so as not to damage the threads of the bolt if for some reason it does not fit into the recess on the shaft.
The thread of the coupling bolt is very easy to damage, so it must be tightened without using a key - by hand
I admit, I myself did not foresee this, and therefore I ruined this bolt and went to buy a new one. In theory, you can’t drive without this bolt, but I replaced it with a thinner one with a nut and that’s how I got to the store, but in general, it’s better not to joke with the steering. If anything, buy a ball joint bolt from a classic - it will definitely fit.
So, if you push the steering wheel away from you, then there will be no gap left between the steering wheel and the steering column pad. You can’t leave it like that, because when you turn the steering wheel, all this stuff will creak.
Now the bolt should easily screw into the flange by hand, to approximately this state.
I remind you: there is no need to tighten it with a wrench yet. We do everything with our gloved hands. Now that the bolt is screwed in, but not yet tightened, pull the steering wheel towards you, it will extend about a centimeter and a gap will appear:
Great! Now you can tighten the bolt with a 13mm spanner - you won’t damage the thread.
So, at this point, your rail is already screwed to the body. I recommend that you lightly lubricate the protruding threads of the four studs securing the rail to the body with lithol. This will avoid problems during future possible dismantling of the steering mechanism.
If the steering wheel is turned, then return it to the “straight” position and screw the steering rods to the rack. We tighten the large 17mm bolts that secure the rods to the rack with the same “meter” wrench and quite firmly.
We put a locking plate on top. This must be done, otherwise the bolts may come loose.
Now is the time to check the rack again for knocks. To do this, you need to grab the steering rod and pull it up and down. If everything is good, then during such a check there should be no knocking, the steering rods should be absolutely motionless.
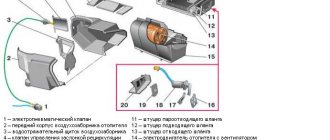
Next, we screw on the thermal protection, connect the IAC and TPS connectors, install a platform under the battery and fix two wires to it from below, and install the battery itself on the platform. Not forgetting to remove the rags (if there were any), install the air duct between the air filter and the engine, and tighten all the clamps with a screwdriver.
What kind of steering wheel can I install?
If you decide to replace your old steering wheel, it means that its appearance did not suit you in some way. Of course, the issue may be a breakdown or external damage, however, even in this case, you should consider installing third-party models. What if you like one of them much more than the previous steering wheel?
Sports models
When tuning their iron horses, car enthusiasts often look at sports steering wheels. Their appearance helps create the image of a fashionable racing car. The sports steering wheel has a smaller diameter than a regular steering wheel, which significantly improves maneuverability. In addition, it saves space inside the car. And various design options give room for creativity when styling the rest of the interior.
The design of a sports steering wheel can refresh the interior of the car
Unfortunately, sports steering wheel models have as many disadvantages as advantages. It is not as safe in a collision as the stock steering wheel. Its construction uses metal, so upon impact, the risk of serious injury increases. In addition, sports steering wheels are not equipped with airbags.
To install such a steering wheel you will need special adapters. They can be divided into two categories:
- cast;
- corrugated.
Moreover, the latter are much safer, since in the event of an accident they can fold up and absorb part of the energy.
The corrugated adapter for the sports steering wheel can fold upon impact, therefore it is considered injury-proof
Buy a sports steering wheel from trusted stores and from well-known manufacturers. Make sure you have the appropriate certificate. A poor-quality steering wheel, even with a corrugated adapter, can play a cruel joke on you if you get into an accident.
Steering wheels from other VAZ car models
Steering wheels from more modern models of VAZ cars, such as Lada Priora, Kalina or Granta, look prettier and are much more comfortable in the hands. Installing them will not be difficult, provided that you replace not only the steering wheel itself, but also the steering column column. Otherwise, the hub size will not match.
The Lada Kalina steering wheel looks more stylish and presentable than the standard part from a VAZ 2114 or 2115
Read on to learn how to choose the right steering wheel for the VAZ 2114 and VAZ 2115.
What you need to know when installing
Please note that not every steering wheel is suitable for installation on VAZ 2114 and VAZ 2115 cars. You need to choose a steering wheel with the same contact group as the original part.
choose a steering wheel with the same contact group as that of the VAZ 2114 and 2115
This is quite easy to do if you plan to install a steering wheel from other VAZ models. For example, a steering wheel with a Europanel from a VAZ 2110 is ideal for these purposes.
If you have chosen a Lada Kalina car, then its steering wheel should be marked 1118–3402010. With it you will also have to install the upper casing marked 2110–3403070–30, as well as the lower casing 2110–3403072–30.
Replacing hoses and oil
Power steering hoses are an important part of it. Therefore, they need an eye and an eye. But what if they still need to be replaced? Should you take your car to a service station? Of course, there is no need, because you can do all this yourself. Usually, hoses are replaced simultaneously with the power steering oil change. And it would be opportune to present joint instructions.
- First you need to lift both front wheels of the car (they should be in the air);
- We find the power steering reservoir from which the oil should be pumped out;
- Pump out the oil;
- Turn the steering wheel all the way in any direction (after this oil will appear in the tank again, which needs to be pumped out again);
- Now turn the steering wheel in the other direction and pump out the oil again;
- We remove the hose, which is the oil conductor (through it, the oil comes from the passenger compartment and enters the tank);
- Turn the steering wheel from side to side (oil should come out again);
Replacing power steering oil
- We take new power steering oil (usually about 800 ml);
- Fill it into the tank to the maximum level;
- Again, turn the steering wheel from side to side (all the way);
- We start the engine for a few seconds, turn it off;
- We turn the steering wheel again;
- Add oil;
- We pump and remove air from the system by turning the steering wheel with the car turned off ten times in each direction (we do the same number of times with the engine running).
When changing the oil, be sure to look at all hoses and pipes. If oil is leaking, this is a sign of a torn or faulty hose that will need to be replaced. Hoses are replaced only after the oil has been completely pumped out. You will need to unscrew the clamps and remove the hoses from the pump. As for installation, new hoses and pipes should be tightened with clamps and not overdo it (hoses easily burst, if anything happens).
https://youtube.com/watch?v=bRn-PAMRJxA
Reasons for replacement
There are more than enough reasons to want to replace your steering wheel. But everyone has their own:
- The old steering wheel was worn out;
- The current rim does not meet the driver's requirements;
- The driver feels uncomfortable with the factory steering wheel;
- The unit received mechanical damage;
- Tuning, modifications to the interior and the entire car, etc. are carried out.
Drivers can name many more reasons why they want to get a new one to replace their old steering wheel.
Option for tuning
What to choose?
Based on the presented range of steering wheels suitable for the VAZ 2110, certain conclusions can be drawn regarding the advantages and disadvantages of various options.
We suggest you familiarize yourself with them in the table.
| Options | Advantages | Flaws |
| Native factory | Designed specifically for this model Manufactured according to the appropriate calculations Has a reliable design | Appearance leaves much to be desired Not functional enough Wears out quickly |
| From new VAZ models | More multifunctional Improved appearance It's not difficult to install in place of the old one | There are questions about the quality of workmanship |
| From foreign cars | More modern, functional Attractive appearance Thoughtful design and button placement Comfortable grip | High price It's hard to find a VAZ Possible installation problems |
It’s up to you to decide which one you choose. The steering wheel plays a significant role in ensuring comfort and safety, so you should choose a high-quality product that you can use to comfortably control the movement of your car.
Euro steering wheel
Reasons that lead to rapid wear of the steering wheel
Replacing the steering wheel and removing the steering wheel
The process of replacing the steering block can be considered complete. In order to avoid the need to replace this part in the future, you need to know the causes of the steering column malfunction and try to prevent them. Among the reasons are the following:
- Creaking in the steering column. The cause of the squeak may be wear of the elements, malfunction of parts of the steering column joystick unit, or deformation of the facing panels;
- Play in the steering column is a more serious sign. Play in the steering wheel area may indicate that the spline joints are loose.
With a competent approach and high-quality installation of all elements, the steering column can last quite a long time without replacement. Loosening of the nuts and bolts of the connections can cause free play, and over time, abrasion of the splines. As a result, the column fails precisely because the connections cannot function correctly. This video will help you do everything correctly.
We remove the steering wheel on a VAZ 2110 with our own hands - step-by-step instructions
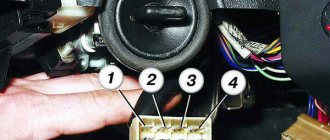
1. First of all, you need to remove the decorative trim with the inscription “LADA”, under which the screws for securing the signal cover are hidden. It's best to do this with something flat, such as a small flat-head screwdriver.
2. Next, take a Phillips screwdriver and unscrew the steering signal cover.
3. Let's move on. The cover has been removed, now we have access to the steering wheel mounting nut, which must be unscrewed using a wrench and a 24mm socket. Before you start unscrewing, turn the steering wheel to the right until the steering wheel locks, this will make it easier to unscrew the nut.
4. After the nut is unscrewed, you can begin dismantling the VAZ 2110 steering wheel. Before removing the steering wheel, you need to align its position exactly in the center. To do this, set the steering wheel straight and, focusing on the factory mark, make your own mark on the steering column casing, this will simplify the subsequent installation of the steering wheel.
5. Disconnect the signal power supply and you can safely remove the steering wheel.
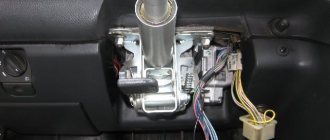
6. We grab the steering wheel with both hands and remove it from the splines. Sometimes the steering wheel sits very tightly, so you have to put a lot of effort into removing it. To speed up the removal process, apply light blows to the edges of the steering wheel, while simultaneously trying to pull the steering wheel towards you. Simply put, we turn the steering wheel towards ourselves.
7. The VAZ 2110 steering wheel has been removed. We carry out the necessary work and perform assembly in reverse order.
That's all for me, thank you for your attention and for visiting VAZ Repair. Until we meet again, take care of yourself and your VAZ
Bye.
All about the VAZ steering wheel
Replacing the steering wheel of a VAZ 2110
First of all, you need to understand this important truth: the safest steering wheel is the one that was initially installed on the vehicle by the manufacturer. It was developed specifically for a specific car model, passed the necessary tests and is in accordance with current regulations. However, the design of the standard VAZ 2110 steering wheel is not to the taste of many and leaves much to be desired: the rim is very thin, there is no comfort and convenience when hands touch its surface, it is smooth, cold to the touch in winter and slips in the hands in summer. Therefore, car owners quite often think about replacing the standard steering wheel with a steering wheel from a different manufacturer, purchased in a specialized store. Also, the need to replace the steering wheel may arise due to the appearance of abrasions on the top, if there is a need to repair the sound signal.
Note. It should be remembered that, despite the large assortment of steering wheel models offered, quite often they are questionable in terms of safety and quality.
VAZ 2110 steering wheel removal
It should also be remembered that, according to the current rules, replacing the steering wheel of a vehicle is actually considered making changes to its design.
Of course, you can put different covers and leather, rubber or fur braids on the wheel, but it’s still not always possible to get a comfortable steering wheel this way.
Do-it-yourself VAZ clutch replacement (front-wheel drive)
Unlike VAZ classics, on front-wheel drive 2108-2115 it takes a little longer to change the clutch, and the work of removing the gearbox is more labor-intensive. But with experience, professionals perform the operation of removing the gearbox quickly, and besides, there is a method in which it is not necessary to completely dismantle the gearbox; it is enough to just hang it up.
We do the replacement ourselves without completely removing the gearbox as follows:
- we hang the car on a car lift; if the work is being done in a pit, we place tripods under both front sides of the underbody;
- remove the battery terminal (minus);
- unscrew the front wheel bolts and remove the front wheels;
- unscrew the clutch cable mounting bracket from the box and move the cable itself to the side;
- dismantle the speedometer cable (if you do not remove it, when you move the gearbox, it may become overtightened and as a result burst);
- unscrew the ball joint nuts on each side (left and right bearing);
- unscrew the starter and move it to the side;
- unscrew the nuts of the front wheel hubs;
- unscrew the three fastenings of the lower gearbox casing and remove the casing;
- if there is protection under the engine, it must also be removed;
- dismantle the left mudguard;
- remove the three bolts of the left “crab” (bracket), which is attached to the front left, next to the front bumper;
- unscrew the fastening of the left lever (in the area of the wheel);
- loosen the other lever fastening (in the area of the box), move the levers down so as not to interfere;
- remove the left gearbox cushion;
- unscrew the bolts securing the gear shift rod, disconnect the rod;
- unscrew the rear gearbox cushion;
- unscrew the top two bolts securing the gearbox to the engine, screw in the long bolts of the cylinder head instead;
- unscrew all other transmission fasteners - now the box on the top bolts “moves away” from the engine;
- twist the six bolts securing the basket; we install the new parts in place, tightening all the bolts, move the box towards the engine, tighten the bolts to the end through the hole in the starter (turning the crankshaft). With this method, the centering roller will not fit here, so the clutch can only be secured in this way;
- We put all the removed parts back in place.
With this method, there is no need to drain the oil from the gearbox, since the wheel drives (CV joints) are not removed from the gearbox housing. The distance between the engine and gearbox is not too large, but there is enough space to attach the bolts of the basket.
Main faults of the VAZ 2110 steering rack
In modern VAZ 2110 cars, breakdowns of the steering rack and power steering are a very common occurrence. The reasons may be the following:
Frequent driving on uneven roads, getting the car into potholes at high speed, active (uneconomical) driving style. In such a situation, the steering rack and power steering will quickly fail, an annoying knock will appear, and controllability will deteriorate. The result is failure of the unit; sudden acceleration when the steering wheel is in the extreme right or left position
This driving practice negatively affects the life expectancy of the steering rack; Regular trips to curbs are a big load for such an important mechanism.
Fans of such “obstacle driving” will very soon have to spend money on repairing the steering rack.
We have identified the main reasons. But how to determine whether a steering rack is faulty in practice? For what symptoms? We will look at this issue in more detail.
Power steering pump
The pump of this mechanism deserves a separate discussion. It costs about 3 thousand Russian rubles and is often repaired rather than replaced. But if repairs don’t help, you’ll have to spend money. As for high-quality repairs, you can again do it yourself, thereby saving your money.
Typically, a ZF brand pump is installed on the VAZ 2110 power steering, which is also used on the Audi A6, Volkswagen and other cars. But this pump model is not dismountable and there are no retaining rings or covers on it. This does not mean that it is impossible to restore the operation of such a pump. Below are instructions for removing and disassembling the power steering pump:
- Remove the clamp;
- Disconnect the return hose (do it carefully so as not to spill oil);
- Disconnect the connector;
- Remove the DJ (sensor) from the fitting bolt.
- We disconnect the discharge tube, first removing the union bolt;
- Remove the power steering drive belt;
- Now it's time to start removing the pump itself;
- Loosen the first bolt securing the pump;
- We completely unscrew the second bolt securing the pump;
- Remove the pump assembly.
We clean the pump from dirt and visually inspect it. If a development is found on the inner wall of the housing, resembling steps, then they need to be removed using a special nozzle and a drill.
Pump bearing and seal
A worn bearing in a sealed housing can also cause power steering failure. The cuff, which needs periodic replacement, is no exception.
Let's consider both options:
- To secure the bearing in the first way, you need to make a groove on a lathe on the outside of the housing. Then we drill threaded holes in the pump wall. The new bearing should be inserted and secured using bolts with sharpened ends, which are also sawn off.
- The second option involves bending the edges of the body.
We assemble the pump in reverse order. Unlike other pump models, the ZF version has vanes that do not turn over.
The power steering pump may make noise after installation. But there is no need to be afraid of this, because everything is explained simply: grinding in parts.
How to remove?
Let's take a step-by-step look at how to remove the steering wheel. This will allow you to understand the principle of operation and avoid any mistakes in the process. So, withdrawal is carried out in the following order:
- To begin, place the wheels straight. You don’t have to do this, but in general it will be easier to work with the steering wheel positioned straight;
- Using a slotted screwdriver, pry up the horn trim and remove it. In order not to break the part, you should pry it as evenly as possible;
- Using a Phillips screwdriver, unscrew the 2 screws that secure the horn cover;
- The cover is removable, in some cases it needs to be pryed off with a screwdriver;
- The horn contacts are secured with self-tapping screws. Unscrew them;
- The wire is disconnected from the contact and removed;
- Use the socket to unscrew the nut. There is no need to unscrew it completely, just loosen it;
- Grasp the steering wheel with both hands and pull it firmly towards you. This will allow you to remove the part from the splines. A nut that is not fully twisted will prevent the steering wheel from suddenly being torn off the column;
- Unscrew the nut completely and remove the steering wheel.
In some cases, the steering wheel will not budge. In this case, you will need help. Your assistant will hold the steering wheel, and you need to apply strong blows with a hammer through a soft drift. This will allow you to remove the part.
Tuning options
Modifications to the steering wheel on this model usually involve installing a sports version, or installing a part from another model. The optimal option is considered to be a steering wheel from Kalina. But, if desired, you can select other spare parts. Here you need to look at the number and size of splines. If they match, then the steering wheel can be installed on the car. This can significantly improve the appearance of the interior.
conclusions
. As you can see, dismantling this unit is not difficult. But in order to do it without problems, you should clearly know how to remove the steering wheel on a VAZ 2110 and 2112. First of all, it is worth studying the possible complications that often occur. This way you can do this work yourself and in the shortest possible time.
When will dismantling be required?
First, you need to figure out in what cases it is necessary to remove the steering wheel. This will allow you to orient yourself in advance and prepare everything you need. It's worth noting that there are actually few reasons for doing this. This is probably the most reliable design element of VAZ cars. But such work may still be required.
First of all, the steering wheel must be removed if it is replaced. It is changed in the following cases:
- Malfunction;
- Loss of appearance;
- Replacement with another model.
malfunction
on a VAZ 2110, but sometimes it happens. Most often, the reason is worn splines. Because of this, backlash occurs, and the car reacts worse to your actions. If you suspect such a problem, it is better to replace it. Also, drivers often decide to replace the steering wheel due to loss of appearance. The reason is constant contact with the hands of the person driving the vehicle. Therefore, over time, the casing wears off, and not all drivers use the braid. In such a situation, the best solution would be to simply change the steering wheel or buy a steering wheel cover.
Another option is to replace it with another model. Essentially this is tuning, and we will consider this issue separately.
It is also often necessary to remove the steering wheel in connection with the repair of certain parts. The steering wheel is removed if it interferes with operation. For example, drivers often prefer to remove it when working on the dashboard. You will also need to remove this part when repairing the steering column.
Basic faults
- Most often, the rod, seals, and, less often, the slider wear out in the dozen. For this reason, knocking occurs in the suspension, which is transmitted to the steering wheel. Wear on ball joints can also result in knocking noises.
- It also happens that the unit begins to leak, if we talk about hydraulics. Leaks are indicated by oil stains that invariably remain on the asphalt after a long period of parking.
- Another most common malfunction is the so-called tight steering wheel. It also happens that the steering wheel turns only in one direction, this is a symptom of a serious defect in the component parts.
But why does the steering rack fail? As a rule, such problems come to reckless drivers, lovers of high speeds and bad roads.
Sharp braking, contact with holes and potholes, as well as wear on the boots and dirt getting into the system, all this will certainly lead to malfunctions that require serious repairs or complete replacement. These problems can be avoided by treating your car more carefully.
Do not drive it at all speeds and choose more comfortable roads, and, most importantly, under no circumstances leave the car in the cold with the wheels turned out: in this case, the hydraulics instantly fail.
How to replace the steering rack of a VAZ 2110 step by step instructions + photo report
In order to independently replace the steering rack of a VAZ 2110, you must perform the following procedure:
- Before you start work, unscrew the wheels so that they are directed towards the front, then hang the front part and remove both front wheels from the car, but before that, carefully secure your car so that it does not fall to the ground, and for this You will need to put it on the handbrake, put wheel chocks under the rear wheels just in case, and most importantly, the area on which you are going to do the work must be flat and must be asphalt, in case the car does fall, place the wheels under it in advance (So that it fell on them).
- Let's go to the salon, while there, you will have to use two keys (one bolt must be kept from turning) to unscrew the nut of the bolt, which compresses the clamp clamp, with the help of which the propeller shaft is held on the splines of the steering rack, after the nut is unscrewed and the bolt removed (see small photo), insert a powerful screwdriver into the slot (where the bolt was located, indicated by a blue arrow) and with its help, unclench the clamp so that the driveshaft can easily come off the steering rack splines.
- Now, on both sides, pull out the steering tips from the holes into which they go, we will briefly explain how to pull out the tip using the example of the right side, in general, take pliers and use them to pull out the key (This is a kind of metal wire), as soon as it is pulled out, unscrew the nut and using a puller, press the tip out of the hole and that’s it, if you need pictures and you have no idea what a steering tip is, then in this case read the article: “Replacing steering tips”, it says everything in detail.
- When both steering tips are removed from the holes, start turning out the bolts that secure the rods themselves (the steering rods are located on these rods), they are directly screwed to the steering rack in the central part (To remove the bolts, pry up the locking plate with a screwdriver, it does not allow the bolts spontaneously unscrew) by unscrewing one bolt at a time, completely remove the rods from the car (you need to pull them out through the wheel arches) and as you already noticed in the small photo, when removing the rod, the person still holds the connecting plate, do not lose this plate, when turning out the last bolt, this Always hold the plate with your other hand.
- And finally, unscrew two nuts on each side that secure the steering rack to the dashboard, remove the metal clamps and through the arch, remove the rack completely from the car, you can get acquainted with all this in more detail by looking at the photos below:
Important! When removing the steering wheel of a VAZ 2110, 2111, 2112, 2113, 2114
The first thing you need to do is use a flat screwdriver to pry out the plate with the inscription “Lada” and carefully remove it.
Under the sign you need to unscrew two screws with a Phillips screwdriver.
Remove the plastic horn cover. We turn the steering wheel in any direction all the way or remove the key from the ignition switch and turn the steering wheel back and forth until it locks. After using a 24mm socket and a wrench extension, unscrew the nut in the central hole of the steering wheel. Do not unscrew the nut completely! We do this so that the steering wheel does not fall off when knocked out.
We align the wheels evenly, and put a mark on the steering wheel (as shown in the picture), you can use a corrector - we do this in order to put the steering wheel back in the same position.
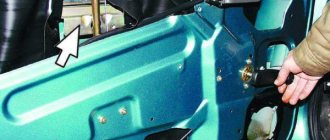
We remove the terminal that goes to the sound signal by first removing the lower plastic trim under the steering wheel. It’s hard to see in the picture, but there it is alone and red.
By tapping the back of the steering wheel with your palm and shaking it, we knock the steering wheel off the splines. When it comes off the splines, unscrew the fastening nut completely and remove the steering wheel.
When installing, do not forget about the marks and the protruding rod on the steering wheel, which is needed so that when turning, including the turn indicators, they snap into the neutral position.
When tightening the steering wheel, do not overdo it, the force should be 30 Newtons. If by eye, we hold the steering wheel with one hand and tighten it as best we can with the other. That seems to be everything I wanted to say about the subtleties of installation!
When does the steering rack need to be tightened on a Priora?
The steering rack is a vulnerable point for the Lada Priora. The first sign indicating the need to adjust the rack is the appearance of a knocking sound when driving over small uneven surfaces.
The knocking will be felt especially clearly when driving on country roads. In this case, the driver will feel shocks and vibrations on the steering wheel, which will also be transmitted to the entire car body. In addition, if the steering wheel adjustment nut is loosened when driving on the highway, the car will “float” a little, and additional steering will be required from the driver, which will also immediately become noticeable.
Experts also say that a tightening is necessary if the driver begins to notice the appearance of a clearly audible crunching sound in the area of the steering column, as well as an increase in the amplitude of the steering wheel rotation.
Choosing a steering wheel is a responsible matter
Sports steering wheel VAZ 2110
So:
- In the process of choosing a suitable steering wheel, you should take into account that a small steering wheel on a car without a VAZ power steering or rack will be much heavier, and a steering wheel with a larger diameter will be much more convenient to turn.
Note. The height of the driver should also be taken into account; for example, drivers with long legs may rest their knees on the large steering wheel while shifting the throttle or shifting the clutch.
- A small sports steering wheel is not suitable for driving in the city, but would be more appropriate in a rally or on a high-speed track. A large leather-trimmed steering wheel with a wide rim is ideal for a comfortable and convenient ride. It is also recommended to hold and rotate the new steering wheel in your hands, simulating maneuvering.
Note. This is very important, since the further ease of use of the selected steering wheel will depend on this.
Replacing a car steering wheel with a steering wheel with a modified design may lead to some changes regarding the ergonomics of the driver's workplace. In addition, the force on the steering wheel also changes, which to some extent causes violations of passive safety in the car.
Comfort steering wheel for VAZ 2110
What is needed to replace the steering rack of a VAZ 2110
To replace the old rack with a new VAZ 2110 we will need: WD-40 fluid, a vice, a puller for removing the tips or a hammer, an open-end wrench “13”, “22”, “19”, a socket wrench with a head “13” , “17”, “22”, chisel and screwdriver, pry bar, jack, new steering rack.
You should pay attention to the fact that the VAZ 2110 power steering steering rack with the article number (21100340001030) costs much more. When buying a new rack, it is more profitable to take the rack assembled so that there are rod ends, etc., and it is better to choose a new part when you have the old one on hand. The price of a standard rack for a VAZ 2110 with article number (21100340001200) will be about 2,500 rubles, and an improved version with power steering costs 15,000 rubles
The price of a standard rack for a VAZ 2110 with article number (21100340001200) will be about 2,500 rubles, and an improved version with power steering costs 15,000 rubles.
The cost of spare parts is indicated for spring 2022 in Moscow and the region.