The ignition system of any car includes various elements and mechanisms to ensure the most optimal start of the power unit. One of the main components is the Priora ignition switch, with which the driver can start the engine. We will tell you more about the malfunctions, as well as the replacement of the seal below.
Features of the ignition switch on Priora
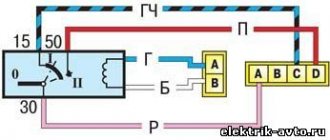
The Priora ignition switch is a unit equipped with an anti-theft device and a restart blocker for the starter mechanism. As can be seen from the diagram, the voltage from the battery is supplied to output 30 of the VAZ ignition device. To ensure protection of the unit circuit, relay K4 is installed in the fuse block. When the ignition key on a Priora is set to position 0, the locking rod of the anti-theft mechanism extends. The key can only be removed in this position.
Different circuits are activated in different key positions:
- I. In accordance with the connection diagram of the connection wires, in this position the operation of the motor control system, the excitation circuit of the generator unit, optics, and alarm are activated. The instrument panel, windshield cleaning system, and power windows are also included, if included in the package.
- II. In this position, all components activated in position I work, as well as the starter device (video author: Alexey Wolf).
Car alarm connection points for Lada Priora
Block to the right of the brake pedal: hood switch (-) – white/black in the middle connector ignition (+) – orange in the middle connector trunk opening (-) – blue/red in the small connector door switch (-) – white/black in the small connector connector trunk limit switch (-) – yellow/red in a small connector
original siren – gray/black on the fuse block
To control the central locking , cut the brown wire in the driver's door and connect it according to the diagram:
Possible malfunctions of the protection system and ways to eliminate them
If the ignition switch fails on a VAZ 2170, many motorists may confuse this problem with a breakdown of the ignition coil or, for example, the ignition module. But as for the 3Z specifically, its repair or replacement is carried out only if the key is not moved to position I or the steering wheel is not blocked after the key is removed. The key must always return to position I after starting the engine. If this does not happen, then you can either repair or replace the ignition switch.
Repair instructions
The location of the 3Z is known to everyone - this unit is located directly under the steering wheel. To properly replace or repair a device, you must follow the instructions:
- First, disconnect the battery and remove the plastic steering column cover, which is secured with bolts.
- Next, press out the fastening and disconnect the connector with the 33 wiring from the control panel wiring block. When unplugging, be careful not to damage the plug.
- Having done this, you will also need to disconnect the plug with the 3Z wires from the connector with the wiring of the immobilizer control system. Using a hammer and chisel or a drill, you need to remove the four breakaway screws and remove the assembly from the steering column. You can't just unscrew these bolts. VAZ engineers decided to use this method of installing the protection in order to protect car owners from possible thefts. This method of fastening, as you can guess, makes it very difficult to dismantle the protection, so at this stage you will have to tinker. In any case, the bolts can be dismantled or drilled out, but instead you will have to purchase new ones in advance.
- After completing these steps, you can bend the connector mount with wiring from the 3Z. The terminals with wires are removed from this connector. Next, you need to compress the latches again and dismantle the plastic cover of the device itself. If you plan to simply change the node, then this can be done at this stage. We suggest that you familiarize yourself with more detailed information on repairs - it is quite possible that simple steps will restore the unit’s functionality and save money.
- So, if you decide to repair the mechanism, then at this stage you need to press out two more plastic clips and remove the contact group from the cover.
- Next, it is necessary to carry out a thorough visual diagnosis of the contacts. If you notice that the contacts have oxidized or burnt, you can restore their functionality by cleaning them using fine-grained sandpaper. Get rid of oxidation and plaque, but do not go too hard so that the contacts do not wear off. If the damage to the contacts is too severe, then cleaning will not solve the problem - you will only need to change either the contactor itself or only the contact group.
- If everything worked out with the contacts, then you can assemble and install the protection. During assembly, pay attention to the position of the terminals with the wiring in the connector; under no circumstances should they be mixed up.
- After completing these steps, install the locking device back into place, while pre-sinking the locking rod of the anti-theft unit. To do this correctly, install the key in the 3Z and turn it to any position, the main thing is that it is not in the “0” position. If the key is replaced, then the transponders must also be changed - these are special electronic code components on the head of the key. If you do not do this, then you will also have to carry out the training procedure, as well as change the lock cylinder on the trunk and doors, and this is a rather labor-intensive process. Otherwise, you will have to use the old key to open the doors and trunk and the new one to start the engine. Agree, this is completely inconvenient, but this is only relevant for those car owners who have changed their license plate.
Removing the ignition switch, replacing the contact group and immobilizer coil
We remove the ignition switch to replace it if its cylinder mechanism fails, to replace the contact group of the switch, and also if it is necessary to replace the immobilizer coil. Disconnect the wire terminal from the negative terminal of the battery. To access the ignition switch, remove the upper and lower steering column casings (see “Removing the steering column switches, switch connector and spiral cable drum device”).
Remove the sealing ring from the ignition switch. Having released the pad lock...
...disconnect the ignition switch contact block from the instrument panel wiring harness block. Use a slotted screwdriver to pry up the edge of the immobilizer coil wire block...
...and disconnect the wiring block of the instrument panel harness from it. The heads of the ignition switch mounting bolts are torn off.
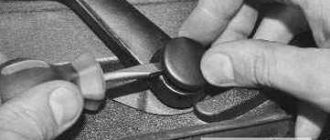
Loosen the bolts using a chisel... ...and unscrew the bolts with pliers
Remove the bracket and ignition switch from the steering column.
Using a Phillips screwdriver, unscrew the three screws...
...and remove the ignition switch bracket.
We take out the locking rod of the anti-theft device. Turn the key in the ignition switch...
...and remove the locking rod drive and the drive spring.
Remove the stopper with the spring from the drive. We push the cylinder mechanism out of the switch body.
We take out the locking ball and cylinder mechanism.
We remove the locking ball spring from the hole in the mechanism.
Prying it with a screwdriver. ... we disengage the two plastic latches of the cover of the ignition switch wire block and open the cover. We mark the wires located in the block.
Using a thin awl or stiff wire, bend the locking tendrils of the wire tips...
...and remove the wires from the block. Remove the insulating tube from the wires.
Squeeze the three plastic latches with a screwdriver. ...remove the contact group from the switch body and bring the wires out through the holes in the body.
Prying it with a screwdriver. ...we disengage the three plastic latches...
...and disconnect the contact group.
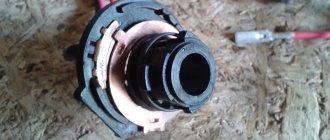
Remove the moving part of the contact group.
By pressing the moving contact and turning it counterclockwise.
...remove the moving contact. Remove the contact spring.
...remove the immobilizer coil. We assemble and install the ignition switch in the reverse order. We install the moving part of the contact group as follows.
...so that the wide protrusion of the moving contact is located opposite the protrusion on the cover with the fixed contact. . and the protrusion on the body of the lock cylinder mechanism should fit...
...into the recess on the body of the moving part of the contact group. Install new ignition switch mounting bolts. We tighten the fastening bolts evenly until their heads come off.
Video “Detailed instructions for replacing the seal”
Visual instructions on how to replace a unit at home are given in the video below (author - channel In Sandro's Garage).
The ignition switch on a Lada Priora car starts the engine. In order for it to start, the machine needs to be given a command. The price of a part for a Priora car is from 1,800 rubles. Replacing the ignition switch is a simple procedure that a beginner can handle.
The driver, turning the key in the lock with the immobilizer in several different positions, gives the command to turn on the ignition or start the engine. Only after this everything starts to work: the starter turns, the crankshaft begins to move, and finally the spark plugs give a spark for the first portion of the air-fuel mixture. But the operation of all these parts may not take place due to a malfunction of the ignition switch on the Priora.
If the car does not start, and you are sure that the components are working properly and the battery is charged, you will have to remove it in any case to inspect and identify the fault. Repairs can be done by anyone; it’s enough to understand all the steps in detail. If it does not help, then the ignition switch needs to be replaced.
How to change and remove it on a Lada Priora car and how many actions need to be performed, you will learn from the article.
Standard ignition switch - article number, price, how it works, device
The module on Priora does not work directly with the components that initiate the engine start. For it to work properly, you need to wait a few seconds before starting until the fuel pump creates the required pressure. On the Priora, only wires are connected to it - the paths along which messages pass from the ignition switch to the electronic control unit.
The ECU of the Priora car just receives data about the position of the key and can crank the starter if this operation is “not blocked”. Due to a breakdown, it can only turn on the ignition, leaving the battery to work.
After the ECU key has turned, it gives commands to several parts at once. When you turn on the second position, let the fuel pump run for 5 seconds so that it pumps fuel from the tank closer to the engine.
When the starting process itself begins, the starter rotates - the force it creates goes to the crankshaft;
the ignition system element converts the low voltage current coming from the battery into a high one so that the spark plugs are “charged” and give a spark at the right moment;
The injector creates the first batch of air-fuel mixture to put it into the chamber, where everything is ready for it - the pistons “move”, the spark plugs spark.
In the module itself, everything is simple - there is a cylinder with a return spring inside, between the coils there is a locking ball that does not allow it to curl up more than necessary, and a locking rod holds the structure in place. Finally, as a complication of the entire system, there is an “immobilizer” - an anti-theft system that you can install yourself. It just takes a long time to set it up.
A regular kit with a master key and several door cylinders (with an immobilizer) costs from 1,800 - 2,000 rubles, catalog number - 2170-3704005. A set without a master key (without an immobilizer) can be purchased for 1,200 – 1,400 rubles, article number -2170-3704006.
Diagram and pinout of the ignition switch on Priora
The diagram looks like this:
Using the diagram, you can track the presence of an immobilizer, as well as a blocker for excessive cranking of the starter. It starts from the battery - the pinout transmits voltage from it to point 30. Here the connection to K4 is a fuse relay. The contact group of the ignition switch of a Priora car will only work if the locking rod is in place and holds the key.
There are two positions in the diagram – I (ignition) and II (engine start). Replace the ignition switch of the Lada Priora in accordance with this diagram.
Car alarm connection points for Lada Priora 2011
Ignition switch: + 12V – brown Starter – red IGN – blue/black
Tidy: Tacho signal - brown/red Handbrake - brown/blue (For more details, see Diagram 1)
Connector X3 (See Fig. 1) BCM: Driver's door switch - blue/black Right front door switch - brown Rear door switches - gray/red Trunk switch - yellow/red Opening the trunk (low-current input, possible without a relay, additional channel directly to alarm) – blue/red
Basic faults
Usually the module is “sinned” when the battery is dead - nothing will turn on, even the ECU will not receive a signal. You can solve everything by charging the battery or installing a new one. But if you are sure that the key in the ignition switch has turned, but there is no “effect”, then the problem is in the module.
- Firstly, one of the dangerous problems is a faulty locking rod. As was said, it does not allow you to remove the key when it is in position I or II. If you accidentally notice that the key falls out, try to replace the block as soon as possible. It happens that replacement is taken due to an immobilizer error. This can only be done as a last resort, having accurately checked all possible “escape routes”, because reconfiguring the ECU will take a lot of time.
- Secondly, the wiring connected to the unit may become damaged, and it will become “cut off” from the Priora’s electronic control unit. It is necessary to ring all sections of the wiring and change it. In the same group of problems is the fuse relay. If the fuse is blown, the engine will not start.
- Thirdly, the spring may become deformed or break. This manifests itself in the fact that after cranking the starter and starting the engine, the key does not return to position I.
Possible causes of malfunction
If you absolutely require a basic function from your cigarette lighter, but the head does not heat up, it makes sense to try replacing it.
One of the possible problems is lack of heating. In this case, power is supplied to the fuse assembly itself without problems. The head may stop heating after prolonged use.
READ How to connect sata and ata hard drives
Boat trailer: buy or make it yourself
Category: Light trailers
If replacing the cartridge does not change anything, then the problem should be looked for in the car's electrical network, which powers the cigarette lighter.
When diagnosing, carefully examine the condition of all contacts and connections.
It is important to eliminate the possibility of some wires burning out.
Particular attention should be paid to some elements. In case of self-assessment of the condition of the cigarette lighter assembly, experienced motorists and specialists in the field of auto electricians are advised to look at:
In case of self-assessment of the condition of the cigarette lighter assembly, experienced motorists and specialists in the field of auto electricians are advised to look at:
By checking all these components, you can determine exactly where the problem is coming from.
Experience shows that most often the fuse blows. Finding it and replacing it will not be difficult. But if the fuse is intact, then check whether the socket itself has blown. This occurs when using a faulty plug from the connected source, as well as when using inappropriate devices.
Removing and installing (replacing) the ignition switch on a Priora
Before removing and replacing the module, have a few tools ready:
- chisel;
- hammer;
- pliers;
- key "10";
- Phillips screwdriver.
Replacing the Priora ignition switch is carried out according to the following algorithm:
- Put the car on the handbrake, remove the negative from the battery.
- Remove the steering column covers - to do this, insert a screwdriver into the small technical holes and unscrew the bolts.
- In front of you will be a steering shaft, to which the ignition module is attached with four bolts. They are twisted very tightly - so that potential hijackers would have to waste time removing the module; to do this, they would have to tear off all the fasteners. Place the chisel under the bolt head and tap the chisel with a hammer until the bolt head begins to rise.
- By lifting the threaded fasteners, you can unscrew them - but for convenience, it is better to do this not with your hand, but with prepared narrow pliers - there is a lot of space for standard ones.
- As you unscrew each bolt, try to “catch” the falling module.
- All that holds it is a block of wires. Disconnect it, then install a new ignition module for the Priora car instead of the old one. Tighten the fasteners just as tightly, but try not to tear them off when tightening.
New lock installation stage
Viburnum ignition switch
For installation, you will need the bolts used in breakaway fasteners. When a certain force is created, the edges will break off, leaving a head that the classic key will not take. As a result, the clamps will be tightened sufficiently tightly and at the same time receive additional protection.
All four bolts are screwed in the same way with the edges breaking off. The estimated cost of the castle is about 1000 rubles. Most often, special bolts may be included in the kit so as not to purchase them separately.
A replacement service will cost another few hundred. As a result, by doing everything yourself, you can save money.
Lock lighting
Illumination of the ignition switch in a Priora car is a convenient modification in the dark. There are ways to tune anything inside your Priora. One of the most practical ways is to help yourself find the ignition switch by highlighting it. But getting a flashlight or phone out takes a long time and is impractical. Instead, you can put a backlight on this part, which will also be aesthetically pleasing to the car owner.
Such an upgrade can be purchased on Chinese websites - preferably only for Priora. To connect, climb under the steering casing, place the LED strip, and the wire soldered to it needs to be “powered.” When connected to contacts No. 8 or No. 9, when the dimensions are turned on, the backlight turns on.
How to connect correctly
A three-pin plug fits a standard car cigarette lighter. Before installing an additional device, you need to understand how a car cigarette lighter works and learn the pinout.
The connection diagram looks like this.
Option to mount directly to the battery
There is a way to connect directly to the car battery. This scheme has advantages. You need to know how to connect the cigarette lighter directly to the battery. This will avoid interference with the wiring itself. The work will take less time; the positive wires should be brought directly to the battery, and the negative wire should be attached to the car body.
It is necessary to select the necessary spare parts. Initially, this concerns the wires. Each square millimeter of cross-section is designed for 5 - 10 amperes of current. You should take the wire with a reserve. A cross-section of 3–5 mm is quite sufficient to transmit the required voltage. Otherwise, the wires may burn, resulting in a risk of short circuit. The circuit should be routed through an additional fuse with a rating specified by the manufacturer.
Button instead of ignition switch
As a replacement, the Lada Granta and many foreign car models have a START-STOP button. We can say that the start button is a matter of driver convenience, but if you want to make your car unique, you can use different options:
- removing the standard module - the steering wheel will not be blocked;
- The standard module remains, but the steering wheel lock does not work;
- The standard module remains in place, the steering wheel lock works.
You can supply a pre-formed kit, or assemble it yourself - it will be several times cheaper, but not faster.
The cost of the set will be from 1,300 to 1,800 rubles, individual parts in total from 300 to 500 rubles.
How to put
To place a button instead of a module, perform the following steps:
- Remove the negative from the battery.
- Remove the steering casing and the plastic panel to the right of the pedal assembly.
- In accordance with the instructions that came with the start button, connect the wires to the block.
- Connect the green cable from the central unit to the brake pedal switch connector.
- The wire from the button should be connected to the three-pin connector of the central unit.
- If you need to disable the steering lock, cut off only the part of the key that fits into the cylinder and leave it in the lock in the first or second position.
- Place the key at the junction of the casing.
- Test the Start-Stop button with a few presses.
Schematic electrical diagrams, connecting devices and pinouts of connectors
The ignition switch in cars of the VAZ family fails from time to time due to weakening of the contact posts or burning of the contacts inside it. It also happens that the cams of a plastic roller are produced. You can disassemble the lock and clean it, but it’s better to just replace it with a new one, considering that it costs pennies compared to imported locks.
But if connecting the wires together did not result in the starter operating (or it did not turn on the first time), check the solenoid relay on the starter. The contact spots on it may also burn out, which will prevent the circuit from closing normally. Alternatively, you can use a screwdriver to short-circuit the two large terminals on the solenoid relay (before doing this, put the car in neutral and use the handbrake). When closed, the starter should begin to spin vigorously. If this happens, remove and change the solenoid relay. If the starter rotates “sluggishly” when it closes, you will have to remove it and check the condition of the brushes.
All operations are performed with your own hands, without the help of car service specialists. Moreover, the price of an ignition switch on a VAZ2106 is up to 100 rubles. To replace it, you will need to know the pinout of the wires coming from it, for which the editors of the site 2 Schemes.ru have prepared a large reference material.
The ignition switch is designed not only to start the engine - it performs several functions at once:
- supplies voltage to the vehicle’s on-board network, closing the circuits of the ignition system, lighting, sound alarm, additional devices and instruments;
- at the driver’s command, turns on the starter to start the power plant and turns it off;
- turns off the power to the on-board circuit, preserving the battery charge;
- protects the car from theft by fixing the steering shaft.
Connector to the ignition switch Kalina, Priora, Granta, Chevrolet Niva (4 terminals assembled with wires) “mother”
Dear customers, in order to avoid errors when sending the connecting connector for connecting to the ignition switch, in the “Comment” line indicate your car model, year of manufacture.
The ignition switch for VAZ-1118, 2170, 2190, 2123 is a complex device designed to control the power supply to the vehicle systems, prevent the battery from being discharged and ensure the engine starts from the starter system.
The castle includes two components:
– mechanical, represented by a lock cylinder;
– electrical, which is a set of contacts that close electrical impulses when the key is turned in one way or another.
Connecting block 1118-3704005АХ with 4 contacts, assembled with female wires, is one of the elements of the ignition system harness, connected to the ignition switch connector of cars of the Lada Kalina, Priora, Granta, Chevrolet Niva family. Can be used to make your own cable. The contacts are already crimped onto the wires (wire length 100 mm) and inserted into the connector, you can install them on the car.
The ignition switch on VAZ-1118, 2170, 2190, 2123 has three modes:
– Mode “0”. In this position, the key can be easily removed, and the lighting, emergency lights, and audio system work.
– Mode “1”, fixed. It is no longer possible to remove the key from this position; when it turns on, the ignition system is turned on and power is supplied to all systems except the starter.
note
But it is worth considering that keeping the key in mode “1” for a long time can lead to battery discharge.
This position is used when turning on the starter, so that the running fuel pump pumps up the required pressure to ensure further ideal operation of the starter.
– Mode “2”—activation of the starter system.
Malfunctions of the ignition switch VAZ-1118, 2170, 2190, 2123
– Oxidation of contacts always leads to serious damage (usually due to moisture and dampness in the machine);
– Burnout of contacts, which occurs due to sudden surges in voltage. Voltage drops usually occur when the power unit is started, during which the temperature inside the system rises sharply, causing the insulation to simply burn out
That's why it's so important to approach the launch issue wisely
- Mechanical damage. If, when you are about to turn the key, you notice that it has become more difficult to do so than usual, it means that something happened to the lock cylinder, perhaps it was simply clogged with dirt or dust, or maybe there was a defect at the factory that came to light only now.
If the problem lies in burnout or oxidation, then when you turn the key in the lock, you will not see any reaction from the ignition system. In this case, you just need to replace the contacts without changing the entire lock; if the defect in the wires is not severe, then you can get by with cleaning the contacts.
When the ignition key of the VAZ-1118, 2170, 2190, 2123 is in position O - “off”, all contacts must be open.
In position II - “starter”, contacts 15 and 50 should be closed (the resistance between terminals C and D is close to zero).
Designation of the terminals on the ignition switch (lock) block: A - pin 30; C - contact 15; D - pin 50
Replacing the contact carrier 2190-3704005АХ (4 PIN) assembled with wires, which is an element of the controller harness (ignition system), connecting the ignition switch, through the block in cars of the Lada Kalina, Priora, Granta, Chevrolet Niva family can be done independently, without contacting specialized services service.
Important
Other article numbers of the product and its analogues in the catalogues: 111803704005АХ, 219003704005АХ.
VAZ-1117, VAZ – 1118, VAZ – 1119 “Kalina”, VAZ 2170, VAZ -2171, VAZ -2172, LADA GRANTA, VAZ 2123.
Any breakdown is not the end of the world, but a completely solvable problem!
How to independently replace the connector for connecting to the ignition switch on the controller harness in a car of the Lada Kalina, Priora, Granta family.
With the AvtoAzbuka online store, repair costs will be minimal.
Just COMPARE and BE SURE!!!
Don't forget to share the information you find with your friends and acquaintances, because they may also need it - just click one of the social networking buttons located above.
Pinout of the ignition switch VAZ-2101 - VAZ-2107
The ignition switch on these cars is located to the left of the steering column. It is fixed directly to it using two fixing bolts. The entire mechanism of the device, except for the upper part in which the keyhole is located, is hidden by a plastic casing.
On the visible part of the ignition switch housing, special marks are applied in a certain order, allowing inexperienced drivers to navigate the lock activation mode when the key is in the hole:
- “ ” – a mark indicating that all systems, devices and instruments that are turned on using the lock are turned off (this does not include the cigarette lighter, interior lighting, brake light, and in some cases the radio);
- “ I ” is a mark informing that the vehicle’s on-board network is powered from the battery. In this position, the key is fixed independently, and electricity is supplied to the ignition system, to the electric motors of the heater and windshield washer, instrumentation, headlights and light signaling;
- “ II ” – engine start mark. It indicates that voltage is applied to the starter. The key does not lock in this position. If you release it, it will return to the "I" position. This is done so as not to subject the starter to unnecessary loads;
- “ III ” – parking mark. If you remove the key from the ignition in this position, the steering column will be locked with a latch. It can only be unlocked by inserting the key back and turning it to position “0” or “I”.
The ignition switch has five contacts and, accordingly, five terminals, which are responsible for supplying voltage to the desired unit. All of them are numbered for convenience. Each pin corresponds to a wire of a certain color:
- “50” – output responsible for supplying current to the starter (red or purple wire);
- “15” – terminal through which voltage is supplied to the ignition system, to the electric motors of the heater, washer, and instrument panel (double blue wire with a black stripe);
- “30” and “30/1” – constant “plus” (pink and brown wires, respectively);
- “INT” – external lighting and light signaling (double black wire).
Priora won't start, starter turns
Possible malfunction
| Diagnostics | Remedies | |
| There is no gasoline in the tank | On the instrument panel the fuel level indicator is at zero. | Pour gasoline |
| Battery is low | The voltage at the battery terminals without load is less than 12V. When trying to start the car, a crashing sound is heard from under the hood. | Charge the battery or replace it with a new one |
| Oxidation of battery terminals or wire terminals, their fit is not tight | When you try to start the engine, the voltage in the on-board network drops much more than at the battery terminals. In this case, a crash may be heard under the hood. | Clean the contacts, lubricate them with petroleum jelly and tighten the terminals |
| Unreliable connection of electrical circuits of engine control and power supply systems | Check the connections of the connectors and the reliability of the contacts in the blocks. | Fix faulty wire connections |
| Increased resistance to rotation of the crankshaft (scores on the shafts, bearing shells, cylinder-piston parts, deformation of the shafts, frozen engine oil, jammed generator, jammed coolant pump) | The crankshaft turns slowly. If the engine is started in severe frost, and the engine was working properly the day before, then most likely the engine oil has frozen. If you hear extraneous noise when starting the engine, check the free rotation of the pump and generator pulleys. | Use the recommended engine oil. Repair the engine. Replace the pump and generator. |
| Malfunction in the ignition system | Check for spark. | Check the circuits and devices of the ignition system. Replace faulty system elements. |
| The high voltage wires are connected in the wrong order or the wire is disconnected | Inspect. | Connect the wires in the correct order |
| The timing belt is broken or the belt teeth are cut off | Open the front timing cover and check. | Replace timing belt |
| Disturbed valve timing | Check the marks on the crankshaft and camshaft pulleys. | Set the correct shaft position |
| Malfunction of the computer (brains), its circuits, crankshaft position sensor or coolant temperature | Check the supply of +12V to the ECU, the sensor circuit, and the absence of damage to the sensors themselves. | Replace ECU, sensors. |
| The idle air regulator (IAC) or its circuits are faulty | Check the idle air control. When starting the engine, lightly press the gas pedal. If the engine starts and stalls when you release the gas pedal, the sensor is faulty. | Replace sensor |
| The fuse is blown or the main relay of the control system is faulty | Check fuse and relay. | Eliminate the cause of the blown fuse. Replace fuse and relay |
| Fuse blown, fuel pump relay. Circuit, relay or pump is faulty. | When the ignition is turned on, there is no sound of the pump running. Check the fuse. Apply voltage to the pump from the battery. | Clean contacts, replace faulty circuits, replace fuse, pump and relay. |
| The fuel filter is dirty, the water in the fuel line is frozen, the fuel line is damaged | Check the pressure in the fuel rail and the condition of the fuel lines. | Replace the filter, blow out or replace the fuel lines. |
| Insufficient pressure in the fuel rail | Check the pressure in the fuel rail, the pump strainer and the condition of the fuel lines. | Clean the filter. Replace pump, fuel pressure regulator |
| Faulty injectors or their power supply circuits | Check the injector windings with an ohmmeter. Check the chains for breaks. | Replace injectors, replace chains |
| Air leak into the intake tract | Inspect the joints and fittings of the hoses and clamps. During start-up, turn off the vacuum brake booster and plug the receiver fitting. | Eliminate air leaks, replace vacuum booster |
Pinout of lock VAZ-2108, VAZ-2109, VAZ-21099
Pinout according to the old type
Pinout of the VAZ-2109 ignition switch with unloading relay:
- comes +12V in position I, II, III (parking)
- comes +12V in position I, II, III (parking)
- comes +12V in position III (parking)
- position I, +12V goes out after turning on the ignition (contact 15/2), disappears at start (II);
- position I, +12V goes to the starter (pin 50);
- position I, +12V goes away after turning on the ignition (pin 15), does not disappear when starting II;
- +12V comes from the battery (pin 30);
- comes +12V constantly.
New pinout type
Pinout of the new VAZ-2109 ignition switch:
- comes +12V constantly
- comes +12V constantly
- +12V arrives after turning on the ignition (pin 15), does not disappear when starting II;
- +12V arrives after turning on the ignition (contact 15/2), disappears at start (II);
- position I, +12V goes to the starter (pin 50);
- +12V arrives after turning on the ignition (pin 15), does not disappear when starting II;
- +12V comes from the battery (pin 30);
- comes +12V constantly.
Pinout of lock VAZ-2110, VAZ-2111, VAZ-2112
Pinout of the ignition switch VAZ-2110:
- comes +12V for the microphone of the sensor of the inserted key;
- the mass comes when the driver's door is open;
- +12V goes to the starter (pin 50);
- +12V goes out after turning on the ignition (pin 15);
- +12V goes out when the key is inserted to pin 5 of the BSK;
- comes +12V to illuminate the lock cylinder;
- +12V comes from the battery (pin 30);
- not used.
Reasons for replacement
How to remove and install the ignition switch on a VAZ 2106 (diagrams and photos of wiring connections)
It is necessary to replace the entire lock or just the contact group, depending on the nature of the breakdown and the situation with your car. Therefore, we will consider options when replacement may still be required.
Reason for replacement
Your actions
There was an attempted theft, as a result of which the integrity of the lock was compromised
In this case, only the contact group and the cylinder can be replaced, since the lock itself is most likely intact. Lower costs and required repair efficiency. Although experts advise purchasing a new lock right away and installing it
The keys were lost and there was no spare
There is no point in trying to find a master who will turn you exactly the same key as before. You will have to purchase a lock and install it on your car
Problems with contacts or contact group
It is not difficult to check whether this is really the problem. Turn off the battery by disconnecting the negative terminal, then remove the cover under the steering column and check the wires for resistance. Switch the key alternately to positions 1,2 and 3, while measuring the resistance. If the ohmmeter shows “zero”, then the lock really has a problem and needs to be replaced.
There was a desire to improve the castle
Often, car owners replace the standard ignition with a more modern one, equipped with lighting. It is not expensive, but it is convenient to use in the dark. No need to fumble for the key slot
When checking the contact group, be sure to disconnect the negative terminal from the battery, otherwise a short circuit will occur, and not only the contactor will have to be replaced.
Pinout in photo
Circuit and pinout
First of all, get acquainted with the lock diagram and wire connection diagram, which will allow you to better understand the features of the 3Z pinout.
As you can see, the pinout includes 8 elements. What does each of them mean and what functions are they responsible for? We'll figure out.
- Power supply for the inserted key sensor microswitch (+12Volt).
- Power supply to ground when doors are opened on the driver's side.
- Power supply that supplies current to the starter (+12Volt, pin 50 on the diagram).
- Source at +12Volt. Activated after turning on the ignition. Power supply for additional equipment, such as video recorders, clocks, etc. (pin 15 in the diagram).
- Source at +12 Volts. Triggers when the key is inserted. Goes to pin 5.
- Power supply +12Volt. The illumination of the 3Z larva is activated.
- +12V source from the battery (pin 30 in the diagram).
- Not active.
Wiring
Pinout of lock VAZ-2113, VAZ-2114, VAZ-2115
Pinout of the ignition switch VAZ-2113, 2114, 2115:
- comes +12V for the microphone of the sensor of the inserted key;
- the mass comes when the driver's door is open;
- +12V goes to the starter (pin 50);
- +12V goes out after turning on the ignition (pin 15);
- +12V goes out when the key is inserted to pin 5 of the BSK;
- comes +12V to illuminate the lock cylinder;
- +12V comes from the battery (pin 30);
- not used.
The structure of a car ignition switch
- Locking rod
- Frame
- Roller
- Contact disc
- Contact sleeve
- Block
- Protrusion of the contact part.
The lock mechanism is connected to many wires. They continue from the battery, connecting all the electrical devices of the car into a single chain. When you turn the ignition key, the electrical circuit is closed from the “-” terminal of the battery to the ignition coil. As a result, the current passes through the wires to the ignition switch, through its contacts it is directed to the induction coil, after which it returns back to the “+” terminal. As electricity passes through the coil, it generates high voltage, which it transmits to the spark plug. Therefore, the key closes the contacts of the ignition circuit, thereby starting the car engine.
