Maneuvering in the city becomes more and more difficult every year, so more and more often you have to resort to the help of other people in order not to touch the fence or a nearby car. Parking sensors for the Priora car have been around for quite a long time, but they can distort the real picture. The driver needs to have visibility, see what is behind the vehicle, while remaining in it.
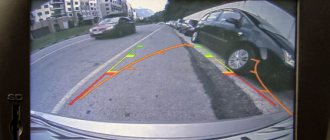
This opportunity is provided by the rear view camera on the Priora. As an example, with it you can quickly notice a child appearing out of nowhere, or drive out of a parallel parking lot, even if it seems that you are locked out. This part is not standard, but the installation of a rear view camera on Lada Priora 1st and 2nd modifications, including hatchback, sedan and station wagon, is actively practiced by drivers. Mainly because this way you can avoid dents on the body.
Installation
Required:
- rear view camera, see AliExpress catalog.
- mini ISO connector (blue block and tulip).
- several meters of wire.
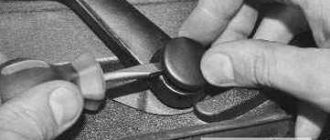
Most often, the rear view camera is placed above the license plate (on an overlay called “saber”). This location is the most favorable from a viewing point of view; the camera is not noticeable and there is no need to remove the bumper. First, remove the trunk lid trim, and then the saber, which is held on by 6 M8 screws.
We determine the most suitable place for the camera and drill a hole there. We secure the accessory on the reverse side with a nut.
We route the wires from the camera into the trunk through standard corrugations.
It is more convenient to route the wiring to the front of the car under the rubber seal of the headliner. Then we drag it under the dashboard to the back of the radio. To remove the MMC, you will first need to dismantle the panel cladding.
Connection
General diagram for connecting a rear view camera:
In the trunk we connect the camera to the rear light wiring:
- +12V to green wire (reverse)
- "mass" to black
We connect the miniISO connector to the radio, the location of the wires in the blue block is as follows:
- Ground (outer part of the tulip) of the connector to pin 16.
- Plus (central part) of the connector to pin 19.
It is worth noting that if the MMC was installed on a car in the “norm” or “standard” configuration, then you will need to additionally supply +12V from reverse to pin No. 1 of connector A1 of the radio.
The process is also shown in the video:
Setting up standard MMS
No firmware is required for the radio; you just need to activate the rear view camera. To do this, download the program (To download files you need to log in to the site) and copy it to removable media (USB Flash).
- Go to the desktop (WinCE). On the radio screen, hold down the “Settings” button, then “Exit” and “Desktop”.
- Let's launch the program. My device - USB disk - Folder with the program - Run the CamOnOff file.
- We allow you to use the camera. Click on the corresponding button. We close the program, it and the flash drive will no longer be needed.
By the way, the whole process is also shown in the video:
We check the operation of the rear view camera, including reverse gear.
Let us remind you that some motorists prefer to use parking sensors instead of a camera.
Specifications
| Viewing angle | 170° |
| Supported Video Modes | NTSC |
| Dust and moisture protection class | IP68 |
| Nutrition | 6V DC |
| Matrix | CCD |
| Permission | 1280x720 |
| Minimum illumination | 0.1 LUX (good visibility in the dark) |
| Working temperature | -40+65 degrees |
| Image | Mirror |
Main features of the device
- Possibility of mounting in a regular place;
- Preset tilt angle;
- Availability of durable anti-vandal housing;
- Scratch-resistant lens;
- Clarity of color rendering even at night;
- Availability of parking lines with the ability to turn off;
- Ability to work with any type of monitor.
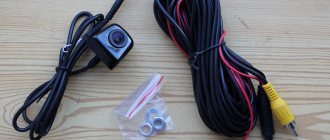
Included:
- Camera
- Video wires
- Power cable
- Manual
- 1 year warranty
Payment upon receipt at Russian Post - The parcel is sent with an inventory
LADA - installation of a rear view camera
Parking camera LADA Priora
Installing a rear view camera on a Lada Priora car
(photo example and connection description)
How to find a connector for connecting a camera?
In order to connect a rear view camera, we will need to dismantle the factory radio and find a connector for connecting a rear view camera.
We connect the camera cable to the found connector (marked with an arrow in the photo), and check the PAL NTSC color system to make sure that we have selected the camera correctly.
Stories from our readers
“Fucking basin. "
Hi all! My name is Mikhail, now I’ll tell you a story about how I managed to exchange my two-wheeler for a 2010 Camry. It all started with the fact that I began to be wildly irritated by the breakdowns of the two-wheeler, it seemed like nothing serious was broken, but damn it, there were so many little things that really started to irritate me. This is where the idea arose that it was time to change the car to a foreign car. The choice fell on the melting Camry of the tenth years.
- Universal rear view cameras (Installed in any car) – There are flat (butterfly), pyramid, together with a license plate frame, etc.
- Model (Standard) – Installed in cars from the factory.
What comes standard
Due to the fact that there is no standard video device for the Lada Priora, the driver chooses a suitable product based on the cost and type of mount. Most often, cameras with a wide-angle lens and a mounting bracket for outdoor installation are used. The last condition is mandatory, since such products are made in a waterproof case.
Simple package includes:
- rear view camera with power and video output cables;
- video line extender;
- power supply wires to the device.
If the car does not have MMC installed, then purchase an additional monitor.
Where to look?
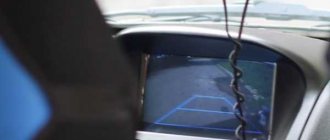
The camera has been selected - we go to the receiving devices, which display the image from the video camera. This could even be a DVR that has a second (rear) camera and displays the image from it on its display. It’s just very difficult to see anything on such a small screen.
It’s another matter when the picture is displayed on a 2 DIN multimedia device (standard or installed additionally). It is usually equipped with a display with a diagonal of six to seven inches and allows you to connect a rear view camera. All that remains is to provide a signal to this device, and also inform it that reverse gear is engaged.
|
The radio transmitter module was placed under the door trim. |
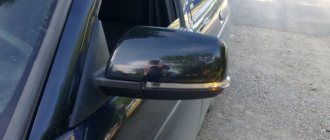
Another option for installing the camera is behind glass. A long wiper (400 mm, longer than the standard one) provides it with a good view, and the heated glass protects it from fogging.
Another option for installing the camera is behind glass. A long wiper (400 mm, longer than the standard one) provides it with a good view, and the heated glass protects it from fogging.
They also offer separate monitors with a screen diagonal of no more than five inches, which are mounted on the instrument panel. But a modern car’s front panel is already crammed with equipment. Therefore, another solution seems interesting, quite inexpensive (and compact): you can use a rear-view mirror with a monitor that comes to life only when power and a video signal are supplied.
You need to connect two devices with a video cable. This task is quite troublesome, since the cable will have to be routed through a moving connection - an opening door or trunk lid. We recommend laying the cable under the roof trim: it is much easier than making your way along the thresholds of the car, where the non-standard cable may be subject to chafing.
A more convenient solution is to transmit the image over a radio channel. We purchase a so-called radio module. It receives power, as well as a video signal, from the camera and transmits it via radio frequency to the receiving device, which outputs the signal to the display. The radio module will cost one and a half thousand, but will save time during installation.
To ensure the correct viewing angle, a rubber wedge had to be placed. But now the camera sees everything. |
In order not to drill into the body, we install a camera in the additional brake light. |
Which camera to choose
The appearance of the car after installing the parking device is of great importance. It is influenced by the design of the camera. By type of execution they are divided into:
- Regular ones. The video device is installed in a special place prepared by the manufacturer. It is easy to install.
- Mortise. Mounted in the hole prepared on the bumper.
- Universal. Can be attached anywhere.
- For license plate frame. Unnoticeable and easy to install.
In most cases, universal models are used. They are easier to install on the Priora hatchback.
The quality of the video device is affected by:
- weather;
- installation location;
- illumination
The device must operate flawlessly in all weather conditions. Precipitation should not affect image quality. On sedans, cameras are installed above the license plate. This arrangement prevents dirt from getting on the lens. The use of products with black and white images gives a clearer picture in low light and is cheaper than with color.
How to avoid strabismus
The parking assistance system consists of two main components - a video camera (this is a kind of eye of the system) and a device with a display on which the image is displayed. All car video cameras have a similar design: a set of lenses plus a light-sensitive matrix. They produce color images of not very high quality - due to the peculiarities of video signal processing, the resolution usually does not exceed 0.3 megapixels. But this is quite enough to recognize a parking post or a pedestrian. It is better to install the camera higher: the view is wider and less dirty.
One of the options for its placement on station wagons, hatchbacks, crossovers, and vans is an additional brake light cover or cover. For this purpose, a mortise camera with latches or an external camera with a bracket is suitable. You need to adjust the “eye” so that the bottom part of the image on the screen includes the outermost element of your car - the bumper, tailgate or towbar ball.
If you don’t want to bother with installing the camera, buy a license frame with a built-in “eye”. However, this option is only suitable for cars on which the number plate is located high. If the registration plate is installed on the bumper, it is better to abandon the idea - from a half-meter height it is difficult to perceive what is happening, and besides, the peephole will constantly go blind. In order not to encounter “squint,” you should not install such a camera on cars where the number plate is offset from the center. These are, for example, vans with hinged doors and SUVs with side-opening doors. For many cars they offer video cameras combined with a license plate light. They are the easiest to install, they look aesthetically pleasing, but with similar characteristics they are more expensive than others.
Video system components
When selecting a camera, you should pay attention to the video signal standard - PAL or NTSC. The standards of the camera and display should not differ, otherwise, as they say, “there will be no cinema.”
Life hack: Priora car rear view camera - installation, price
Maneuvering in the city becomes more and more difficult every year, so more and more often you have to resort to the help of other people in order not to touch the fence or a nearby car. Parking sensors for the Priora car have been around for quite a long time, but they can distort the real picture. The driver needs to have visibility, see what is behind the vehicle, while remaining in it.
This opportunity is provided by the rear view camera on the Priora. As an example, with it you can quickly notice a child appearing out of nowhere, or drive out of a parallel parking lot, even if it seems that you are locked out. This part is not standard, but the installation of a rear view camera on Lada Priora 1st and 2nd modifications, including hatchback, sedan and station wagon, is actively practiced by drivers. Mainly because this way you can avoid dents on the body.
Benefits of new technologies
MMC Lada Kalina 2 is characterized by a simplified control system. Now all the necessary options can be obtained with 1-2 taps on the screen. The system is equipped with a more functional resistive screen. Unlike the standard Kalina radio with a capacitive version, the resistant screen has improved performance characteristics. The device is able to operate without failures in any temperature conditions.
Lada owners often complained that in sunny weather it became impossible to use the car radio. This is due to the numerous glares that make the characters on capacitive screens almost unreadable. The designers, when developing the second version of the radio, took this drawback into account.
The maximum display area of MMS Kalina 2 is 7 inches. Its operation is based on the Windows CE 6 operating system. The version developed specifically for radio tape recorders has characteristics close to optimal. It takes a few seconds to turn on the device. The amount of RAM ranges from 128 to 256 MB. Firmware for the Kalina 2 radio has significantly improved the technical capabilities of the equipment. Now they are as follows:
- support for wav, wma, mp3 formats;
- 6 programmed shades of music playback;
- the display of the Lada Kalina 2 radio shows information about the song and album during playback;
- there is the ability to play video in wmv format;
- the multimedia system supports maximum video resolution at 320*240 pixels;
- it is possible to play video files of other formats, but for this you will have to use a convector;
- availability of FM radio;
- micro SD card support;
- Lada radio firmware makes it possible to view images saved in bmp, gif, jpe, jpg, jpeg formats;
- The maximum photo size is not limited, but if it exceeds 2 MB, then the Kalina multimedia firmware will open it from 2 to 10 seconds.
Manufacturers and prices
There are two options for buying cameras for the Lada Priora:
- Local shops;
- Foreign stores with delivery by mail.
When ordering abroad, you can with almost complete confidence choose a camera with a low price, picture quality, and speed - it should not freeze at the wrong moment.
The following devices are suitable for Priora:
- SHO-MECA-6184LED – 1400 rubles.
- SHO-MECA-2024 – 640 rubles.
- Xiaomi 70 Mai HD Reverse Video Camera – 1,500 rubles.
- Vizant RMCM-07 BOX – 820 rubles
- Auto-expert VC-204 – 2,500 rubles.
- Digma DCV-200, 1,220 rubles.
You can find many universal offers on the market - they are suitable for all cars. It is important to take into account the specifics of the location of the camera and the “TV”:
- The camera can be installed under the saber or be part of the new license plate frame;
- The “TV” can be built into the interior rear-view mirror or radio; It is also possible to install an additional screen on the center console;
- The camera can be supplied without a screen for displaying images, but with wires, so you can implement the most convenient option inside for you to look at the screen without straining.
Basic faults
The main problems that you may encounter when using the camera include:
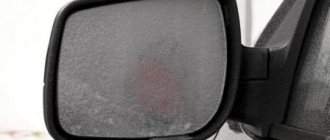
- Pollution (especially off-season or winter). The roads are very dirty, and this is a fact - in addition to the fact that the bottom collects almost all the dirt from the ground, individual drops reach the video camera. So it’s worth wiping it before the trip, and if the trip itself is long, you’ll have to clean the device right before parking. Due to the dirt, the image will be cloudy, so you will have to park the old fashioned way.
- Incorrect connection - “dissonance” with parking sensors or lack of image. You will have to check all connections to ensure they match the wiring diagram.
- Mechanical damage to wires. Almost always, the most vulnerable parts of the wires need to be insulated, protecting them from the influence of moving parts. Take care of this by using electrical tape.
Step-by-step installation of a rear view camera - instructions
In order to install a reverse camera for Lada Priora, do the following:
- Tighten the handbrake, remove the negative terminal from the battery.
- Open the trunk.
- Remove the saber (the chrome part above the state number), smoothly prying it off on both sides.
- Make a hole for the video camera in the center - so that the picture is even and does not mislead you.
- Place the camera, covering the holes with sealant.
- Connect power: green wire is positive, black wire is negative. This way you can feed the reversing lamps.
- Route the wires under the trunk trim on the right or left along the floor of the cabin, and then lead them under the tunnel. Connect them to a screen - to a mirror, radio or new media system.
- Check the functionality of the system, if necessary, adjust the screen.
INSTALLATION
- Rear View Camera.
- mini ISO connector (blue block and tulip).
- several meters of wire.
Most often, the rear view camera is placed above the license plate (on an overlay called “saber”). This location is the most favorable from a viewing point of view; the camera is not noticeable and there is no need to remove the bumper. First, remove the trunk lid trim, and then the saber, which is held on by 6 M8 screws.
We determine the most suitable place for the camera and drill a hole there. We secure the accessory on the reverse side with a nut.
We route the wires from the camera into the trunk through standard corrugations.
It is more convenient to route the wiring to the front of the car under the rubber seal of the headliner. Then we drag it under the dashboard to the back of the radio. To remove the MMC, you will first need to dismantle the panel cladding.
Wire length:
Camera instructions and specifications:
The specifications indicate 3 cameras, but which one I got was not noted, but most likely with the lowest resolution.
CONNECTION
General diagram for connecting a rear view camera:
In the trunk we connect the camera to the rear light wiring:
- +12V to green wire (reverse)
- "mass" to black
We connect the miniISO connector to the radio, the location of the wires in the blue block is as follows:
- Ground (outer part of the tulip) of the connector to pin 16.
- Plus (central part) of the connector to pin 19.
It is worth noting that if the MMC was installed on a car in the “norm” or “standard” configuration, then you will need to additionally supply +12V from reverse to pin No. 1 of connector A1 of the radio.
The process is also shown in the video: