Print this article Font size 16
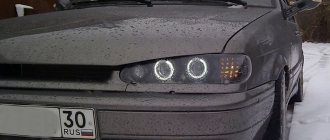
Today we will talk about the most attractive option for tuning headlights on a VAZ 2110 with your own hands in terms of effectiveness - angel eyes . This is an invention of the BMW company, which is actively used by owners of other brands to achieve a similar external result.
To carry out such modifications yourself, you will need ingenuity, some available materials and LEDs.
We will consider the option of installing angel eyes on standard Kirzhach headlights. You will see that there is actually nothing complicated in such tuning.
Independent design modernization
You should pay attention to the fact that you can independently change the original optics, make it more effective and beautiful.
Headlights on a VAZ 2110 tuning are quite often painted or covered with a special film. Let's consider the features of painting the optics:
1. You can use paint that does not react to environmental influences. 2. Work should be carried out at positive temperatures. 3. First, you need to decide on the color of the paint - as a rule, it is selected according to the color of the car body. 4. Painting of the protective glass can only be done when the optics are dismantled. Dismantling work can be completed quite quickly: the design of the 2110 car is quite simple; to remove the optics, minor dismantling must be performed. 5. After the optics have been removed, they should be disassembled. First you need to remove the protective glass, which will be painted. 6. The next step can be called covering with masking tape those elements that should not be painted. 7. When applying paint, remember that the protective glass must transmit quite a lot of light. Therefore, paint is usually applied in a small layer. 8. After completing the painting work, you can assemble the optics and install them.
The above points should be taken into account in order to carry out the work efficiently and quickly.
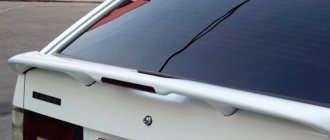
Rear optics tuning
Often, as a means of tuning the rear lights on the VAZ 2110, alternative optics are installed in the form of LEDs, which are mounted in the headlight reflector. This method is affordable, and the result looks quite impressive.
The rear lights are removed in the same way as the front ones.
After dismantling the glass, the components of the headlights are removed. Next, the interior of the headlights is filled with polyurethane foam. Be careful! The dried foam is given the required shape, and a coating in the form of fiberglass or epoxy resin can be applied on top - this will be more convenient.
You will need red LED strips and yellow LED strips for turn signals. They are soldered together and glued to the base inside the headlight, onto which it is necessary to first apply paint darker than the yellow polyurethane foam. Remember to use a primer first and then a heat resistant paint. When the paint has dried, glue the strip with LEDs, then replace the glass and proceed to connecting the headlights.
instructions with photos and videos
Tuning the headlights on your VAZ-2110 with your own hands will not be difficult if you approach this procedure wisely. In this case, the result will please the owner, and his previously unattractive car will look much more modern. The main thing in this matter is to strictly follow the instructions in order to avoid mistakes.
This brand, as a rule, has optics of such types as “Kirzhach” and “Bosch”. The procedure for dismantling old headlights consists of the following steps:
- First you need to disconnect the blocks with wires and remove the upper part from the radiator grille. To do this, take a key of 10.
- After this, you need to remove the boxes with the wires connected to the direction indicators. Immediately after this, the headlight hydraulic corrector is pulled out using a special latch.
- Next, you need to unscrew the headlight mounting bolts and remove the edge from the place where it engages with the wing.
- After completing this work, the headlight of the car is carefully pulled out.
We looked at the procedure for removing a Bosch headlight. Now let’s find out how to remove the Kirzhach optics. This work consists of the following stages:
A flat screwdriver is inserted into the corner of the headlight, as well as a utility knife, which is used to cut off the sealant. If you can’t cut with this tool, you can use a hair dryer;
then we proceed to remove the reflector
This is done like this: unscrew 3 bolts around the perimeter and unfasten 4 latches; then the headlights are carefully removed
As we can see, removing the headlights on a VAZ-2110 car is absolutely easy.
The situation is different with the modernization of optics
It is very important to understand what is suitable in a particular case and what is not. Let's try to understand this issue
Do-it-yourself headlight tuning on a VAZ-2110: tinting
After dismantling the old headlights, it is necessary to remove the spring in the hydraulic corrector hole. Next, the adjusting screw is unscrewed, after which the optics module with reflector is removed. Before you start painting the part, you need to clean it thoroughly. A degreasing primer is suitable for this. It is not advisable to paint with enamel, since the temperature inside the headlight is always very high. In this case, heat-resistant paint is perfect.
It is advisable to carry out the painting procedure itself in a dry room, very carefully, keeping this part at a distance from you
“Angel Eyes” - a new type of tuning
Installing “angel eyes” on a car yourself is not at all difficult. There are several options for this procedure:
- buy finished products;
- make them yourself using LED strip;
- make it yourself using a transparent tube.
As practice shows, it is much better to make “angel eyes” yourself, since stores sell very low-quality and short-lived products. You can buy a ready-made LED strip and glue it to the inside of the optics with special glue or sealant. But it will still be more effective and brighter if you use an LED ring made of a plastic tube.
The work in this case consists of the following stages:
To begin with, the plastic tube is heated using a hair dryer. This must be done so that it bends well. However, you also need to understand that if the product is overheated, it will become deformed.
After this, use pliers to bend the tube around the can, so you get an even circle. When the part has cooled, the edges are sawed off. Resistors and LEDs are assembled using the same circuit
It is important to sand the ends thoroughly. Then, using a hacksaw, notches are made around the perimeter at approximately a distance of 2-2.5 mm. The ends are covered with foil and a special tube
Next, the made ring is attached with glue around the optic lens. It is important that the notches are on the inside
The ends are covered with foil and a special tube. Next, the made ring is attached with glue around the optic lens
It is important that the notches are on the inside
If you clearly follow the instructions and correctly carry out all stages of the work, the updated headlight will have a very presentable appearance and will be able to last about 7 years without replacement.
How to profitably exchange a used car
To guarantee the legality of the used car exchange service and its objective cost, the purchase and sale process should be carried out at a trusted auto center. Here the client will be offered:
- Diagnostics of the old model, on the basis of which its cost will be determined;
- Selection of cars for exchange, completely new or with a clean mileage history: all cars undergo forensic examination, therefore the car dealership will never sell a car with a “dark past”;
- Legal support of the transaction: the client enters into a notarized agreement and, if necessary, can use the credit services of the car dealership’s partner bank;
- Efficiency of the service: the client does not need to look for buyers for his vehicle; he does not need to settle issues with the traffic police or the bank. The listed functions are the task of the auto center.
Read here! Chevrolet tuning
Thus, with minimal documents, it is possible to buy an improved car within one to three days. The used car exchange service makes it possible to regularly change the owner’s vehicle fleet by purchasing its best models.
Modernization of rear lights VAZ 2108-2115,2110-2112
And if owners of 2108-2114 and cars of the tenth family have an alternative in the form of domestic OSVAR rear optics, then for some reason the tags turned out to be completely deprived in this regard. I really don’t want to buy a Chinese product with problems during maintenance, and even without a guarantee for normal operation and cosmic appearance.
There are several treatment options available. I took the path of completely abandoning the conductive tape and using sockets for each lamp from the VAZ 2101. This option was described in the magazine “Behind the Wheel” back in 2007.
We take out the rear light board, use a screwdriver to pry up the plastic sockets and take out the tape.
on the board you can see where the contact was lost and because of this the lamps did not light up
The rear lights of tags use double lamps for the markers and stops, therefore, in stores you need to look for double sockets for markers and stops, and single sockets for the turn indicators. In VAZ 2108-2114 models all cartridges are single. The cost of such cartridges in the store is 15-30 rubles. In addition, you will need wires, lugs, connectors (you can also use computer connectors), and M3 bolts and nuts for attaching the cartridges.
Electrical diagram of the rear lights of the VAZ 2108-2115 from the book. Everything seems to be more than clear, the total weight and advantages for each cartridge.
This diagram for tags does not show the series connection of the side lights and brake lights. I quickly jotted down a cheat sheet.
Now we need to arm ourselves with patience. We mark and drill holes for the cartridges in the same places where they were installed earlier. The metal part of the cartridge had to be slightly modified, namely, on the cartridges of clearance and brake lights, the terminals for the tips were moved 180 degrees with pliers, and on the cartridges of turn indicators, they were completely bitten out.
holes drilled and filed for cartridges
To attach the cartridges to the plastic base, I used small bolts with M3 nuts, it came out neatly. But all the work is quite painstaking and slow.
Since I couldn’t find single sockets for turn signals, I made a jumper in the center on the double one.
After all the cartridges are secured, the most pleasant and interesting part remains. Well, at least for me, electrical wiring.
First, I made the total mass by connecting all the cartridges in series, then the plus on the turn signal and connected the pluses in series on the terminals of the brake lights and dimensions.
I rang the resulting wiring and, making sure that I had not screwed up anywhere, extended the purchased connector block.
All that remains now in the car is to replace the stock pad with a newly purchased one.
Author of the material; Alexander Kuzmin, 27 years old
We recommend watching:
- Is the driver allowed to reverse?
- Additional reversing lighting
- Prohibiting and permitting traffic signs
- Road signs additional information pictures with...
- What does the category ve provide?
- How to remove the right headlight on a Priora
Phosphor headlight illumination
Everyone has heard about illuminating optics with LEDs, and have seen them more than once. In this photo report I want to talk about tuning with phosphor. What kind of powder is this, what properties does it have, where can you buy it, and is it really possible to tuning the headlights with a phosphor?
<< First < Go back 2 Read more > Last >>What else can you do?
Another option for modifying the rear of the car is to install additional rear fog lights on the VAZ-2110. But such lighting elements will have to be purchased.
And then the PTFs are installed on the bumper and connected to the vehicle’s on-board network. Attaching additional lights to a standard bumper will not be easy, since you will have to cut holes for them. But you can also buy a tuning bumper, which has niches for PTF.
There are two ways to power the fog lights. The first one involves connecting them to the side lights. In this case, the fog lights will light up when the headlights are turned on.
In the second method, the PTF is also connected to the dimensions, but a power key is additionally embedded in the circuit, which is then installed on the dashboard.
This article will be of interest to those who decided to replace the rear lights on a VAZ 2110. For those who have another car, this will be an excellent example for such a homemade product. Today we will look at how to make round headlights, like those on legendary sports cars. Unfortunately, for the VAZ 2110 there are no such kits so that they can be installed, so here you have to do everything yourself. There are several options for how to make such headlights.
The easiest way to do this is by remaking the standard VAZ lights. But in order to do everything efficiently and beautifully, you will need to put in a certain amount of effort and spend some money. Let's consider each modification option separately.
Option 1. Reworking the standard VAZ taillights For such a modification you will need 56 red LEDs 5 mm in size. That is, there are 16 LEDs for each brake light size. You will also need to buy 8 LEDs for yellow turn signals.
The author decided to arrange the inner circle for turns, and the outer one will work as dimensions.
Creating dimensions
First, the LEDs will need to be mounted on any round platform. Due to the fact that the rear lights of the “dozens” cannot be disassembled, the author had to break the rear part. Then you can drill holes and install a round platform with LED diodes in them.
How to make brake lights:
Here the author decided not to use a platform, but simply attached the diodes in a circle on the wire. In the headlight, you also need to drill holes in the same way and then insert diodes in a circle. Since the diodes are inserted with some effort, the author did not use additional fastening for them. And finally, the headlights are painted to match the color of the car. This work took only 3 days.
Another way to create round flashlights It is unlikely that you will be able to buy such optics for tuning in a store today, but they sell elements that will allow you to make it yourself.
Those car enthusiasts who purchased taillight masks noticed the following feature: 1. This mask does not have attachment to the body and for installing optics;2. In order to hermetically install the modules into the mask, you need rubber seals under them;3. And yet, the holes in the mask for installing modules need to be improved.
Using universal rear round headlights In tuning departments you can still find such elements as universal round headlights. They come in several types. They are distinguished by quality, price and manufacturer.
In the first case, you can purchase the Pro-Sport kit, it is the cheapest, but has one drawback. Incandescent lamps are used here, and this leads to heating and, as a result, deformation. In this regard, everything will have to be modified, namely, changing incandescent lamps to LEDs, and this is investment and labor.
There is also a Hella kit, it costs twice as much, but is of higher quality. These headlights also shine much longer.
It is also important to note that these headlights are 2mm larger in size
For better tuning, you will need fiberglass putty, you will need finishing and roughing putty. You will also need sandpaper of different grits, as well as a lot of time, effort and patience. The work takes quite a long time and painstakingly, so you can’t do it without patience and inspiration. Then everything is sanded to a perfectly smooth state and painted to match the color of the car.
At the end of all the work, we get round headlights that are perfectly integrated into the car without gaps. Everything looks like these headlights were installed from the factory. In the photo you can see what the shape of the rear mask looks like after modification.
Below is a collection of cars that have had round headlights installed.
Let's talk about remodeling
For those who decide to upgrade their lighting, products from the Kirzhach brand are the most suitable option. They allow several modification options, and there is also the possibility of installing xenon. Thanks to such modifications, the efficiency of the headlight and its light output increases. Having the skills to work with various plumbing tools, you can perform such alterations yourself.
In order to begin upgrading these products, you must first remove the headlights from the car. Next, you will need to completely disassemble the removed optical elements. First of all, you need to carefully separate the glass from the headlight housing. It is attached to the body using a special sealant
This work must be done carefully so as not to damage the glass, otherwise you will have to buy a new one
Tuning the dashboard of VAZ 2110
So, the seats and side panels are modernized and the eye falls on the standard dashboard of your “ten”. The old design doesn't look very good and needs updating. Fortunately, you have many options for tuning a VAZ 2110 torpedo with your own hands. Let's take a closer look at what can be done here.
Craftsmen have repeatedly come to the conclusion through trial and error that the best option, and most importantly simple, would be to install a device from Priora. The only thing that will need to be done is to change the mounting of the electronic control unit, and also install “Prior” sound insulation.
Dashboard from Priora on VAZ 2110
If such tuning is not enough for you, then you can go much further and replace the entire shield. “Ten” allows you to implement this without unnecessary problems. The thing is that there are three options for instrument panels for this modification of the car.
- Similar to a standard panel, but without a shelf;
Euro 1 instrument panel VAZ 2110
Euro 2 instrument panel VAZ 2110
Euro 3 instrument panel VAZ 2110
Once you have decided on the type of dashboard, you need to carry out a number of dismantling works. Let's give some advice:
- Disconnect the battery terminals and lower the steering wheel to the lower position if provided;
- With little effort, unscrew the screws on which the panel is attached;
- Disconnect all connectors;
- We carefully unbend the instrument bracket, for example, with pliers;
- We remove the panel.
When the new VAZ 2110 dashboard is installed, you should carry out these manipulations in the reverse order. Be careful and try not to forget to turn on any block.
Replacing the instrument panel backlight
You can also change the lighting of the PP to a more interesting and harmonious one. Most often, LED strip or neon glow is used. Of course, such ready-made torpedoes are already on sale, but their prices are incredibly high. However, you can do everything yourself.
Tuning the instrument lighting of the VAZ 2110
First of all, you need to remove the glass, which serves as protection for the devices. Then we place a sheet of cardboard under the arrows and carefully remove them with a screwdriver. The backing of the devices is attached to the sealant, which must be removed. The easiest way to do this is to use a knife. We are now holding a number of events:
- The light filter should be removed with the same knife, and the remaining paint should be removed with acetone;
- We replace the odometer backlight lamp with a multi-color LED;
- We carry out the same actions with the remaining lamps;
- The hands can be decolorized with solvent and painted in any color you like.
The whole process on video:
Illuminated control buttons
In addition to instruments with arrows, various types of backlighting are also installed on control buttons. As an example, we will show how to design a button that turns on the rear fog light. First of all, we dismantle the switch. To do this, remove the moving part of the button from the housing. Then use a screwdriver to pry up the latches and remove the inner part of the switch.
We find a black bracket and, taking it out, disassemble the entire button mechanism. Using tweezers, take out the backlight lamp. Let's move on to removing the filter. We just drill it out.
After this, you need to install an LED of a certain color instead of the standard factory lamp
It is important here not to confuse the polarity, otherwise this will lead to certain problems. As soon as the button is connected, you must check its functionality, and only then assemble the entire structure
Using this approach, you can replace all other buttons with more beautiful and tuned ones.
Adjusting the luminous flux
In order for the VAZ 2110 to be driven comfortably, all the rules of correct light supply must be followed so as not to blind oncoming drivers. There are special screws on the headlamp housing that are used to adjust the light supply.
When you turn the left screw, the angle of inclination of the optics changes vertically, respectively, turning the right screw changes the optics horizontally.
To correctly set the luminous flux, a horizontal line is drawn from the ground to the center of the headlights and another similar horizontal line is drawn 65 cm below it. After all the preparation has been completed, you can proceed directly to the adjustment:
Buying a ready-made set
The fairly strong distribution of the car in question has become the reason that many optical manufacturers are creating special tuning kits. The advantages of this tuning method include the following points:
- Only high-quality materials and modern equipment are used in production.
- The created headlight sets are ideal for installation on a car. In other words, you don’t have to modify the car - installation takes no more than one hour, and you can get by with a standard set of tools.
- The next important point is the fairly large selection. There are several hundred sets of optics that are suitable for installation on the vehicle in question. The choice can be made quite simply - the type of light source, as well as the design, are taken into account.
- The service life of most offerings on the market is quite long.
The above points can be called the main ones. Headlights for a VAZ 2110 tuning cost relatively little, but still creating the design yourself can significantly reduce costs.
Advantages of modern diodes
Recently, diodes have been increasingly used in the production of optics. These light sources have the following advantages:
1. Service life is at least 5-10 years. The design of the diodes is quite simple, and the features of their operation determine the possibility of operation for more than 5 years. 2. Low energy consumption. The design of the car determines that by reducing the amount of energy consumed, fuel consumption is significantly reduced. Also, do not forget that when the internal combustion engine is not running, the lights are powered by a battery. The less energy they consume, the longer the battery will last. 3. Resistant to environmental influences. If ordinary lamps are quite susceptible to high humidity, then LEDs are not 4. When creating complex structures from several LEDs, a rather beautiful look is created.
In general, we can say that there are quite a lot of advantages of diodes. That is why they are used to create modern structures.
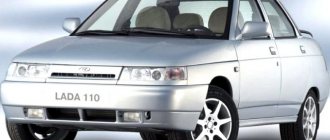
Table with technical characteristics
| Brand and modification | Body type | Volume | Power | Release |
| Lada (VAZ) 2110 | sedan (4 doors) | 1499 cm3 | 71 hp | 1996 — 01.1999 |
| Lada (VAZ) 21101 | sedan (4 doors) | 1596 cm3 | 80 hp | 09.1999 — 2007 |
| Lada (VAZ) 21102 | sedan (4 doors) | 1499 cm3 | 79 hp | 01.1996 — 2007 |
Removing headlights
Removing the rear headlights is not always required only for upgrading the VAZ-2110. This operation may also be required if the lighting elements are damaged or the lenses burn out.
To dismantle the optics, you only need two tools - a screwdriver and 8-mm wrenches (you can use a tool with a wrench). Removal is done like this:
- First, we dismantle the part of the canopy mounted on the wing. To do this, we provide access to the fastening nuts;
- Unscrew the fasteners;
- Carefully push out the equipment;
- After it comes out of the seat, disconnect the block with the wires;
- Let's move on to the second part of the lantern;
- Disconnect the block;
- Unscrew the fastening nuts;
- We remove the lighting element;
And then repair or replacement of the rear lights of the VAZ-2110 is carried out.
Now about modernization. It can be of two types - install lighting elements in which the design of the VAZ-2110 rear lights differs from the standard ones, or slightly alter the “native” headlights.
A little about the improvement
The purpose of such an operation can be only one, improving the illumination of the roadway. Experts break it down into several stages, they can be as follows:
- Work to move the lens closer to the reflectors;
- Refinement of curtains;
- Changing the shape for the reflector.
Only carrying out all stages of refinement can lead to achieving the desired results in improving Kirzhach optics. We need to talk about these stages separately
Tuning the rear lights
Such work will give the car style and elegance. If you want to save money, you can do everything yourself. There are two options for finishing the rear lights:
- varnish composition for tinting;
- tint film.
Having purchased a special varnish, the lanterns should be thoroughly washed and dried. After this, their surface is degreased with an alcohol-containing composition. The varnish is sprayed from a distance of thirty centimeters; after each applied layer, time is allowed for it to dry completely. The tuning effect will depend on the number of layers. At the end, some drivers polish to achieve a matte effect.
But after a certain time, the varnish is washed off, and the work has to be repeated, having first removed the residue with an acetone solution. Film that can be removed at any time is considered more convenient. When using it, the headlight is washed, dried, and degreased. Having cut the material, the surface of the lantern is moistened with water and soap diluted in it. Having removed the film backing, apply the tint to the lamp, press it with a rubber spatula, and smooth it to remove water and air bubbles. When tinting headlights, you should remember that there may be problematic issues with the police. So it is recommended to observe moderation in these actions.
Good day! Let's take a look at our auto industry again. This time the “ten” VAZ 2110
Comments 89
What is this black stuff?
Ah I see, thanks
How many LEDs did you use for the dimensions?
A lot, I didn't count
Okay, okay, I'll figure it out
Listen, what kind of cutter do you use to cut the diffuser and PVC? I tried cutting it with corn, it warms the plastic and winds it up
Of course it will wind, it’s heating up. Through cutter 3 mm
Well, do you need to stop it periodically? It’s just that after 2cm of cutting it already winds up a huge piece and starts to move out) I’m afraid to guess what will happen next if you don’t stop) Corn cutter?
What corn? Passage! You need to set the speed and feed correctly
It is important. Well, do you need to stop it periodically? It’s just that after 2cm of cutting it already winds up a huge piece and starts to move out) I’m afraid to guess what will happen next if you don’t stop) Corn cutter?
Well, do you need to stop it periodically? It’s just that after 2cm of cutting it already winds up a huge piece and starts to move out) I’m afraid to guess what will happen next if you don’t stop) Corn cutter?
Let's talk about remodeling
For those who decide to upgrade their lighting, products from the Kirzhach brand are the most suitable option. They allow several modification options, and there is also the possibility of installing xenon. Thanks to such modifications, the efficiency of the headlight and its light output increases. Having the skills to work with various plumbing tools, you can perform such alterations yourself.
In order to begin upgrading these products, you must first remove the headlights from the car. Next, you will need to completely disassemble the removed optical elements. First of all, you need to carefully separate the glass from the headlight housing. It is attached to the body using a special sealant
This work must be done carefully so as not to damage the glass, otherwise you will have to buy a new one
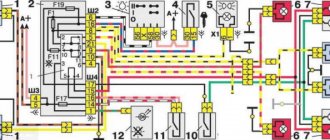
Dismantling and assembling the headlight unit, replacing lamps VAZ 2110-2111-2112
Removing and installing headlights
Instructions for repairing faults in the lighting system of the VAZ 2110, the procedure for assembling and disassembling headlights and replacing lamps of the VAZ 2111, adjustment. Diagnostics of electrical equipment of the Lada 2110 car. Instructions for troubleshooting the lighting system. Repair of generator and starter for Lada 2111 - 2112.
Disconnect the negative cable from the battery.
Disconnect the two electrical connectors of the headlight unit.
Using a 10mm wrench, unscrew the two bolts of the upper headlight mounting.
We dismantle the radiator grille.
Unscrew the lower mounting bolt.
Carefully pry off the decorative trim with a screwdriver.
Slide the cover towards the center and remove it.
Using a 10mm socket, unscrew the nut securing the headlight to the bracket.
We take out the headlight block.
Use a screwdriver to pry the hydraulic corrector cylinder lock and turn it...
...and remove it from the headlight housing.
Unscrew the two screws securing the turn signal...
...and extract it.
To replace the headlight glass, unfasten the six fastening latches and, cutting off the sealant layer, remove the glass.
We glue the new glass using a special sealant.
You can replace the headlight bulbs on your car. For clarity, we will carry out these operations on a dismantled headlight.
By turning the turn signal socket counterclockwise, remove it from the socket along with the lamp.
By pressing the lamp inward and turning it counterclockwise, remove it from the socket.
Turn the headlight cover counterclockwise and remove it.
Disconnect the wire from the low beam lamp.
Having squeezed the spring clamp, we remove its antennae from the grooves.
Move the lock up and remove the low beam lamp.
To remove the high beam and side beam lamps, remove the second headlight cover.
Disconnect the wire from the high beam lamp.
We remove the antennae of the spring retainer from the grooves.
Remove the high beam lamp.
Disconnect the wire from the side light lamp.
We take out the socket with the lamp.
Remove the lamp from the socket.
We assemble and install the headlamp in the reverse order.
The directions of the light beams of the headlights are adjusted by rotating screws that rotate the optical element in the vertical and horizontal planes.
Screws for adjusting the light beam in the horizontal...
...and vertical planes.
How to move the lens?
This operation is carried out to move the lens to reduce its area that receives illumination from the lamp. This achieves a decrease in the curvature of the lens. This can be done this way:
- It is necessary to completely disassemble the module and remove the lenses from it. Cuttings must be made at the proposed new location for installing the module. At this time, it is necessary to carefully monitor the position of the curtain; it should always be at a distance of 50 mm;
- In the marked place, you need to saw off the module and strengthen the lens; for this, previously made cuts are used, and the module becomes somewhat shorter. It is important to take this point into account; the lens heats up, so the optimal approximation size will be 10 mm.
➤ Adjusting headlights on the Lada Granta - description of the process
The factory adjustment of the headlights on the Lada Granta is not ideal; owners often independently adjust the optics to “their needs.”
The adjustment process is not complicated, every driver can do it. If you don't have time, contact the service center for assistance.
Why does the headlight adjustment go wrong?
Poor quality assembly of components, insufficient fixation with fasteners;
- Manufacturing defect;
- Due to damage, the headlight range control does not work;
- Violation of operating conditions;
- Inconsistency in temperature conditions, as a result of which the reflector, base, and mounting socket are destroyed and deformed;
- Negative consequences of an accident, impact, collision;
- Wear of springs, front / rear struts, ground clearance decreases, the car body leans forward.
The given list of reasons why headlight adjustment is impossible is exhaustive.
Procedure for adjusting the headlights of a Lada Granta with your own hands
Tool preparation: screwdriver, hexagon.
- Installation of the machine within the perimeter of the repair area, on a flat platform.
- Checking the tire pressure, the presence of a spare tire in the trunk, the weight of the load on the driver's seat is 75.0 kg.
- Adjustment / correction of the light beam at a distance of no more than 3.0 meters from the wall.
- Check the illumination angle of each headlight one by one.
- Completion of work, testing for serviceability and accuracy of lighting.
The lighting system on the Lada Granta (liftback) is completely identical to that of Kalina, Priora, Vesta. The turn signal, high beam, and daytime running lights (hereinafter referred to as DRLs) are located together in one module.
Each lamp is placed in a separate socket with the possibility of autonomous adjustment using a hydraulic cylinder. The headlights are adjusted using two hexagonal screws:
- the top one is responsible for the horizontal position of the light beam,
- bottom for vertical.
Preparation and adjustment of headlights in accordance with GOST
Adjustment scheme
- We first check the tire pressure, place a load (75.0 kg) on the front seat, squeeze the parking brake lever;
- On the wall (obstacle) we draw a horizontal line at a distance of 550 mm. from the earth. This will be the level of visibility of the driver’s pupils at a distance of three meters from the front bumper;
- We draw a line perpendicularly passing through the center of the light beam for each of the headlights: line 1 and 2.
- A vertical line is drawn down the center.
Adjusting and adjusting the headlight manually
- We measure the distance of lines 1 and 2, they should be equal. For the objectivity of the data, let’s rock the side of the car and check the accuracy of the beam accuracy restoration, simulating a road bump;
- Using the hydraulic corrector, we complete the headlight height adjustment. Initially, set the lever to position “0”. Experts recommend setting up each of the headlights separately, after covering the inactive one with an opaque material;
- Adjusting the low beam headlights on the Lada Granta is considered complete when the light spots on the wall completely coincide with the horizontal line;
- If necessary, repeat the setup process again.
We improve the quality of work done
In order to increase the efficiency of roadway lighting, we check body elements for defects, damage, and deformation. By ignoring the curvatures on the body, it is impossible to achieve maximum concentration of the light beam.
We check the integrity of the headlight glass and the tightness of the sealing elements. There is dust and dirt inside the optics module - a sign of poor sealing. Replace the rubber seal, update the silicone sealant.
Long-term operation of the machine on rough terrain or unpaved surfaces leads to damage and scratches on the optics. It is not at all necessary to change the headlights; it is enough to carefully polish them with special means.
If the reflector or mirror surface is damaged, unconditional replacement of the optics. Such a defect cannot be restored.
Installation of lamps strictly in accordance with catalog articles. Purchasing components other than factory ones does not guarantee the quality of lighting or service life.
Video “Polishing optics with toothpaste”
How to polish the headlights on a “ten” with your own hands using toothpaste, see the video below (the author of the video is Dima Artist).
Do you have any questions? Specialists and readers of labavto.com will help you. Support the project - share the link, thank you! Rate the benefit of the article: Rate the author (vote(s), average: out of 5) Loading…
The most common cause of road accidents is poor visibility. Therefore, there is no need to explain why your headlights should be well adjusted. On foreign cars you can find adaptive light - this is when the headlights direct light depending on the angle of the car, load and other parameters.
The easiest way to adjust the headlights is at a service station. But we do everything with our own hands and don’t want to give away extra money. Therefore, in this article I will tell you how to adjust the headlights on a VAZ 2110. Before starting the adjustment, in order to avoid errors, you should check several things, namely:
- Check the headlights for dirt.
- Inspect the headlights for damage.
- Check tire pressure.
- You should be driving at a weight that is approximately equal to yours.
- We make the adjustment on a completely level place. In this case, there should be a wall opposite that stands at 90° to the site.
- The distance from the wall to the car is 5 m.
- Draw this design on the wall with chalk. Or draw this image on sheets of paper and stick them on the wall.
- We draw the first line parallel to the platform, the distance from the platform to the line should be equal to the distance from the platform to the top of the headlights.
- We draw the second line parallel to the previous one, 7.5 cm lower.
- We draw 2 lines, conditionally running along the center of the headlights. Let's call these lines A and B. They are parallel to each other and perpendicular to lines 1 and 2. Let's call their intersection points with line 2 E. The distance between these points is 936 mm.
- If your VAZ 2110 has a hydraulic corrector, then set it to position 1 and turn on the low beam headlights.
- Cover one of the headlights with something light-proof (cloth)
- We achieve the glow of the headlight beam along line 2. (Using the adjusting screw at the back of the headlight)
- Using the second screw, we achieve alignment of the break point of the light in the vertical boundary of the center of the headlights.
- Now cover this headlight with a cloth and adjust the second one in the same way as the first.
We see that there is nothing complicated and it doesn’t take long. But you will be sure that in the dark you will clearly see the road surface and will not blind oncoming drivers.
(votes: 1, average: 5.00 out of 5).
Tags: VAZ 2110/2111/2112Adjusting headlights Before purchasing, each driver needs to decide which VAZ 2110 low beam bulbs provide optimal brightness and have a compatible base.
Adjusting VAZ 2110 headlights with your own hands.
Signs of trouble
If the odometer suddenly refuses to work, and the speedometer works jerkily, or “lies” regarding speed and mileage, these are direct indications that the speed sensor or its drive is failing. It is also possible that there is a problem in the electrical circuit, the connector is failing, the pinout is mixed up, if the operation of this system has been interfered with, etc.
In addition, an indirect indication of a malfunction may be that the car stalls at idle (although there may be other reasons for this).
Naturally, if the speedometer begins to give deliberately false readings, and the “CHECK ENGINE” light is on on the dashboard, then the reason is the speed sensor.
Alternative option
If the driver of a VAZ 2110 car seems that simple Kirzhach headlights do not provide good road lighting, then a bi-xenon module can be installed in them if desired.
The Kirzhach headlight module and the bi-xenon module are not very different, but this will not be an obstacle to replacing them.
Installing a bi-xenon module consists of several stages:
Installation of xenon lamps is very simple, because it occurs without changing the wiring. After the alteration, the lighting will be completely different from what it was before. After changing the modules, the ignition unit is attached to any point, there are many places for this, it is installed anywhere at the driver’s request.
Afterwards, everything is put back in its place and the glow at night is checked in practice.
After modernization, modifications and various alterations, at the request of the driver, the Kirzhach headlight must be mounted back on the VAZ 2110 using a sealant or a special construction sealant.
My headlights “decided to live a long time” As everyone knows, lens headlights don’t shine a damn thing on the tenth family. And mine were probably worse than the dimensions, and out of anger I shoved the xenon into the far one! after which everyone started blinking and swearing)))) And then a friend fitted me with lensed headlights and I decided to finish them a little for our “conscientious” AvtoVAZ drivers.
1. Zoomed in on the lens in the lamp
2. I made two new straight curtains from polish covers with a shelf of 1mm, so I removed the “graph”, anyone in the know will understand
3. I covered the curtains with foil for better light diffusion
The headlights are still undergoing modifications, but I connected the lenses this way and checked that they shine many times better than the standard ones. Plans to paint the glitter ) around the reflectors black and push the LED strip in place of the light bulb size!
modification and tuning of headlights
| The headlight unit can be dismantled for repair, replacement with a new one, or for tuning or modification. In this article we will talk about the removal and disassembly of a VAZ headlight of the tenth family, depending on its manufacturer (Bosch or Kirzhach). |
| The better the roadside is illuminated, the safer driving becomes. Foreign cars have an “adaptive lighting when turning” option for this case, but Russian cars still lag behind foreign cars. You can improve the illumination of the edge of the road by swapping the fog lights and direction indicators. |
Competition for the most original tuning of head optics among the tenth family of VAZs. Requirements for participation: photos of headlights after tuning. Recruitment of applications from December 2 to December 15, 2013. inclusive.Voting from December 16 to December 31, 2013. inclusive.
| To make your car attractive, replace the standard optics with alternative ones, for example, ProSport headlights. And if you want the car to be 100% unique, then do the ProSport headlight tuning yourself. |
| ProSport tuning is familiar to many; it is a wide range of parts not only for VAZ, but also for foreign cars. If we talk about ProSport headlights for the “ten”, then all the reviews fit into the “beautiful, but don’t shine” category. Let's try to figure out how to remake them with our own hands. |
| With the advent of LEDs and LED strips, the possibilities for car tuning have expanded significantly. A specific example is the installation of illumination of headlight lenses on a VAZ 2110. |
Do they shine or glow?
To search for the truth, I decided to conduct comprehensive tests (due to my capabilities), the main example of which was a set of one of the most popular and interesting (in my opinion) headlights with an integrated turn signal - ProSport (ProSport). Naturally, to complete the picture, in the article this optics will have many competitors, but first things first. Have you ever noticed that the headlights of the VAZ 2110 “AvtoSvet” (Kirzhach) blind oncoming people at night, even without the collective farm xenon? In fact, this is another drawback of the “ten”, when the low and high beam beams practically coincide in height. Let's learn how to adjust the light beam of VAZ 2110 headlights with lenses.
| Many car owners notice that their car headlights sweat. This is an unpleasant situation, for which there may be several reasons. We are trying to figure out why the headlight fogged up and what to do in this case. |
The light of low and high beam headlights does not suit many drivers. In one case it is too dim, in another the headlights shine low. The last problem can be solved by a simple modification, which will take 5 minutes of time, but the effect will be amazing.
You have to adjust the headlight beam quite often, especially on station wagons, when the car trunk is heavily loaded and the light is directed into the eyes of oncoming drivers. If at one point you notice that the reflector has fallen and the light adjustment does not work, then you can try to repair the 2110 headlight yourself.
Imagine that you never use high beam headlights, then the useless parts of the headlight can be used as additional low beam. Let's figure out how to get rid of the high beams and install low beams in their place.
Covers for car headlights are also called cilia. Such headlight tuning can significantly embellish the appearance of the car, and with minimal investment of time and money. Let's learn how to make eyelashes for headlights with your own hands.
How can you improve your headlights yourself?
Only when the luminous flux
adjusted, with slight modifications you can improve the headlight illumination on your own car without the help of others. First the headlight
is removed, and improvement is carried out in this order:
- The protective glass is removed. To make it easier to remove the protection, it is recommended to heat the glass using a regular hair dryer for this purpose. A warm air flow will warm up the sealant, after which the panel, of course, can be easily separated from the headlight using a sharp knife;
- carefully remove the reflective gasket;
- When using the appropriate tool, it is necessary to move the lens approximately 15 mm towards the reflector or slightly shorten the modular ring on a lathe.
Such actions will help not only improve the light of the headlights, but also increase the luminous flux and make it much wider. Both adjusting the headlights and improving the luminous flux, as you can see, is a fairly common process that is available to every car enthusiast.