When carrying out electrical repair work on VAZ 2108, 2109, 21099 cars and their modifications, as well as when problems arise such as brake lights or parking lights do not light up, the reverse light does not work, turn signals do not blink, very often you have to understand the wiring , leading to the rear lights.
In such a situation, information about where which wire goes and what it is intended for in the rear lights is simply necessary. In this article, we will take a closer look at the wires leading to the rear lights of VAZ 2108, 2109, 21099 cars. As an example, we will use the left light (the one behind the driver). All wires in the connecting block of the left lamp are located in a certain order. In some cases, they may even be numbered at the end of the block.
purpose of wires in the connecting block of the rear left lamp of VAZ 2108, 2109, 21099 cars
1. Yellow wire with a black stripe, the topmost one in the connecting block - plus to the parking light lamp.
2. Brown or orange wire with a black stripe, the second in the connecting block (located below the yellow one) - positive for the fog lamp.
3. Blue wire with a black stripe, the third in the connecting block - positive for the turn signal lamp.
4. Green wire, fourth in the block - plus to the rear light bulb.
5. Black wire, fifth in the block (penultimate) - negative for all flashlight lamps.
6. Red, sixth (the very last) - plus for the brake light lamp.
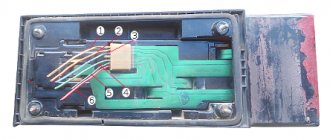
Each wire in the connecting block corresponds to its own track on the rear light board. For more information about checking the rear light boards, see “Checking the rear light boards of VAZ 2108. 2109, 21099”.
Notes and additions
— The wires and connections of the right lamp of VAZ 2108, 2109, 21099 cars are similar to the left one and duplicate them.
Five more articles on the website on VAZ car electricals
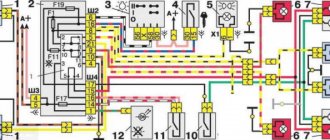
Relay and fuse box diagram 2109
Fuse block 2114-3722010-18
K1-relay for turning on headlight cleaners; K2-relay-breaker for direction indicators and hazard warning lights; K3 - windshield wiper relay; K4-relay for monitoring the health of lamps; K5-power window relay; K6 - relay for turning on sound signals; K7-relay for turning on the electric heating of the rear window; K8-relay for high beam headlights; K9-relay for low beam headlights; F1-F16 - fuses.
Fuse block 2114-3722010-60
K1 - Headlight wiper relay, K2 - Turn signal and hazard warning relay, K3 - Windshield wiper relay, K4 - Brake light and parking light relay, K5 - Power window relay, K6 - Horn relay , K7 - Rear window heating relay, K8 - Headlight high beam relay, K9 - Headlight low beam relay, F1 - F16 - Fuses, F1 - F20 - Spare fuses.
Source
Selection of xenon headlights
In many ways, the choice of xenon device depends on the design features of the headlight. If the headlamp unit is designed to install a lamp with one incandescent electrode, then the usual type of xenon is installed on it. When the manufacturer recommends installing products with two hot electrodes, bi-xenon is installed in the headlight.
These xenon bulbs have an electromagnetic metal curtain that covers part of the glass bulb. It is worth noting that the headlight lens may also need to be replaced. This is due to the fact that a standard diffuser evenly splits the light stream, and for xenon to work effectively, the light beam must be focused into a certain stream. The use of a conventional reflector and xenon lamps results in blinding drivers of oncoming cars. This is fraught with various emergency situations, possibly resulting in death.
Installation and testing of rear lights of VAZ 2109
The rear lights (headlights) of the VAZ 2108, VAZ 2109, VAZ 21099 have the following bulbs: 1) Brake lights. 2) Dimensions. 3) Reverse. 4) Turns. 5) Fog lamp.
Tail light board
A wiring harness goes from the mounting block to the rear lights. The purpose of each individual wire in the harness can be understood by its color: 1) Brake lights - red 2) Dimensions - yellow 3) Reverse - green. 4) Turns - blue. 5) Fog light - orange-black.
Remove the connector from the rear light board
Naturally, you need to understand that if the car is old and a lot of people have done the wiring, then the color match of the wire to its purpose may be disrupted. That is, the red wire can be converted not to brake lights, but, for example, to dimensions. But in general, this is a very important point: AvtoVAZ developers specifically marked the functional purpose of the wire with a certain color to make it easier to use.
Flashlight board
If some light signal in the rear headlight of a VAZ 2109 does not work, then before climbing into the mounting block and opening the electrical circuit, we check the following: 1) The reliability of fastening the rear light mass to the body. 2) Check the reliability of fastening the wire connector to the headlight. 3) Integrity of the light bulb 4) Quality of contact between the light bulb and the flashlight board. It often happens that everything is intact, the light bulb and the mass are good, and 12 Volts come to the light bulb, but it does not light. The reason is poor contact between the light bulb and the board. In this case, you need to clean both the light bulb base and the area on the lantern with fine sandpaper. As one smart person said: “Electrics is the science of contacts.” To disassemble the rear light of the nine, first remove the protective plastic cover. Then disconnect the black wire of the flashlight from ground. Then we remove the connector from the flashlight board and remove the board itself with the bulbs from the headlight housing. If it is necessary to replace the headlight itself, then unscrew the remaining bolts securing the headlight to the car frame and remove it.
Lantern body
There is one important point that many owners of the ninth model Zhiguli do not know. This is the rear fog light. It is turned on by a button between the hazard warning button and the heated rear window. The rear fog light will only work if: 1) The ignition is turned on. 2) Low beam headlights are on. 3) The flashlight power button is pressed. The fog light bulb is the only one that has a reflector inside the headlight. Thanks to this reflector, the glow of the lantern becomes brighter.
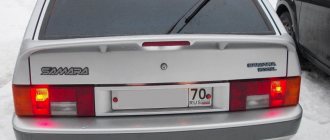
Enabled clearance
Rear fog light on
Rear light bulb power: Dimensions 5 Watt Fog light 21 Watt Reverse 21 Watt Stop light 21 Watt Turn signal 21 Watt
Purpose of DRL
To properly connect running lights to headlights, you must have at least minimal experience working with electrical equipment. Before we tell you how to connect DRLs according to GOST, we will analyze the purpose of this type of optics. Running lights are external lighting elements used to indicate the dimensions of a vehicle during daylight hours. As a rule, when installing DRLs with their own hands, car owners use LED lighting sources.
Usually the optics are connected to the headlights or low beam, but if necessary, you can use a separate button to control the headlights. Also, automatic activation of DRLs can be done by connecting fog lights to the circuit.
Optics installation requirements
Video “Refinement of rear lights”
You can learn more about modifying the rear lights on the VAZ 2109 from the author of the video, Dmitry Sergeevich.
The rear lights (headlights) of the VAZ 2108, VAZ 2109, VAZ 21099 have the following bulbs: 1) Brake lights. 2) Dimensions. 3) Reverse. 4) Turns. 5) Fog lamp.
Rear light board for VAZ 2108, VAZ 2109, VAZ 21099
A wiring harness goes from the mounting block to the rear lights. The purpose of each individual wire in the harness can be understood by its color: 1) Brake lights - red 2) Dimensions - yellow 3) Reverse - green. 4) Turns - blue. 5) Fog light - orange-black.
We remove the connector from the rear light board of VAZ 2108, VAZ 2109, VAZ 21099
Naturally, you need to understand that if the car VAZ 2108, VAZ 2109, VAZ 21099 is old and there are a lot of people doing the wiring, then the color match of the wire to its purpose may be violated. That is, the red wire can be converted not to brake lights, but, for example, to dimensions. But in general this is a very important point: the developers of the VAZ 2108, VAZ 2109, VAZ 21099 specifically marked the functional purpose of the wires with a certain color to make it easier to use.
Flashlight board VAZ 2108, VAZ 2109, VAZ 21099
If some light signal in the taillight of a VAZ 2108, VAZ 2109, VAZ 21099 does not work, then before climbing into the mounting block and opening the electrical circuit, we check the following: 1) The reliability of fastening the mass of the taillight to the body of the VAZ 2108, VAZ 2109, VAZ 21099. 2) Check the reliability of fastening the wire connector to the headlight. 3) Integrity of the light bulb 4) Quality of contact between the light bulb and the flashlight board. It often happens that everything is intact, the light bulb and the mass are good, and 12 Volts come to the light bulb, but it does not light. The reason is poor contact between the light bulb and the board. In this case, you need to clean both the light bulb base and the area on the lantern with fine sandpaper. As one smart person said: “Electrics is the science of contacts.” To disassemble the rear light of a VAZ 2108, VAZ 2109, VAZ 21099, first remove the protective plastic cover. Then disconnect the black wire of the flashlight from ground. Then we remove the connector from the flashlight board and remove the board itself with the bulbs from the headlight housing. If it is necessary to replace the headlight itself, then unscrew the remaining bolts securing the headlight to the car frame and remove it.
How and from what you can make any patterns for tuning headlights.
See how to make material for ornaments for tuning headlights
. My VKontakte group:
also the tuning
of the rear lights yourself. Such lanterns have a chance to become unique and inimitable, and the quality of their manufacture will depend only on the curvature of the hands of their creator, that is, if you have certain skills, there is a chance to make a very high-quality product. On the Internet you can find masters specializing in this type of tuning. Although their products are not cheap, the quality and originality of these products will be at their best.
VAZ 2109 generator circuit
If you lose charge, this is most often due to a failure of the generator, and most often it is the generator brushes, but it happens that there are winding breaks and a short circuit in the circuit or an open circuit. In this case, I recommend that you familiarize yourself with this generator circuit for the VAZ 2109.
Numerical designations on the diagram
| 1. Generator. | 2. Negative valve. | 3. Additional diode. |
| 4. Positive valve. | 5. Battery discharge warning lamp. | 6. Instrument cluster. |
| 7. Voltmeter. | 8. Mounting block. | 9. Additional resistors of 100 Ohm, 2 W. |
| 10. Ignition relay. | 11. Ignition switch. | 12. Rechargeable battery. |
| 13. Capacitor. | 14. Rotor winding. | 15. Voltage regulator. |
Malfunctions
There are two main reasons why an alternator stops charging properly.
Cause
Peculiarities
This happens to those who like to install numerous additional equipment that is powered by a generator, that is, it requires electricity. These could be speakers, electric pumps, video devices, etc. A standard generator is not designed for such loads, and therefore loses efficiency
It will be useful: VAZ 2110 ignition module: signs of malfunction
Battery and alternator mismatch
To ensure the operation of electrical equipment additionally installed on the car, many decide to install a more powerful battery with a standard generator. A mismatch in power leads to the fact that the generator ceases to provide proper charging to the more powerful battery. So he simply does not have enough resources for this
What charge does the generator produce?
Many people are interested in the question of how much a generator should produce for normal operation.
Here the parameters directly depend on the current state of the car.
- If the engine is cold and just turns on, then the voltage will normally be 14.1-14.4 Volts;
- If you check the voltage after long trips in traffic jams, then the generator will produce less, about 13.9-14.1V.
Repair and tuning of rear lights on the legendary Nines - VAZ 2109
The rear lights of the VAZ 2109 can not only cause inconvenience with their breakdowns and malfunctions. If, of course, this happens, below you can find out how to eliminate some of them
It is also important that the lights can be tuned
Causes of failure of the rear parts of the lighting system and driver actions
You can find out what the breakdown may be and how to solve the problem below. We will talk about modified nines.
Possible malfunctions of brake lights and their elimination
- Due to a voltage drop, a short circuit may occur and the paws will burn out.
- If it's time to strip the wires because the contacts have oxidized and the terminals do not conduct current well enough.
- Often, in the event of a voltage drop, it may be necessary to remove and replace fuses.
- If the reverse sensor contacts are broken or damaged.
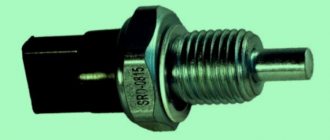
Removing the brake light switch sensor
In case of the problems listed above, the easiest way, of course, is to install a new lamp. This happens without any difficulty: you just need to turn off the lights, open the trunk and remove the wiring block. After this, holding the fixing elements that are installed on the sides, remove the panel and unscrew the lamp. In its place, install a new light device and assemble the assembly in the reverse order. If we talk about stops, both lamps and one of them may not work, that is, only in one headlamp.
If such a problem occurs, it is necessary to immediately diagnose:
- Check the fuse and, if necessary, replace it with a new one. Fixing a breakdown is not enough, because, as in the case of human diseases, a burnout may be a fault in the system that needs to be corrected. If this is not done, you can change the device until the end of the life of the VAZ 21099. One of the reasons may be a short circuit.
- If the wiring in the signal lamp sockets has oxidized, the lamp needs to be twisted a little in the socket to scrape off the damaged layer. To make the work done more effective, you can clean the contacts with sandpaper.
- If the lamps in the stops burn out, you need to replace it with a new one and check whether the system will work. And if the contacts are bad, they need to be cleaned both on the board and on the wire block.
- If the tracks in the headlight circuit board are burnt out, then you can remove the board and visually diagnose its integrity. If there are burnt tracks, they can be modified by replacing the wiring.
- The sensor is faulty or the electrical circuit is broken. First, you need to remove the red and white wires from the sensor and connect them with a piece of wire. If the brake lights come on, then the sensor needs to be replaced; if not, you need to check the electrical circuit. It needs to be checked for broken contacts.
Removing and replacing rear lights
- It is best to make the replacement before wiring problems begin.
- To work you need to remove the lights. On the VAZ 21099 it is hidden by a plastic decorative trim in the trunk.
- Now unscrew the fixing screws on the trim and remove them.
- Disconnect the block with wires and carefully remove it, being careful not to damage the board, because it sits tightly in place.
- Now, using a 10mm wrench, unscrew the 4 nuts securing the headlight housing. Remove the part from the machine. Now you can install the new part and calmly begin the replacement.
- The collection is done in reverse order (the author of the video is Automaniac1994).
Which ones to choose?
The only problem that motorists face is which lamps are best to put in the headlights. Even taking into account the high cost of the product, drivers often prefer xenon. This is due to the fact that such light provides excellent visibility of the road even in bad weather conditions. Moreover, its effect on the human eye has no contraindications. Xenon bulbs emit a luminous flux similar to natural daylight, which makes it possible to drive a car for a long time in the dark without feeling tired or putting much strain on the eyes. Taking this factor into account, driving is more comfortable and safe.
In conditions of rain or thick fog, visibility of the road and other road users is especially difficult. If the car's headlights are equipped with halogen lamps, the beam cannot fully illuminate the veil of fog and rain wall. This leads to emergency situations. The light flow from xenon is three times higher in quality than the light of halogen lamps and allows you to have a large viewing area in front of you.
It is worth noting that manufacturers of xenon products guarantee a long service life of the device - almost three thousand hours, while the service life of a halogen headlight is only five hundred hours. At the same time, the power consumption of the first is only 35 W, and the second – 60 W.
Fuse box of the new VAZ 2109 model
1. 8A Backup fuse2. 8A Backup fuse3. 8A Backup fuse4. 16A Coil of the radiator fan relay, electrical circuit of the switch and heater motor5. 3A Hazard warning switch in turn signal mode, turn signal breaker, turn signal switch, turn signal indicator light, turn signal indicator light, reverse optics switch, reverse lights, tachometer, voltmeter, gasoline level indicator, gasoline level sensor, gasoline level indicator light, coolant temperature indicator, temperature sensor, warning lamp and emergency oil pressure sensor, brake emergency lamp, brake system hydraulic switch, handbrake switch6. 8A Switch and brake light bulbs, interior lighting7. 8A Room lighting lamps, indicator lamp for turning on the parking lights, illumination lamp for the heater and cigarette lighter handles, glove box illumination lamp, switch and instrument panel illumination lamp8. 16A Horn, horn switch, radiator fan motor9. 8A Left side lamp, left rear side lamp 10. 8A Right side lamp, right rear side lamp, fog light switch, fog light indicator lamp 11. 8A Turn signal switch and breaker, turn signal lamps, warning lamp in emergency mode12. 16A Cigarette lighter, socket for carrying lamp13. 8A High beam of the right headlight14. 8A Main beam of the left headlight, high-range optics warning lamp 15. 8A Low beam of the right headlight16. 8A Low beam left headlight
Wiring diagram for power windows on a VAZ 2109
Tired of lifting windows with ordinary “oars”? Then install electric windows using the wiring diagram for electric windows on a VAZ 2109.
Numerical designations on the diagram
| 1. Mounting block. | 2. Ignition relay. | 3. Ignition switch. |
| 4. Right door electric window motor. | 5. Left door electric window motor. | 6. Right door power window switch. |
| 7. Left door power window switch. | K7. Power window power relay. | A. To terminal “30” of the generator. |
| B. To the wiring harness block connected to the heater lever illumination display. |
Equipment diagram for VAZ-2109 injector
The VAZ 2109 wiring for the injector has many connectors for connecting sensors to the computer.
- TPS (throttle position sensor);
- DPKV (crankshaft position sensor);
- DT (temperature sensor);
- DSA (vehicle speed sensor);
- Canister purge valve;
- MAF (mass air flow sensor);
- DD (knock sensor) and others.
Since the mid-90s, VAZ 2109 began to use engines with an injection system, which greatly changed the electrical layout of the engine compartment and instrument panel. Below is an electrical diagram of a 1999 car with an ECM type GM ISFI-2S and January 4/4.1.
- 1 - nozzle system;
- 2 - candles;
- 3 — ignition control module;
- 4 — diagnostic connector;
- 5 — General Motors or January controller;
- 6 — connector for connecting the instrument cluster;
- 7 — main relay of the system;
- 8 — fuse for power supply wiring of the controller and ignition system module;
- 9 — protection of the speed sensor and air flow meter circuits;
- 10 — fuel supply pump power protection;
- 11 — fuel pump controller;
- 12 — engine temperature meter;
- 13 — idle system;
- 14 — detonation meter;
- 15 — tank purge system for collecting fuel vapors;
- 16 — crankshaft position meter;
- 17 — speed meter;
- 18 — air flow meter;
- 19 — lambda probe;
- 20 — throttle position angle meter;
- 21 — electric fuel pump complete with fuel level sensor;
- 22 — connection of the ignition system;
- 23 — control lamp;
- 24 — ignition switch;
- 25 - switching block;
- 26 — radiator cooling fan.
With headlight removed
Replacement of headlight glass VAZ 2109
To improve operating efficiency, the headlights must be removed. Its installation is located in the engine compartment:
- Therefore, it is necessary to lift the hood and put on a gasket.
- The headlight is attached to four screws using nuts.
- Unscrew them with head number 10.
- The whole body moves towards itself; if necessary, apply a little pressure on the front bumper.
- Disable the two power timers.
- Remove the adjuster, turn your head to the left, remove the headlight.
It is advisable to carry out further work indoors at a temperature of 18 0 C. This is necessary:
- Place the spotlight on the table;
- Unscrew the turn signal housing;
- Remove the windshield wiper stops;
- Remove the remaining glass from the headlight housing, you can use a knife;
- Carefully clean the glass of any remaining glue;
- The solvent degreases the contact surfaces of the headlight and glass.
Note: Be careful not to get any solvent on the reflector; if necessary, wipe it with a dry cloth.
The sealant is applied in a thin layer to the body along the edge of the glass:
- After 3 minutes, all the parts that need to be glued together.
- Turn the headlight onto the glass, first place a piece of tarpaulin or any fabric on the table.
- Place a wooden rod under one edge of the glass to level the headlight housing support post.
Note
The work must be done carefully to prevent glue from getting into the body
- Leave the glued parts for one day.
- Faro stepped into place and connected all the parts.
After the work is completed, it is necessary to adjust the installed headlight. To do this, you need to contact a specialist car service. There, at a special stand, this procedure will be carried out professionally. The price of glass will largely depend on the manufacturer and quality. Since market prices have a wide range: from 100 rubles. up to 750 rubles. for one glass. Glasses are represented on the market by factories in Kirzhach, Avtopribor Plant LLC in Dimitrovgrad, BOSCH and others. Therefore, you need to weigh everything carefully, listen to the advice of sales consultants. After this, you can safely begin car self-service. When you do the work yourself to replace a headlight, you need to read the instructions, watch the video, study the photo carefully.
Injection engine
The VAZ 2111 engine is built, one might say, on the basis of the VAZ 21083 - the block and cylinder head remain the same. Only the parts of the connecting rod and piston group have undergone minor changes - on the VAZ 21083 engine the piston pin is pressed into the connecting rod head, on the VAZ 2111 it has a loose fit. The connecting rod, pin and piston assembly are interchangeable.
The engine power supply and ignition systems have radically changed - instead of a carburetor, a ramp with injectors is installed on the intake manifold, injecting fuel into the inlet channels of the cylinders. The fuel pump is electric, installed in the fuel tank. Changing the quality of the fuel mixture and ignition timing is carried out by an electronic control unit.
The change in the power system did not affect the rated engine power (70 hp), but improved its traction characteristics - the maximum torque on the injection VAZ 21099 is achieved at 2800 rpm, on the carburetor - at 3400 rpm.
For car enthusiasts, in terms of operation and maintenance of the injection VAZ 21099, the changes affected the identification of problems in the engine control system. The same work as changing the oil, timing belt or even a blown cylinder head gasket is carried out in the same way for both engines.
How to adjust the front seats
Before driving, adjust your seat position so that you feel comfortable behind the wheel. An uncomfortable seating position increases fatigue, which can negatively affect driving safety. The front seats are adjustable in the longitudinal direction (back and forth), by the angle of the backrest and the height of the headrests. The seat adjustment is considered correct when the straightened left leg rests with the entire foot on the floor under the clutch pedal, and the arms, slightly bent at the elbows, lie on the steering wheel wheel in the “10 minutes to 2 o’clock” position. Sit on the seat and check how comfortable it is to drive.
VAZ 2109 fuse diagram
Has the fuse blown again? Because you loaded your VAZ 2109 with a powerful light or installed a sub for which the wiring and fuse box were not designed? Then this fuse diagram will come in handy!
| № | Ampere | Purpose |
| 1 | 8 | Right fog lamp |
| 2 | 8 | Left fog lamp |
| 3 | 8 | Headlight cleaners (at the moment of switching on) Headlight cleaner switching relay (contacts) Headlight washer switching valve |
| 4 | 16 | Headlight wiper motor Headlight wiper relay (winding) Heater motor Window washer motor Rear window wiper motor Rear window washer timing relay Windshield and rear window washer activation valve Cooling system electric fan relay relay coil Coil of the rear window heating relay coil Rear window heating control lamp Wardrobe lighting lamp box |
| 5 | 8 | Turn indicators in turn signal mode and the corresponding indicator lamp Rear lights (reversing lamps) Indicator lamp for fuel reserve, oil pressure, parking brake, brake fluid level, carburetor choke Voltmeter and indicator lamp for charging the battery Gearmotor and windshield wiper switch relay Generator excitation winding (at start-up) “STOP” indicator lamp Coolant temperature and fuel level indicators |
| 6 | 8 | Rear lights (brake lights) Body interior light Power windows and power window relay |
| 7 | 8 | License plate lights Engine compartment lamp Indicator lamp for turning on side lighting Instrument lighting lamp and cigarette lighter lamp Heater lever illumination panel |
| 8 | 16 | Engine cooling fan electric motor and its activation relay (contacts) Sound signal and its activation relay |
| 9 | 8 | Left headlight (side light) Left rear light (side light) |
| 10 | 8 | Right headlight (side light) Right rear light (side light) |
| 11 | 8 | Direction indicators and hazard warning relay (in hazard mode) Hazard warning lamp |
| 12 | 16 | Heated rear window element and heating relay Cigarette lighter Socket for portable lamp |
| 13 | 8 | Right headlight (high beam) |
| 14 | 8 | Left headlight (high beam) High beam indicator lamp |
| 15 | 8 | Left headlight (low beam) |
| 16 | 8 | Right headlight (low beam) |
| Relay | ||
| K1 | Rear window washer time relay (451.3747 / 2108-3747110, 2108-3747110-06) | |
| K2 | Relay-breaker for direction indicators and hazard warning lights (493.3747 / 2108-3747010-02) | |
| K3 | Windshield wiper relay breaker (522.3747 / 2108-3747710) | |
| K4 | Contact jumpers in place of the lamp integrity monitoring relay. Lamp integrity monitoring relay (4402.3747 / 21083-3747410, 21083-3747410-06) | |
| K5 | Headlight high beam relay (113.3747 / 2105-3747210-10, 2105-3747210-12) | |
| K6 | Headlight cleaner relay (112.3747 / 2105-3747210, 2105-3747210-02) | |
| K7 | Power window relay (13.3747 / 2105-3747210-10, 2105-3747210-12) | |
| K8 | Relay for turning on sound signals (13.3747 / 2105-3747210-10, 2105-3747210-12) | |
| K9 | Relay for turning on the electric cooling fan (13.3747 / 2105-3747210-10, 2105-3747210-12) | |
| K10 | Relay for turning on the heated rear window (13.3747 / 2105-3747210-10, 2105-3747210-12) | |
| K11 | Relay for low beam headlights (13.3747 / 2105-3747210-10, 2105-3747210-12) |
Classification of car headlights
In order to properly navigate the many alternative optics options for passenger cars, in particular VAZ, we will consider the most common light sources.
- An incandescent lamp is a tungsten filament placed in a sealed bulb made of durable glass. When heated, the metal filament emits tungsten from the surface and emits a beam of light. The disadvantage of such a light source is its short service life compared to other automotive optics. Over time, tungsten wears out and the lamp burns out. In addition, due to constant evaporation, the optics darken over time.
- A halogen lamp differs from an incandescent lamp in that inside the bulb with a metal filament is halogen gas (most often I or Br). Thanks to the gas, the heating temperature of the filament increases, and the lighting capabilities of the headlamp are improved. In addition, a halogen lamp lasts many times longer than an incandescent lamp (up to 1000 hours).
- A gas discharge lamp allows you to create a much more powerful design. Such lamps are also called “High intensity discharge” or HID. Illumination occurs due to the heating of gas under high pressure. HID lamps use xenon due to its maximum light output. The disadvantage of such a lamp is its high cost, because To operate such a device you need special equipment.
- Light-emitting diodes or LED are the most efficient, long-lasting and bright lamp. An LED is a semiconductor device that converts electrical current into light. In recent years, diode lamps have become more popular than others due to their relatively low cost, bright light and huge service life - more than 3 thousand hours.
The most common halogen headlights are gradually making way for LED ones. LED headlights have not yet become widely used, but their use reduces maintenance costs, their service life is much longer than others, and their energy consumption is the lowest. However, xenon headlights are still considered the most prestigious. Let's compare them.
Connection diagram
Before we talk about typical malfunctions of the VAZ 2110 rear light, let’s look at the electrical diagram for connecting it to the on-board network.
Electrical circuit for powering external lighting devices of the VAZ 2110
We are interested in the following positions:
- 2 – mounting block;
- 3 – external lighting switch;
- 4 – ignition switch;
- 6 – rear marker lamps;
- 7 – brake light lamps;
- 10 – reverse signal switch;
- 11 – brake light switch;
- 13 – reverse indicators.
The scheme is quite simple and does not require any special explanation. The side light is controlled by the external lighting switch 3. The reversing lamps are activated by limit switch 10 located on the gearbox. The brake signal turns on limit switch 11 - it is located in the cabin above the brake pedal and is activated when you press it. The side light turns on, bypassing the ignition switch, the brake and reverse signal - through it, and they can only be activated when the ignition is on.
Connection diagram for turn signals VAZ 2110
Here we need the following positions:
- 2 – mounting block;
- 3 – ignition switch;
- 4 – alarm switch;
- 6 – direction indicator lamps in the rear lights;
- 7 – direction indicator switch;
- K3 – relay-interrupter of direction indicators.
Comparison of xenon and diode headlights
The design of an LED headlight is much simpler than that of a xenon headlight, so low cost is added to the other advantages. Xenon lamps are a privilege of business-class cars, and despite their high light emission characteristics, their maintenance is very expensive. Just look at the cost of a separate ignition unit and control unit! In addition, when xenon headlights are on, they consume a huge amount of energy - when turned on at full power, they can drain the battery in just a few hours.
LED headlights have record low energy consumption. In addition, they are easy to install, lightweight and take up little space. A VAZ-2109 with diode headlights may not require maintenance for 10-15 years. In addition to all the advantages described above, LED headlights operate much faster than others. Considering all the positive qualities of LED lamps, in the future they are predicted to completely replace xenon and, especially, halogen headlights.
Original diagrams of VAZ 2109 modification VAZ -21093
Here are high-quality electrical circuits of additional equipment installed on modifications of the VAZ-2109 car, model VAZ-21093
Electrical diagram for connecting the front fog lights on a VAZ 21093
| Position number on the diagram | Explanation of position |
| 1 | front fog light |
| 2 | front fog lamp connection connector |
| 3 | relay and fuse box |
| 4 | ignition switch |
| 5 | size switch |
| 6 | Checking the connection of the front fog lights |
| 7 | front fog light switch with light bulb |
| A | to terminal “30” of the generator |
| B | to the instrument panel light switch |
Connection diagram for front door windows on VAZ-21093
| Position number on the diagram | Explanation of position |
| 1 | relay and fuse box |
| 2 | ignition stick |
| 3 | ignition switch |
| 4 | right door electric window motor |
| 5 | left door electric window motor |
| 6 | right door power window connector |
| 7 | left door power window switch |
| K7 | power window power relay |
| A | to contact “30” of the generator |
| B | to the terminal block, a bundle of wires connected to the lighting panel of the stove levers |
| IN | to the stove lever lighting display |
| G | conventional numbering of terminals in the gear motor block |
Diagram of the VAZ 21093 door lock system
| Position number on the diagram | Explanation of position |
| 1 | relay and fuse box |
| 2 | ECU |
| 3 | electric motor for locking the right front door lock |
| 4 | Right rear door locking gearmotor |
| 5 | electric motor with gearbox for locking the left rear door lock |
| 6 | electric motor with gearbox for locking the left front door |
| A | to contact “30” of the generator |
| B | order of allowed terminal numbering in the ECU block |
| IN | method of relative numbering of contacts in blocks of electric motors with gearboxes |
Contact diagram in the terminal connector of the trip computer
| Addresses of output plugs of the trip computer VAZ 2109 modification VAZ 21093 | ||
| Plug number | Connected wire color | Plug address |
| 1 | green | Gasoline consumption meter output |
| 2 | orange | Fuse “5” (to contact “87” of the ignition switch) |
| 3 | red with blue | Fuse “12” (to “+” battery |
| 4 | black | to minus |
| 5 | white | "+" speed meter |
| 6 | blue | "-" gasoline consumption sensor |
| 7 | pink | “+” of the gasoline consumption meter |
| 8 | brown | Fuse “7” (to the headlight switch) |
| 9 | grey | "-" speed meter |