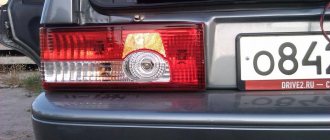
On the Samara-2 car, one of the stop signal locations is the VAZ-2114 spoiler. This signal became relevant a few years ago; such cars gave drivers the opportunity to feel like the owner of a new updated “swallow”. The most interesting thing is that the spoiler really decorates the design of a classic car, giving it novelty and uniqueness. The brake light on the spoiler is more visible.
Almost every driver can install a spoiler on his own if he understands his car. By following clear instructions, you can customize not only the spoiler, but also any other part of the VAZ-2114 car in the desired way.
What kind of lamps are in the rear lights of the VAZ 2114
The five-door hatchback VAZ-2114 (LADA Samara) is a restyled model of the VAZ 2109, and therefore the rear lights and lamps in them are practically no different from each other. In both modifications of the VAZ, only two types of light bulbs are used in the rear lights - P21W (A12-21-3) and T5W (A12-5). The first has a power of 21, the second 5 W.
P21W and T5W lamps used in the rear lights of the VAZ 2114
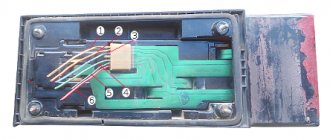
P21W bulbs signal the turn signals, brake lights, reverse lights and rear fog lights. T5W lamps are in size. You will see the location of these lighting devices and their purpose in the photo.
Location of lamps in the rear light of a VAZ 2114 (in the photo is the left light board)
The numbers in the photo indicate:
- stop signal;
- reverse indicator;
- fog light;
- side light;
- turn indicator.
The principle of operation of the brake light
The brake lights are located at the rear of the car. Red lanterns. They light up automatically if the driver brakes. When the driver takes his foot off the brake pedal, they are also automatically turned off. The presence of stops is mandatory for vehicles.
The lights should be located symmetrically and burn brighter than the side lights. Brake lights are installed on the sides, on the rear window, in the center above the line of the side stops.
Primary and secondary brake lights can be a single bulb, a neon tube, or a set of LED bulbs. The car enthusiast is additionally equipped with a brake light repeater. The rear brake light can also serve as a fog light. You can install a formula 1 brake light (the author of the video is Mikhail Ermolaev).
The simplest brake light includes a breaker (switch) and a flashlight. The brake light switch is often called the frog switch. The plastic body of the breaker contains two terminals, a rod and a spring. This device is installed on the brake pedal.
When the driver presses the pedal, the rod enters the breaker body, the contact closes and the light comes on. As soon as the driver removes his foot from the brake pedal, the spring pushes out the rod, the contacts open and the light goes out.
LED brake lights consist of a chip and a sensor, which in this case is a frog, it sends a signal when the driver presses the brake. As with the single lamp, the frog is mounted under the brake pedal.
Foot control device diagram
Any pedal has free play. Therefore, although the driver presses the pedal, the car does not brake immediately. The brake light comes on as soon as the brake pedal is pressed. Drivers of vehicles behind will become aware of braking before the vehicle begins to brake. This way they have time to prepare for braking.
Replacing light bulbs
Now let's replace the rear light bulbs. We lift the trunk and look for a valve in the upholstery located opposite this device.
On the trunk side the lamp is covered with a Velcro flap
We open the valve (it is on Velcro) and observe the back of the flashlight with the power supply connected to it.
Rear part of the lamp VAZ 2114
We pull out the block by pulling it towards the central axis of the machine.
Important! The mating part of the block is a metallization applied to a flexible circuit board. We remove the block carefully, since if the pulling is unsuccessful, the entire board will have to be replaced.
We release the latch located on the side of the lamp that is located closer to the center of the machine, and remove the board along with the lamps.
Removing the board with lamps
We unfold the board with the bulbs facing up and observe the picture shown in the photo in the first section of the article. All lamps are removed in the same way - by turning them counterclockwise. We find the burnt out lamp and replace it with a new one.
Replacing the reverse indicator lamp
Connection diagram
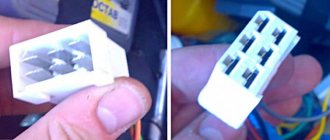
The rear lights on the VAZ 2114 are connected to the vehicle’s on-board network using connectors, the pinout of which is given below.
Pinout of the VAZ 2114 rear light block and wire colors
The numbers in the photo indicate:
- turn indicator – blue (right), blue-black.
- side light – yellow (right), yellow-black.
- The brake signal is red.
- fog light – red-black.
- The reverse indicator is green.
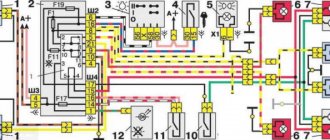
Both lights are connected to one harness, which runs along the rear of the body from the right light fixture to the left, then along the left side to the mounting block located in the engine compartment immediately behind the windshield opposite the driver. The complete wiring diagram of the electrical equipment of the VAZ 2114 (injector) will look like this:
Complete electrical diagram of VAZ 2114
In this scheme we occupy the marked positions:
- 20 — reversing light switch;
- 26 — mounting block of fuses and relays;
- 27 — brake signal switch;
- 29 — ignition switch (lock);
- 33 — rear fog light switch;
- 35 - combined switch for side lights and headlights;
- 36 — alarm switch;
- 58 — rear light;
- 60 - additional brake light.
Tips for motorists
Traffic rules prohibit the operation of a car with such a malfunction, and the driver is required to check the serviceability of lighting and alarm devices before leaving. It may be that problems appear while driving, but wherever this happens, the driver must navigate the situation and know what to do in this case. Sometimes the problems are very minor and can be easily fixed on your own.
Many experienced drivers carry a car tester with them; they are now available in small sizes, so they don’t take up much space. In a pinch, a simple test light may be useful. It is also advisable to have a printout of the fuses used and the circuits they protect.
Tail light repair
The most common reason for the failure of a VAZ 2114 rear light is the failure of a flexible printed circuit board or a connector made directly on it with conventional metallization. You can, of course, just buy a new printed circuit board and replace the faulty one with it, but, firstly, for how long?
And secondly, we are not looking for easy ways. So we will try to eliminate this malfunction on our own, at minimal cost and in such a way that it will last forever. Let's start with the connector for connecting the flashlight to the on-board network. It looks something like this:
The connector for connecting the rear light to the on-board network is part of a flexible circuit board and cannot be replaced separately
There are many reasons for this connector to fail. For example, we removed the power supply from the flashlight too often and simply partially erased the traces, which have a very small thickness of copper deposition on the plastic. Another reason is that the conductive paths next to the connector broke due to constant vibration. Well, the most banal thing is that the tracks burned out due to overload or short circuit.
Due to burnout of the conductive tracks of the flexible board, the rear fog lights do not light up
The photo shows a flashlight connector of a different modification, but the meaning of the problem is the same. All these issues can be solved with the help of a soldering iron, mounting wire and a regular six-pin (or more) connector with a mating part.
For repairs you will need this block with a mating part
We clean the connector contacts on the board using a student eraser (not sandpaper - the foil is very thin!) and service them.
You need to tin the tracks very quickly with a well-heated soldering iron. Otherwise, the tracks will simply fall off the substrate.
We solder the wires from the block onto the tracks, not forgetting to mark them, and fill the soldering area with sealant or a hot glue gun.
Mounting block soldered to the rear light board
We cut off the standard power harness block, and in its place we solder the mating part of the new one. We assemble the flashlight, connect it to the on-board network - and check it. If we haven't messed up the wiring of the pads, then everything will work right away with a bang.
What to do if the tracks are burned out or broken? You can get out of this situation as follows. Immediately after the fracture, we clean the protective varnish from the tracks, tin, and solder the block. It will look like this:
You can solder the header anywhere on the flexible board.
You can, of course, limit yourself to this (until next time), but if you spend a little more time and effort, you can make more serious repairs. Flashlights modified in this way will serve faithfully for many years. Such a repair will save you from the eternal problem of contacts of flimsy standard sockets - this is also a very common malfunction of VAZ 2114 headlights.
To implement this idea, in addition to the six-pin block with a mating part (see above), you will need five cartridges from the VAZ 2106 direction indicators and a dozen terminals for them.
You will need 5 such cartridges and 10 terminals for them
We remove the lamps, standard sockets and flexible printed circuit board from the panel. We place the purchased cartridges in the right places on the panel and mark their centers. Special precision is not required here, the main thing is that each lamp shines into its own “window”. We drill holes according to the diameter of the base parts of the cartridges.
Holes for future cartridges
We insert the cartridges into the holes, mark the mounting holes, drill them, and screw in the screws. Now the cartridges are firmly fixed in the panel.
We secure each cartridge with two self-tapping screws
Using a mounting wire with terminals pressed onto it (you can crimp it with ordinary pliers and solder it to be sure), we assemble a circuit that repeats the layout of a standard flexible printed circuit board. To be sure, the terminals can be insulated with heat-shrinkable tubing, but in principle this is not necessary - the panel on which the cartridges are mounted is plastic. We solder our block to the ends of the wires.
This block will connect the rear light to the on-board network
We solder the mating part of the block to the power supply harness of the lights, having first cut off the old one. We solder it, not twist it together. The twist will oxidize in a week, and problems will begin again - sometimes it burns, sometimes it doesn’t. We insulate the solder joint with heat shrink or cotton (black rag) tape. PVC electrical tape is an extremely bad option. It can unfold over time. This kind of isolation is no good.
Everything is ready, you can connect and check
We admire our work for a couple of minutes, insert the lamps, connect them, check them. Is everything working as expected? We assemble the lantern and connect it.
The lantern is in place, all problems are solved for a long time
LED analog P21W
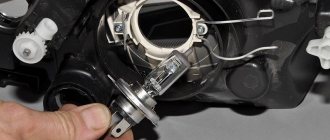
Tuning
First, let's try to insert Priora LED boards into our disassembled headlight. Such boards can be found on sale without reflectors; you can buy additional reflectors for each LED, or you can find a whole module with original reflectors at disassembly, so the matter is simplified. This board will be responsible for the dimensions and fog lights. Let's leave the turn signal as is.
Rear light board with LEDs and reflector from Lada Priora 2
Since we are not interested in the direction indicator, we will not remove the glass, but only the part of the body responsible for the side light. To do this, we will use a circular saw attachment and a piece of regular blade. If you don’t have a file, you can get by with just one blade.
First, using a saw, we cut off half of the body, responsible for the side light, from the glass.
Cutting the taillight housing from the glass
Now we arm ourselves with a hacksaw blade and cut the rear light housing in half.
Cutting the body with a hacksaw blade
We use a knife to undermine the places where the glass is attached to the body in the area of the reflector (see the section “How to disassemble them”). Remove half of the body.
The removed half of the rear light housing of a VAZ 2110
Again, we take the canvas in our hands and cut off that part of the body that previously covered the reflector (reflector). It will interfere with putting the case in place after installing the LED Prior board.
This piece of the body needs to be cut down
We clean all burrs with a file or sandpaper. Now the most important operation. The result will depend on the thoroughness of its implementation. It is necessary to remove all these diverging microlenses from the inside of the glass, making it completely transparent.
To do this, we will use grinding attachments on a drill. They are easy to buy at any relevant store. We carry out first rough, then fine grinding.
Removing diverging lenses from the inside of the glass
We polish and get absolutely transparent glass.
After polishing, the glass is completely transparent
We insert our board from Priora VAZ 2112 into the glass.
The board fits into the glass like a glove
We install the sawn half of the body in place, grab it in several places with a soldering iron (temporarily so that the structure does not fall apart). Fill the seam with sealant.
Reinstalling the rear light housing
When the sealant has dried, we admire the work done.
The result of our tuning
All that remains is to connect the board instead of the standard lamps. We remove the side and fog light bulbs from the board, leaving the turn signal lamp. We solder the wires from the LED board directly to the conductive busbars of the lamp board, focusing on the diagram included with the product.
You can power the LED insert directly from the standard board
We connect, install the rear light in place, and check.
More options
This, of course, is not the only tuning option. Instead of the Prior board, you can install almost any LED modules or even an LED strip of appropriate power.
You can put, for example, these modules in a flashlight:
You can secure them in the housing using the same sealant or even a heat gun. The result will not be as good, and if you polish the glass, the modules will be visible through it. But if you don’t grind the glass, then the tuning is quite good and, most importantly, much simpler than the previous option. The advantage of using such modules is that they have a built-in stabilizer (driver), which means they will last a very long time.
And here is the result of tuning the rear lights using a regular LED strip and a diode module installed instead of a reversing lamp.
Option for tuning the rear lights of the VAZ 2110
In the next option, the LED strip is glued directly to the glass using double-sided transparent tape, but, of course, you can also use transparent sealant. The result is not so great, but it is cheap, easy and cheerful.
Option for tuning the rear light with LED strip
And these lanterns look very original, although, you must admit, a little collective farm.
Diamond-shaped side lights
Tinting
The next tuning option is tinting. We will only tint the “stick”. To do this we need a tint film and a small rubber spatula. Such spatulas are used for body filler.
To tint you need a film and a spatula
What is the beauty of this tuning: you don’t need to tear the tail light to pieces or even dismantle it. We will tint the outside of the stick. We cut off a piece of film for the lamp located in the body.
Cut the required piece of film
Wash the taillight thoroughly and apply a mild soap solution to it or simply wet it. We apply the film and, gradually removing the protective layer, carefully smooth it out first with our hands, and then with a spatula from the center to the edges, expelling water from under the film. To better adhere the film to the glass, you can use a hairdryer.
Applying tint film
We take a mounting knife and cut off the excess film, leaving it only on the “stick”.
Trimming excess film
We remove the cut film and go over the glued one again with a spatula, paying special attention to the cut edges. We repeat the operation on the flashlight, which is located in the trunk.
Pasting the film on the additional rear light
This is the result of our work. It looks much more solid and presentable than the original one.
Tinted “stick” of the rear light of the VAZ 2110
So we got acquainted with the rear light of the VAZ 2110 car and all the tricks associated with it. Now it won’t be difficult for us to replace the light bulbs in it, dismantle it and even disassemble it for tuning.
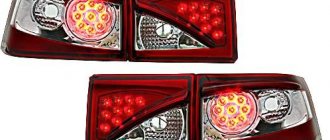
What and how can you change the standard lights?
The easiest way is to change the appearance of your car - replacing the light fixtures with more original ones. The range of flashlights for the VAZ 2114, of course, is not particularly wide, but there is plenty to choose from. And the simple way is because all tuning comes down to “removing the standard ones, installing the purchased ones.” Let's wander around the shops and see what we can find for our VAZ 2114.
Osvar flashlights are the most popular option among car enthusiasts. They are relatively inexpensive and finding them is not a problem. The only thing is that the manufacturer uses ordinary light bulbs in it, but if desired, you can replace them with LED ones yourself. Although for most car owners this is not relevant.
Tail light “Osvar” on VAZ 2114
Skyline style . Also a “lamp” option, but it looks completely different.
Tail light Skyline style for VAZ 2114
ProSport RS-02020 . This is already an LED option. True, the light bulbs responsible for the different signals in them are clearly not in their places, which may not please other road users, and the traffic police inspector will definitely not understand you.
Tail light ProSport RS-02020
ProSport RS-02020-T . The same “ProSport” with mixed up signals, but with tinted windows. A real gift to the traffic police!
Tail light ProSport RS-02020 with tinted glass
ProSport RS-07490 . Option with light bulbs. Same manufacturer, same misunderstanding - the turn signal is located between the marker and the brake light. You can't make it up on purpose.
Tail light ProSport RS-07490
"Zigzag" 0013L . This LED miracle is offered by manufacturers from Togliatti, the birthplace of the VAZ car. Here at least the signals are more or less in place.
Tail light "Zigzag" 0013L
We'll finish our shopping trip here, although there are still many miracles there. Just watch a short video about a flashlight with red turn signals and move on to the next point.
How to remove tail lights
It's time to figure out how to remove the stock lights to install new ones. To work, you will need an 8 socket wrench with an extension and a Phillips screwdriver. We open the trunk door, use a Phillips screwdriver to dismantle part of the upholstery so that, by bending it, you can gain access to the entire rear part of the lamp.
The upholstery is attached to the body using self-tapping screws
We find 4 nuts around the perimeter of the light fixture and unscrew them with a wrench
The lamp is secured with four nuts
Carefully remove the connector by pulling it towards the central axle of the car. We don’t swing it, we just pull it, trying not to twist it!
Removing the power supply
Pull the light from the outside of the car toward you and remove it.
Now the lamp can be removed
We install the new light fixture in the reverse order.