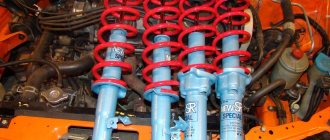
About gas struts in the trunk of Priora hatchback and station wagon
| The trunk pillars of a Priora hatchback or station wagon begin to fail to cope with their responsibilities in cold weather; they cannot lift and do not hold the rear door lid. A similar problem may appear after soundproofing the trunk lid. To solve the problem, we suggest you replace the Priora trunk shock absorbers with more powerful ones. |
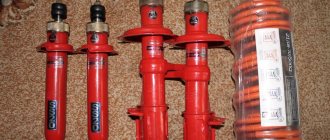
Standard gas struts for the Priora trunk:
- hatchback SAAZ 21720-8231015
- station wagon SAAZ 1119-8231010
The force with which the gas struts open the trunk lid is determined by the “Force on the rod” parameter, and for standard Priora trunk shock absorbers it has a value of 340N. If the trunk has been soundproofed, then stronger gas struts will be needed to lift and hold the heavier trunk lid.
VAZ tailgate shock absorbers:
| VAZ model | Rod force, N |
| 2121 | 260 |
| 2108 | 340 |
| 1119 | 340 |
| 2111 | 430 |
| 2112 | 460 |
So, if the trunk on a Priora does not open, then it makes sense to install gas stops 2111-8231010 for the VAZ 2171 and 2112-8231010 for the VAZ 2172, because they have the greatest force on the rod. Trunk shock absorbers from Kraft and Finwhale are also praised, but in order not to make a mistake, before purchasing, check what force they have on the rod.
How to choose stops for the hood and trunk
It is not necessary to buy original spare parts. Car manufacturers do not manufacture gas springs themselves; they have more important things to do.
All they do in the spare parts market is package the goods purchased from a specialized company under their own brand and charge the price twice or more. Therefore, it is wiser to find out from catalogs cross-numbers of non-original parts from a well-known company and save a lot.
Restoring struts: collapsible and non-dismountable shock absorber
A simple automobile shock absorber has the following design:
- lug body;
- rod with casing and mounting eye;
- piston, compression and return valves, rings;
- cylinder with valves;
- seals and fastening nuts.
First of all, the main problem of the shock absorber is leakage of oil or boost gas. As a result, the rack leaks, a knocking sound is heard during operation, and deformation of the rod is also possible. Violations of tightness and defects lead to changes in characteristics (partial or complete loss of performance). As a result, the car handles and brakes poorly, rolls, and does not hold the road, since the struts do not dampen the vibrations and sway of the body.
The main malfunctions include: free movement of the rod in the pipe, play during compression or rebound (workout in the rod or cylinder), damage to the shock absorber valves. It is also impossible to exclude external damage (case cracks, dents, etc.).
To repair, you need to remove the strut, remove the spring and release the shock absorber. Next, you should understand whether the shock absorber on the car is collapsible or non-dismountable. If the body is solid, then such a rack cannot be repaired. It is officially prohibited to open the body and try to weld the shock absorber after repair. If there is a nut or retaining ring in the place where the rod enters the pipe, this stand allows for repairs or maintenance.
To repair a gas and gas-oil collapsible shock absorber in a garage, you will need a compressor for supplying air (you can use a bicycle pump), a fitting for supplying compressed air, and a pressure gauge
Please note that you will have to work with high pressure, you should protect your eyes, hands, and face in advance
Repair of a collapsible type rack begins with the rack being clamped vertically in a vice, washed of dirt, and the entry point of the rod is also blown with air. Next, disassembly of the shock absorber begins and the protective cap of the rod is removed. Then you need to fill the shock absorber under pressure; for this you need a pressure gauge.
The shock absorber can be filled with nitrogen, carbon dioxide and compressed air. In the garage, it is optimal to use compressed air for repairs. First, the rack is disassembled, cleaned, the O-rings are checked, and the condition of the inner wall of the pipe is assessed.
If the shock absorber has damage to the rod, seals or valves inside the strut, you can buy a repair kit for dismountable shock absorbers, remove “live” parts from another strut, etc. The main task is to install all functional parts to obtain complete tightness, while cleanliness is extremely important during assembly (debris and shavings will quickly damage the restored rack).
By the way, it is always better to replace the oil seal with a new one, even if the existing one does not cause any complaints. Next, all that remains is to pump oil or air into the shock absorber, after which the strut needs to be pumped.
Shock absorber bleeding is required
Please note that shock absorber repairs must be done in pairs, just like replacements. In other words, repairing rear shock absorbers or repairing front struts involves manipulating both the right and left sides, that is, you need to restore both struts on the same axis
Now let's move on to how to disassemble a shock absorber and how to repair a non-dismountable shock absorber. Let us note once again that such parts are not officially repaired. However, repairs are possible, but they require skills and special equipment. In fact, usually non-separable shock absorbers are simply converted into collapsible struts.
If there is equipment, the repair comes down to the fact that it may be necessary to change the main part of the rack (cartridge), it may be necessary to replace the rod (sometimes to install a reinforced one), oil seals, seals, etc. In general, the process is reminiscent of repairing struts with your own hands in the case of collapsible shock absorbers.
In fact, it all comes down to replacing worn components, reassembling and pumping gas/oil. The main difference is that you need to remove the “cover”, which is not removable. There are many ways, from drilling holes to converting the rack from permanent to collapsible by installing a rod protection cap.
In any case, such repair of the shock absorber strut (if it is successful) allows you to restore performance, but it is difficult to guarantee the reliability and service life of the repaired strut. The main reason is that, in fact, it is necessary to make changes to the design, since the restoration of non-separable type shock absorbers involves disassembling and subsequent reassembly of the body, which initially does not provide such a possibility.
Issues of operation, maintenance and repair of the shock absorber
Modern trunk lid shock absorbers are very reliable and durable, designed to last thousands of cycles under the most severe conditions. However, to extend their service life, you should follow a few simple recommendations. For example, in the winter season you should open the trunk without jerking, preferably by helping the lid to lift up. Also, do not jerk the trunk lid to the top point, as this leads to an excessive increase in pressure in the gas spring and to its wear. Finally, shock absorbers should not be subjected to impacts, it is not recommended to disassemble them (since there is high pressure gas inside), etc.
The trunk lid shock absorbers do not require special maintenance or repair. When the service life is exhausted or in the event of a malfunction, this device is replaced with a new one.
When purchasing new shock absorbers, you should choose those models recommended by the car manufacturer. Of course, replacements are possible, but you should not replace shock absorbers with dynamic damping with shock absorbers with hydraulic damping. In this case, the load on the trunk lid and body parts will change, and installation problems may arise.
It is better to replace shock absorbers in pairs. When replacing, you should follow the method of installing the shock absorber - with the rod down or with the rod up, depending on its type (as mentioned above). The procedure for removing and installing gas springs is indicated in the maintenance and repair instructions for this particular car; this work usually does not require special qualifications (but it is better to entrust it to specialists if the car is under warranty).
Purpose and types of shock absorbers
A shock absorber is a device designed to dampen vibrations and shocks falling on the lower part of the car, which are then transmitted to the steering wheel and into the passenger compartment. A shock absorber or, as it is also called, a strut prevents this process, softens the harshness of driving, making it more comfortable and stable.
In addition, the part in question gives the car maneuverability and reliability. If good struts are installed, they allow the car to easily take sharp turns and cope with any tests on the road perfectly. The following types of shock absorbers are known today:
In addition, racks are divided into:
- single-pipe;
- two-pipe;
- adjustable;
- unregulated.
Despite the fact that the rack designs are different, all types of parts have the same operating principle. When the piston located in the cylinder begins to move, it passes shock-absorbing fluid through the valves, which dampens vibrations that occur while the car is moving. The quality of extinguishing depends on the speed of liquid movement through the valves.
We independently remove the trunk lid on a VAZ 2115
Over time, any mechanism wears out. What should be done with the trunk lid of a VAZ 2115 if it no longer holds on? This problem may appear as early as six months after purchasing the car. The torsion bars start clicking when the trunk opens. And then the trunk lid of the VAZ 2115 simply does not hold. A good solution to the problem would be to replace the hinge. At the beginning, a new hinge and paint are purchased. It is necessary to degrease the surface and then paint. When replacing, it is recommended to remove the rear window. If the torsion bar bounces, it won't break it. Now the trunk lid will open easily.
Also, if the trunk lid does not hold, then you can remove the rear parcel shelf and see the shifted plates into which rods are installed that work to twist. They jump off a fixed place and do not create a twisting effect. Therefore, you need to carefully remove the rods from the fixations using a steel tube, return the plates to the desired position and tighten them securely. Using the power lever of the steel tube, return the rods to their original position.
To securely fix the cover you will need a classic brake spring. But this method is good for a short time - the spring quickly stretches. Therefore, you can install a shock absorber for the rear door of a VAZ 1117. In order to install it in the trunk of a VAZ 2115 you need: a shock absorber from Kalina, self-tapping screws, an iron strip that is tucked under the upholstery. When the trunk lid lifts up, it rises neatly and does not fly up, as it did before.
Spring in the trunk of a car - a cheap door closer for opening
Hi all. Not long ago I received another package that I was really looking forward to - a spring. True, the spring is not a simple one, but one that performs a specific function - regulating the degree of opening of the trunk in a car. The fact is that initially in my car the trunk lid did not open all the way. After pulling a lever or pressing a button on the key, the lid rose 10-15 centimeters, and then it had to be opened by hand... In harsh reality, it looked like this: Of course, it’s not difficult. And if your hands are not busy, then opening the lid is a matter of seconds. But if, for example, you return from the store with bags full of groceries, then everything becomes not so simple. You have to either put the bags on the ground or lift the lid while holding them in your hands. In any case, it's not very convenient. So something had to be done about it. Fortunately, the network is now full of resources dedicated to cars, and on one of them I spotted a solution to this problem - buying a spring that costs about $5.
The place of purchase was eBay, since it was there that the seller with the minimum price for this product was found. The parcel was sent with a full track, so all tracking information is available via this link.
The closer spring arrived in a regular plastic bag with a zipper. There was no information on the packaging, except for the sticker affixed by the store employees. Before moving on to the actual inspection of the spring, I will give you a description of the product from the seller’s page (Google translation):
Material: Metal. Size: Shortest 17.5cm, longest length about 24cm (flexible and adjustable). Color: As picture. If your car trunk has a remote control function, but will not lift the box, you can add this spring, then open the window will automatically lift to avoid unarmed to mention the cover trouble. With automatic design, you can adjust the height by yourself. Fixed on the car trunk, can prevent the trunk head damage. Flexible and adjustable.
Externally, the spring looks very nice: in the sun the polished metal shines and sparkles. The principle of its design is extremely simple, but at the same time very effective. The main force is transmitted by a conventional spring, which works to “tighten”. The length of this section is about 9.5 centimeters, if you do not take into account the “hook”.
This “mechanism” has a length adjustment, which is carried out by means of the second section of the spring - the adjusting pin.
The pin, equipped with a head with a ring, can be screwed in and out freely, which allows you to adjust not only the force, but also determine the location of its attachment, as well as the degree of opening of the lid. After the desired length has been selected, the stud is fixed in this position with a nut. Everything can be turned by hand without using a tool, so there should be no problems with adjusting the length.
The maximum “overhang” of the hairpin is 9 centimeters (11 centimeters around the ring).
I was “pleased” with the way of fastening the nut into which the pin is screwed, located inside the spring. It is held there by a gasket inserted between the turns. Despite the fact that the fixation method is not the most reliable, the washer does not pop out, and the coils do not unbend. This is due to the fact that the effort required here is not very large.
The total length of the spring with the pin is 23 centimeters. In principle, there is nothing else interesting in our “closer”, which means we can move on to checking its performance.
The most difficult thing here is to choose the right location and adjust the tension force. After this is done, you can tension the spring by hooking one side (I have this ring) on the drive/mount of the trunk lid, and the other (I have a hook) on the body. I installed the spring in the Camry trunk as follows:
All that's left to do is check how everything works. We pull the lever - everything opens, and not like before, and the lid rises completely :).
A short video of how the trunk lid opens now:
To sum up everything that has been written here, I can say that this spring copes well with the task assigned to it. Now the trunk lid opens completely and there is no need to help it with your hands. The advantages of this product include: firstly, the minimum cost; secondly, versatility (can be installed on any car). I found only one downside, and even that one is very conditional - the lid began to close a little harder than before. But over time, the spring will stretch a little, and you will get into the habit of pressing the lid harder. So I was very pleased with the purchase
That's probably all. Thank you for your attention and your time.
DIY rear door shock absorber repair
In the vastness of the forum, there are different ways to relieve pressure from the rack before disassembling, but there is not a single detailed one. Write down who does it and how, in detail, so to speak “competitively”, so that later you won’t be offended by the repair you just made, or worse, by a damaged eye.
A thin drill bit and a drill at low speed. True, I was dismantling a shriveled gas strut. Otherwise, the GP from the office chair was understood in the same way. Drill so that the future hole is located above the oil level. If you are afraid for your eyes, put a protective shield cut out of cardboard over the drill. However, I drilled without anything and there was nothing but zilch.
Why be wise? Drilled and pricked with a needle. If it didn’t puncture, I still drilled it. Drill 1-1.5 mm. I used to drill with a 0.25 drill bit, but it's difficult without breaking it. It drills where it is cut. And so, my grandfather sawed such a stand on the balcony, using a file in a circle. Then he told how someone fired a gun at him and showed off the bruise. It’s good that he at least said what he did, otherwise I might have believed it.
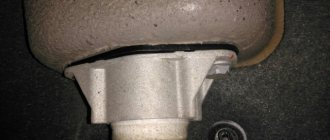
Where is the sealing ring located on the rod plug? I ask because it is necessary to maintain the maximum length of the pipe. Where should I drill? Here are two photos:
Honestly, I don't remember. I was drilling a stand that was already leaking, there was a little oil in it, a cube at most. You let it lie down in a horizontal position so that as much oil as possible drains off the top wall. Once the air is released, the oil will no longer flow, it will only ooze. Cover the pipe with rags if you are afraid of getting something dirty, but I don’t think they will be useful. I can’t tell you where to drill - I drilled in the middle, I was just curious what was inside
Yes, they drilled her hole and that’s it. There is no more than a couple of cubes of oil. Don't be afraid of it, while you're drilling it will all flow down. The hole definitely won't have it.
Judging by the photo, the stand is stretched, made of a round coin, like a 12 gram can. This means the walls are a little thicker, but not by much.
Drilled. It turned out “the devil is not so scary.” “The drill was really dull, I didn’t sharpen it, I drilled for about 3 minutes, and at the same time I was watching a movie on TV, when it “bumped” I didn’t even have time to get scared - I was distracted. By the way, the “zilch” is similar to what happens if you hold the fitting of a car pump with your finger, pump and release the fitting, that is, the sound is quite quiet and nothing is splashed with oil. If anyone is interested, after complete disassembly I will post a photo of the giblets, if not necessary, I will destroy the thread.
This shriveled stand (it was easily pressed in) was removed using a dirty but safe method - the rod in the place number “1” was ground off with sandpaper, then it was pressed against the floor with the rod and pressed. I naturally bleed it down the machined rod along with the oil =) well, this was all done in the garage using old rags. I disassembled the next one by FINISHING it with a hacksaw in the place numbered “2”. file the current at one point (and not in a circle.) or it’s even easier to drill with a thin 1mm drill. when it hisses, don’t get scared and don’t throw it away (if it’s in a vice, you can cover it with a rag and step aside. If you’re drilling on the floor, you can put the stand in a thicker pipe, leaving only the tip into which you’ll drill), otherwise it will turn over and splash oil =)
Be sure to use safety glasses.
At one time I drilled into a stud along its axis. A small spritz and a drop of oil. All!
Lada Priora Universal › Logbook › Repair of the gas stop fastening of the trunk lid
The recording will be of interest mainly to owners of a Prior station wagon. I encountered a problem related to replacing the gas stops of the trunk lid, because they don’t hold up at all in cold weather. I arrived at the store like this) I open the trunk lid and see a complex design, instead of the usual 13″ turnkey ends we have here we have a bracket, the ball pin in it is tightly rolled. I took off the stop along with it and went to the store, no, the other one, no. The third time they see it for the first time! although the marking on it is 1119... The difference from the Kalinovsky is that we have this fucking bracket at the end)
Well, after shopping around, I came home and started looking for a solution to the problem. At the prompting of one of the owners of the car, it was decided to remove these very gas stops from the pin) according to him, this will not be difficult for me) Then a donor car turned up for me) with a stock trunk lid, which shot up with a bang, but without these moronic brackets )
I successfully replaced the left side) It turned out that everything was not so difficult) The trunk lid was already confidently held in the open position. But this turned out to be not enough for me, and I began to remove the second stop. Having removed it, I dragged it into the garage, according to the proven scheme, I clamp the bracket in a vice and twist the stand to a bend, trying to remove it from the pin)
What should I do?) I felt a convulsive pounding of something inside me) Realizing that where the hell would I find such brackets, I almost cried and wandered home... “After all, one was enough for me”: I endlessly repeated to myself, why the hell are you second? useful to change?
The next day, having collected my thoughts, I came up with an idea to restore this mechanism. We urgently need a donor, a regular one, a telescopic one! Having written to the local community about searching for this travesty, within 5 minutes Andryukha responded duxact
. And now, I have a donor in my hands, for which I thank you very much Andryukha
We are sawing off the fuck off the remains of the rolled pin, the vice is no longer there, I broke it out of anger last night) when, in my opinion, because of them I broke this bracket) so I screwed it to the body of some kind of welding machine that was standing in my garage)
source
Reasons for replacing old shock absorbers
It is impossible not to notice that one of the racks is broken. Most often, the door stops locking when lifted, which causes inconvenience for the driver. If you do not replace it in time, you may be injured when using the roof rack. Typically breakdowns occur for the following reasons:
- Inaccurate operation.
- Temperature changes combined with moisture entering the mechanism.
- Natural wear and tear.
Trunk shock absorber
If the shock absorber is working properly, when lifted, the cover moves up on its own to its original position. The door should not rise any further, even if you push it. Faulty stands usually do not hold the lid at all. Also, a broken door may not lift all the way or move beyond its original position when lightly pressed by hand.
How does a trunk gas shock absorber work and why does it fail?
The principle of operation of the trunk lid stop in a car is similar to any other gas shock absorber. In its sealed cavity there are two chambers, separated by a partition with a small hole, filled with compressed gas. It is this that prevents the rapid movement of the rod inside a confined space, slowly passing through the hole.
Gas shock absorbers are quite durable, reliable and less demanding on operating conditions than previously used oil shock absorbers, but even they can fail sooner or later. In the case of trunk stops, this occurs mainly when the seal is destroyed with a subsequent decrease in gas pressure. External damage in the form of deformation of the rod or body is much less common - this usually only occurs as a result of an accident.
Tips for long-term use of shock absorbers
Sometimes motorists complain about squeaks when opening the lid . To avoid such problems, you can try lubricating the stops and hinges. But in most cases the reason is the low quality of components or their obsolescence. At low temperatures, the viscosity of the working substance increases. Therefore, in winter, when operating in northern regions, you need to open the trunk with a smooth movement.
Often, after replacing one shock absorber, you have to apply more force when closing the door. Therefore, some drivers decide that one stand is enough. In fact, the load will be distributed unevenly, and the mechanism will begin to wear out faster. To avoid having to replace it again soon, it is better to immediately install two shock absorbers .
If the shock absorber no longer holds the door, it is not necessary to throw it away. You can make simple repairs to temporarily postpone the purchase of a new part for a while. Before you begin restoration work, you need to prepare tools - a cordless drill and a metal drill.
When carrying out a simple repair, you will first need to pull the piston out and drill a hole in the housing. In this case, it is important to get into the area located in front of the piston. Then you need to wait until the air comes out from inside. The oil is also drained through the hole.
The drilled hole will allow you to determine the position of the piston. You need to drill a second hole, which will be located exactly under the piston. It is made end-to-end.
A nail on a string is tied to the stop with electrical tape. After lifting the trunk, a nail is inserted into the hole, so the lid is fixed. To lower it, the nail is removed.
Inserted nail in repaired stop
Do-it-yourself repairs should only be done as a last resort and, if possible, new components should be supplied as quickly as possible. No maintenance is required after installation. In order for gas struts to last as long as possible, it is important to check that the trunk lock is closed before traveling. Otherwise, the cover may open along the way, resulting in damage to the glass and the stops breaking out.
Removing the wiper and tuning the doors
External tuning of a VAZ also involves getting rid of some parts. If you plan to completely redesign the body, you must first remove the bumpers. It is advisable to purchase new ones that will be better than the old ones both in the quality of the material and in appearance.
When improving the body, you can also pay attention to the interior of the cabin. Many people prefer to sew noise-insulating material into the inner door trim, which ensures relative silence in the car while driving.
As for the appearance of the doors, more attention should be paid to the handles. Ideally, the old handles are removed and replaced with new ones, which are used in expensive sports cars. But if you don’t have the funds for this, you can simply remove the old handles, putty them and paint them in some unusual color. This will significantly change the appearance of the car, even if the hood and main body color remain the same.
https://youtube.com/watch?v=cy9zmm3kiEw
So, on the VAZ-2112 you can partially do the tuning yourself, but otherwise trust the specialists. It is best to improve a new car, since it will be possible to initially improve the existing characteristics and thereby extend the life of the car.
The trunk lid and its weaknesses
Among people living in Russia, there is an opinion that our auto industry creates, to put it mildly, not very high-quality cars. Perhaps this point of view is too biased, but it is an indisputable fact that owners of domestic cars sooner or later have to spend personal funds on car service. You can go into lengthy discussions about how it was before and how it is now, but many VAZ-2115 owners have already encountered a similar problem.
Sometimes a car brings a surprise not in the form of a breakdown of the chassis, transmission or engine, but in the form of a petty and nasty thing called a malfunction of the trunk torsion bars. For those who don't know, a little explanation. Torsion bars are shafts made of elastic material (or metal) that perform the same functions as shock absorbers or springs. The trunk lid in the “tag” is entrusted to be controlled by these devices.
During their service life, torsion bars tend to “loose their grip,” which is why while driving you can hear extraneous sounds and knocking coming from the depths of the trunk of the VAZ-2115. This is especially noticeable when driving over bumps.
Due to insufficient traction, there is an additional load on the lock, and if you do not pay attention to the diagnosis of “little things” in time, you can see in the rearview mirror while driving how the luggage compartment lid copies the movements of a bird’s wing, taking off merrily when the car hits an uneven surface
How to replace a trunk shock absorber on a domestic car
When removing shock absorbers from a car of a Russian automaker, in addition to a screwdriver, a wrench with a diameter of 13 mm is used. The following describes the procedure for Lada Samara cars:
On each side, the trunk lid stops are held in place by two ball-head bolts. These bolts need to be unscrewed.
The bolts at the bottom of the mount are also unscrewed.
Then the new shock absorbers are screwed in exactly the same way. Those with a hydraulic mechanism are screwed with the rod down. If the machine did not previously have stops, you will have to drill holes for the bolts. There will be a gap at the bottom at the connection point. Therefore, it is advisable to install a washer that will press the bolt.
Videos with step-by-step instructions:
Which trunk shock absorber to choose and what to look for when purchasing
It is advisable to first remove the part and go to the store with it. Another option is to measure the length and height in advance; you can even make a pattern on paper. Before purchasing, you should study the instructions for the car; important parameters are indicated there:
- The buoyant force or force is expressed in Newtons. The heavier the lid, the greater the buoyancy force must be. This is especially important to remember when tuning.
- Length in mm - indicated in the free and compressed state. If you buy stops that are too long or too short, the lid will no longer close.
- Diameter of piston, rod and reservoir
- Piston stroke in mm
- Charging pressure
- Operating temperature in winter - if a person lives in the northern region, the shock absorber should work normally at sub-zero temperatures.
- Vehicle characteristics, mounting location.
There are many trunk shock absorbers, and they are different
Depending on the method of suppressing vibrations, shock absorbers are divided into hydraulic and dynamic. Hydraulic models slow down the movement of the lid sharply. Dynamic ones work smoothly.
Many motorists ask on forums whether it is worth replacing old oil stops with more reliable gas ones . It is important to consider that they will be more expensive, but their advantage is stable operation even at subzero temperatures. Value for money and acceptable quality - gas-oil models. Their difference from gas ones is only that in cold weather they are more susceptible to breakdowns, but they are more reliable than conventional oil ones.
Gas shock absorber for VAZ 2121 “Niva”
Sometimes there is no model of stops on sale with the ejection force of the original ones. Instead of 450 N, you can take 470 or 430 Newton. On domestic cars, it is not advisable to install shock absorbers with plastic fasteners and bolts that are held in place by clamps. When opening a heavy trunk of a Volga or Niva, the struts may break out. You need to choose parts with metal hinges that will be securely fixed.
Both pushers need to be replaced at once , although it may seem that even when installing one new one, the cover holds quite well. In fact, soon the problem will arise again, and the second shock absorber will have to be replaced. Therefore, it makes no sense to save, especially since the cost of the part is usually about 200-400 rubles. If you wish, you can install stops for VAZ on foreign cars or purchase imported shock absorbers for domestic cars. Such replacement does not affect the service life of components. However, many note that stops for foreign cars are superior in quality. It is important to remember that the price of imported spare parts is always several times higher.
Preparatory activities
To repair the bottom with your own hands, you first need to prepare in a certain way. You will need a set of tools, premises, a lot of time, experience and desire to do such things.
Of the tools, it is especially important to prepare the following components:
- Welding machine. In the case of repairing the underbody of a car, it is better to use a semi-automatic machine with wire and carbon dioxide. It is better, more efficient and more reliable than gas and electrodes;
- Angle grinder. It will be useful, if necessary, to remove rust from the floor, to adjust elements and patches, to clean seams and surfaces;
- Car stands. Here you can use various items. So look for what you have;
- The rest of the kit is standard and includes such components as anti-corrosion solution, mastic for seams, welding wire, sandpaper, primer, soundproofing sheets, paint, etc.
Now you need to drive the car into the garage or other equipment room and put it on stands.
The machine should be positioned in such a way that it is comfortable and safe to work under it.
Disconnect the battery, then remove the doors. In this case, experts advise providing spacers for doorways in order to maintain body rigidity and the necessary geometry.
Dismantling the interior
Since you need to repair the underbody not only under the car, but also from the inside, you will have to completely disassemble the interior. This is a difficult task that will take a lot of time. Be psychologically prepared for this. You will have to dismantle:
- Armchairs;
- Floor tunnel lining;
- Carpeting;
- Air ducts;
- Soundproofing layer.
Carefully collect all the wiring, combine it into bundles if they are not collected, so that later there will be no problems with assembly. Collect all the fasteners, distribute them into boxes or bags, label them
This is extremely important because you may end up with serious problems later.
If you plan to completely replace the bottom or weld a panel to the floor, then the dashboard and beard will have to be removed to create open access to the engine shield.
Lifting a car
Welding
So, you have disassembled your VAZ 2110, so now you can really assess the condition of the bottom, as well as analyze the required amount of work. The most optimal situation is one that does not require replacement of elements. The rust spots are cleaned until high-quality metal is obtained, after which they are strengthened by patches. But not everyone manages to face such a situation.
If the holes in the bottom turn out to be through, this will lead to a loss of body rigidity, therefore it is strongly recommended to replace the element completely. In the case of the VAZ 2110, the following body elements are distinguished:
- Floor panels;
- Support platforms;
- Threshold extensions;
- Spar extensions;
- Crossbar;
- Connectors.
Now let's discuss a few basic nuances of welding.
To replace a part that has “slipped” due to corrosion, it must be drilled out at the welded points or simply cut off using a grinder. Do not forget that the brake and fuel system pipelines pass under the bottom. It is extremely difficult to dismantle them, so the easiest way is to cut them off and install new pipeline elements during reassembly. If the floor panels are in critical condition, the entire bottom assembly should be replaced. But in this case, be sure to dismantle the exhaust system. If it is necessary to change the thresholds, they are dismantled and new ones are installed one by one
It is important to control the geometry. If the floor and thresholds are being replaced at the same time, the thresholds are replaced first, and only then the floor panels. Carefully mark the elements for welding. The old components must strictly correspond to the new ones being cut out. You cannot do without an assistant, so agree in advance with someone who can help you. Always start the bottom from the bottom, then grab it. Do not do basic welding with a continuous seam
Maintain a step of approximately 4-5 centimeters.
When welding work is completed, be sure to carry out anti-corrosion treatment.
Adjusting the gaps between the hood and wings of the VAZ 2114
Open and place the hood on the stop. Loosen the bolts securing it to the hinges. There are two of them on each side. After this, we cover the hood and install it so that the gaps between the wings and the hood are equal on both the right and left sides. Now carefully lift the hood and thoroughly tighten the fastening bolts.
The height of the buffers can be adjusted by turning them in or out. Having completed all these operations, you need to make sure that the hood now opens easily and closes securely with the lock. If the closure does not close securely or there are other problems with closing, the hood latch must be adjusted.
Replacing torsion bars on a VAZ 2115
You can simply replace the torsion bars with your own hands, without having to drill holes in the body or buy a gas stop. Standard tools such as a wrench and a screwdriver are required. Just two hours and you will have well-tightened trunk torsion bars, or new ones installed. You will need a protective board on the glass to remove the torsion bars. Any wooden board will do for this. Wooden blocks are also needed to secure the trunk in the upper position. Now you can safely replace the torsion bars. There's no need to remove the rear window or worry about the trunk lid falling off at the worst possible time.
The trunk lid of the VAZ-2115 causes a lot of disappointments for owners who have a good car. But over time, we learned to solve the problem, and we will try to outline all the features of this part of the car.
Recommendations for installing trunk supports
To ensure that the lid closes and opens smoothly in any weather, you can adjust the trunk and wrap the torsion bars with electrical tape. If the door begins to open too much and touches the roof, it is better to attach a gas strut travel limiter. It is easy to make from nylon rope.
Sometimes it happens that shock absorbers are sold without mounting bolts. In this case, the missing elements must be removed from the old stops. If the model is not designed for disassembly, you will have to cut the body of the old stop. To connect an old bolt to a new part, you must:
- Remove the spring from the ball pin.
- Insert the bolt inside until it stops. It is necessary that it catches on the retaining ring. A characteristic click should be heard.
- If the parts were able to be attached, install the spring in its old place.