The brake mechanisms (calipers) of the front wheels of VAZ 2108, 2109, 21099 vehicles operate under constant exposure to an external aggressive environment (salt, dirt, water, etc.). In this regard, it is recommended to inspect and service calipers and brake pads every 15 thousand km. Jamming or “souring” of the pistons in the caliper cylinders is most often the result of a lack of periodic monitoring of the condition of the brake mechanisms, damage to their protective boots, severe wear of the brake pads in which the pistons extend too far from the cylinders, thereby coming under external influence, the presence of water or foreign substances. impurities in brake fluid.
Reference: the pistons of the brake mechanisms of the front wheels of VAZ 2108, 2109, 21099 cars have a mirror coating, the same coating is found inside the cylinders. The cylinders are equipped with rubber rings that return the pistons to their original state after extension. On the outside, the pistons are protected by anthers (protective caps with retaining rings).
Damage to the mirror coating of the pistons (“souring”) leads to a loss of their mobility in the cylinders and, as a consequence, to incomplete release of the front wheels, since the pads are constantly pressed against the brake discs. In this case, accelerated wear of the pads, overheating and warping of the brake discs occurs, fuel consumption increases, the vehicle's controllability (pulls to the side) and its dynamics are impaired, vibration and beating appear when the brake pedal is pressed.
There are at least two ways to develop a soured piston:
— without removing the brake mechanism from the car;
- with the brake mechanism removed.
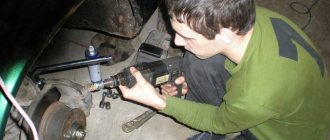
In the first case, it is necessary to jack up the car, remove the wheel, clean the outside of the caliper from dirt, disconnect and lift its floating bracket.
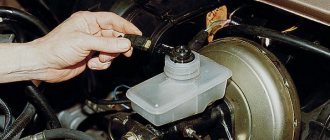
We remove the retaining ring and the cylinder boot, remove dirt from under it using a rag soaked in gasoline and a hard brush or toothbrush. Lightly press the brake pedal so that the piston moves out a little (a centimeter at most) from the cylinder. We clean it again, being careful not to damage the piston mirror and remove only dirt and deposits. You cannot clean the piston with sandpaper, as this can damage the mirror. A popular way to clean deposits is to use a rough wooden block, which will remove deposits and not damage the cylinder. Remove the cap from the brake fluid reservoir and, using an adjustable wrench or vice, push the piston back into the cylinder. We press the brake pedal, pushing out the piston, and press it down again. We carry out this procedure for developing his mobility 20-30 times. Then we apply graphite lubricant to the protruding part of the piston, install a new boot and retaining ring.
The advantage of this method is that there is no need to drain the brake fluid from the car’s brake system circuits and pump the brakes.
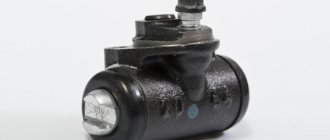
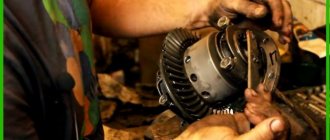
In the second case, we remove the brake cylinder and disassemble and develop it. This method is suitable for a major overhaul of calipers, since it is necessary to either drain the brake fluid or plug the brake pipe, which still risks losing a certain amount of fluid and requires bleeding the brakes after the work is completed.
The piston must be squeezed out of the cylinder either before removing it (by pressing the brake pedal), or with the piston already removed, pressurized air must be supplied into the hole under the brake pipe. Before extruding, remove the retaining ring and boot from the piston. We try not to scratch the removed piston. We clean it from dirt and oxidation using the method described above, if necessary, change the rubber sealing ring, rinse and blow through the cylinder. Before assembly, lubricate the inside of the brake cylinder with brake fluid, and lubricate the piston itself with graphite lubricant. We press it inside the cylinder (for example, using a vice), put a new boot and retaining ring on top.
A little history
The first to create such a model of brakes (disc type) was Frederick Lanchester (Great Britain). It was in its design that a caliper was used that pressed the pads. However, technology at that time did not allow the creation of reliable disc brake systems.
Disc brakes were revived in aviation, and in the 50s they began to be installed on cars - first on sports models, and then on production ones. The first car with serial front disc brakes was the Chrysler Crown Imperial (in 1949).
The importance of this component is difficult to overestimate, because the brake disc and pads are passive components, while the caliper plays an active role. Due to this, the pads are pressed. Therefore, the brake caliper is the most important component.
Installation details and purchasing spare parts
So, it's time to start installation. The first step is to unscrew the brackets, cylinders and guides. Typically, new discs have a large central hole (CO), and therefore, for correct operation and accurate centering, I would advise cutting a strip from a tin beer can, which must be inserted between the hub and the disc to eliminate play. After this operation, you can put on the disc and screw on a new bracket. Diagnostics of the car's brake system must be performed without fail.
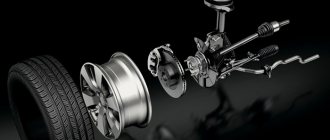
Front brake caliper - design types
The development of these mechanisms is reflected in their division into 2 categories, depending on the layout:
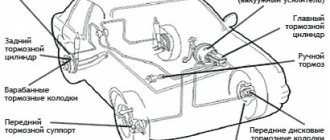
- Fixed design - it consists of a body made of metal, and there are working cylinders on both sides of the brake disc. Their arrangement is symmetrical. In this case, the body itself is fixed on the steering knuckle. At rest, the pads are held in place by special springs, and during braking they are compressed, causing them to be pressed against the surface of the disc. To ensure the operation of such a design, it is required that brake fluid be supplied simultaneously to all cylinders, which is achieved through a whole system of hoses, pipes and various tubes. Such brakes are highly efficient, making them ideal for cars with powerful engines and large weight - racing and executive models. World famous brands - Brembo and others - specialize in such calipers.
- A floating caliper is the fundamental difference between such a caliper and a fixed one in that one of the pads is in a constant position. Its design involves the presence of a bracket, as well as a cylinder, which is fixed on the inside. Typically, such calipers are single- or double-piston. The braking process is as follows - the piston presses the pad and presses it against the disc, and at the end of this phase, the bracket (floating type) begins to move towards the piston, sliding along the guides. Due to this, another pad is pressed against the surface of the disc.
This design is usually found on cars in budget segments, as it is cheaper to manufacture and simpler.
What does the price depend on?
In addition to the brand, the following product parameters are involved in determining the consumer price:
- Total area of the brake wheel cylinder.
- Fixed caliper dimensions with fixed mounting holes (standard caliper fits 13″ stamped wheel rim).
- Dimensions of the movable bracket.
- Material of guide pins for movable bracket.
- Locking plate material.
The caliper for VAZ 2109, 2110, 2114, 2115 has a single-piston design , therefore it is the cheapest in its class. Among the additional pricing factors it is worth noting:
- Availability of a brake hose (reinforced, regular).
- Implementation of a casing-channel for laying hoses.
- Availability of spare bolts securing the working cylinder to the movable bracket.
Working principle of brake caliper
The brake caliper performs its main task - it provides the necessary braking force required to slow down or stop the car.
Pressing the brake pedal causes pressure to build up in the brake line. It is transmitted to the caliper pistons, which at this time strictly parallel fixes the pads relative to the disc. When braking, the calipers compress the pads on both sides of the disc, causing it to slow down. But there is another effect. It involves heating, as friction energy is transformed into heat. This significantly heats up both the disc and the pads and calipers. The temperature of the brake fluid also increases.
Replacement
Replacing brake pads on a VAZ 2114 is quite simple; using the instructions below, this work can be carried out by anyone, even those far from cars.
First you need to prepare the tools that you will need to carry out the work.
Required tool:
- Jack;
- 13mm key;
- Powerful flat counter;
Instructions for replacing pads
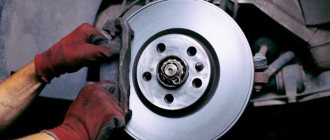
- We remove the front wheel from the side on which the replacement will be made;
- Press in the caliper piston using a screwdriver;
- Unscrew the bolt securing the guide pin;
- Raise the caliper bracket up and remove the old pads;
- We install new pads and reassemble in the reverse order;
Symptoms of a problem
There are several common signs of a failing brake caliper:
- increased force - this is what needs to be applied to completely stop the machine;
- the car pulls to the side during braking;
- the pedal becomes “soft” - pressing it requires a fairly weak force;
- brake pedal pulsation;
- slight resistance in moving the pedal to the floor;
- brake sticking;
- blocking the rear brakes with great force, etc.
Caliper repair methods
Caliper malfunctions can be different. However, we can highlight the most common cases, as well as recommendations for eliminating them.
Brake pads jam in caliper
This is noticeable when, with the caliper removed, the pads do not move freely. Usually the reason is rust on the stationary caliper pads, which prevents the pads from moving.
To eliminate the problem, you should arm yourself with sandpaper, a metal brush and a file (but only a small one). Then you need to clean off the corrosion from the metal, and then lubricate the surface with a high-temperature type lubricant. However, there should be no wear on the caliper - pits from corrosion. If they are present, cleaning will not help - the pad will not be pressed tightly enough or will not move away from the surface of the brake disc quickly enough.
Sometimes such a defect can be eliminated with a file (subject to insignificant wear), but usually you have to buy a new part of the caliper (fixed).
Something else useful for you:
Video: Passat front caliper rebuild
Corrosion on the caliper piston
It can be triggered either by a defective boot or a long downtime of the machine.
To eliminate the problem, it is recommended to remove and disassemble the caliper. Remove the rust-damaged piston from it and polish it with a special paste or fine rust. After this, thoroughly wash the piston seat with WD-40 and reassemble the caliper. Installing new cuffs won't hurt either. But the best option would be to buy a new piston or caliper assembly.
The caliper guides are jammed
It is necessary to achieve free movement along the guides. To do this, you will need to dismantle the pads, then reassemble the brake caliper and try to move it along the guides. If sliding is difficult, it is recommended to take measures - inspect the guide for bends or breaks, lubricate them, clean them, etc. It is necessary to achieve free movement.
Piston jams in caliper
To check, you need to release the bleeder fitting after the pads jam. In the event of a malfunction, jamming is not observed after that. And with the caliper removed, it is extremely difficult to press the piston back.
For prevention, you can periodically move the piston all the way inside the caliper using a screw, and then push it out with the pedal. But not entirely, so that it does not fall out.
The situation when the brake caliper jams is not just unpleasant, but dangerous for the driver and passengers in the car. The caliper is the most important element of the braking system of a modern car. Its job is to press the brake pads against the brake disc when the driver presses the brake pedal. The caliper is a complex mechanism, and its serviceability must be monitored. You should not only allow the caliper to jam, but also the appearance of squeaks and knocks in it.
How does a brake caliper work?
In ideal condition, the brake caliper should operate as follows:
- The driver inside the car presses the brake pedal;
- At this moment, pressure is built up inside the brake line and it is transmitted to the piston group of all calipers;
- The calipers, under the influence of pressure, bring the brake pads to the disc mounted directly on the rotating wheel;
- Due to the frictional force that arises, the rotation of the disk, and at the same time the wheel, slows down.
When to change pads
VAZ 2114 brake pads must be changed as they wear out. Most often, good brake pads can last about 30-40 thousand kilometers, but “Chinese” fakes may not even last 10 thousand kilometers.
You should also pay attention to the condition of the pads themselves; the wear of the rubbing part of the pad should not be less than 2mm. Some pads are equipped with a special indicator strip, which can be used to easily determine pad wear.
Why does the brake caliper squeak and jam?
A signal that there are problems with a car caliper is a squeaking sound. It may indicate that the caliper is worn out and needs to be replaced, or that a part needs diagnostic maintenance. The squeaking sound when calipers operate most often occurs for one of the following reasons:
The pads are not installed correctly. If the pads are not parallel to the brake discs (or are not in the right place, for example, due to an error during repair), this can lead to squeaking;
- Worn brake discs, which are also directly involved in the braking process;
- There is no lubricant or the lubricant selected is incorrect. Often, drivers (and private services) save on grease for calipers, which is absolutely not allowed. The fact is that it is necessary to select for the caliper not only a lubricant with the ability to cool and prevent friction. Also, the caliper lubricant must be resistant to external influences, especially in winter, when there is a lot of dirt and salt on the road.
The situation is critical when the brake caliper not only creaks, but jams during operation. In other words, the driver presses the brake pedal, and when it is released, the caliper does not remove the pads from the brake discs, which leads to uncontrolled braking of the car, excessive wear and overheating of parts in the brake mechanism.
What to do if the caliper creaks or jams
If the brake caliper creaks or jams, and the part is in good condition, you can try to fix the problems yourself. To do this, it is recommended to perform the following set of actions:
- The first step is to unscrew the brake caliper; to do this, you need to put the car on a jack and remove the wheel. It is worth noting that in some car models the caliper can be unscrewed counterclockwise;
- Having removed the caliper, unscrew the piston using a wrench, then it must be pulled out of the cylinder;
- The removed parts must be carefully inspected for chips, rust, corrosion and various damages. If rust is found, it needs to be cleaned well. When the calipers are heavily worn, problems may arise with cleaning the rust with improvised means; in such a situation, the part will need to be sanded;
Important: When reassembling the caliper, pay special attention to the boot so as not to accidentally damage it. If there are cracks on the boot, be sure to replace it.