If the brake cylinders fail, depending on the type of defect, the rear wheels may lock when released or, conversely, continue to rotate freely when the brake pedal is pressed. In any case, you shouldn’t wait for this moment, especially since replacing the rear brake cylinders can easily be done with your own hands.
Replacing the master and working brake cylinders on VAZ cars
The effectiveness of a car's brakes depends on the condition of all its elements, and if there are any signs of malfunction in the brake system, repairs must be made.
Replacing a brake cylinder is a simple job, but extremely important; driving with faulty brakes is strictly prohibited. Diagnostics and repair of the brake system (TS) must be carried out in a timely manner; traffic safety depends on the serviceability of the brakes.
Brake performance is low
The most common reasons for this problem are:
- brake pads are oily;
- pistons jam in wheel cylinders;
- the linings on the blocks have become unusable;
- the brake system mechanisms overheated;
- the pressure regulator was set incorrectly;
- one of the circuits has lost its tightness.
The linings on the brake pads will need to be cleaned using a wire brush, warm water and washing powder.
If the pistons jam, you will have to change the cylinders and bleed the system.
When the linings wear out, they need to be removed and new ones installed.
Overheating of the system is eliminated by immediate shutdown. It will take some time for it to cool completely.
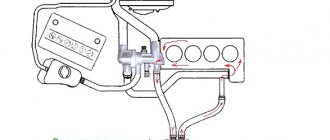
The device of the VAZ brake system
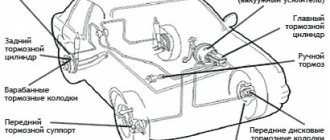
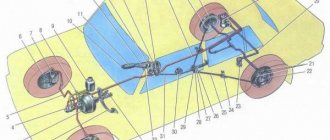
The brake system of Togliatti-made cars is quite simple; the vehicle consists of the following main parts:
- pedals, which are pressed to achieve braking;
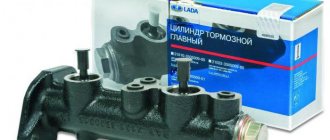
- brake master cylinder (MBC), it transmits the force of pressing the pedal through hydraulics to the working cylinders, respectively, to the wheels. GTZ VAZ - dual-circuit, the circuits are divided to transmit fluid pressure to the front and rear wheels;
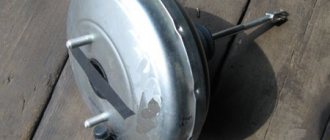
- a vacuum booster that makes it easier to press the pedal;
- tubes that connect the elements of the vehicle;
- brake working cylinders (RTC);
- pads (drums) and discs;
- brake distributor (pressure regulator).
When you press the brake pedal, the piston in the brake fluid compressor compresses the brake fluid and transmits its pressure to the brake pedal. The pistons of the working cylinders are expanded under the influence of hydraulics, moving the pads towards the discs or drums. The movement of the wheels slows down, and thus the car slows down.
Installation
Installation of the new element is carried out in the reverse order. Before installation, you need to thoroughly clean the brake mechanism from dirt using sandpaper. Degrease the seat with white spirit.
So, first you need to open the hood and add brake fluid to the maximum level. It is not recommended to mix different classes of products. Cars of the “tenth” family are filled with RosDot-4 class fluid. Please note that during pumping the level in the tank will drop. As soon as it drops 1.5 centimeters, you need to top it up again. Next we need an assistant. He will press the brake pedal at your command. So, unscrew the cap from the bleeder fitting and put the hose on it. We put its second end into a plastic bottle. We give the command to the assistant. He must press the pedal 5 times and at the last stage press it “to the floor”. At this time, you will observe how aired liquid flows out of the fitting.
Malfunctions occurring in the brakes
From time to time, various malfunctions occur in the vehicle, and the working and master cylinders also often fail. The following breakdowns occur at the RTC:
- the piston gets stuck in one of the positions;
- the inner surface wears out;
- The sealing cuffs fail (tear or swell).
The main sign of a faulty condition is the appearance of smudges (leaks) of brake fluid (FL) from the RTC. If the pads are worn down to bare metal, the pistons in the RTC extend too far, and as a result, the brake fluid may leak and the brakes will fail.
In the GTZ, the piston can also jam, the internal cavity of the mechanism can wear out or rust, and the cuffs can leak. Symptoms of a GTZ malfunction are as follows:
- when braking, the brake pedal (BP) “fails”, the effectiveness of pressing disappears, this usually happens when there is a small leak from the turbocharger;
- braking occurs at the very end of the pedal stroke, and you have to press the PT several times to brake;
- there are no brakes on the front or rear wheels, this happens if one of the GTZ circuits does not work.
You cannot drive with faulty working and master brake cylinders; the parts should be replaced immediately.
The brake pedal has too much travel
In this case, one might suspect that:
- air has entered the hydraulic drive;
- the rear cylinder piston thrust ring lost elasticity, as a result of which it shifted inward;
- Brake fluid has leaked from the system;
- There is too much clearance between the main cylinder piston and the vacuum booster adjusting bolt.
Respectively:
- in the first case, you will need to bleed the system;
- in the 2nd - you will need to completely change the cylinder;
- in the 3rd - eliminate the leak by replacing seals or hoses that have become unusable.
Replacing the master brake cylinder
Replacing the GTZ on VAZ classic cars (2101-07) is not difficult; you can do this work yourself. To perform such an operation you will need the following tool:
- 10mm wrench (or special bleeder wrench);
- Phillips screwdriver;
- combination wrench for 13 (you can additionally use a head with a knob and a ratchet for convenience).
It is not necessary to use a pit or a lift to perform the work; replacement can be done outside in dry weather or in the garage. The work should be performed in the following sequence:
- unscrew the three brake pipes from the bottom of the device (key for ten);
- loosen the clamps of the two hoses (at the bottom of the GTZ), pull off the hoses;
- unscrew the two nuts securing the GTZ to the vacuum booster (you need a 13mm wrench or a socket with a wrench);
- We dismantle the part, install the new gas turbine unit in place, and reassemble it.
After the operation, you should add fluid to the vehicle reservoir, then be sure to bleed the brakes well.
Examination
You should make sure that the master cylinder is the culprit for the malfunction of the brake system. This is easy to do; you don’t even have to go to a service center and spend money on it.
Unit location
- Press the brake pedal with the power unit off.
- Start the engine without taking your foot off the gas pedal.
- During normal operation, the gas turbine engine fails under the influence of vacuum.
- If the pedal does not fail, you will need to conduct more thorough diagnostics and restore the device to functionality.
Most likely, you will need to restore the tightness of the return regulator connection. It is located on the intake manifold amplifier housing.
Repair kit or new GTZ?
Many car owners face a question when the brake master cylinder fails: how exactly to repair the brake master cylinder. After all, there are two main options:
- Purchase a new GTZ;
- Use repair kit.
First, let's take a look at the price tags.
| Element | Price |
| New GTZ entry-level quality | from 800 rubles |
| New high quality GTZ | 4000 rubles |
| Repair kit | from 350 rubles |
Purchasing a repair kit and using it to restore the functionality of the brake cylinder entails uneven wear of old and new elements, breakage of rings and a number of other problems. In this regard, we advise you to eliminate the breakdown by completely replacing the gas turbine engine, and not by using a repair kit.
Replacing brake cylinder 2114
The work of replacing the GTZ on VAZ 2108-15 models is carried out approximately the same way, there are only some design differences.
We make the replacement as follows (using the example of the VAZ-2114):
- Unscrew the four tubes on the sides (two on the left and two on the right). It is better to use a special pipe wrench; you can roll up the edges of the nuts with an open-end wrench;
- unscrew two thirteen nuts securing the GTZ to the “vacuum”;
- We remove the old spare part and install a new one, not forgetting to bleed the brakes at the end of the work. At this point, the replacement of cylinder 2114 can be considered complete.
If in the GTZ 2114 the inner surface of the cylinder itself is not yet worn out, you can replace the insides of the mechanism by installing a new repair kit. The repair kit consists of four cuffs:
- three cuffs are the same, they are the same as on models 2101-07;
- one o-ring 2108.
Changing the repair kit is very simple:
- pour the liquid out of the GTZ;
- dismantle the plastic tank;
- unscrew the front stopper (made in the form of a plug);
- we take out all the contents (pistons, o-rings, springs), change the cuffs, and install the entire mechanism in the reverse order. Nothing should be mixed up here, otherwise the unit being repaired will not work.
Repairing the GTZ on VAZ models is not always advisable - if the mirror surface inside the mechanism is worn out, replacing the brake cylinder repair kit will not solve the problem, the GTZ will also leak. Most often, on VAZ cars, the entire master brake cylinder is replaced - a new assembled part costs around one thousand rubles, and the repair turns out to be unjustified.
Dismantling
To carry out dismantling work that entails replacing the master brake cylinder, it is necessary to prepare a certain set of tools and materials. It includes:
- Brake fluid;
- Tool for unscrewing fittings;
- Pliers;
- Dry rags;
- Metal brush for cleaning contacts;
- Key for 17, 13 and 10 millimeters;
- Spring tensioner;
- New brake cylinder.
Before starting work, prepare yourself a site where you can place all the elements to be removed. Write down or photograph, or otherwise record where this or that unit was removed from. This will greatly simplify the reassembly procedure.
After all the preparatory activities, you can start working.
- Be sure to remove the negative terminal from the battery of your VAZ 2114. Without this, almost no repair or maintenance work on the car can begin.
- Raise the hood and lock it securely.
- Use a syringe to remove any remaining brake fluid from the container.
- Unscrew the brake fluid supply pipes using an open-end wrench. Unscrew it carefully so that the brake fluid does not get on other units in the engine compartment.
- In some cases, the thread becomes stuck, making it very difficult to remove. In such a situation, we recommend treating the threads with brake fluid and letting it sit for a while. Then the hoses are removed using a 10 mm wrench.
- If these measures do not help, you will need a special wrench with a clamping bolt and a cap slot. It is attached to a nut, clamped with a bolt and rotates the part.
- After dismantling the brake fluid pipes, be sure to mark them with a marker or corrector so that you know which pipe is connected where during reassembly.
- Now you need to remove the brake master cylinder. To do this, first remove the two main nuts that hold the GTZ to the amplifier.
- That's it, the damaged element can be removed from its seat.
- Clean the installation sites so that there are no problems with the new cylinder in the very first months of operation.
- Follow the reverse assembly sequence so as not to confuse the location of certain elements.
- Do not clamp the brake fluid hoses too tightly, otherwise there is a risk of stripping the threads. Restoring connections is a hassle.
- It is recommended to replace the brake fluid used before repair, and then be sure to bleed the brakes.
- To level up, you will need help, so make an agreement with a friend in advance. One will gently press the brake from inside the car, and the other will wait for brake fluid to start coming out of the holes. At this very moment it will be necessary to return the front tubes to their places.
Be sure to simultaneously check the correct operation of the vacuum booster. If it is faulty, it will need to be replaced.
Expert advice
Experience is useful. Therefore, listen to some very practical advice regarding replacing the brake cylinder and interfering with the brake system in general.
- Before reassembling the unit, be sure to treat all dismantled elements with isopropyl alcohol. Blow out the openings of the units and wipe them thoroughly with a dry cloth. This will significantly increase their service life and avoid a number of problems in the early stages of operation.
- Try to prevent rubber, plastic elements, seals, and pipes from coming into contact with gasoline, kerosene and other chemically powerful substances. Their contact can lead to damage and loss of integrity of the elements.
- Before changing the GTZ, put the device body in order. It is necessary to remove all traces of oxidation, dirt, and plaque.
- Make sure the device is sealed. Carry out periodic checks of the sealing rings even if the gas turbine engine does not show any signs of malfunction.
- When assembling the unit, treat all elements with brake emulsion.
- Under the screws securing the GTZ there are sealing gaskets that will need to be replaced during the repair process of the device.
- After replacing the master cylinder, do not forget to bleed the brakes. This is necessary in order to remove air trapped in the system. The presence of air locks can lead to accidents, since the brake pedal simply will not work at some point.
- When removing the block with wires (when replacing the vacuum booster), be sure to close all open holes so that dust, dirt, and brake fluid do not get there.
- When carrying out dismantling work to remove the main brake cylinder, it is recommended to first remove the main brake reservoir, and only then unscrew the mounting screws. This will make it much easier to remove the unit and all other elements of the system.
- Most often, the turbocharger fails due to leaks in the brake fluid supply system. Lift the hood and look at the joint of the device. The presence of traces of leakage indicates that the gas turbine seal is worn out and needs to be replaced.
Always remember that any intervention in the brake system requires mandatory bleeding of the brakes after completion of the work. Ignoring this step can have serious consequences.
As you can see, it is more than possible to carry out work on replacing the gas turbine engine yourself. This will save an impressive amount of money, since such services at professional service stations will cost at least 1,000 rubles. Moreover, this is in ideal situations and the presence of good friends at the service station.
Source
Replacing brake cylinder 2107
If the replacement operation on a VAZ classic is not performed on a car lift, it is more convenient to do the work sequentially - first on one side, then on the other side of the rear wheel. To perform the work, the vehicle must be placed on a level surface, then proceed as follows:
- We turn off the engine, set the car to speed, and put chocks under the front wheels. Don’t forget to fully release the handbrake;
- loosen the wheel nuts of the rear wheel, jack up the car and remove the wheel;
- To prevent the car from going anywhere, it is advisable to place a “tragus” next to the jack;
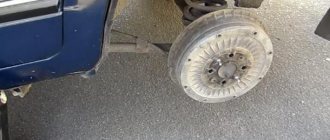
- remove the brake drum - use a 12 mm combination wrench to unscrew the two guides;
- the drum usually comes off tightly, so it should be tapped from behind with a hammer through a piece of wood. You cannot hit the part with an iron hammer; the drum can split;
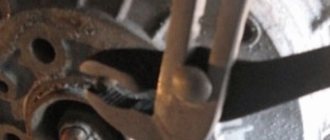
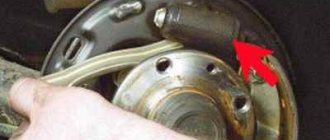
- unscrew the brake pipe from behind the cylinder, also 2 ten bolts securing the RTC itself;
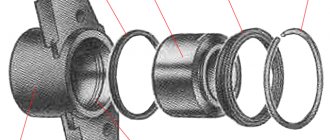
- pull out the cylinder, freeing it from the pads;
- We install the part prepared for replacement (it is important to get the pads into the slots on the RTC pistons, we fasten all the removed parts in their places;
After the work has been done, it is necessary to top up the fuel injection system reservoir and bleed the brakes.
Braking of one of the wheels is observed when driving
Most often, such a breakdown is caused by the destruction of the tension spring on the rear brake. The damaged one will have to be removed and a new one put in its place.
It is also common for pistons in wheel cylinders to not function properly if dirt has gotten inside or they have begun to rust. Cleaning and rinsing will eliminate the problem.
Sometimes braking occurs due to loosening of the bolts that secure the guide pads directly to the steering knuckle. If they are re-tightened or replaced with new ones, the problem will be eliminated.
And finally, this can happen because the parking brake system has not been adjusted correctly.
Replacing the brake cylinder VAZ 2109
The RTC on the rear axle of the 2109 wheels is changed according to the same principle as on the VAZ classic; the wheel and drum are also removed, the tube and two cylinder fastenings are unscrewed with a ten key. It often happens that the tube and RTC bolts on the support disk boil; to remove them carefully, you need to spray the connections with WD-40, and wait 15-20 minutes before unscrewing. The brake pipe nut will be easier to unscrew if you gently tap the metal around it with a hammer. When tapping, it is important not to break the bleeder fitting.
Replacing brake cylinder 2109 is not a difficult task, and many drivers can do this work themselves.
Tools that will be needed during the replacement process
To replace the brake cylinder you will need a tool.
Before starting any repair work, you should prepare thoroughly. Replacing the brake master cylinder is no exception. To replace this part you will need:
- Set of keys. Having a variety of sockets and socket wrenches will be a huge advantage.
- Screwdriver Set.
- Round nose pliers will help when changing cuffs.
- Special “brake” wrench for 10.
In addition, during the replacement process, brake fluid will spill out, which is generally advisable to replace with new one. DOT-4 brake fluid is suitable for the VAZ-2110.
The process of removing the old part
In order to remove the brake master cylinder, you need to open the hood and do the following:
- To get to the part, you will first have to remove the sound insulation. You should not try to tear it off, as it is secured with bolts. Therefore, you should arm yourself with a screwdriver and unscrew all the fasteners. If the sound insulation is not removed after this, it means that not all fasteners have been unscrewed. If you pull the element, it can be damaged. After this, you can start replacing.
We unscrew several screws using a Phillips screwdriver to remove the sound insulation.
Disconnect the terminal with wires.
We disconnect the tubes and put rubber caps on them.
Unscrew the fastening bolts.
Remove the brake cylinder.
At this point, the dismantling process can be considered complete.
Replacing the front brake cylinder
The following calipers are installed on the front wheels of VAZ cars:
- in a VAZ classic car, two front brake cylinders (FTC) are attached to the caliper brackets;
- on VAZ 2108-15 models, one PTC is installed on each side of the front axle.
Replacing the front cylinder 2109 is not difficult, it is also easy to do yourself:
- we put the car on a flat area (the work can be done without a pit and a lift), we put tackles under the rear wheels;
- jack up the car, take off the front wheel;
- unscrew the two caliper fasteners with a hexagon;
- loosen the brake hose nut;
- bend the locking washers on the upper and lower bolts, unscrew the cylinder fastenings to the caliper bracket
- we move the PTC to the side along with the bracket;
- disconnect the cylinder from the bracket, then from the hose so that the brake fluid does not leak; after disconnecting the PTC, it is better to immediately direct the hose upward;
- we install another, new spare part, and perform the assembly.
Symptoms of a problem
With a calm driving style and regular maintenance of the brake system, the GTZ will serve without interruption for many years. Cylinder output increases with frequent vehicle use in city traffic.
Frequent and prolonged stops accelerate the wear process of the turbocharger, which is reflected in the manifestation of the following symptoms:
- When you press the brake pedal, the car stops slowly, although the fluid level and the condition of the discs and pads are normal;
- To effectively brake, you have to press the pedal with serious force;
- Short brake pedal travel is another sign of a worn cylinder;
- Sudden failure of the pedal and “grabbing” of the brake at the end of pressing;
- Incomplete disengagement of the calipers, which leads to friction of the pads on the discs.
The listed symptoms of a faulty master cylinder manifest themselves in different ways, but always mean there are problems with the braking system. The braking system in your car requires regular maintenance. Despite the simplicity of the design and reliability, diagnostics of the design should be carried out every maintenance. Regular replacement of pads, installation of new brake discs, replacement of fluid, elimination of leaks from pipes - all this ensures the smooth operation of the system as a whole. The GTZ plays a crucial role in this design, because Braking efficiency directly depends on the correct operation of the cylinder. In addition to the GTZ located under the hood of the car, there are other elements in the system that are responsible for stopping the car. Often, in addition to the main brake cylinder, it is necessary to replace the front brake cylinder on a VAZ 2114. It is located on each caliper and is responsible for actuating the pads.
A faulty front brake cylinder on a VAZ 2114 leads to a wedge in the mechanism and friction of structural parts. If the front TC fails, the car begins to move to the side when braking, and extraneous noise comes from the wheel.
Replacing the brake cylinder cuff
If desired, on VAZ cars you can not change the entire rear working cylinders, but only replace the cuffs. To do this, you need to disassemble the RTC - remove the pistons and spring, remove the old cuffs from the pistons and install new ones. It is advisable to repair the RTC only if the cylinders did not last long, but they began to leak. The thing is that on VAZ cars the RTCs are very inexpensive, it is advisable to change the rear cylinders as a whole - replacing the cuffs is often unjustified.
Why is the rear brake mechanism acting up?
The hydraulic drive built into the VAZ-2110 combines in its internal design a booster and a dual-circuit pressure controller designed to control the rear brakes.
If the rear cylinder is not working correctly, problems can provoke and create an emergency situation at any time when the vehicle is moving along the roadway. To prevent this from happening, the part should be repaired in a timely manner. There is nothing surprising in replacing an old type of rear brake cylinder (RBC) with a new one; nothing lasts forever. Auto parts stores offer car enthusiasts the opportunity to purchase parts from the best manufacturers that will last a long time and guarantee safety on the road.
Leveling up
After replacing any cylinder in the vehicle, it is necessary to bleed the brakes. Bleeding on any car always begins with the furthest wheel from the GTZ. On all VAZ cars, first of all, they start pumping the brakes from the rear right wheel, then move to the rear left, right front, and the front left wheel is pumped last. If the brake pedal takes at the very end or is hard, bleeding should be repeated, the work should be done according to the same scheme again.
Some tips
- If you start having problems with the brakes, first of all you need to carry out an external inspection of the vehicle: check the fluid level in the reservoir, make sure that the front/rear cylinders are not leaking. There should not even be stains of brake fluid in the brake hydraulics.
- “Brake fluid” must be filled with the same brand; it is recommended to completely replace the brake fluid at least once every two years.
- If faults are identified in the gas turbine engine, and it has already served for at least a year, it is more advisable to replace it completely than to repair it. The same can be said about the rear working cylinders.
- Before changing the turbocharger, the brake fluid should be removed from it; this operation is usually done using a syringe.
- Usually a leak in the master cylinder is not visible, but if there is any suspicion that this part is faulty, you should remove the main cylinder - there will be traces of leaks at the rear, and this indicates its faulty condition.
- If, during an external inspection, cracks were found on the brake hoses, it is better not to take risks and immediately replace the defective parts.
Didn't find the information you are looking for? on our forum.
How to extend the service life of a new fuel pump
Before installing the part, you need to know the rules that will further extend the service life of the part:
- Choose the best products in the store, created by experienced manufacturers you can trust. By saving on brakes, you won't end up cheap.
- Pay attention to marriage. A defective product is characterized by the pistons coming out of the cylinder structure by a couple of millimeters. However, this is quite enough to cause another breakdown and replacement of the part.
- Buy good brake fluid.
- Ideally, you need to change not one cylinder, but two at once. As practice shows, if one element of the system has already failed, the second one will not be long in coming either.