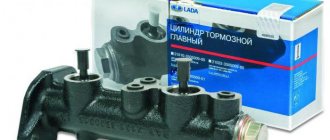
Repair and replacement of the main brake cylinder of VAZ 2110
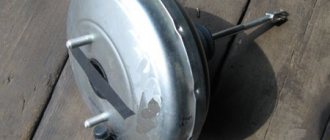
The main element in the VAZ brake system is the main brake cylinder (MBC). Due to the operation of this unit, the entire brake assembly is brought into operation. The master cylinder consists of o-rings, pistons and return springs. In the VAZ 2110 system, the unit works together with a vacuum booster. When the GTZ fails, repairs are rarely required, since it is more profitable and reliable to completely replace the device. If the damage is not serious (for example, wear of the O-rings), then repairs can be carried out using a special kit.
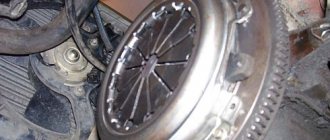
2110 brake design
A dual-circuit hydraulic system with a vacuum brake booster is not uncommon on cars developed in the 80s. Easy to maintain, without unnecessary electronic bells and whistles, like ABS, cheap spare parts and pads. The front brakes are disc, and on models 2112, in the hatchback body, they are also ventilated with a larger diameter. This is because on the twelfth only 16-valve engines were installed and more effective brakes were needed to stop this incredible hundred-horsepower power. And also in order to cope with the Opel engine of 150 horsepower, which was also sometimes used for modification by dozens.
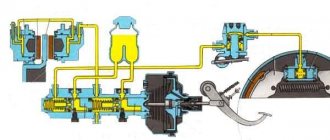
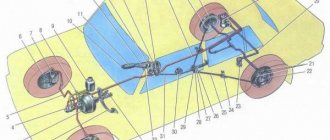
The rear brakes are tens of drum type, and the parking brake is mechanical. Everything is like in the good old classics. The car has a vacuum brake booster and the system is divided into two circuits. If one of them fails, the second one remains operational, so there won’t be a dozen left without brakes. The circuits work in a diagonal pattern - front-rear wheel diagonally. Also, the brake system of the VAZ 2110, the diagram of which is presented above, has a pressure regulator for uniform distribution of braking force, depending on the load of the rear axle. Both brake circuits are connected through the regulator.
Faults and diagnostics of the GTZ
You can determine that a repair or complete replacement of the VAZ 2110 GTZ is required based on the following criteria:
- The brake pedal is too soft.
- When you press the pedal, it does not return to its original position.
- Smudges of working fluid appear on the body of the vacuum booster and at the junction with the turbocharger.
- When braking, the pedal sticks.
If such signs appear, then it is necessary to carry out diagnostics, and only then begin to repair the unit. The check must begin with the housing - there should be no cracks or leaks of working fluid on it. Next, you need to inspect the O-rings for damage and abrasions. If the seals are swollen, then there is no need for repairs; it will be enough to rinse the master brake cylinder with alcohol.
The unit must also be completely sealed. This can only be checked on a special stand, so you cannot carry out such diagnostics yourself. If there are no problems with tightness, then you should proceed to checking the gap between the gas turbine engine and the pistons - the initial parameters are presented in the VAZ 2110 service manual.
Causes of breakdowns and their symptoms
One of the main reasons for brake master cylinder failure is uneven distribution of fluid in the system, leading to circuit failure. The wear of the sealing collars located at the points where the rod enters the cylinder has a negative effect. It is also possible that scuffs may appear on the pistons and deformation of their return springs with rubber cuffs.
In addition, the compression hole becomes partially or completely clogged. The above malfunctions can be caused by poor-quality brake fluid. Any failed part should be urgently dismantled and a new one installed in its place; if the cylinder mirror is faulty, the entire assembly must be replaced. Moreover, you cannot hesitate, since the correct operation of the gas turbine engine is one of the keys to your safety.
Much can be understood by the performance of the brake pedal. So, if it has a reduced stroke, then most likely the reason lies in the compression hole. It may be clogged or blocked. It may also be due to the lack of clearance between the gas turbine seal and the piston. When the piston gets stuck, the channels are blocked and the cuff is deformed, the pedal does not make a full stroke. But if it moves too easily, then the cause is a hydraulic fluid leak, and the rubber bushings need to be replaced. Sticking of the piston is indicated by the wheels braking when the pedal is released.
Required Tools
If you plan to do the repair yourself, then you need to check the availability of the following tools and materials:
- Screwdriver Set.
- Brake fluid.
- Special wrench for disassembling brakes “10”.
- Socket wrench “17”.
- Plug fittings.
- Pliers.
- Rubber caps.
- A set of keys.
- Socket wrench "13".
Advice! If in the VAZ 2110 mechanism, in addition to the sealing rings, other parts are damaged, then only replacing the GTZ will help. If the remaining elements are fully operational, you need to buy new rings and install them in place of the damaged parts.
Replacement instructions
Replacement or repair of the unit can only be carried out after dismantling the main brake cylinder and disconnecting it from the vacuum booster. Removal proceeds as follows:
- The first step is to disconnect the negative terminal from the battery. The next step will be the dismantling of the GTZ pipelines. Before this, it is necessary to remove all working fluid from the cylinder reservoir;
- There is an emergency indicator next to the GTZ - you also need to disconnect the block with wires secured by terminals from it;
To inspect the parts and subsequently replace it, it is necessary to disassemble the brake master cylinder on a table or workbench. Having determined which parts need to be changed, you can begin repairing. Ready-made repair kits for the VAZ 2110 are sold on the automotive market. Before assembling all parts, the body must be washed.
IMPORTANT: rubber structural elements must not be wiped with oil or gasoline, as these liquids will lead to deformation of the rubber products.
Source: remontvazov.com
Main brake cylinder VAZ 2110
The GTZ is the main part of the brake system; when you press the brake pedal, it distributes the brake fluid through the lines to the calipers and creates the necessary pressure to compress the brake pads.
Below are signs that indicate the need to replace the brake master cylinder.
Signs of a malfunction of the GTZ:
- Traces of brake fluid leaking through the O-rings are noticeable;
- The force on the brake pedal disappears and when you press the pedal, the car does not brake;
- The pedal does not engage due to the jamming of the GTZ rod;
With these signs, it is not recommended to delay replacing the gas turbine engine.
Basic faults
Despite the simplicity of the design and the small number of moving elements, the GTZ often ceases to perform its functions normally due to malfunctions.
It is not difficult to detect a breakdown of the GTZ. The first signals of a malfunction will be given by the brake pedal. Any change in its behavior when pressed (lightness, increase in force, etc.) indicates a breakdown. But it will signal the emergence of problems throughout the system. Checking the system on the highway allows you to more accurately identify the malfunction (the car accelerates, and then emergency braking is performed). And then the traces determine how the system works. Afterwards, all that remains is to visually inspect all the components of the drive for leaks.
The main malfunctions of the master brake cylinder are:
- Depressurization.
- Air leak.
- One of the pistons is jammed.
The master cylinder loses its seal, usually due to severe wear or damage to the sealing collars. In this case, liquid can flow between the chambers and also come out of the housing. This allows air to enter the system. As a result, the pressure decreases significantly and the effectiveness of the braking system deteriorates.
Video:Replacing the master brake cylinder VAZ 2108 2109 2110
Air leaks in the system may occur due to blockage of the ventilation hole in the tank lid. Because of this, when the liquid moves, a vacuum is formed in the tank, which is compensated by air penetrating through the cuff. As a result, airing of the system causes a decrease in the efficiency of the system.
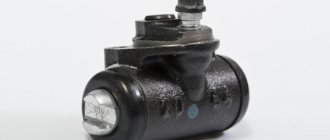
Piston jamming can occur for two reasons - debris entering the cylinder through the tank or the formation of rust on the internal surfaces of the housing. This causes one of the circuits to stop working.
Restoring the performance of the gas turbine engine is possible only in case of wear or damage to the seals or clogging. Special repair kits are sold for repairs.
Often, washing the cylinder and replacing rubber elements allows you to completely restore functionality. But there are also cases when such measures do not help and the problem can only be solved by replacing the assembly.
Consequences of brake fluid leakage from the GTZ
When brake fluid leaks from the master cylinder, brake fluid can get onto various parts of the car. As you know, TZ is quite chemically active and often damages other parts of the car.
For example, when liquid leaks, it can fall on the vacuum booster membrane, which will soon lead to its rupture and, as a result, air leakage from the receiver, and of course, replacement of the vacuum booster itself.
VUT membrane rupture
Also, when brake fluid leaks, it gets into part of the engine compartment, behind the steering rack, and causes great damage to the paintwork.
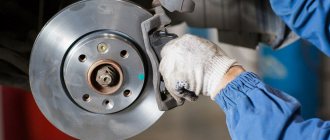
When to change cuffs?
Any brake system contains a large number of metal pipes connected using metal fasteners and sealed with cuffs. The seals prevent brake fluid from leaking through moving parts and provide a sealed brake system.
The main signs of a cuff malfunction are a decrease in braking efficiency and a decrease in the level of brake fluid in the reservoir. First you need to find the specific location of the leak. To do this, you need to examine each wheel of the car one by one. If there are traces of brake fluid on it, then this is a clear sign that this brake cylinder has a faulty seal that needs to be replaced. After this, the brake lines and master cylinder are subject to diagnosis.
Found traces of brake fluid indicate a violation of the tightness of the element, which occurs due to worn out seals.
Replacement without bleeding the brake system
Below are instructions that allow you to replace the GTZ without bleeding the brake system and without a large loss of brake fluid. To carry out repairs, you need to prepare the necessary tools and DOT-4 brake fluid.
When replacing, it is necessary to dismantle the brake fluid reservoir from the old GTZ; when dismantling it, breakdowns of the tank occur; it is recommended that when replacing the GTZ, you also purchase a new TJ reservoir.
Required tool:
- Ratchet with extension and 17mm socket;
- Open-end wrench 10mm;
- Syringe;
- Phillips screwdriver;
Step-by-step instruction
- Remove the hood seal and unscrew the interior heater insulation with a Phillips screwdriver;
- We unscrew the cap of the brake fluid reservoir and use a syringe to pump out the brake fluid into a previously prepared container;
- Using a 10mm wrench, unscrew the fittings of the TJ tubes;
- Using a ratchet with a 17mm head, unscrew the 2 nuts securing the GTZ to the vacuum booster and pull the GTZ towards you;
- We remove the tank from the GTZ (if you haven’t bought a new one). We install the reservoir on the new GTZ, lubricating the rubber seals with brake fluid;
- We install the new GTZ on the vacuum booster and fix it;
- We insert the brake fluid fittings into the GTZ, but do not tighten them;
- Fill the TJ tank up to half;
- We wait for brake fluid to flow out of the holes into which the brake pipe fittings are screwed;
- Then we twist and tighten the fittings of the TJ tubes;
- Add brake fluid between the MIN and MAX marks and close the cap;
The replacement process is complete. With this replacement, bleeding the brake system is not required.
Source: enginehack.ru
Disassembly
To replace and repair a damaged master brake cylinder, you need to remove it from the VAZ 2110; to do this, you should carry out several steps:
- Carefully disconnect all pipelines from a part such as the main cylinder;
- Disconnect the block equipped with wires from the emergency brake fluid indicator. They are connected by terminals;
- It is necessary to prevent fluid leakage and contamination of the mechanism; to do this, it is necessary to cover the openings of the unit and pipelines;
- Next, you need to remove it along with the tank; to do this, unscrew the fastening nuts that secure it to the vacuum type amplifier;
- After the VAZ 2110 fluid level sensor is removed, you need to drain all the brake fluid from the cylinder and basque;
We can only add to this that if there is no great need, you should not remove the reservoir from the master cylinder. To completely disassemble it, you need to remove the tank. Assemble and then install in place in exactly the reverse order.
Before you begin assembling the unit, all components must be washed with purified brake fluid or isopropyl alcohol. After this, everything must be carefully dried using a compressor, and then each of them must be wiped with a dry, clean cloth.
The main thing is not to get mineral oils directly or indirectly on the components; it is also dangerous for the front components of the main type brake cylinder, kerosene and diesel fuel to get on them.
If you find that the brake pedal has increased travel, it is recommended to bleed the brakes. The intricacies of the procedure can be found in this article:
How to replace the main brake cylinder on a VAZ 2110 with your own hands
There always comes a time when some problems arise in the operation of a part. If the brakes fail during a trip, this means there is a danger for the driver and passengers. The brake wheel cylinder is a very important part of the entire brake system. It converts the pressure exerted by the fluid into a force that is exerted on the brake pads. Therefore, it is necessary to replace the master cylinder in time if irreparable problems arise with it.
When the driver brakes, he exerts an effect on the brake pedal, and in order for this effect to be realized, there is a part - a rod that acts on the piston of the main cylinder. It affects the brake fluid, which then affects the cylinders. During this process, special pistons press the brake pads against the discs (sometimes drums). The differences arise from different types of braking systems.
Below are instructions for replacing the master cylinder. She will help you make quality repairs with your own hands:
- reasons why the brakes failed;
- the ability to repair the brake master cylinder;
- tools necessary for work;
- replacing the main cylinder;
- its final removal;
- cylinder installation;
- improvement of the main brake cylinder.
Some tips
- If you start having problems with the brakes, first of all you need to carry out an external inspection of the vehicle: check the fluid level in the reservoir, make sure that the front/rear cylinders are not leaking. There should not even be stains of brake fluid in the brake hydraulics.
- “Brake fluid” must be filled with the same brand; it is recommended to completely replace the brake fluid at least once every two years.
- If faults are identified in the gas turbine engine, and it has already served for at least a year, it is more advisable to replace it completely than to repair it. The same can be said about the rear working cylinders.
- Before changing the turbocharger, the brake fluid should be removed from it; this operation is usually done using a syringe.
- Usually a leak in the master cylinder is not visible, but if there is any suspicion that this part is faulty, you should remove the main cylinder - there will be traces of leaks at the rear, and this indicates its faulty condition.
- If, during an external inspection, cracks were found on the brake hoses, it is better not to take risks and immediately replace the defective parts.
For every motorist, a car breakdown is a disappointment, but many problems can be solved without a service station thanks to a ready-made repair kit. Such sets also exist for master brake cylinders, but we’ll figure out how to use them below.
Reasons why the brakes might fail
Any problems during the braking process reduce its effectiveness, which can lead to dire consequences for everyone - the driver, passengers, and other road users.
Very often, problems arise simply because the driver uses low-quality brake fluid. If your car suddenly loses brakes, this may be due to several reasons, the main thing is not to blame the master cylinder for all the problems.
Below are the reasons why the brakes on a car fail:
- One of the main causes is usually a leaking slave cylinder. Gradually, slowly or quickly, all the contained liquid flows out of it.
- You should also check the level of brake fluid in the reservoir and the condition of the main brake.
- If traces of smudges are noticeable on the main brake, then this is the reason.
- Another possible cause of brake failure could be that the brake line is torn. For example, rubber brake hoses could fray, partially rot in some places, or get punctures.
- The working cylinders may have jammed;
If it is nevertheless noticed that the main brake cylinder is not working:
- it will show where traces of brake fluid leaks appeared;
- it will be impossible to press the brake pedal;
- on the contrary, the brake pedal can move on its own without the driver making any effort to do so.
Master brake cylinder with reservoir: 1 — master cylinder body; 2
low pressure o-ring; 3 — drive piston of the “left front-right rear brake” circuit; 4 - spacer ring; 5 - high pressure sealing ring; 6 — pressure spring of the sealing ring; 7 — spring plate; 8 — piston return spring; 9 — washer; 10 — locking screw; 11 — drive piston of the “right front-left rear brake” circuit; 12 — connecting sleeve; 13 - tank; 14 - emergency brake fluid level sensor; A - gap.
Therefore, it is possible to repair the VAZ 2110 brake cylinder, but not always. Most often, if it leaks, a repair kit will help fix the problem and restore the cylinder’s functionality. If the internal mirror in the cylinder is damaged, then, unfortunately, nothing can be corrected, since grinding is prohibited. If everything is not so scary and repairs are possible, you can do it yourself, because the price of the repair kit is quite reasonable, and almost every motorist can afford it.
What tools are required to replace a brake master cylinder?
- key to 17;
- key to 10;
- half-liter bottle of brake fluid;
- syringe;
- brake fluid.
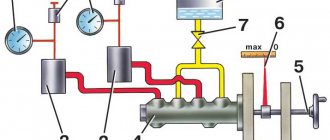
Pressure regulator
1 – pressure regulator housing;
2 – piston; 3 – protective cap; 4, 8 – retaining rings; 5 – piston sleeve; 6 – piston spring; 7 – body bushing; 9, 22 – support washers; 10 – sealing rings of the pusher; 11 – support plate; 12 – pusher bushing spring; 13 – valve seat sealing ring; 14 – valve seat; 15 – sealing gasket; 16 – plug; 17 – valve spring; 18 – valve; 19 – pusher bushing; 20 – pusher; 21 – piston head seal; 23 – piston rod seal; 24 – plug; A, D – chambers connected to the main cylinder; B, C – chambers connected to the wheel cylinders of the rear brakes; K, M, N – clearances The pressure regulator regulates the pressure in the hydraulic drive of the brake mechanisms of the rear wheels depending on the load on the rear axle of the car. It is included in both circuits of the brake system and through it brake fluid flows to both rear brake mechanisms.