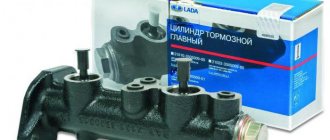
Repair and replacement of the main brake cylinder of VAZ 2110
The main element in the VAZ brake system is the main brake cylinder (MBC). Due to the operation of this unit, the entire brake assembly is brought into operation. The master cylinder consists of o-rings, pistons and return springs. In the VAZ 2110 system, the unit works together with a vacuum booster. When the GTZ fails, repairs are rarely required, since it is more profitable and reliable to completely replace the device. If the damage is not serious (for example, wear of the O-rings), then repairs can be carried out using a special kit.
Nuances of repair
O-rings require special attention. The time the rings are in isopropyl alcohol should not exceed twenty seconds, after which they should be dried immediately using a compressor.
The surfaces of the mirror, as well as the piston elements, must be completely clean and free of rust. Every disassembly and repair of a faulty brake master cylinder must be accompanied by replacement of the O-rings, even if they are in good condition. The cuffs of the device also require attention; if they are swollen and frayed, they must be replaced.
After all, it is necessary to check the elasticity of the piston springs; this should be done under load. The length of the spring under load should be 39.01–45.9 N (3.8–4.8 kgf) - 41 mm, with another option the following indicators should be 82.01–99.48 N (8.35–10 .15 kgf) – 21 mm. When free, the spring should have a length of 59.8 mm. If the springs do not have such indicators, then they must be replaced.
Faults and diagnostics of the GTZ
You can determine that a repair or complete replacement of the VAZ 2110 GTZ is required based on the following criteria:
- The brake pedal is too soft.
- When you press the pedal, it does not return to its original position.
- Smudges of working fluid appear on the body of the vacuum booster and at the junction with the turbocharger.
- When braking, the pedal sticks.
If such signs appear, then it is necessary to carry out diagnostics, and only then begin to repair the unit. The check must begin with the housing - there should be no cracks or leaks of working fluid on it. Next, you need to inspect the O-rings for damage and abrasions. If the seals are swollen, then there is no need for repairs; it will be enough to rinse the master brake cylinder with alcohol.
The unit must also be completely sealed. This can only be checked on a special stand, so you cannot carry out such diagnostics yourself. If there are no problems with tightness, then you should proceed to checking the gap between the gas turbine engine and the pistons - the initial parameters are presented in the VAZ 2110 service manual.
There is a leak between the vacuum seal and the main valve. brake cylinder?
07/27/06 15:05 Reply to message There is a leak between the vacuum seal and the main valve. brake cylinder? by neor
The red light came on, wait, the yellow light came on, wait, and the green light, go.
07/27/06 15:33 Reply to message Leaking between the vacuum seal and the main valve. brake cylinder? by neor
07/27/06 15:36 Reply to message Leaking between the vacuum seal and the main valve. brake cylinder? by neor
07/27/06 15:37 Reply to message Re: Leaking between the vacuum seal and the main valve. brake cylinder? user BRAKE
The red light came on, wait, the yellow light came on, wait, and the green light, go.
07/27/06 15:59 Reply to message Re: Leaking between the vacuum seal and the main valve. brake cylinder? by Flamer
Required Tools
If you plan to do the repair yourself, then you need to check the availability of the following tools and materials:
- Screwdriver Set.
- Brake fluid.
- Special wrench for disassembling brakes “10”.
- Socket wrench “17”.
- Plug fittings.
- Pliers.
- Rubber caps.
- A set of keys.
- Socket wrench "13".
Advice! If in the VAZ 2110 mechanism, in addition to the sealing rings, other parts are damaged, then only replacing the GTZ will help. If the remaining elements are fully operational, you need to buy new rings and install them in place of the damaged parts.
Operation of the system when one of the circuits fails
Dual-circuit brake drive device
If there is a brake fluid leak in one of the circuits, the second will continue to operate. The first piston will move along the cylinder until it contacts the second piston. The latter will begin to move, due to which the brakes of the second circuit will be activated.
If a leak occurs in the secondary circuit, the brake master cylinder will operate differently. The first valve, due to its movement, activates the second piston. The latter moves unhindered until the stop reaches the end of the cylinder body. Due to this, the pressure in the primary circuit begins to increase, and the car brakes.
Even if the brake pedal travel increases due to a fluid leak, the car will maintain control. However, braking will not be as effective.
Replacement instructions
Replacement or repair of the unit can only be carried out after dismantling the main brake cylinder and disconnecting it from the vacuum booster. Removal proceeds as follows:
- The first step is to disconnect the negative terminal from the battery. The next step will be the dismantling of the GTZ pipelines. Before this, it is necessary to remove all working fluid from the cylinder reservoir;
- There is an emergency indicator next to the GTZ - you also need to disconnect the block with wires secured by terminals from it;
To inspect the parts and subsequently replace it, it is necessary to disassemble the brake master cylinder on a table or workbench. Having determined which parts need to be changed, you can begin repairing. Ready-made repair kits for the VAZ 2110 are sold on the automotive market. Before assembling all parts, the body must be washed.
IMPORTANT: rubber structural elements must not be wiped with oil or gasoline, as these liquids will lead to deformation of the rubber products.
Source: remontvazov.com
Disassembly
To replace and repair a damaged master brake cylinder, you need to remove it from the VAZ 2110; to do this, you should carry out several steps:
- Carefully disconnect all pipelines from a part such as the main cylinder;
- Disconnect the block equipped with wires from the emergency brake fluid indicator. They are connected by terminals;
- It is necessary to prevent fluid leakage and contamination of the mechanism; to do this, it is necessary to cover the openings of the unit and pipelines;
- Next, you need to remove it along with the tank; to do this, unscrew the fastening nuts that secure it to the vacuum type amplifier;
- After the VAZ 2110 fluid level sensor is removed, you need to drain all the brake fluid from the cylinder and basque;
We can only add to this that if there is no great need, you should not remove the reservoir from the master cylinder. To completely disassemble it, you need to remove the tank. Assemble and then install in place in exactly the reverse order.
Before you begin assembling the unit, all components must be washed with purified brake fluid or isopropyl alcohol. After this, everything must be carefully dried using a compressor, and then each of them must be wiped with a dry, clean cloth.
The main thing is not to get mineral oils directly or indirectly on the components; it is also dangerous for the front components of the main type brake cylinder, kerosene and diesel fuel to get on them.
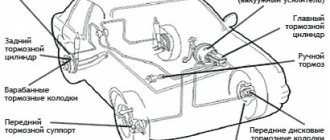
Main brake cylinder VAZ 2110
The GTZ is the main part of the brake system; when you press the brake pedal, it distributes the brake fluid through the lines to the calipers and creates the necessary pressure to compress the brake pads.
Below are signs that indicate the need to replace the brake master cylinder.
Signs of a malfunction of the GTZ:
- Traces of brake fluid leaking through the O-rings are noticeable;
- The force on the brake pedal disappears and when you press the pedal, the car does not brake;
- The pedal does not engage due to the jamming of the GTZ rod;
With these signs, it is not recommended to delay replacing the gas turbine engine.
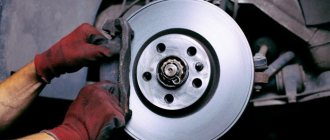
Front wheel brake
1 – brake disc;
2 – pad guide; 3 – caliper; 4 – brake pads; 5 – cylinder; 6 – piston; 7 – pad wear indicator; 8 – sealing ring; 9 – protective cover of the guide pin; 10 – guide pin; 11 – protective casing The front wheel brake mechanism is disc, with automatic adjustment of the gap between the pads and the disc, with a floating caliper and a brake pad wear indicator. The bracket is formed by a caliper 3 and a wheel cylinder 5, which are tightened with bolts. The movable bracket is bolted to pins 10, which are installed in the holes of the guide 2 of the pads. Lubricant is placed in these holes, rubber covers 9 are installed between the pins and the pad guide. Brake pads 4 are pressed against the grooves of the guide by springs, the inner one of which has a lining wear indicator 7.
A piston 6 with a sealing ring 8 is installed in the cavity of the cylinder 5. Due to the elasticity of this ring, the optimal gap between the pads and the disk is maintained.
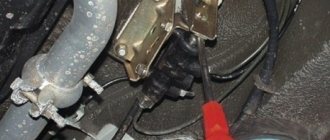
Consequences of brake fluid leakage from the GTZ
When brake fluid leaks from the master cylinder, brake fluid can get onto various parts of the car. As you know, TZ is quite chemically active and often damages other parts of the car.
For example, when liquid leaks, it can fall on the vacuum booster membrane, which will soon lead to its rupture and, as a result, air leakage from the receiver, and of course, replacement of the vacuum booster itself.
VUT membrane rupture
Also, when brake fluid leaks, it gets into part of the engine compartment, behind the steering rack, and causes great damage to the paintwork.
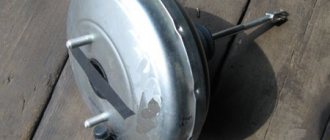
Vacuum booster
The braking system of a car certainly cannot be called perfect, so it has to be supplemented with devices that help improve efficiency. One of them is a vacuum booster.
Application and purpose
Today, a vacuum amplifier is in great demand because it is highly efficient.
Its tasks are extensive, but the amplifier copes with them all perfectly:
- The degree of resistance of the brake pedal increases;
- Reduces the load on the brake system;
- Acts as a highly efficient auxiliary unit;
- Has a positive effect on the service life of the brake system, etc.
If we take into account the design of the vacuum booster, it includes a complex unit directly connected to the master cylinder of the vehicle’s brake system.
This element has the following components:
- Dense body, for the manufacture of which a high-strength polymer is used;
- The diaphragm, which is also called the collecting node;
- Monitoring or control specialized valve;
- Pusher. It allows you to return the engine elements to their original position when there is no power;
- Main piston rod of the brake system cylinder (main);
- Switch return spring.
The body of this spring has two cellular divisions, which are divided into vacuum and atmospheric. Cells are often called chambers.
- The vacuum chamber is a cell directly connected to the brake master cylinder.
- The atmospheric chamber is a cell located opposite the brake pedal. Its open part of the body rests on the brake pedal.
It is also worth noting the diaphragm, which performs two very important tasks:
- Corrects the position of the piston in space;
- Pumps brake fluid to the main brake cylinders.
Installing a vacuum booster involves a serious change in the sensitivity of the pedal, so it is strongly recommended not to apply a large and sudden force to it in the “first couple”. Pressing should be done carefully and smoothly.
Replacement without bleeding the brake system
Below are instructions that allow you to replace the GTZ without bleeding the brake system and without a large loss of brake fluid. To carry out repairs, you need to prepare the necessary tools and DOT-4 brake fluid.
When replacing, it is necessary to dismantle the brake fluid reservoir from the old GTZ; when dismantling it, breakdowns of the tank occur; it is recommended that when replacing the GTZ, you also purchase a new TJ reservoir.
Required tool:
- Ratchet with extension and 17mm socket;
- Open-end wrench 10mm;
- Syringe;
- Phillips screwdriver;
Step-by-step instruction
- Remove the hood seal and unscrew the interior heater insulation with a Phillips screwdriver;
- We unscrew the cap of the brake fluid reservoir and use a syringe to pump out the brake fluid into a previously prepared container;
- Using a 10mm wrench, unscrew the fittings of the TJ tubes;
- Using a ratchet with a 17mm head, unscrew the 2 nuts securing the GTZ to the vacuum booster and pull the GTZ towards you;
- We remove the tank from the GTZ (if you haven’t bought a new one). We install the reservoir on the new GTZ, lubricating the rubber seals with brake fluid;
- We install the new GTZ on the vacuum booster and fix it;
- We insert the brake fluid fittings into the GTZ, but do not tighten them;
- Fill the TJ tank up to half;
- We wait for brake fluid to flow out of the holes into which the brake pipe fittings are screwed;
- Then we twist and tighten the fittings of the TJ tubes;
- Add brake fluid between the MIN and MAX marks and close the cap;
The replacement process is complete. With this replacement, bleeding the brake system is not required.
Source: enginehack.ru
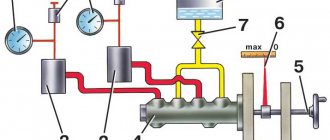
How does the GTZ function?
The unit consists of the following parts:
- metal housing with holes for supplying brake fluid, pedal rod and connecting the expansion tank;
- 2 pistons with rubber seals;
- 2 return springs;
- guide bushings;
- end plug with gasket.
An expansion tank is attached to the top of the main distributor body, where excess fluid goes through compensation holes. Inside, the element is divided into 2 cylinders with separate pistons standing on the same axis.
The blind end of the housing is closed with a threaded plug; on the other side there is a flange for attaching to the vacuum booster. The brake pedal rod is attached to the first piston. The brake circuit pipes are connected to the lower holes - separately for the front and rear wheels.
The operating principle of the master brake cylinder looks like this:
- When you press the pedal, both pistons simultaneously move forward and push fluid into the circuit tubes. Under its pressure, the wheel cylinders are activated, compressing the pads on the discs.
- Part of the liquid that does not have time to pass into the tubes flows into the expansion tank through special bypass holes.
- When the driver releases the pedal, the springs push the pistons back, returning them to their original position. Liquid from the tubes and reservoir refills the cylinders.
- To compensate for the expansion of the liquid (for example, from heating), another pair of holes is provided leading to the expansion tank.
How to replace the main brake cylinder on a VAZ 2110 with your own hands
There always comes a time when some problems arise in the operation of a part. If the brakes fail during a trip, this means there is a danger for the driver and passengers. The brake wheel cylinder is a very important part of the entire brake system. It converts the pressure exerted by the fluid into a force that is exerted on the brake pads. Therefore, it is necessary to replace the master cylinder in time if irreparable problems arise with it.
When the driver brakes, he exerts an effect on the brake pedal, and in order for this effect to be realized, there is a part - a rod that acts on the piston of the main cylinder. It affects the brake fluid, which then affects the cylinders. During this process, special pistons press the brake pads against the discs (sometimes drums). The differences arise from different types of braking systems.
Below are instructions for replacing the master cylinder. She will help you make quality repairs with your own hands:
- reasons why the brakes failed;
- the ability to repair the brake master cylinder;
- tools necessary for work;
- replacing the main cylinder;
- its final removal;
- cylinder installation;
- improvement of the main brake cylinder.
Symptoms of problems
The general technical condition of the car (including the brake system) can be checked using a personal diagnostic adapter - a car scanner. These types of devices are widespread and have a wide price range. We would like to draw your attention to the budget model of Korean production Scan Tool Pro Black Edition.
At a cost of about 2 thousand rubles. This scanner is capable of fully diagnosing your car (engine, gearbox, transmission, abs, srs and much more), which will pay for itself in 1-2 trips to the service station. The adapter is quite easy to use, has Russian-language software and is compatible with most cars produced in 1993. The device will also be useful when buying a used car, as it can show its real mileage and VIN.
The fluid brake system consists of many parts that can become unusable: pipes, wheel cylinders, calipers, drums and pads. Typical signs of a faulty master cylinder:
The listed symptoms of a GTZ malfunction are similar to malfunctions of other elements. Pedal failure also occurs when a large amount of air enters the tubes or loss of fluid in one of the working cylinders. Sluggish deceleration and increased force on the pedal are often caused by a breakdown of the vacuum booster - a cracked membrane or a lack of tightness at the joints of the hose that takes off engine vacuum.
There are signs that clearly indicate the performance of the main hydraulic cylinder and the malfunction of other elements:
If you eliminate these symptoms, it will become easier to check the brake master cylinder in a garage. This also includes obvious brake fluid leaks and the knocking sound of worn calipers.
There are other symptoms indicating a malfunction of the gas turbine engine.
Reasons why the brakes might fail
Any problems during the braking process reduce its effectiveness, which can lead to dire consequences for everyone - the driver, passengers, and other road users.
Very often, problems arise simply because the driver uses low-quality brake fluid. If your car suddenly loses brakes, this may be due to several reasons, the main thing is not to blame the master cylinder for all the problems.
Below are the reasons why the brakes on a car fail:
- One of the main causes is usually a leaking slave cylinder. Gradually, slowly or quickly, all the contained liquid flows out of it.
- You should also check the level of brake fluid in the reservoir and the condition of the main brake.
- If traces of smudges are noticeable on the main brake, then this is the reason.
- Another possible cause of brake failure could be that the brake line is torn. For example, rubber brake hoses could fray, partially rot in some places, or get punctures.
- The working cylinders may have jammed;
If it is nevertheless noticed that the main brake cylinder is not working:
- it will show where traces of brake fluid leaks appeared;
- it will be impossible to press the brake pedal;
- on the contrary, the brake pedal can move on its own without the driver making any effort to do so.
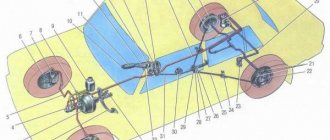
Master brake cylinder with reservoir: 1 — master cylinder body; 2
low pressure o-ring; 3 — drive piston of the “left front-right rear brake” circuit; 4 - spacer ring; 5 - high pressure sealing ring; 6 — pressure spring of the sealing ring; 7 — spring plate; 8 — piston return spring; 9 — washer; 10 — locking screw; 11 — drive piston of the “right front-left rear brake” circuit; 12 — connecting sleeve; 13 - tank; 14 - emergency brake fluid level sensor; A - gap.
Therefore, it is possible to repair the VAZ 2110 brake cylinder, but not always. Most often, if it leaks, a repair kit will help fix the problem and restore the cylinder’s functionality. If the internal mirror in the cylinder is damaged, then, unfortunately, nothing can be corrected, since grinding is prohibited. If everything is not so scary and repairs are possible, you can do it yourself, because the price of the repair kit is quite reasonable, and almost every motorist can afford it.
What tools are required to replace a brake master cylinder?
- key to 17;
- key to 10;
- half-liter bottle of brake fluid;
- syringe;
- brake fluid.
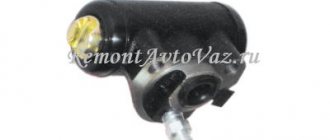
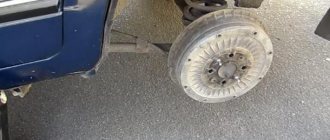
Wheel cylinder
1 – block stop; 2 – protective cap; 3 – cylinder body; 4 – piston; 5 – seal; 6 – support plate; 7 – spring; 8 – crackers; 9 – thrust ring; 10 – thrust screw; 11 – fitting; A – slot on the thrust ring
The rear wheel brake mechanism (Fig. Rear wheel brake mechanism) is drum-type, with automatic adjustment of the gap between the shoes and the drum. The automatic clearance adjustment device is located in the wheel cylinder. Its main element is a split thrust ring 9 (Fig. Wheel cylinder), installed on the piston 4 between the shoulder of the thrust screw 10 and two nuts 8 with a gap of 1.25–1.65 mm.
The thrust rings 9 are inserted into the cylinder with tension, providing a shear force of the ring along the cylinder mirror of at least 343 N (35 kgf), which exceeds the force on the piston from tension springs 3 and 7 (see Fig. Brake mechanism of the rear wheel) of the brake pads.
When, due to wear of the linings, the gap of 1.25–1.65 mm is completely removed, the shoulder on the thrust screw 10 (see Fig. Wheel cylinder) is pressed against the shoulder of the ring 9, as a result of which the thrust ring moves after the piston by the amount of wear. When the braking stops, the pistons are moved by the force of the tension springs until the cracks stop against the shoulder of the thrust ring. This automatically maintains the optimal clearance between the pads and the drum.