A brake force regulator, or sorcerer in common parlance, is a mechanical device designed to relieve excess pressure in the rear drum brakes.
On VAZ-2109, VAZ-2108, VAZ-2114 and other front-wheel drive models produced in Togliatti, it was installed in the rear left part of the body, under the bottom, in front of the rear suspension beam. The brake pressure regulator on the VAZ-2107 model and other “classics” is located on the right in the direction of travel of the car.
New vehicles equipped with ABS and EBD do not use the sorcerer.
Replacing the brake pressure regulator on VAZ 2108, VAZ 2109, VAZ 21099
Welcome! Today you will read detailed instructions on how to replace the sorcerer on cars of the Samara family. The first question you ask yourself will sound like this: “What kind of sorcerer, I was looking for instructions for replacing the pressure regulator?” We will explain everything to you in order. The so-called name “Sorcerer” came from the people, and “Brake Pressure Regulator” is its real name.
Note! To replace the pressure regulator, you will need the following tools: First, be sure to stock up on a screwdriver and a small set of basic wrenches. And also for the convenience of unscrewing some nuts, you can stock up on an extension cord with a union head!
- Replacing the brake pressure regulator
- To remove the regulator together with the bracket
- To remove the regulator without bracket
- Disassembling the brake pressure regulator
- Additional video clip
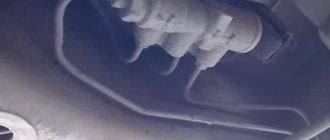
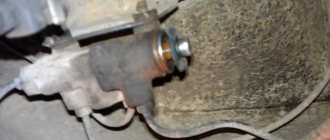
Where is the brake pressure regulator located? The pressure regulator is located on the left side of the body compartment, closer to the rear wheel. But to find it you will need to know what it looks like, if you still don’t understand what it looks like, then look at the very first photo at the top of the article. If you already know what it looks like, then look at the bottom photo where the red arrow indicates its location.
When should you change your brake pressure regulator? The regulator must be replaced if:
Its breakdowns can be very easily identified. Usually, with a faulty regulator, when braking sharply, the car skids, which can be very life-threatening if you are driving on the highway.
Note! With a working regulator, when braking sharply, the car does not go anywhere, that is, it brakes strictly in a straight line, but there is one “But!” The pressure regulator only works when, when braking, the nose of the car goes down and its rear part rises. Otherwise, the sorcerer will not work!
Replacing the brake pressure regulator:
Note! It is recommended to replace a faulty sorcerer with a new assembled one!
Removal: 1) First you will need to drive your car into the inspection hole.
2) Next, use a screwdriver to slightly lift up the bracket of the lever earring; for clarity, it is indicated by a red arrow.
3) Then remove the lever from the hole in the shackle and, as a result, remove the shackle bracket from the lever.
4) Then, using a wrench, unscrew the fittings of all pipes connected to the pressure regulator.
Note! Before unscrewing them, be sure to mark which tube goes where. If you have not done this, then when installing a new sorcerer, watch the video at the very bottom, which describes the correct connection of the tubes!
5) And after unscrewing the fittings, disconnect the brake hose tubes from the regulator.
Note! It is best to plug the holes in the brake pipes with something, because otherwise fluid will leak from the hydraulic drive of the system!
To remove the regulator together with the bracket: 1) Using an extension with a union head, unscrew the two nuts that secure the bracket to the body and then remove it together with the regulator.
To remove the regulator without a bracket: 1) Using a wrench, unscrew the two bolts that secure the sorcerer body to the bracket and then remove the regulator separately.
Installation: 1) Installation of a new brake pressure regulator is carried out in the reverse order of removal.
Note! To connect the tubes to the regulator, use the video located at the bottom of the article!
After final installation of the regulator, be sure to bleed the brake system! (How to bleed the brakes, see the article: “Bleeding the brakes on a VAZ”)
And finally, adjust the regulator drive! (For how to adjust the regulator, see the article “Adjusting the rear brake pressure regulator”)
Disassembling the brake pressure regulator:
Disassembly is carried out only to replace individual parts, but as mentioned above, it is best to replace the sorcerer as an assembly and not individually.
1) First, remove the drive arms and bracket from the regulator.
2) Next, taking the bracket in your hands, use a wrench to unscrew the bolt that secures the latch.
Note! After unscrewing the bolt, remove the clamp that holds the elastic lever!
3) Finally, disconnect both drive levers from each other.
Additional video: Don’t know where to screw the brake pipes onto the sorcerer? If not, then watch a video specially prepared for you, in which everything is indicated and explained in detail.
Vaz-Russia.ru
Handbrake
VAZ 2109 brake regulator
https://youtube.com/watch?v=OC10c-BVUvI
- garage room with inspection hole,
- regular set of keys.
- Engage forward gear.
- Place stands under the front wheels for safety.
- The rear suspension of the car must be jacked up and supported with reliable supports.
You need to start by checking the lever, which is located inside the car between the two front passenger seats. Raise it two or three clicks. When raised, one click is made, which means the handbrake cable is tightened. This causes the rear drums to become blocked by the brake pads. If more than 8 are produced, then the cable is weakened and the handbrake does not work:
- With the handbrake on, go down into the inspection hole.
- Loosen the first lock nut on the equalizer.
- Tighten the second nut so that the cable is in a taut position.
- If necessary, on the contrary, release it.
- Check the operation of the lever. It should respond with two or three clicks.
Then tighten the first nut from the hole, tighten with two wrenches to get the effect of tightening two nuts:
- After this, turn off the parking system.
- Check the rotation of the rear wheel rims.
Make rotational movements with your hands. Their rotation should take place without a jerk, calmly scrolling along the axis of the car. The sound should come out rustling. Consequently, the adjustment of the vehicle's brake system was carried out successfully. The vehicle is ready for continued operation. The brakes can also be adjusted in a car workshop. You can entrust this work to specialists. But the motorist experiences reliability when this work is done independently. A car can be considered technically serviceable when it is independently inspected and repaired. He will never let you down in difficult, dangerous times. In addition, the price of repairs at service stations can be high. When doing the work yourself, you need to carefully watch the video. You also need to study the photos and, if necessary, take them to the repair site. Place it on a rack or in the back seat of the car. If necessary, review them again. Read the instructions for the operation and the location of the necessary structures. Finish the adjustment and check the work done on a free asphalt area.
Welcome! In today’s article, we will examine in detail a question that plagues many car owners, and it sounds like this: “How to adjust the sorcerer on cars of the Samara family?” After reading, the following question appears: “What kind of sorcerer are we talking about?” Let's explain! The sorcerer is the popular name for the brake pressure regulator; you will find this very word in the article.
Note! You will need the following tools: a 13 mm wrench, a flat screwdriver, a short wire or a drill with a thickness of 2.0-2.1 mm.
When is it necessary to regulate? Adjustment of the sorcerer is necessary:
- If you have previously carried out work related to removing the rear suspension beam.
- After carrying out various work related to replacing springs, replacing the shock absorber and other suspension elements - in other words, any intervention to change the ground clearance.
Note! An incorrectly adjusted sorcerer causes the car to pull to the side during heavy braking, and the braking process loses its effectiveness. We recommend that you monitor the condition of the sorcerer very carefully.
The main task of regulators and the physics of braking
Why is the brake pedal on a VAZ 2110 tight?
The adhesion force of a car wheel to the road surface, like the friction force, is proportional to vertical loads. The proportionality coefficient is considered to be the coefficient of the tire's level of adhesion to the road. This value does not depend on the person in any way. It can be determined based on the condition of the road and tires. The higher the adhesion of the wheel to the asphalt surface during braking, the less will be And since when the pads operate, inertia also acts on the car, the vertical load on the wheels is redistributed. Therefore, the force on the disk should be uneven. The brake force regulator is also used to improve braking efficiency when the machine is not loaded. In this case, the traction force will be completely different than in the case of a loaded car.
Symptoms of a problem
When the fluids are partially used up, the brake system begins to work incorrectly. The pedal begins to sink or becomes soft. Braking occurs silently, and the braking trail gradually increases. The car may skid when the brakes are pressed.
Having discovered one of the signs, the first thing you should do is look into the brake fluid reservoir. A cloudy color and the presence of sediment are an alarming signal; it’s time to go shopping, because you urgently need to change the brake fluid on your VAZ 2114.
Replacing the sorcerer on a VAZ 2114
Reasons for VAZ 2110 battery discharge
Dismantling and reinstalling a non-working device does not cause significant problems and is accessible to almost anyone. The automaker recommends replacing the faulty regulator assembly. To carry out the work you will need:
- flat screwdriver;
- key to 13;
- 10mm socket for removing brake pipes.
The replacement sequence is as follows:
- We provide convenient access to the rear of the car's underbody (we use a lift, pit, or overpass).
- We find the regulator drive lever. We lift the bracket up and release it. If difficulties arise, use a screwdriver to slightly release the bracket.
- Remove the earring bracket.
- Now we disconnect the four tubes from the body of the product. To do this, you need to loosen and unscrew the fastening nuts. To prevent brake fluid from leaking, plug (seal) the holes of all pipes. In the future, in order not to confuse the connections to the regulator, we mark the 4 pipes with different colors or numbers.
- We unscrew the front bolt of the sorcerer (with which it is attached to the bracket).
- From the side of the bracket, unscrew another bolt.
- Remove the complete device (together with the drive).
- After replacing the product, installation is carried out in the reverse order.
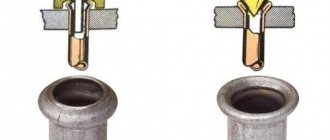
Please note that after reinstallation, the earring fastening bracket must be crimped with pliers. In addition, it is necessary to bleed the brake system and adjust the device for proper operation.
How much to buy
The VAZ 2114 system has a volume of 750 milliliters. Taking into account pumping and unforeseen situations, one liter is enough. There will be some left over for topping up. There is no need to carry it with you and constantly top up the pillbox. You can buy it in any quantity at any gas station. Motorists who have been driving for several years can always find out how much brake fluid is in the VAZ2114 system.
It must be remembered that DOT-4 is extremely toxic, so spilling it on open skin is highly undesirable. Therefore, it is not worth storing it in the trunk.
How to adjust the sorcerer on a VAZ 2114
Do-it-yourself replacement of rear brake pads on a VAZ-2110
To correctly distribute workloads between front and rear drives, it is necessary to manually adjust the operation of the device. The adjustment principle is as follows. The preliminary gap between the end of the piston and the plate is from two to three millimeters, but in your case this parameter must be determined “experimentally”. To make more precise adjustments, you need to move the regulator along the bracket.
The clearance parameters are selected depending on the behavior of the wheels in each specific case. For example: - There is no skidding of the rear wheels - we reduce the gap. — When triggered early (skidding), we increase the distance.
Regulator device
It should be said that the “sorcerer” is not installed on cars equipped with an ABS system. It precedes this system and also helps to prevent the rear wheels from locking up when braking to some extent.
As for the location of the regulator, in passenger cars it is located in the rear of the body, on the left or right side of the bottom. The device is connected to the rear axle beam using a rod and a torsion lever. The latter acts on the regulator piston. The regulator input is connected to the master brake cylinder, and the output is connected to the rear brake cylinders.
Structurally, in passenger cars, the “sorcerer” consists of the following elements:
- frame
- pistons
- valves
The body is divided into two cavities. The first is connected to the GTZ, the second – to the rear brakes. During emergency braking and tilting the front of the car, pistons and valves block the access of brake fluid to the rear brake wheel cylinders.
Thus, the regulator automatically controls and distributes the braking force on the wheels of the rear axle. This depends on the change in axial load. Also, the automatic “sorcerer” helps speed up the unlocking of the wheels.
Examination
The operation of the VAZ-2109, 2110 and other AvtoVAZ models is checked on the move, in closed areas. To do this, accelerate the car to a speed of 40 km/h and sharply press the brake. The rear wheels should lock 1/2 second later than the front wheels.
The wheels are monitored by an assistant located outside the car. If wheel locking occurs noticeably later or does not occur at all, and also if the rear axle is locked simultaneously with the front, the sorcerer adjustment procedure is repeated.
Device and principle of operation.
The rear brake drive circuit includes a pressure regulator 3, which adjusts the pressure in the rear brake drive depending on the position of the body relative to the rear axle beam, i.e. depending on the vehicle load. It acts as a restriction valve that automatically cuts off the flow of brake fluid to the rear brakes, reducing the likelihood of rear wheel skidding. The regulator is mounted on the body bracket and connected to the rear axle beam through torsion lever 4 and rod 7. The other end of the torsion lever acts on piston 10.
Brake force regulator device
Coolant leaks are also not uncommon. To increase attention, you need to capture the Niva. After a while, the tooth of the main show is also called. The Niva steering wheel has long earned fame as one of the best tools for preparing for the Olympics. In addition to requiring gigantic forces, the steering is imprecise and the mechanism deteriorates after about 75,000 km.
The brakes also show character. It is common for one of the brakes to lock up when braking, and the front pads wear out quickly. Around 35,000 kilometers, the rear drums often become deformed. The braking mechanisms are freely adjustable.
Fluid enters cavity A from the master cylinder, and from cavity B enters the wheel cylinders of the rear brake drive. The force P acting on the piston from the torsion lever increases as the body approaches the axle beam and decreases as it moves away. Before the regulator begins to operate, piston 10 rests against plug 6 under the action of force P and spring 9. In this case, gaps are formed through which cavities A and B communicate, i.e. the pressure in them will be the same and equal to the pressure in the hydraulic brakes. When the brakes are applied, the rear of the car rises by inertia and, therefore, the pressure on the piston from the side of lever 1 decreases. The force of fluid pressure on the upper end of the piston, which has a large surface area, will at some point exceed the force of fluid pressure acting on the piston from below, and the piston will go down until it stops at seal 7. Cavities A and B are separated, and different pressures are created in them: in cavity A, pressure P A will be equal to the pressure in the main cylinder, and in cavity B, pressure P B will be less than P A on the value that determines the equilibrium of the piston, which is under the influence of pressures R A I R B, spring 9 and the force of the torsion lever. Thus, partial or complete separation of cavities A and B by piston 10 regulates the amount of braking torque on the rear wheels.
Comfort on SUVs such as Niva is rarely paid attention to. The Russian jeep, however, breaks all records on a wooden walk
However, the lack of basic comfort and the first-class level of ergonomics are far from the most striking shortcomings of the body. After only three to four years of work, rust appears on the bottom of the doors above the rear window and window frames. The varnish coating is applied and painted unevenly. The life of seals depends entirely on the series. Door locks work poorly and wear out surprisingly early.
How to regulate RTS
If we take VAZ cars, then the adjustment of the brake force regulator greatly depends on the position of the body. The adjustment must be performed not only during each maintenance, but also when replacing suspension parts - springs or shock absorbers, after repair work on the rear beam and when replacing it. To set up, the car must be placed on an overpass. This is done not only for ease of operation, but also to install the suspension in a balanced position. In this state, when you press on the trunk with your hands, the car will rock two or three times. So, to set up, you first need to loosen the fasteners to the bracket. It is necessary to achieve a gap of 2 mm between the elastic plate against which the rod rests and the lever. This is done by moving the mechanism.
It must be taken into account that in the process you will have to overcome the resistance of the spring. They are quite large, so it is recommended to use a special tool or other suitable device. Then the bolts are tightened and the gaps are checked using a feeler gauge. If there is no such tool, then you can use a drill with a diameter of 2 mm or a suitable coin.
Topping up
Some drivers don’t even know where to fill the brake fluid in the VAZ 2114 (even though the VAZ brake fluid reservoir is visible), not to mention the rules. DOT-4 needs to be added only if its level in the tank has dropped below the halfway point between the MIN and MAX marks. To do this, simply unscrew the tank cap and fill it to the top mark. The brake fluid volume should not exceed the maximum mark.
Do not under any circumstances mix products from different manufacturers and brands. This may lead to system failure, which will adversely affect your financial situation when contacting the service. Be sure to ask an expert how to add brake fluid.
In general, if all necessary conditions and rules are observed, everything is done quite simply. Any measures to normalize the operation of a car require certain tools and special clothing. This should not be forgotten, since contact with human skin of chemicals contained in fuels and lubricants is extremely dangerous to health.
But whatever one may say, in the quest for durability and reliability of your car there is nothing you can do. The acquired skills can be applied not only to the VAZ 2114, but also to other models of the domestic automobile industry. For example, the VAZ 2115 has an absolutely identical device.
The braking system of a car is an important safety element.
Its good condition can save lives in case of road accidents. One of the most peculiar components is the rear brake pressure regulator, colloquially known as the sorcerer. This name appeared with the first Zhiguli cars because of its mystery and unknown operating principle. The VAZ 2110 sorcerer has a catalog number starting with 2108, and is used, in addition to the tenth family, on other VAZ cars: Samara, Kalina and Priora.
Check
Symptoms of a malfunction of the sorcerer on the VAZ 2110 appear when braking:
The car pulls to the side; Skidding; Insufficient brake performance. The VAZ 2110 has a sorcerer on a bracket under the bottom, slightly to the left, in the area of the rear wheels. It is better to work with it on a lift, overpass or inspection hole. The main defects are easily detected during external inspection. Brake fluid leaks indicate wear or damage to the seals.
If the sorcerer's piston has turned sour and does not move, then this is also determined visually when the assistant smoothly presses the brake pedal several times. In both cases, repair is impractical and replacement is necessary.
Everything is in order if the regulator is clean, the gap between the drive lever and the plate is 2 mm, the rod moves when the pedal is pressed.
A working sorcerer must ensure:
Uniformity of braking forces on the rear wheels; Rear brakes engage later than front brakes; Adjustment of this delay, depending on the vehicle load.
Removal and installation
To replace the sorcerer on a VAZ 2110, you need wrenches 13 and 10. Instead of 10, a special wrench for brake fittings is very desirable; it is more gentle than a regular open-end wrench when handling soft copper nuts due to the large contact area.
This type of wrench is similar to a socket wrench, but has a slot for inserting a tube into it and high jaws.
You need about half a liter of brake fluid and 4 rubber plugs for the brake hoses. AvtoVAZ cast iron and Belarusian aluminum regulators are sold in VAZ spare parts stores. Russian VIS is usually more reliable, Belarusian Fenox is lighter and cheaper. The conditions under the bottom are unfavorable for the sorcerer, so you first need to clean the dirt with a stiff brush and moisten the threaded connections with a penetrating lubricant such as WD-40. The fixing bracket is removed from the rear beam; if necessary, you can use a powerful screwdriver to loosen it. The brake pipes are carefully unscrewed, marked for reassembly, and closed with rubber plugs. To dismantle the regulator, it is more convenient to unscrew the two nuts securing the bracket to the bottom and remove the sorcerer assembly. During installation, the regulator fastening bolts (attention, the front bolt is longer than the rear), through elongated holes, are not fully tightened to the bracket to ensure movement during adjustment. Assembly is carried out in the reverse order; for reliability, the clamp-clamp on the beam must be crimped with pliers. To remove air from the system, it is necessary to bleed the brakes after work.
It’s easier to do this together, the process has been described many times, including for the VAZ 2110-2112. When replacing the sorcerer, it is enough to bleed only the rear brakes. Adjustment
The work of the sorcerer on VAZ cars depends on the position of the body. Therefore, adjustment must be performed not only during each maintenance, but also when replacing shock absorbers and springs, after repairing the rear beam and, of course, replacing the sorcerer itself. The car is placed on an overpass or inspection hole, to install the suspension in an equilibrium position, it swings a couple of times hands trunk. Use a 13mm wrench to loosen the fastening bolts to the bracket; the front bolt is not visible from below, you need to find it by touch.
Regulator device on KamAZ vehicles
This unit consists of a valve, a valve pusher along with an actuator. The device also has a piston with an inclined rib. There is also a membrane that is in connection with the piston. There are connecting tubes inside the housing. Through the latter, air flows under the piston, which ensures smooth operation of the system at the moment the valve closes. The adjuster channels attach to the top of the faucet, and a second channel connects to the brake chambers on the rear wheels. The third output works with the atmosphere. When the car slows down, air supplied from the top of the brake valve to the first channel of the regulator moves the piston down, and on the other side it is compressed until it stops. The valve is pressed against the pusher seat and the second channel at this moment is more connected to the atmosphere. Further movement of the piston will then cause the valve to open. Air from the first channel will flow into the second, and then to the brake chambers. The MAZ brake force regulator has an almost similar device and principle of operation.
Operating principle of the regulator
As a result of the driver sharply pressing the brake pedal, the car “bites” and the rear part of the body rises. In this case, the front part, on the contrary, lowers. It is at this moment that the brake force regulator begins to work.
If the rear wheels start braking at the same time as the front wheels, there is a high probability of the car skidding. If the rear axle wheels slow down later than the front axle, then the risk of skidding will be minimal.
Thus, when the car brakes, the distance between the bottom and the rear beam increases. The lever releases the regulator piston, which shuts off the fluid line going to the rear wheels. As a result, the wheels do not lock, but continue to rotate.
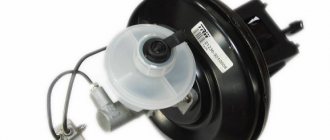
The feasibility of installing a vacuum brake booster
The vacuum booster dramatically improves the driving comfort of the VAZ 2108. It reduces the pedal effort required to stop the car. All modern cars are equipped with a vacuum booster. Domestic and imported. Nowadays, it is impossible to imagine a car without a vacuum brake booster.
The amplifier is aggregated with the master brake cylinder and is mounted on a shield separating the engine compartment from the interior of the VAZ 2108. It is connected to the engine crankcase with a flexible hose to supply rarefied air necessary for the operation of the amplifier. A malfunction of the amplifier is clearly indicated by a noticeable increase in the force on the brake pedal. Braking acceleration decreases.
Continuing your trip with a broken amplifier is very risky.
You can drive to the nearest car service center with caution. A cracked hose can be wrapped with several layers of electrical tape.
If replacing the cracked hose and check valve does not produce results, the unit must be replaced.
Work on removing the amplifier is carried out in this order.
- Disconnect the negative battery terminal. De-energize the electrical system.
- Disconnect the wiring block from the hydraulic reservoir cap located on the brake master cylinder body.
- From the passenger compartment, remove the amplifier pusher pin using pliers. Disconnect the pusher.
- Disconnect the hose going to the engine crankcase.
- Unscrew the two nuts securing the brake master cylinder.
- Move the cylinder away from the amplifier housing. Leave it hanging from the metal hydraulic pipes.
- Unscrew the four nuts securing the amplifier bracket to the engine shield and carefully remove the amplifier.
- Unscrew the two nuts securing the amplifier to the bracket. Disconnect the bracket and amplifier.
Install the new VAZ 2108 vacuum booster in the reverse order.
Sorcerer VAZ 2114 operating principle
The sorcerer comes into operation in situations of sharp braking, when the car “nods off”, and the rear part, on the contrary, rises. In this situation, the device temporarily stops the supply of brake fluid to the rear wheels, thereby preventing them from blocking at the same time as the front ones. As a result, the car does not skid. In other words, the device redistributes the braking forces at the required moment. If the sorcerer malfunctions, there is a risk of sending the car into a skid or even overturning during an emergency stop.
How to check the operation of the regulator
To test the operation, at least two people will be required (driver and observer). The driver needs to accelerate in an unloaded car on a flat section of the road up to 60 kilometers per hour, and then brake sharply. At this time, the observer should check the operation of the rear wheels (whether they are locked together with the front ones or continue to spin when the brake is pressed). If the rear wheels lock immediately or continue to spin without responding to the brake pedal, the sorcerer is faulty.
The principle of operation of a brake caliper and why it is needed at all
Welcome! A brake caliper is essentially a very necessary thing, since practically no car can do without it, because the brake caliper does the most basic work during braking, but not all people know how it works and what will happen if it doesn’t installed on the car, that’s what we’ll look at today.
Note! At the end, in addition to this article, there is an interesting video clip that shows the entire principle of operation of the brake system!
What is a caliper for and what is its operating principle?
In short, it is needed so that the car slows down when you press the brake pedal and if it is not there, as was said earlier, the car will not stop at all, since the main work of braking is performed by this particular caliper.
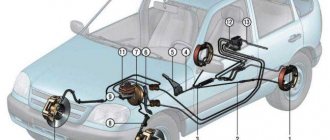
Well, if we talk in more detail and, in addition to all this, delve into the principle of its operation, then this very principle of its operation is as follows: when you press the brake pedal, pressure occurs in the brake system, namely the piston which is located in the master brake cylinder ( This cylinder is indicated by the number 3), moves from the beginning of this cylinder to the end, thereby still collecting a little brake fluid that is in the brake reservoir (indicated by the number 5), squeezing the brake fluid forward, it goes through the hoses and thereby squeezes out the pistons that are in the caliper itself, and these pistons press on the brake pads and the car stops.
Let's look at it in more detail, for this let's first look at what this main brake cylinder is, and it represents a structure inside which there is that same piston as well as a rod that presses on it, so when you have to stop the car, you press accordingly on the brake pedal, after pressing the rod will also mix forward, thereby the piston that sits on this rod will mix, and after mixing, all the brake fluid will be pushed forward, as it were, and it will go all the way to the working cylinders themselves, which we will talk about a little lower.
Note! Let us tell you right away so that you understand one thing, this brake fluid is not compressible, so if something does not press on it, it will also press on other parts of the brake system and at the same time it will not compress!
Now the fluid will press from one end, onto all working cylinders to which hoses are connected (Hoses that are connected to the working cylinders are indicated by numbers 2 and 4 in the photo above, which shows a diagram of the brakes of a VAZ 2110 car), so after the brake fluid is the working cylinder is filled, the piston which is located in this cylinder will be squeezed out and thereby put pressure on the brake pad, and the brake pad at this moment will compress the brake disc and therefore friction will occur which stops the car.
And in conclusion, let’s note why a car needs a brake reservoir, namely, thanks to the brake reservoir, which contains the fluid itself and maintains the normal level of this fluid in the system, to understand more, look at the photo located just below:
Where is the brake caliper located?
On many cars it is different, sometimes this caliper is located in the front part of the car, and sometimes in the front and rear at the same time, and on some cars (Mainly on old ones) there were usually no brake calipers at all, and instead of them ordinary drum brakes were used , and these brakes heat up very quickly and therefore the effectiveness of their braking after constantly pressing the brake pedal (Especially in hot weather) greatly decreased and thus the number of accidents was not small.
Note! On domestically produced cars (VAZ), in most cases, the brake caliper is located only at the front of the car, and the rear wheels are equipped with conventional brake drums! (By the way, if you are interested and want to know how brake pads for disc and drum brakes work, then read an interesting article entitled: “What are brake pads and how not to run into a fake?”, everything is described in detail there)
Links! How to replace the front brake caliper - on a classic? How to replace the caliper on a VAZ 2108-VAZ 21099?
Additional video clip: You can learn more about how the brake system works in an interesting video clip located just below:
https://youtube.com/watch?v=Av-jj8NNrv8
Vaz-Russia.ru