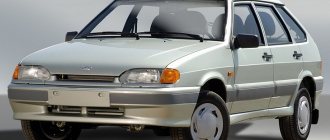
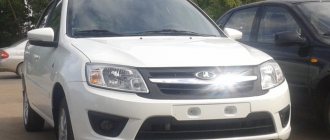
As you use your car, it becomes necessary to replace damaged body parts. The bumper is no exception. This element has more than just a decorative purpose. The bumper reinforcement, securely connected with mounting brackets, is capable of protecting body parts in the event of an accident. When planning to independently repair and maintain the car, you need to learn how to remove the bumper on a VAZ 2114. Knowledge of the design features will allow you to independently remove and replace cracked or damaged protection parts on the front and rear of the car.
Step-by-step instructions for removing bumpers from a VAZ 2113-2115
Most owners of passenger cars of the Lada Samara 2 family are wondering how to remove the front bumper on a VAZ 2114/2113/2115 on their own. For drivers who are well versed in technology, removing and replacing the part is not difficult. If the bumper is damaged, they do not go to specialized auto repair shops or service stations; such repair work is performed with their own hands.
This review is intended for new car enthusiasts who want to understand the mechanics of a car, save money and carry out minor repairs on their car themselves.
Is it possible to do the replacement yourself?
Experienced motorists know that replacing the rear bumper of a VAZ-2114 is sometimes a more profitable investment than the cost of repairs. Especially if you plan to entrust the repair of the part to specialists. The price of the spare part can be called affordable, and there are no complications with the purchase either. The question here is one: is it possible to carry out the replacement yourself?
If you need to replace a worn or damaged product, it is not necessary to seek specialized help. It is quite simple to dismantle and then install the elements yourself. The only point you have to figure out is the step-by-step instructions for removing and installing the part.
Important! If you do not have minimal knowledge regarding car repairs, it will be better if the bumper is replaced at a specialized auto repair shop.
How to replace a bumper VAZ 2114 2115 2113
The VAZ bumper is an energy-absorbing device in the form of a bar, located in the front and rear parts of the Lada Samara 2 car.
This important safety element is a mandatory part of the body and gives the car a beautiful appearance. Body kits have 2 functions:
- Decorative. The car looks more improved. The manufacturer developed inflated body elements as styling for the VAZ 2114. They look aesthetically pleasing and at the same time increase downforce when driving at high speeds, which improves safety.
- Protective. The bumper protects the car from light impacts and damage, protects the reinforcing beam, body and other parts.
VAZ 2113/2114/2115 models are equipped with 2 bumpers:
- in front of him;
- rear
Body kits are made from 2 types of plastic material:
- thermoplastic;
- thermosetting.
Thermoplastic plastic can be easily softened and is combined into a homogeneous structure during repairs. Thermosets cannot be repaired by welding.
The material marking is located on the inside of the body element.
As the vehicle is used, various collisions and obstacles may occur, followed by deformation of the body kit. Replacing the front bumper of the VAZ 2115 in this case is mandatory.
If you leave the damaged part, then with a possible next impact, all the energy will be directed to the car body, as a result of which many mechanisms will fail:
- radiator, its grille;
- fan;
- wheel arch liners
In case of minor damage, such as scratches, small cracks, the body kits can be glued, puttied and painted. The reasons for removing this part are as follows:
- deformation of an element as a result of a collision or impact;
- engine repair, reinforcement beam, radiator replacement;
- installation of a protective mesh, decorative lining;
- replacement of headlights, installation of optics.
The rear body kit of the VAZ 2114 differs from the front one in the absence of holes for the vehicle registration number.
The reasons for repairing and replacing the rear bumper of a VAZ 2114 are the same as for the front element:
- integrity violation;
- body deformation;
- chips, cracks.
When choosing a body part, the car owner must adhere to the following recommendations and rules:
- Thickness. Thicker material increases quality and protection.
- Color. A painted body kit is selected to match the color of the car, while an unpainted body kit is used for major body repairs with full individual car painting.
- Compatibility. All elements must fit in size. It is better to choose ones with holes for fog lights, especially for the VAZ 2114.
- Manufacturer. There are brands from different manufacturers on the market, but for VAZ 2113-2115 it is recommended to buy a new domestic bumper.
- Price. The cost of Russian bumpers is lower, and the quality is higher than that of foreign ones.
By applying these recommendations in practice, the car owner will be able to choose an excellent option according to his preferences and budget.
We shoot with our own hands
Original bumper Factory rear bumper VAZ-2114
Factory rear bumper VAZ-2114
Before you begin directly to work, you should understand that without constructive knowledge of the car, you cannot begin the process. You can always entrust the matter to car service professionals who will do everything efficiently and quickly. But, as practice shows, most car enthusiasts themselves begin to repair their “iron horse”.
Tool
So, first you need to collect all the necessary tools. Of course, it is best to have a lift that will simplify the work, but if you don’t have one, then 2 jacks will do. As with any repair, you will need a set of wrenches and sockets, as well as WD-40 and a wire brush.
Process
Well, everything is assembled, and you can proceed directly to the process of dismantling the product from the car. Let's look at how the process is carried out at home:
- Place the car on a hole or a flat surface.
- In this case, the handbrake is useless, so we fix the front wheels with shoes and 2nd speed at the gearbox.
- Next, we dismantle both rear wheels.
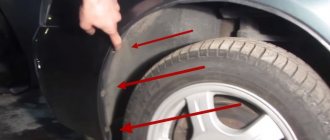
It is worth securing the car well against rolling away so that one and a half tons does not fall on parts of the body. Unscrew the rear wheels from the car - Using socket heads, unscrew the fastenings of the rear fender liners so that they are disconnected from the buffer.
Unscrew the screws securing the rear wheel arch liners - Behind the fender liners, on the side of the inner arch, there are fasteners that also hold the bumper.
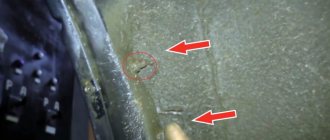
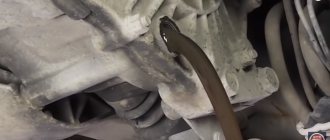
We unscrew them too. Unscrew the internal bumper fasteners located in the wheel arch - We look under the bumper and find 4 amplifier mounting nuts.
Of course, they are already rusty, and it will not be possible to unscrew them. Therefore, we first apply WD-40 to them, sparing the amount of liquid. Unscrew the nuts securing the rear bumper amplifier - We dismantle the bumper.
The process of removing a bumper from a car
On the one hand, the process of dismantling the rear buffer may seem quite complicated, but if you get serious about the removal/installation, then in a week you can go to a car service center to work.
Product selection
Standard rear bumper
The choice of rear bumper for the VAZ-2114 is small: original or tuning version. Both options can be purchased at an auto store. But, some car owners independently convert an old part into a tuning version after an accident.
2114-2803015-01 – original article number for the rear buffer of the VAZ-2114. It is produced at the AvtoVAZ plant in black form. Painting is already taking place at the car service center. Using this number, you can find possible tuning analogues. The cost starts from 4000 rubles .
Tuned rear bumper installed on a car
Step-by-step removal
To remove the front bumper of a VAZ 2114, place the car on a viewing hole or a lift.
The algorithm for dismantling the body kit is as follows:
- The electrical connections to the license plate and fog lights must be turned off before any work can be done.
- The fastening bolts and nuts are treated against rust, as well as for better loosening, with VD-40 aerosol.
- Unfasten the front wheel fenders.
- Unscrew the fender liner mounting plate with a 10 mm wrench.
- Remove the 3 screws that are attached to the body kit.
- Using a 8 key, remove the 6 screws securing the fender liner to the front fender.
- Pull back the fender liner.
- Remove the radiator and headlight trims.
- Using a 10 mm wrench, unscrew the 2 nuts securing the left side of the bumper.
- Pull it a little to the side so that the studs come out of the body bracket.
- In a similar way, you need to unscrew the right side of the bumper.
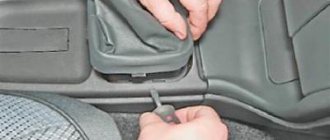
- Using a Phillips screwdriver, remove the mounting screws under the license plate and unscrew the 2 screws located below. Disconnect the license plate.
- Remove the bumper.
If the amplifier is damaged, replace it. Using a 13 mm socket, unscrew 2 nuts on each side. The amplifier is adjusted during installation using shims.
Reinstalling the rear bumper
Regardless of whether the product is being replaced with a new one or an old one is being installed, it must be adjusted. Vertically, this is done by screwing it into the fasteners, then the gap from the lights is reduced. Horizontal adjustment is made by changing the number of shims.
Attention! Before you begin installation on the “tag”, you need to install the terminals for the license plate illumination. There is a fine for driving without illuminated license plates.
The installation itself is carried out in the reverse order of removal.
Dismantling
The rear bumper on VAZ 2115, 2114 and 2113 is mounted on the rear beam using brackets. To remove the rear bumper of a VAZ 2114, you must perform the following steps:
- Remove the rear wheel fenders.
- Use a metal brush to clean off dirt, grease, and oil, and inject VD-40 aerosol while working.
- Using a 10 mm socket with a wrench, unscrew the 4 bolts on which the bumper should be attached, 2 bolts on each side.
- Unscrew the 3 nuts of the bracket for fastening the reinforcement beam using a 13 mm wrench.
- The beam with the bumper must be dismantled.
- Unscrew the screws and disconnect the beam.
The damaged bumper is ready for repair or replacement.
Damage analysis
Any emergency situation that results in the rear bumper coming into contact with an obstacle is a reason to remove the structure for damage analysis. It may seem that a small dent in the plastic is nothing to worry about, but it is not. Such little things often become the primary source of corrosion that spreads to the body part.
Therefore, it is better to remove the rear bumper on a VAZ-2114 car to assess the condition of the spare parts. Most minor damage can be easily repaired with putty and painting. In more serious cases, repair work becomes less cost-effective than replacement. Upon completion of the analysis, proceed with repairs or go to the store for a new product. The last stage awaits you - reassembling the bumper.
We install it in place
After the rear body kit has been repaired or replaced, it must be put back in place. All procedures for installing the rear bumper on a VAZ are performed in the reverse order of removal.
The bumper is attached carefully so as not to damage it. Structural elements must be installed correctly, without changes in the gaps between parts. When performing work, be careful, follow the recommendations and you will be able to complete the procedure without special skills and knowledge.
Didn't find the information you are looking for? on our forum.
Useful video
It is easy to notice that there are no difficult moments in the removal and subsequent installation of the structure. Even novice car enthusiasts can do everything. Finally, it is worth mentioning the last nuance - it is better to carry out the work of replacing the rear bumper on a VAZ-2114 with a partner, this greatly simplifies the task. But even without support, you can do everything on your own.
Published January 22, 2018
“No one is insured against road accidents” - these words can often be heard from different people. The most common reason is failure to maintain distance, especially in big cities. This factor influences damage to the rear bumper of the VAZ-2114. The article will tell you how to dismantle a part for repair or replacement.
Features of the work
New versions of the car have some differences. They touch the bumper reinforcement. It has teeth under the headlights and also under the grille. They are put on with special slots. As a result, in order to remove the bumper without any damage, you will also need to remove the headlights along with the grille. This is very inconvenient, but you can’t do without it.
If you still need to replace the bumper with a new one, you should carefully select the model of the new bumper. Under no circumstances should you buy metal bumpers. They pose a serious threat to the driver during an accident. It is better to give preference to bumpers made of plastic.
We must not forget about color. It must perfectly match the color of the entire body, otherwise a car with multi-colored elements will look simply terrible.
Cost of work
The cost of repairing a rear or front bumper is determined after an express examination carried out by knowledgeable craftsmen. In any case, repair work will cost an order of magnitude cheaper than the price of a new part.
| Removal/installation of part | Part replacement | Painting a new part (with material) | Painting parts up to 30% damage (with material) | Painting parts up to 50% damage (with material) | |
| Front bumper | from 500 rub. | from 600 rub. | from 3700 rub. | from 3900 rub. | from 4200 rub. |
| Rear bumper | from 300 rub. | from 400 rub. | from 3700 rub. | from 3900 rub. | from 4200 rub. |
| Radiator grille | from 200 rub. | — | from 1100 rub. | — | — |
Obvious advantages of our offer
- You are offered a high-quality repair of plastic bumpers with perfect welding, painting and polishing, giving you the opportunity to avoid purchasing a new expensive part.
- Our craftsmen take on the most hopeless cases, and such little things as local repairs of cracks and scratches are eliminated in a couple of hours.
- Doctor Bumper service stations are located in every district of the city, which will allow you to save time.
- Refurbished bumpers are provided with a 2-year documentary warranty. If a crack or chip appears again in the same place without serious external influences, we will eliminate such a defect free of charge.
- Our prices differ from competing companies by approximately 15-20% in favor of the car owner. We will pleasantly surprise you not only with good work, but also with a truly attractive price!
How we do it
The presence of special equipment makes it possible to successfully carry out the following operations:
- qualified dismantling, disassembly and installation
- efficient welding of plastic;
- selection of lost fragments from similar material;
- bumper reinforcement;
- bumper welding;
- grinding of restored surfaces;
- putty and primer
- complete or local painting of a plastic bumper