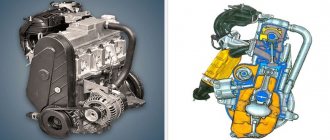
To avoid unpredictable consequences for the main power unit of the Lada Kalina, it is worth changing the timing belt on time. Since untimely replacement can lead to major repairs and a blow to the owner’s wallet. Of course, not every car enthusiast can do this himself and has to contact a car service center.
But after reading this article, you can not only learn how to change this unit, but also correctly select spare parts and determine the timing belt malfunction.
Video of replacing the timing belt on Lada Kalina (8-valve engine).
Article number and price of the video for Lada Kalina
An integral operation of selecting a belt is also selecting a timing pulley. As in the first option, there is an original and several analogues that can be used. Let's look at the article numbers and prices for the timing pulley Lada Kalina 8 valves:
- The original catalog number of the timing belt roller of the 8-valve Lada Kalina is: 21126-1006135. The average cost of this part in the Russian Federation is 700 rubles.
- There are quite a lot of analogues of the original timing pulley, which are successfully certified for use on a car and differ only in quality and service life. Let's consider which timing pulley can be installed instead of the original one on a Kalina with 8 valves:
Table indicating manufacturers, part numbers and prices for a non-original timing pulley
| Manufacturer's name | Catalog number | Average price in the Russian Federation in rubles |
| Master-sport | 21126-1006135-ST-PCS-MS | 580 |
| QML | BT1006 | 650 |
| Pilenga | PT-P1571 | 670 |
| Torque | KR5016 | 680 |
| Caffaro | 320-99 | 720 |
| Trialli | CM172 | 735 |
| Optimal | 0-N2044 | 750 |
| LYNXauto | PB-3012 | 1080 |
| Gates | T42150 | 1300 |
| Dayco | ATB2543 | 1450 |
| Ina | 532060410 | 1470 |
| SNR | GE372.00 | 1500 |
| Ruville | 57207 | 1550 |
| Coram | C834 | 1850 |
| Outlog | RT1663 | 2000 |
This is a Chinese video, the quality is not very good, it quickly became noisy
A fairly large selection of timing rollers is available to the owner of the 8-valve Lada Kalina. It is worth noting that most of the products from the table have high quality workmanship and also have a service life of about 40,000 km.
Video on the topic:
Thanks to the camshaft of the VAZ 2114, the intake and exhaust strokes of the internal combustion engine are synchronized. The camshaft is driven by rotation of the crankshaft, which, in turn, rotates through the movement of the crankshaft. The most important structural part of the camshaft is the so-called “cams”. The cams are directly responsible for the process of opening/closing valves.
Thanks to the cams, the valve timing of the engine is regulated. On all cars, the camshaft is located in the RBC (cylinder block camber). The VAZ 2114 is equipped with a cast iron camshaft, the design of which can be seen in the screenshot below. The standard eight-valve engines of the Samara-2 family have one camshaft installed.
"VAZ" camshafts have an average resource potential: 90 - 100 tkm. At this point, a major overhaul of the internal combustion engine is usually carried out.
Reasons for failure and consequences of not timely replacement
There are several reasons for the failure of the timing belt on the Lada Kalina with 8 valves.
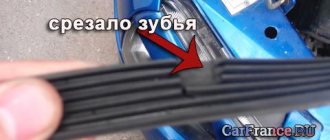
Due to poor quality, the timing belt slides closer to the driver's side
Let's consider the main ones:
- Wear. During operation, the belt heats up, which leads to its stretching. In turn, the consequences are the formation of cracks.
- Quality workmanship of the part. A bad part can last much less than its intended service life.
- Incorrectly selected spare parts. If a part is installed incorrectly or is not the correct one, the engine will not work correctly and the gas distribution process will be disrupted. This leads to increased wear of the elements of the power unit or replacement of the cylinder head.
Consequences of untimely replacement of the timing belt and pulley
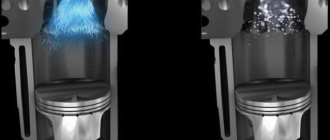
On the 8-valve Kalina, the engine is “not plug-in” - in slang this means that the pistons do not meet the valves in the event of a timing belt break
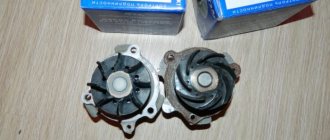
The consequences of untimely replacement of the timing belt can be both minor and large-scale, which will hit the owner’s wallet. On the 8-valve Lada Kalina engine, the valves do not bend, so if the timing belt breaks, you will only need to replace it and find out the reason. Either the belt broke on its own, or it was helped, for example, by a jammed pump.
So, let's look at the main troubles that can happen:
- Wear of piston and liners.
- Increased oil consumption.
- Worn camshaft and valve guides.
- Bent cylinder head valves.
- Timing gear deformation.
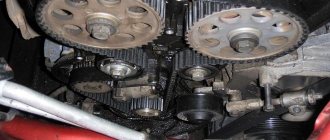
The timing belt is a special toothed belt made of rubber and reinforced with nylon thread. The role of this device is to transmit rotational torque from the crankshaft pulley to the camshaft while simultaneously reducing the speed by half.
Video of replacing the timing belt on an 8-valve Lada Kalina:
Withdrawal procedure
- Removing the timing belt
- Unscrew the nut and bolt of the upper fastening of the rear timing belt cover
- Removing the cylinder head cover
- On engines with phased fuel injection, disconnect the wiring harness connector from the camshaft position sensor
- Disconnect the wiring harness from the coolant temperature sensor
Using a 10 mm socket wrench, unscrew the bolt and two nuts securing the plug. A rubber sealing ring is installed under the plug mounting bolt. Replace the damaged o-ring.
- We remove the plug. On an engine with a camshaft position sensor, the plug can only be removed if the pin (1) is located opposite the slot (2).
- Remove the sealing ring of the plug. The O-ring must be replaced if it is damaged or if oil is leaking from under the plug.
- Using a 13 mm socket wrench, evenly (in several steps) unscrew the ten nuts securing the two bearing housings.
- Remove the front bearing housing.
- Remove the rear bearing housing.
- Remove the camshaft from the cylinder head by slightly pulling the rear timing belt cover.
- Remove the oil seal from the camshaft.
Camshaft installation:
- Lubricate the camshaft journals with clean engine oil.
- Place the camshaft in the cylinder head with the pin facing up.
- Before installing the bearing housings, apply a thin layer of sealant to the mating surface of the block head in the areas of the front oil seal and plug.
- Evenly, in several steps, tighten the nuts of the bearing housings until the housings come into contact with the cylinder head (following the sequence indicated in the photo). Then tighten the nuts to a torque of 18.4–22.6 N m (1.9–2.3 kgf m).
- Pressing in a new camshaft oil seal
- Before installing the plug, put an O-ring on it.
- Further assembly is carried out in the reverse order of removal.
We exhale, we are not in danger of bending the valves
If you have an 8-valve engine, then bending the valves and replacing them, as a rule, does not threaten you, but if the “head” is 16-valve, you are definitely guaranteed to replace these elements. However, in this article we will look at how to change the timing belt on a younger brother, when a breakdown does not entail any unpleasant consequences, and all work can be carried out almost in the field and with minimal knowledge.
Major breakdowns
There are three main types of timing belt failure:
- The integrity of the belt structure is compromised - in this case, the belt delaminates, and the internal threads on its surface become visible to the naked eye. These problems occur due to mechanical damage or due to incorrect adjustment. This belt must be replaced immediately.
- Over-tension or under-tension of the belt - the tension roller is responsible for the degree of belt tension, which allows the belt to rotate around its own axis and allows it to be adjusted correctly. If the belt is too tight or too loose, it will fall into an indecent state very quickly.
- A break is the most unpleasant situation that can happen on the road with a timing belt. In this case, the engine will completely stall and it will be possible to start it again only by installing a new element.
To avoid such troubles, the manufacturer recommends checking it every 15,000 kilometers and replacing it every 75,000 kilometers. In fact, it should be changed as soon as visible cracks are detected on the surface.
Why do you need a phase sensor (PF)?
Before talking about repairs, you need to find out what this sensor is needed for. It determines the operating cycles of the internal combustion engine. The camshaft cams drive the valves, and the DF determines which valve is open.
This is an integrated control unit, that is, it includes a sensitive element and a signal conversion system. There is a Hall element there - data is taken based on changes in the magnetic field.
The converter has a bridge circuit, a converter block, and an output stage. The work is that the DF determines the intake and exhaust phases of the 1st cylinder.
For carburetor engines it is not needed because the spark is supplied at the moment of compression and at the end of the exhaust gases. DPKV is sufficient for this.
Roughly speaking, the VAZ 2114, 2115 phase sensor functions as a fuel injection system. If it breaks down, the work of sparking falls on the crankshaft position sensor. The designs that are used on 16-valve cars differ from eight-valve cars.
Now let's try to explain in simple words how the phased injection system works. It turns out something like this: the DF gives a signal to the electronic engine control system (ECM), and it, in turn, gives a command to inject fuel, while the intake valve begins to open, and after it has opened, air is sucked in and mixed with gasoline to form a mixture.
When not running, fuel can be supplied to two cylinders simultaneously. If there is a breakdown, the on-board computer displays error 0340 or 0343, which indicates a faulty phase sensor.
The following signs may also be observed:
- When the starter rotates for four or five seconds, the engine starts and the check engine light comes on. This means that the ECU is waiting for a signal from the DF and, not receiving it, writes off the data from the crankshaft position sensor.
- Fuel consumption increases quite decently, by 15 percent.
- Self-diagnosis mode does not work.
- Engine dynamics drop.
Phase sensor malfunctions are difficult to determine at home. So its diagnosis needs to be carried out at special service stations, since the equipment for its diagnosis is quite expensive.
Video about setting marks on Kalina's 8-valve valve
When performing all work, do not close the hood and start the engine. If everything is installed correctly, then there should be no extraneous noise or creaks in the operation of the motor. With a well-tensioned drive, the engine should not move in “waves”, that is, regardless of the speed, the engine should not deviate from stable operation. If the belt is tensioned too much, a peculiar “hum” from the tension roller may be observed. If this happens, loosen the roller and fix everything again. Upon completion of all work, reinstall the belt and engine cover.
Which belt to buy
The efficiency of the car engine depends on the quality of the parts used in the timing mechanism drive (tensioner roller, belt). When repairing or servicing a car, it is advisable to use original parts, but in some cases, non-original spare parts for automobile components have worked well.
The article number of the original timing belt is 21126–1006040 , which is produced by the RTI plant in Balakovo. Experts recommend confidently using parts from Gates, Bosch, Contitech, Optibelt, Dayco. When choosing, you should be especially careful, since under the brand name of well-known manufacturers you can buy a fake.
How to remove the crankshaft pulley
As a rule, unscrewing the crankshaft pulley bolt is quite difficult.
This is due to the fact that when you try to unscrew the bolt, your crankshaft will rotate. And this could be a problem. If you just decide to change the timing belt or oil seal, then nothing bad will happen. If your timing belt breaks and you rotate the crankshaft, not knowing whether the valve on your engine is bending, there is no point in describing the consequences. I will tell you 3 ways to remove the pulley. They are suitable for cars with a classic engine arrangement. Of course, if you have a special device that fixes the pulley, then everything will turn out very simple. But most likely, since you are reading this article, you do not have the device.
The easiest way to unscrew the crankshaft pulley bolt is to use a pneumatic impact wrench, the kind that is used at tire shops. It is advisable that the compressor pressure be more than 7 bar. It is much more efficient to unscrew a bolt by briefly pressing the trigger of the impact wrench. The key is to create powerful jerks rather than prolonged rotational impact. Most likely, if you have a good impact wrench, the bolt will come out right away.
The next method is to unscrew the crankshaft pulley bolt using the starter. The method is also quite simple, the main thing is not to be afraid) We put the required head with a long collar on the crankshaft bolt. The driver needs to be rested against the floor or the suspension arm. Everything must be done so that when the starter turns the crank, it immediately hits the floor or lever. You only need to use a hex head. Under no circumstances should a 12-sided one be used, it can cut off the edges of the bolt, and this is a huge problem. You need to turn off the spark plugs. Let's try. We briefly turn the starter and go see the result. We try to manually unscrew the bolt with a wrench; if that doesn’t work, turn it with the starter again. Usually everything works out the second or third time.
This method will require more labor. Each automatic transmission has a small hatch through which the bolts connecting the flywheel and fluid coupling are unscrewed. So, if you open this hatch and insert the assembly into the flywheel teeth, you will be able to block the crankshaft. Accordingly, you can unscrew the crankshaft pulley bolt without any problems.
When the bolt is unscrewed, all that remains is to remove the pulley itself. If it cannot be removed by hand, use any universal puller. It is not recommended to knock down the pulley with a hammer; the metal there is very delicate. That's all.
The author of the article sincerely hopes that he helped cope with the problem, which sometimes takes a lot of time and nerves. Good luck, friend .
Every second car enthusiast who tries to repair his favorite four-wheeled friend with his own hands has encountered the problem of how to remove the crankshaft pulley. After reading the instructions in the maintenance and repair manual, at first glance, the procedure does not seem complicated, however, when you first try to unscrew the ill-fated bolt, it turns out that this is not so easy. It is completely unclear how to fix the crankshaft so that it does not rotate. Another problem is where is the best way to get to the treasured bolt. Removing the crankshaft pulley causes a lot of trouble because it is too tight. There is a high probability of damaging many parts of the engine compartment or the paintwork of the body.
The problem is that the crankshaft pulley bolt (or nut, depending on the model) is tightened with great force during installation. This is done so that it does not unwind spontaneously, since if unscrewed, serious damage and expensive repairs cannot be avoided. The degree of tightening gradually increases as the engine operates and is aggravated by sticking, coking, and corrosion.
In reality, the entire dismantling process can take 10-15 minutes, but there are some techniques you need to know and use. Different motor models use either a bolt or a nut to secure the pulley. Each option should be considered.
How to unscrew the crankshaft pulley nut?
The nut at the end of the crankshaft holding the pulley is a sign of the engine of a classic rear-wheel drive car like VAZ from model 2101 to 2107, Niva and the like. Such a nut is also called a “ratchet”, since it can have ledges for a “crooked starter”.
It is better to do the work above the inspection hole. The crankshaft should be secured by placing the gearbox in 4th gear and applying the parking brake. You should stock up on the following tools in advance:
- socket or socket wrench 36 (or 38);
- lever extension in the form of a piece of pipe.
While under the car, try to unscrew the nut with a wrench with a sufficiently long lever. If the attempt is unsuccessful, put the gearbox in neutral and proceed as follows:
- the candlesticks are removed;
- while in the pit, install the key and extension so that the end rests on the floor or spar as the shaft rotates;
- turning the key in the ignition switch gives a short-term impulse.
As a rule, on the first or second attempt the nut comes off and is then unscrewed with a regular wrench. Don't forget to loosen and remove the alternator belt.
How to unscrew the crankshaft pulley bolt?
The bolt holding the pulley predominates in engines in front-wheel drive cars, when the block is located perpendicular to the axis of the car. In this case, you will have to tinker more, since it is more difficult to get to the bolt. To work you should prepare:
- jack;
- “tragus” (stump);
- a socket to the size of the bolt with an extension and lever;
- set of automotive tools.
In search of an answer to the question of how to remove the crankshaft pulley, many car enthusiasts begin to look for an opportunity to do this without prior preparation. By definition, such attempts cannot be successful.
In order to correctly remove the pulley, you must perform the following manipulations::
- the right front part of the car is lifted, the wheel is removed;
- the car is installed on a “tragus”;
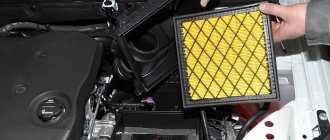
- From the top side of the hood, all parts that impede access are removed: the air filter and the engine mudguard;
- the alternator belt is removed;
- to fix the crankshaft, the plug on the clutch block is opened and a pry bar is inserted into the resulting window to jam the flywheel teeth;
- under the wheel arch, a head with an extension and a lever is put on the pulley bolt;
- the bolt is unscrewed counterclockwise.
How to replace the VAZ 2114 phase sensor yourself.
But replacing it is a very easy job. It is located at the end of the cylinder head next to the air filter.
Replacing the phase sensor begins by disconnecting the power from the battery. In this case, the control unit memory will be reset.
If this is not done, it will continue to operate in the same mode as with a faulty phase sensor. Normal operation will begin after a few engine starts.
The tool that will be needed is just a ten key and sealant. Next, disconnect the wires from the phase sensor and remove it using a key.
The new sensor needs to be coated with sealant, the layer should be small, and it should be left for about five minutes before installation. We install it on the seat and connect the wires.
Next, connect the battery, start the engine and see if the check engine light comes on. If it no longer lights up, then the sensor is installed correctly.
That's all the work was done, as they say, for ten minutes. Yes, the price of the sensor itself is around $15, depending on the region.
FakeHeader
Comments 29
how's the pulley? check light is not on? no vibrations?
Yes, I changed it yesterday, drove home and that’s it. The check did not light up, although I turned it to the cut-off point a couple of times while driving home. There is vibration because it is smaller but hits. As I understand it, the quality of the pulley itself is the same.
In fact, yes, I don’t know where to get a quality pulley. Or you need to buy it and look for somewhere to balance it and, preferably, add a mounting point. But something tells me that this is some kind of fuse so as not to break the key on the crankshaft.
“The basin continues to disassemble itself on its own.” - a great phrase!