How to change it yourself?
The complexity of replacing the alternator belt on Kalina does not depend on the number of valves or additional units on the engine.
Replacement on 8 valve engines without tensioner
Replacing the belt on such an engine is the simplest; the only tools you need are a 13 mm wrench and a short flat-blade screwdriver. Since the tension in such a drive scheme is quite strong, when changing it is necessary to use only a Gates 6PK823SF or Dayco 825 six-V belt with the additional marking POLY-V. The remaining straps are too rigid, quickly collapse and damage the bearing on the generator shaft.
Stages of work
To complete the task you need to do the following:
- Unscrew the lower mounting bolt of the generator 2-3 turns.
- Unscrew the nut of the upper fastening, use a screwdriver to push out the bolt and remove it completely.
- Lower the generator down. The eye of the mechanism must pass through the gap between the radiator and the TV body.
- Remove the old belt and replace it with a new one. If the strap does not fit easily onto the pulleys, you can carefully tighten it using a screwdriver.
- Raise the generator up, ensuring the belt is tensioned.
- Insert the upper mounting point bolt and tighten the nut.
- Tighten the lower mounting point bolt.
- Check the operation of the belt.
The repair process on such an engine is clearly shown in the video filmed by the author Ilgiz Magafurov.
Replacement on 8 valve engines with tensioner
Here, the procedure for installing a new alternator belt is very different from that presented above.
Required Tools
To replace the alternator belt yourself, you will need at least the following tools:
- regular or box wrench for 13, 17 and 19 mm nuts;
- a head with a ratchet for 8 mm nuts; if it is not available, an open-end or regular wrench of the same size will do;
- a screwdriver with a thin flat blade;
- thin needle;
- rags;
- white spirit or gasoline, approximately 0.5 liters;
- container and brush for washing;
- CV joint bearing lubricant.
Stages of work
To adjust the degree of belt tension on Kalina engines, a mechanical tensioner is used, in contrast to the timing drive, which uses a hydraulic tensioner. When changing an element, it is recommended to carry out preventive maintenance of the roller by adding fresh lubricant.
To complete the work you need to do the following:
- Loosen the roller bolt. The thread on it is reversed.
- Use a screwdriver to pry up the plastic plug on the roller and carefully remove it.
- Unscrew the fixing nut on the tensioner rod a few turns.
- Loosen the belt tension by rotating the rod nut clockwise. The nut must be unscrewed until the rod begins to move freely in the seat.
- Unscrew the side bolt securing the rod end, located next to the tension roller.
- Remove the tensioner and set it aside.
- Proceed to dismantle the strap. The procedure must begin with the generator pulley, while overcoming the slight resistance of the belt.
- Remove the element from the crankshaft pulley and remove it completely.
- Unscrew the roller bolt and remove it.
- Using a needle, carefully pry up and remove the protective caps on the bearing. Wash the bearing with white spirit or gasoline.
- Refill with fresh grease and install protective rubber caps.
- Assemble all the parts and mount the roller in place. When assembling, you must remember that the bushing is in the bearing on the side of the bracket.
- Change the belt by installing it in the reverse order - from the crankshaft pulley to the generator pulley.
- Install the tensioner and begin tightening the belt by turning the nut counterclockwise. The nut must be tightened until the resistance increases. A well-tensioned strap should be slightly pressed when pressed by hand.
- Tighten the nut securing the tensioner rod.
- Check the operation of the mechanism; if a whistle occurs, tighten the strap.
We recommend: Changing the oil in the Nissan X Trail T31 variator with your own hands
Loosening the 17 mm left nut Removing the cover on the roller Disassembled tension roller Bearing with removed covers Cleaned roller Reassembling the unit Belt tension Tightening the control nut
Replacement on 16 valve engines
The difficulty of replacing the alternator drive belt on such Kalinas lies in the need to remove the front engine mount.
Required Tools
- head for hexagonal sprockets size 11 mm or TORX E14;
- two jacks;
- 17 mm socket or wrench;
- 8 mm ratchet head.
Replacement process
During the work process you need to perform the following actions:
- Raise the car on a jack and remove the right wheel, as well as the protective wheel arch liner and the support boot.
- Install a safety support under the bottom of the machine.
- Remove the protective shield under the engine.
- Raise the engine under the crankcase with a jack. A wooden stand must be placed between the lifting part of the jack and the engine oil sump.
- Remove two TORX E14 bolts securing the power unit support to the bracket. If the screws are tight, you need to vary the position of the motor with a jack, achieving easy rotation.
- Unscrew the three TORX E14 bolts securing the support to the side members of the car body.
- To loosen the belt tension, to do this you need to unscrew the fixing nut.
- Rotate the nut 8 mm clockwise until the belt is completely loosened. Then you need to remove the strap and thread a new element through the place where the support was removed.
- If necessary, you can replace the grease in the tension roller. The scheme is completely identical to that described above.
- Tension the belt by turning the nut 8 mm counterclockwise. The tension should be controlled by hand - the element should bend when pressed.
- Secure the tension with a 19 mm nut.
- Install all removed parts in reverse order.
- Start the engine and check the operation of the drive. To do this, you need to load the belt as much as possible - turn on all electricity consumers and the air conditioner.
- If a whistle occurs during operation, you must tighten the strap. To do this, with the engine running, you need to loosen the lock and carefully tighten the tensioner rod until the whistle disappears.
- Tighten the lock nut.
- If a whistling noise occurs during operation, the belt must be tightened further.
The engine mount is outlined in red. Loosening the tensioner. Arch locker and support boot. The engine mount is highlighted in red oval. Location of the five TORX E14 bolts. Place for support on the engine.
We diagnose the timing belt ourselves
If you decide to carry out diagnostics yourself, when disassembling the system you should pay attention to indicators indicating that the timing belt has failed.
- Check the condition of the teeth on the belt.
- After removing chemical contaminants such as oil or gasoline particles, inspect the cleaned section and check its tension properties.
- Pay attention to the presence of antifreeze on the belt. This chemical must not leak. Its presence can cause irreparable damage to the surface of the belt and render it unusable in a short period of time. If a leak is detected, it is recommended to immediately eliminate its cause.
- Inspect the belt for various chips, cracks, or areas of change in surface structure.
- Check the stretch value along the entire length.
- Determine wear and, if possible, replace the tensioner and rollers. Experts recommend that when changing the timing belt, you also replace components in order to ensure stable operation of the system.
If any of the described signs of timing belt failure are detected, the part must be replaced, this will extend the life of the remaining components of the mechanism. It is easy to calculate that the cost of a new battery, which may break, is several times higher than the price of a belt.
Car care and timely elimination of all problems will help to avoid emergency repairs due to a broken belt on the highway. Such a breakdown is especially unpleasant if you are outside the city, far from mechanics and car shops. Scrupulous and competent maintenance will help the car enthusiast avoid many troubles and operate the car for many years.
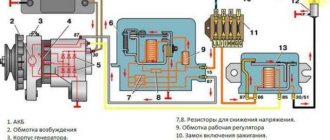
The alternator belt on the Lada Kalina plays an important role in engine operation. Without it, the generator will not be powered, which in turn may result in the battery not charging. If the battery is not charged, the car will not be able to start.
Determination of malfunction and replacement time
Determining a faulty alternator belt is quite simple. Let's look at the main indicators:
- Whistle in under engine space. It appears when you increase the speed of the gas pedal, and the current in the bot network increases.
- Tightening the belt had no effect and the whistle remained.
- Cracks or elasticity in the belt.
Bad alternator belt, bad - teeth torn (torn off)
- Frame deformation, eversion.
The crack on the alternator belt is clearly visible
All these malfunctions indicate that it is time to replace the alternator belt on Kalina. Otherwise, it may break at the most inopportune moment.
Torn belt on one of the Kalinas
We check the condition of the alternator belt ourselves
Before Lada Granta alternator belt
, car owners usually inspect its condition to make sure whether this is really necessary. Replacing the alternator belt - renault megane forum (Renault Megane. To make a diagnosis, you need to perform the usual steps. First you need to turn on the fifth gear and get out of the car, then try to push your Grant back, acting on the front bumper or side pillar, if this will do assistant In all this, the hood must be open and while pushing you need to see how the RG behaves.
We recommend: Turn on high beams on Ford Focus 2
Worn and damaged RG, unsuitable for operation
There should be no signs of damage on the strap when pushing the car. Replacing the timing belt for a Renault Megane with a 1.6 engine. We are talking about cracks, delamination or breaks, even the smallest ones, although this can completely happen, especially with frequent use of the vehicle. In this case, if during the diagnostic process you see traces of damage on the RG, this indicates that the belt
If it doesn't work, it needs to be
replaced .
The timing belt is diagnosed in a similar way. If you don’t need to tighten the RG and adjust the tension on an 8-valve engine, you can also check the condition of the generator itself. After all, if you have any suspicions about the quality of the work of the DG, it makes sense to check the device itself. [09] DIY alternator belt replacement. —. In addition, during diagnostics, you can also check the generator belt , with which the belt can be tensioned. If there are chips on the roller or other signs of deformation and damage, including changes in geometry, the element must also be replaced. The video below provides detailed instructions for replacing the bracket, as well as the alternator strap on a Lada Granta (the author of the video is Igor Semenishin).
Belt selection, catalog number, price
Each belt in a car has its own service life and resource, and therefore requires periodic replacement. So what kind of alternator belt should be installed on the 8-valve Lada Kalina and how is this done?
Original number and belt size:
- Knowing the original catalog number. Using it you can easily find a suitable belt, without knowing the size or teeth.
- By size and type of teeth (number of ribs = 6, size = 1018 mm). Belt marking for Lada Kalina with 8 valves – 6PK1018 .
Gates 6pk108 - ideal price/quality ratio
This is the standard size that fits this car. The teeth of the generator belt on Kalina do not run across the base of the court, but along it, having 6 strips that are installed on the corresponding pulleys.
It is worth considering that the replacement of the alternator belt also includes a tension roller, which wears out along with it. When performing the replacement process, it also needs to be replaced.
When choosing a belt and roller, the motorist faces a difficult task: original or analogue. Both are good. But what should you do if you don’t have a belt with you when buying in a store?
Alternator belt items for Kalina
- The original article number for the alternator belt for the 8-valve Lada Kalina looks like this: 1118-1041020. The average cost in the Russian Federation is 750 rubles.
Analogue of the original alternator belt 1118-1041020 - 6PK1018
- The original alternator belt pulley costs about the same, about 750 rubles. and has a catalog number - 2123-1041056. In total, a set of spare parts for replacing the alternator belt with an 8-valve Kalina will cost the owner 1,500 rubles.
Old roller and new 2123-1041056 generator belt tensioner pulley
Table of alternator belt analogues for the 8-valve Lada Kalina
| Manufacturer | Catalog number | Price in rubles |
| Luzar | LB 0190 | 750 |
| Contitech | 6PK852 ELAST | 1000 |
| Gates | 6PK823SF | 1150 |
| LYNXauto | 6PK0823EL | 1200 |
All belt analogues performed quite well and won the trust of motorists.
Table of alternator belt roller analogues for the 8-valve Lada Kalina
| Manufacturer | Catalog number | Price in rubles |
| Trialli | CM 123 | 800 |
| Master-sport | 21230-1041056-10-ST-PCS-MS | 1000 |
| Pilenga | PT-P 1523 | 750 |
Repair technology for the auxiliary drive system
The sequence of actions is similar for both models with and without air conditioning and consists of the following points:
- Remove the engine protection.
- Remove the right wheel and fender liner.
- Remove the expansion tank.
- Jack up the right side of the engine and unscrew the mount.
- By tightening the tensioner mechanism pin, loosen the belt tension.
- Remove the drive from the roller and then from all pulleys.
- Install the new part and reassemble in reverse order.
- Adjust the tension.
What is it needed for?
As mentioned above, any vehicle is equipped with such an important device as a generator. If it fails, the operation of the vehicle will be impossible. Therefore, special attention should be paid to the performance of all elements of the device, be it a Lada Kalina with a 16- or 8-cl. engine, with or without air conditioning. What is the component size? How is the roller strap adjusted and replaced? How to tighten up? You can find out the answers to these questions in the article.
Car Lada Kalina tuning
Before answering questions that interest Lad Kalin owners, you should understand why this component is needed. Not every motorist knows what role he plays in the functioning of the car.
How to change the belt yourself
If you have ever encountered the need to replace a belt on a 16-cl or 8-cl engine, then this procedure will not take much time. If you are encountering this for the first time and have never heard of a generator before, we recommend that you seek help from specialists. Don't forget that one wrong action can lead to irreversible consequences. Therefore, these instructions will help everyone who decides to replace the belt for the first time.
Required Tools
Of course, any repair work begins with the preparation of the necessary tools. To replace the strap on an 8- or 16-cl. Lada Kalina engine, prepare:
- open-end wrench size “19”;
- socket wrench set to “8”;
- wrench to “13”;
- new alternator belt.
Open-end wrench on "19"
Socket wrench "8"
Wrench "13"
New generator element
Stages of work
If you have prepared everything that may be required in the process, then you can begin the replacement work. So let's get started:
- Turn off the engine and open the hood of the Lada Kalina.
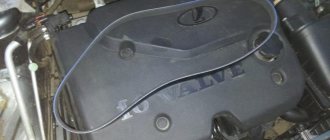
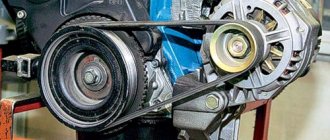
- The alternator belt can be found on the left side of the engine compartment. If you don’t know where it is, then start the engine and look in the engine compartment. The strap will rotate on rollers and you will see it.
- Having found the installation location of the element, take a wrench and loosen the screw that secures the adjusting rod. Immediately try to touch the belt to see how tight it is. This is necessary so that you understand how to set the tensioner after installing the element.
- When the nut is loosened, take an “8” spanner and tighten the adjusting rod. When you start turning it clockwise, the tension on the generator belt on the rollers will be loosened. Turn the rod almost all the way.
- This will loosen the belt tensioner on the rollers. If the tensioner is already loose, you can unscrew the lower fastening of the device. To do this, use the key at “13”.
- It is necessary to move the adjusting rod upward. When the rod is pulled back, the strap can be removed, but first remove it from the shaft of the device.
- Once the belt portion is removed from the pulley assembly, remove it completely from the crankshaft.
- Pull out the element and visually inspect it. If the strap is cracked, you will see other signs of deformation, for example, the shape has changed, then it must be replaced. Install the new component in place of the old one, assembling everything in reverse order.
- When the installation of the element is completed, it is necessary to check the tension on the rollers. The tension must be adjusted using the appropriate rod. The element should not be too loose as it will regularly come off while riding. But it shouldn’t be too tense either.
- Start the engine and warm up the car to 50 degrees. Then turn off the engine and check again how tightly the element is tensioned. If it's loose, tighten it.
1. Stop the engine and loosen the adjusting rod nut
2. Tighten the adjusting rod so that you can loosen the belt.
3. Move the rod up and remove the strap, first from the generator pulley
4. Remove the element from the crankshaft pulley
We recommend: VAZ 2115 won’t start - what to do
When is it time to change?
On Lada Kalina cars, the manufacturer does not regulate the replacement of this part. However, its failure is a common problem. In particular, we are talking about Lada Kalina cars. This applies to both 16-cl and 8-cl engines.
This is what a deformed element of a Kalina generator with an 8-cyl internal combustion engine looks like
Therefore, let’s look at the signs that indicate that the belt may fail in the near future:
- Whistle when moving. As a rule, this whistle appears when the electrical appliances of the vehicle begin to load. For example, if you start the car, and when you press the gas, a loud whistle is heard from the engine compartment, this indicates that the belt is loose. In this case, it must be tightened using a tensioner or replaced.
- Cracks on the strap. If you open the hood, look at the belt and see cracks on it, then you know that it’s time to change the element. Neither tensioning nor adjusting the rollers will help here. The component can be tightened, but this will not be enough for a long time. The only option left is replacement.
- Deformation. As in the previous case, neither tightening the tensioner nor adjusting the rollers will give much effect. You just need to change the element.
- Noise when the engine is running. If the element has already served its service life, this can be understood by the noise that appears when the motor is running. For example, some Lad Kalin car owners report loud knocking and even impacts when the engine is running.
The assembly is disassembled: this is what the strap looks like on the shafts
If the vehicle is equipped with a generator sensor that determines its performance, then it will be easier to identify the malfunction. For example, if you heard a whistle from under the hood, and at this time the indicator on the sensor came on, then you need to pay attention to the strap. This indicates that the belt needs to be tightened, since it may be in a weak state or that its service life has been exhausted.
One way or another, if the slipping and whistling of the strap cannot be eliminated by adjusting the belt or rollers, it needs to be changed.
Replacement instructions
The procedure for replacing the RG is quite complicated and responsible. If you make a mistake during the steps, this may lead to the strap breaking while the car is moving. Of course, it will be possible to continue driving to the nearest service station or garage, but you will lose not only the money spent on the purchase of the RG, but also your own time. Replacing the timing belt repair Mitsubishi Lancer 9 and remove the washer reservoir from the car. 9. Therefore, think several times before whether you can do everything yourself and whether it is advisable - perhaps it makes sense to simply pay specialists at the service station. Peugeot 306. Video. Replacing the timing belt on a Peugeot 307 with a 1.6i 16v engine. How to remove the generator. But at the same time, you will be sure that everything was done correctly, and if problems arise, you will have someone to file a claim with.
Let's sum it up
Taking into account the above information, it becomes clear that the Kalina generator tensioner is no less important than the belt itself. In practice, the presence of a tensioner allows you to increase the service life of the generator bearings. The main thing is to use this solution correctly, avoid over-tightening the belt, and also maintain and change the tensioner if the mechanism fails.
We also recommend reading the article on how to replace the timing belt on a VAZ 2114 with your own hands. From this article you will learn about the features of the replacement, how to replace the VAZ 2114 timing belt, as well as what subtleties and nuances you should pay attention to as part of this procedure.
As a result, let us remind you once again that the quality of the generator’s operation and battery charging will directly depend on the condition of the tensioner and the alternator belt itself. Also, if the belt slips, malfunctions in the operation of other attachments cannot be ruled out. For this reason, the generator belt must be checked regularly, as well as the belt and tensioner itself must be changed according to regulations or, if necessary, in case of emergency situations.
Detailed instructions for replacing the belt
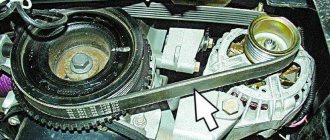
So, the first thing you will need to do is loosen the large locking nut on the tensioner rod by making a couple of turns, clearly shown below:
And after this, it is necessary to loosen the tension of the generator belt by twisting the rod itself clockwise, thereby loosening the belt. It is convenient to do this with a ratchet, approximately as shown in the following photo:
Twist until the rod loosens and dangles freely. Then unscrew its mounting bolt from below, see the picture in more detail:
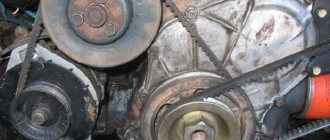
And having taken out the bolt with the bushing and washer, lift the tensioner to the top and place it approximately as I did, so that it does not interfere in the future when replacing it.
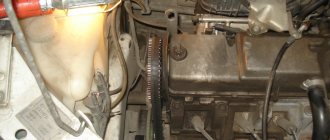
Now the belt is loosened enough and there are no more obstacles to removing it. First, release it from the generator pulley using a little force:
And after that, remove it from the crankshaft pulley:
And everything is ready, take it out of there, turning it a little to the side so that it does not cling to anything to avoid damage:
If, upon inspection of the belt, damage and severe wear are found, it will need to be replaced with a new one. The price for this part of the Lada Kalina is inexpensive and is approximately 300 rubles, so it’s not particularly hard on the pocket. We perform the installation in the reverse order and do not forget to adjust the tension to the required level. I’ll write about making the adjustment in the next article today, if I have time, but I think it’s not difficult to figure it out, since everything is done in literally five minutes with two keys in hand. Later I’ll post a link here so you don’t have to search for it for a long time.