Design features and malfunctions of ABS
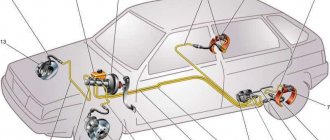
The principle of operation of the sensor is based on recording information regarding the speed of rotation of the wheel, with subsequent transmission of data to the central organ of the system. The control unit analyzes the received parameters and issues commands to the elements of the vehicle’s hydraulic system. Thanks to timely changes in fluid pressure in the brake system, wheel locking is prevented when the brake is pressed.
Despite its reliability, the ABS sensor fails from time to time, which is why the control unit receives incorrect signals, or they do not reach it at all. In such a situation, it is necessary to check the ABS sensor and then replace the device (if a breakdown is detected).
The most common problem is a break in the supply circuit between the control unit and the monitoring sensor. It is also possible for the sensor to fail, followed by the transmission of distorted information.
Recognizing a problem with ABS is not difficult. It manifests itself by the glow of the corresponding light bulb during movement. In this case, accurate diagnosis is possible only after checking the device. Before deciding to replace or check the sensor, determine whether the system is working or not.
A breakdown can be recognized by the following signs:
1. The system is tested, after which an ABS error is detected. Probable causes are malfunctions in the controller, lack of signals from the angular velocity measurement sensor.
2. After activating the ABS, the system is tested and a breakdown is detected. The device continues to operate. This is possible if there is a malfunction of the ABS sensor, for example, if it breaks.
3. The system undergoes diagnostics and turns off. Probable causes are a break or poor quality of contact connections, or a short circuit of the sensor to the body.
4. ABS does not work at all. This is possible due to irregularities in the wiring (for example, a broken wire in the sensor power circuit), wear of the wheel bearings, damage to the wheel sensors, and so on.
Causes of ABS error
The main possible reasons for a constantly burning ABS light on the dashboard:
- the contact in the connection connector has disappeared;
- loss of communication with one of the sensors (possibly a wire break);
- The ABS sensor has failed (the sensor needs to be checked and then replaced);
- the crown on the hub is damaged;
- The ABS control units have failed.
After inspection and, it would seem, elimination of the cause, it is very easy to check the operation of the ABS; you just need to accelerate to 40 km and brake sharply - the vibration of the pedal will make itself felt and the icon will go out.
If a simple inspection for damage in the sensor circuit to the unit does not reveal anything, then diagnostics will be needed to determine the specific error code for the anti-lock brake system. On cars where an on-board computer is installed, this task is simplified; you just need to clearly understand the decoding of the code and where the problem could arise.
What to do in this case, how to measure the resistance?
As can be seen from the breakdown options discussed above, most of the problems are related specifically to the ABS sensor. In this case, information about the malfunction immediately manifests itself in the form of a warning lamp glowing.
ABS light came on
The question is how to check the ABS sensor without spending additional money and calling for service. All that is required to solve the problem is a combination device or multimeter, a car manual and wires with PIN connectors. If possible, use an assistant.
To check the resistance, switch the multimeter to ohmmeter mode, then proceed as follows:
- Use a lifting device (jack) to lift the machine.
- Remove the wheel if it restricts access to the sensor.
- Remove the screw that holds the device in place (it's easy to find at the back of the hub).
- Remove the housing that protects the control unit, and then remove the connectors through which power is supplied to the controllers.
- Insert wires with PIN connectors into the circuit, and then connect them with the sensor and multimeter.
- Measure the resistance and check the resulting parameter with what the car manufacturer recommends.
- Check the wires for continuity and short circuit.
Have a helper spin the wheel several times. At the same time, monitor and record resistance parameters. If the sensor is working properly, then during rotation the resistance indicator will change. The normal parameters are as follows (measurements are made in relation to the sensor):
- Leg device - 5-26 Ohm.
- Ground device - from 20 kOhm or more.
What to do if a breakdown is detected
What to do with the ABS sensor if a malfunction is detected? If the problem point is the device itself, it will have to be replaced, but in the case of electrical wiring, you can fix the defect yourself. To restore its integrity, we use the “soldering” method, carefully wrapping the joints with insulating tape.
If the ABS indicator on the dashboard lights up, this is a clear sign of a sensor failure. The described steps will help identify the cause of the breakdown, but if you lack knowledge and experience, it is better to contact a car service center. Otherwise, illiterate diagnostics of the condition, coupled with improper repair of the device, will reduce the effectiveness of the anti-lock braking system and can provoke an accident.
The ABS light is on on the instrument panel - there is apparently a fault with the ABS sensor or something else. Tell me how to check the anti-lock braking system sensor ?
You can only measure the resistance and voltage and check the wiring with your own hands. to check the performance of the ABS sensor is naturally to connect it with an oscilloscope and by turning the wheel we will see a sine wave (measuring the frequency and level of oscillation of the pulses transmitted by the sensor), you can use a pointer gauge (we will see the deviation of the needle), a digital gauge will show an increase in voltage.
This number will not work on new machines, there is no sector, the bearing is magnetized and the sensor is a hall sensor.
To check the serviceability, you can make a “probe” consisting of an ordinary resistance of 900 - 1200 with wires ending in separate pins that “fit” into the connector. — Turning the wheels in one direction or the other, alternately connect the “probe” to the connectors, turn on the ignition and look at the behavior of the ABS light on the instrument panel. If, when connecting the “probe” to one of the connectors, the light goes out, the malfunction lies in this sensor.
How to measure voltage, other ways to check
Now let's look at how to check the ABS sensor with a tester by checking the voltage.
Proceed like this:
- Set the multimeter to a mode that allows you to measure DC voltage.
- Raise the car with a jack and hang the wheels.
- Connect the wiring PIN connectors and connect them to the measuring device.
- Rotate the wheel at a speed of one revolution per second.
If the sensor is intact, then the voltmeter shows a voltage in the range of 0.25-1.2 Volts. Please note that as the wheel spin speed increases, the numbers on the device will also change upward.
Checking the sensor with a tester
Measuring with a multimeter is not the only way to check. To identify a breakdown, you can use a more accurate device - an oscilloscope. After connecting the device, a graph is displayed on the display. By analyzing the amplitude, one can draw conclusions about the resistance parameters and serviceability of the sensor as a whole.
The problem is that the oscilloscope is too expensive for garage use, and it requires skill to use. Often such a device is used at specialized service stations and is used to accurately diagnose the problem.
Modern ABS systems are capable of self-checking. If you activate this option, you can see the fault code (a set of letters and numbers). Then, using the car manual, unravel the data obtained and accurately determine the cause of the breakdown.
ABS is on: why does the indicated indicator light up?
So, having figured out how ABS works, what it is and why the system is needed, let’s move on to its problems. First of all, problems will be indicated by a warning light located on the instrument panel.
Of course, as in the case of airbags and other solutions, individual control units, which are integrated into the overall electronic engine control system (ECM), interrogate the sensors after turning on the ignition (self-diagnosis). In this case, on some cars the ABS lights up for just a couple of seconds, after which it goes out, and this is the norm.
It is quite obvious that overall safety will depend on the operation of the anti-lock braking system, while the “ABS” indicator warns the driver that the ABS system is not working and is disabled, that is, during emergency braking, the wheels will lock when the brake is pressed hard.
In any case, a diagnosis is needed. If you remember the general structure of the system, then it becomes clear that the ABS light often comes on for one of the following reasons:
- The wheel rotation sensor has failed;
- There are problems with the ABS module;
- The contacts from the sensor to the unit are damaged, that is, communication is lost;
- There are problems with the crown on the hub;
In other words, the anti-lock braking system light on the instrument panel indicates that the ABS is faulty and is therefore deactivated. Moreover, even if the ABS lights up, this does not mean that there is something wrong with the braking system itself. The fact is that another indicator is responsible for the brakes (often a red exclamation mark on the instrument panel).
One way or another, drivers often note that the ABS sensor comes on while driving or the indicator lights up from the moment the engine starts. In this case, the problem can be constant and floating, when vibration on a rough road causes the ABS to light up and then go out.
We also note that although the system is quite reliable, occasionally the electronics themselves may fail. In this case, you need to do a reset. Sometimes it is enough to disconnect the battery terminal for 10-15 minutes, then connect it back and start the car. If there are no breakdowns and everything is in order, after a reset the system will work normally.
Is it possible to repair the sensor?
In the event of a malfunction, the device requires replacement (how to remove the ABS sensor was discussed above). Before starting work, contact your dealer and order a new part. After carrying out the work, test the device to ensure it is working properly. To do this, find a flat section of the road, accelerate the car to 30-40 kilometers per hour, and then sharply squeeze the brake.
If everything is done correctly, then impulses will be felt under your foot, and the car will stop. If the wiring is damaged, the latter must be replaced, and then diagnose the system using the algorithm already discussed.
Remember that if the sensor fails, it cannot be repaired. The only way out is replacement. What can be fixed is the wiring, which is changed or repaired with a soldering iron and electrical tape.
When connecting the wiring, be careful and take into account the polarity of the sensor. To avoid mistakes, look at the instructions, where the necessary symbols are indicated. Good luck on the roads and of course no breakdowns.
The presence of ABS in a vehicle greatly increases traffic safety. Gradually, car parts wear out and may become unusable. Knowing how to check the ABS sensor, the driver can identify and fix the fault in a timely manner without resorting to the services of a workshop specialist.
Checking the quality of work performed
After replacing the sensor, its functionality is checked. To do this, it is enough to accelerate to a speed of 40 km/h on a flat, safe section of the road and perform sharp braking. If the car stops without pulling to the side, vibration is transmitted to the pedal and a specific sound of brake pads being activated is heard - the ABS system is operating normally.
Today you can easily find and buy any ABS sensors - from expensive original devices to analog parts at an affordable price. Remember that proper selection of system elements plays an important role in its uninterrupted operation. When choosing a sensor, study the manufacturer's instructions and make sure that it fits the car, and this review will help you replace the device yourself.
Source
How ABS works on a car
The anti-lock braking system (ABS; Anti-lock braking system) is designed to prevent the car's wheels from locking.
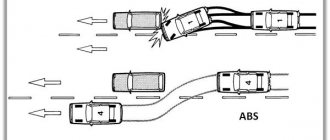
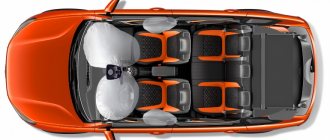
The primary task of ABS is to maintain control of the car, its stability and controllability during unexpected braking. This allows the driver to make sharp maneuvers, which significantly increases the active safety of the vehicle.
Since the friction coefficient is reduced in relation to the rest coefficient, the car, when braking on locked wheels, will travel a much greater distance than on rotating ones. In addition, when the wheels are blocked, the car skids, depriving the driver of the chance to carry out any maneuver.
The ABS system is not always effective. On an unstable surface (loose soil, gravel, snow or sand), the immobilized wheels form a barrier of the surface in front of them, breaking into it. This significantly reduces braking distance. A car with studded tires on ice travels a greater distance when the ABS is activated than on locked wheels. This is explained by the fact that rotation prevents the spikes from crashing into the ice and slowing down the movement of vehicles. But at the same time, the car retains controllability and stability, which in most cases is much more important.
Wheel speed sensors are installed on the hubs
Equipment installed on individual vehicles allows the function of disabling ABS.
This is interesting! Experienced drivers in cars not equipped with an anti-lock braking device, when braking unexpectedly on a difficult section of the road (wet asphalt, ice, snow slush), jerk the brake pedal. In this way, they avoid complete blocking of the wheels and prevent the car from skidding.
The “ABS” icon on the instrument panel lights up: causes of the malfunction
A modern car is equipped with a large number of auxiliary electronic systems that increase driving safety. Some solutions improve directional stability, others affect braking efficiency, etc.
Moreover, in some countries it is prohibited by law to operate cars without ABS on public roads. Of course, if this system fails, the behavior of the car when braking changes greatly, and not for the better. The ABS icon also lights up on the dashboard, indicating that the problem needs to be repaired.
ABS device
The anti-locking device consists of several components:
- Speed meters (acceleration, deceleration);
- Control magnetic dampers included in the pressure modulator and located in the brake system line;
- Electronic monitoring and control system.
Pulses from the sensors enter the control unit. In the event of an unexpected decrease in speed or a complete stop (blocking) of any wheel, the block sends a command to the desired valve, which reduces the pressure of the fluid that enters the caliper. This weakens the brake pads and allows the wheel to move again. When the speed of the wheel is equalized with the others, the valve closes and the pressure in the entire system is equalized.
General view of the ABS system in a car
On new cars, the anti-lock braking system activates up to 20 times per second.
The ABS of some vehicles includes a pump, the function of which is to quickly increase the pressure in the desired section of the highway to normal.
This is interesting! The effect of the anti-lock braking system is felt by reverse shocks (impacts) on the brake pedal when there is strong pressure on it.
Based on the number of valves and sensors, the device is divided into:
- Single channel. The sensor is located in the differential area on the rear axle. If even one wheel stops, the valve reduces the pressure on the entire line. Found only on older cars.
- Two-channel. Two sensors are located diagonally on the front and rear wheels. One valve is connected to the main line of each bridge. It is not used in cars manufactured according to modern standards.
- Three-channel. Speed meters are located on the front wheels and the rear differential. Each has a separate valve attached to it. Used in budget rear-wheel drive models.
- Four-channel. Each wheel is equipped with a sensor and its rotation speed is controlled by a separate valve. Installed on modern cars.
practical guide
Anti-lock braking system
1. We prepare the car for work.
3. Using a TORX E8 socket wrench, unscrew the sensor mounting bolt.
4. Remove the sensor from the brake mechanism shield. Continue reading →
1. We prepare the car for work.
The following procedure is not required to replace the right wheel speed sensor.
2. Remove the air filter.
3. Using a thin slotted screwdriver, press the latch and disconnect the sensor wiring harness block (the block is secured in the front part of the left side member).
4. Push down the pad lock Read more →
To check the technical condition of the anti-lock brake system (ABS), a warning lamp is installed on the instrument panel. An ABS malfunction may be caused by a failure of the wheel rotation sensors or a malfunction of the hydraulic valve block itself. If the ABS fails, the braking system remains operational, but braking efficiency is reduced, which is especially dangerous on slippery surfaces.
If the lamp lights up, you must contact a service station as soon as possible for diagnostics and repairs.
The anti-lock braking system (ABS) prevents the wheels from locking when braking, eliminating the risk of losing control of the vehicle and maintaining its stability when driving. Due to its reasonable cost, this equipment is widely installed on modern automotive vehicles. An important role in the operation of the system is played by touch sensors that are mounted on the hubs and record the speed of rotation of the wheels.
Main types
The ABS sensor is read as the primary measuring part of the anti-lock braking system.
The device consists of:
- A meter placed permanently near the wheel;
- An induction ring (rotation indicator, impulse rotor) installed on a wheel (hub, wheel bearing, CV joint).
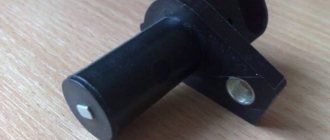
The sensors are available in two versions:
- Straight (end) cylindrical shape (rod) with a pulse element at one end and a connector at the other;
- Angled with a connector on the side and a metal or plastic bracket with a hole for a mounting bolt.
Two types of sensors are available:
- Passive - inductive;
- Active - magnetoresistive and based on a Hall element.
ABS allows you to maintain controllability and significantly increase stability during emergency braking
Passive
They are distinguished by a simple operating system, but are quite reliable and have a long validity period. Does not require a power connection. An inductive sensor is essentially an induction coil made of copper wire, in the middle of which there is a stationary magnet with a metal core.
The meter is located with the core to the pulse rotor in the form of a wheel with teeth. There is a certain gap between them. The rotor teeth are rectangular in shape. The opening between them is equal to or slightly larger than the width of the tooth.
While the vehicle is in motion as the rotor teeth pass near the core, the magnetic field penetrating the coil is constantly changing, forming an alternating current in the coil. The frequency and amplitude of the current are directly dependent on the speed of the wheel. Based on processing of this data, the control unit issues a command to the magnetic valves.
The disadvantages of passive sensors are:
- Relatively large dimensions;
- Poor accuracy of readings;
- They begin to function when the car picks up speed over 5 km/h;
- Triggered by minimal wheel rotation.
Due to frequent errors, they are installed extremely rarely on modern cars.
Magnetoresistive
The work is based on the property of ferromagnetic materials to change electrical resistance when exposed to a constant magnetic field.
The part of the sensor that controls changes is made of two or four layers of iron-nickel plates with conductors applied to them. Part of the element is installed in an integrated circuit that reads changes in resistance and generates a control signal.
The impulse rotor, which is a magnetized plastic ring in places, is rigidly fixed to the wheel hub. During operation, the magnetized sections of the rotor change the environment in the plates of the sensitive element, which is recorded by the circuit. Its output produces pulsed digital signals that enter the control unit.
This type of device controls the speed, direction of rotation of the wheels and the moment they come to a complete stop.
Magnetoresistive sensors record changes in the rotation of vehicle wheels with great accuracy, increasing the efficiency of safety systems.
Based on Hall element
This type of ABS sensor operates based on the Hall effect. In a flat conductor placed in a magnetic field, a transverse potential difference is formed.
Hall effect - the appearance of a transverse potential difference when a conductor with direct current is placed in a magnetic field
This conductor is a square-shaped metal plate placed in a microcircuit that includes a Hall integrated circuit and a control electronic system. The sensor is located on the opposite side of the pulse rotor and has the form of a metal wheel with teeth or a plastic ring, magnetized in places, rigidly fixed to the wheel hub.
The Hall circuit continuously produces signal bursts of a certain frequency. At rest, the signal frequency is reduced to a minimum or dies out completely. During movement, magnetized areas or rotor teeth passing by the sensing element cause changes in the current in the sensor, which are recorded by the tracking circuit. Based on the received data, an output signal is generated and sent to the control unit.
Sensors of this type measure speed from the beginning of the vehicle’s movement and are distinguished by the accuracy of measurements and the reliability of their functions.
What brake fluid should I use?
The system responsible for braking the Priora can contain up to one liter of working reagent. The brake fluid should be clear with some yellowish tint. When the color of the liquid changes to dark, topping up is impossible. In this case, the substance must be replaced.
It must be said that the brake fluid in the Lada Priora system is replaced approximately every three years. This time period is considered the most optimal, since during this time the liquid will change under the influence of temperature heating. Brake fluid includes: main components up to 98% and additives. Depending on the content of the base, TJ is classified into three types:
| Type of working fluid | Compound |
| Mineral | Contains alcohol and castor oil. |
| Glycolic | Contains polyglycols and their esters. |
| Silicone | Includes organosilicon polymer products. |
In addition to these compositions, brake fluid is divided according to the degree of thickening and the temperature at which it can boil.
The Lada Priora uses DOT-4 brake fluid based on glycol. Its volume must be at least one liter. If the working fluid needs to be replaced along with the flushing procedure, then it will require more fluid - about one and a half liters.
To correctly decide which brake fluid to use, you need to carefully study whether the fluid meets the necessary requirements and GOST standards. The main ones include:
- The temperature at which heating occurs to boiling.
- Volume of least corrosive activity;
- Possibilities for lubrication.
- Stable viscosity.
On the labels issued by manufacturers, everything is described colorfully and attractively, but this is not always true. After analyzing consumer reviews and practical experience, the following conclusions were made.
Foreign liquids that received positive ratings include: Castrol React DOT-4, Motul DOT 5.1, Liqui Moly Bremsenflussigkeit DOT-4.
Russian-made brake fluids that can be used include: Ros DOT-4 and Sintec Super DOT-4.
Other brands may be considered questionable and may cause harm to the car owner and other road users.
Before deciding on the brand of brake fluid for Lada Priora, you need to understand the specifications that are established for this car. Thus, the Priora brake system must be filled with glycol fuel fluid (FMVSS 116 not lower than DOT-3).
How to check the ABS sensor
You can monitor the serviceability of the speed sensor by contacting a car service specialist, or by yourself:
- Without special devices;
- Multimeter;
- An oscilloscope.
Tester (multimeter)
In addition to the measuring device, you will need a description of the functionality of this model. Sequence of work performed:
- The car is placed on a platform with a smooth, uniform surface, its position is fixed.
- The wheel is dismantled for free access to the sensor.
- The plug used for connection is disconnected from the general wiring and cleaned of dirt. The rear wheel connectors are located in the rear compartment. To ensure unobstructed access to them, you need to remove the rear seat cushion and move the carpet with soundproofing mats.
- Conduct a visual inspection of the connecting wires for abrasions, breaks and damage to the insulation.
- The multimeter is set to ohmmeter mode.
- The sensor contacts are connected to the probes of the device and the resistance is measured. The standard readings can be found in the instructions. If there is no reference book, then readings from 0.5 to 2 kOhm are taken as the norm.
- The wiring harness must be checked to exclude the possibility of a short circuit.
- To confirm the functionality of the sensor, spin the wheel and monitor the data from the device. The resistance reading changes as the rotation speed increases or decreases.
- Switch the device to voltmeter mode.
- When the wheel moves at a speed of 1 rpm, the voltage should be 0.25-0.5 V. As the rotation speed increases, the voltage should increase.
- Observing the stages, check the remaining sensors.
It is important! The design and resistance values of the sensors on the front and rear axles are different.
A resistance of 0.5 to 2 kOhm at the ABS sensor terminals is considered optimal
Based on the measured resistance values, the performance of the sensors is determined:
- The indicator is reduced compared to the norm - the sensor is faulty;
- Resistance tends to or corresponds to zero - interturn short circuit in the induction coil;
- Changing the resistance data when bending the wiring harness - damage to the wire cores;
- The resistance tends to infinity - a wire break in the harness or induction coil of the sensor.
It is important! If, after checking the functions of all sensors, the resistance value of any of them differs significantly, this sensor is faulty.
Before checking the wiring for integrity, you need to find out the pinout of the control module plug. After that :
- Open the connections between the sensors and the control unit;
- According to the pinout, all wire harnesses ring in turn.
Oscilloscope
The device allows you to more accurately determine the performance of the ABS sensor. Using the signal change graph, the magnitude of the pulses and their amplitude are tested. Diagnostics are carried out on the car without removing the system:
- Disconnect the device connector and clean it of dirt.
- The oscilloscope is connected to the sensor via pins.
- The hub is rotated at a speed of 2-3 rpm.
- The signal change schedule is recorded.
- Using the same scheme, check the sensor on the other side of the axle.
An oscilloscope gives the most complete picture of the operation of the anti-lock braking system sensor
The sensors are operational if:
- The recorded signal oscillation amplitudes on the sensors of one axis are identical;
- The graph curve is uniform, without visible deviations;
- The amplitude height is stable and does not exceed 0.5 V.
Without devices
Correct operation of the sensor can be determined by the presence of a magnetic field. For this purpose, any object made of steel is applied to the sensor body. When the ignition is turned on, it should be attracted.
In addition, it is necessary to inspect the sensor housing for its integrity. There should be no abrasions, insulation breaks, or oxides on the wiring. The sensor connector must be clean and the contacts must not be oxidized.
It is important! Dirt and oxides on the plug contacts can cause signal transmission distortion.
ABS brake bleeding process
In order to efficiently complete the task, it is advisable to carry out bleeding with an assistant, starting with pumping the brake system from the front wheels, then the rear wheels (right and left).
Pressure is released by discharging the pressure accumulator. To do this, turn off the ignition and press the brake pedal about 20 times. And then to proceed to the next stage of bleeding the brakes, disconnect the connectors on the brake fluid reservoir.
General principle of how to bleed ABS brakes
- We find and remove the fuse in the block responsible for the operation of the ABS;
- We unscrew the wheel and find the RTC fitting for bleeding the brake;
- We begin to pump the brakes with abs with the pedal depressed;
- We turn on the hydraulic pump (turning on the ignition, the ABS light on the dashboard will light up) and wait until all the air comes out;
- We tighten the fitting and release the brake pedal; if the ABS light no longer lights up, everything is done correctly and the air has completely escaped.
Sequence of removing air from the vehicle
We start pumping the brakes from the front right, and then the left. The procedure takes place with the ignition turned off (position at “0”) and the terminal on the TJ tank removed.
- We put the hose, with the bottle, on the fitting and open it (with an open-end wrench). It is necessary to push the transparent hose so that air bubbles can be seen, and the other end of the hose must be completely placed in the liquid.
- We fully depress the pedal and hold it until all the air comes out.
- Tighten the fitting and release the pedal until liquid flows out without air.
The rear wheels are pumped with the ignition on in key position “2”.
- As when bleeding the front wheels, we put a hose on the bleeding fitting on the caliper.
- Having fully depressed the pedal, turn the ignition key (to start the hydraulic pump). We observe the air coming out and control the level of brake fluid in the reservoir (top up periodically).
To properly bleed the ABS brakes on the rear left wheel, the sequence of actions needs to be slightly changed.
- As in previous cases, we first put the hose on the fitting and do not unscrew it completely, but only 1 turn, and the pedal does not need to be depressed.
- Turn the ignition key to start the hydraulic pump.
- As soon as the air comes out, depress the brake pedal halfway and tighten the bleeder fitting.
- Then we release the brake and wait for the pump to stop.
- Turn off the ignition and connect the removed connector from the tank.
If you need to pump the brakes together with the ABS modulator, then information on this procedure can be found here.
It is imperative that after bleeding the brakes, before driving off, you need to check the tightness of the system and the absence of leaks. Check the brake fluid level.
Sensor repair
A failed passive ABS sensor can be repaired yourself. This requires perseverance and mastery of tools. If you doubt your own abilities, it is recommended to replace the faulty sensor with a new one.
Repairs are carried out in the following sequence:
- The sensor is carefully removed from the hub. The soured fastening bolt is unscrewed, having previously been treated with WD40 liquid.
- The protective body of the coil is sawed with a file, being careful not to damage the winding.
- Remove the protective film from the winding with a knife.
- The damaged wire is unwinded from the reel. The ferrite core is shaped like a thread spool.
- For the new winding, you can use copper wire from RES-8 coils. The wire is wound so that it does not protrude beyond the dimensions of the core.
- Measure the resistance of the new coil. It must match the parameter of a working sensor located on the other side of the axis. Reduce the value by unwinding several turns of wire from the spool. To increase the resistance, you will have to re-wind the wire of greater length. Secure the wire with adhesive tape or tape.
- Wires, preferably multi-core, are soldered to the ends of the winding to connect the coil to the harness.
- The coil is placed in the old housing. If it is damaged, then the coil is filled with epoxy resin, having previously positioned it in the center of the housing from the capacitor. It is necessary to fill the entire gap between the coil and the walls of the capacitor with glue so that air voids do not form. After the resin has hardened, the body is removed.
- The sensor mount is fixed with epoxy resin. It is also used to treat cracks and voids that have arisen.
- The body is brought to the required dimensions using a file and sandpaper.
- The repaired sensor is installed in its original place. The gap between the tip and the gear rotor is set to 0.9-1.1 mm using spacers.
After installing the repaired sensor, the ABS system is diagnosed at different speeds. Sometimes the system spontaneously trips before stopping. In this case, the working gap of the sensor is corrected using gaskets or grinding of the core.
It is important! Faulty active speed sensors cannot be repaired and must be replaced with new ones.
Video: how to repair an ABS sensor
Alternative solution to the issue
- remove the used liquid from the container and fill it with new one;
- bleed all four brake cylinders using the classical method according to the scheme specified by the manufacturer;
- install a special adapter for the compressor or a home-made installation instead of the “brake reservoir” cap;
- connect a hose to the drain fitting of the anti-blocking module and unscrew it 1 turn;
- create a pressure of about 1 BAR;
- identify the end of the release of old liquid and bubbles;
- relieve pressure.
When replacing used brake fluid with new brake fluid in an ABS system, the following notes should be taken into account:
- constant monitoring of the liquid level in the tank is necessary: a decrease below the minimum mark (MIN, Low) is not allowed;
- The permissible operating time of the hydraulic pump is 2 minutes; if it is exceeded, turn off the ignition and allow the unit to cool for 5-10 minutes.
- before draining the fluid, it is necessary to “discharge” the system by pressing the brake pedal at least 20 times;
- It is strictly prohibited to pour used liquid or a composition that has stood for a long time in an open container;
- When you turn on the ignition and the drain plug is open, you should be prepared for a sudden release of liquid.
Wiring repair
The damaged section of the wiring can be replaced. For this:
- Disconnect the wire plug from the control unit.
- Draw or photograph a diagram of the location of the wiring fastening brackets with distance measurements.
- Unscrew the fastening bolt and dismantle the sensor with wiring, having previously removed the mounting brackets from it.
- Cut off the damaged section of the wire, taking into account the length available for soldering.
- Remove protective covers and brackets from the cut cable.
- Covers and fastenings are placed on the wire, pre-selected according to its outer diameter and cross-section, using a soap solution.
- Solder the sensor and connecting plug to the ends of the new harness.
- Insulate solder joints. The quality of the insulation determines the accuracy of the signals transmitted by the sensor and the service life of the repaired section of the wiring.
- The sensor is installed in place, the wiring is positioned and secured according to the diagram.
- Check the operation of the system in different speed modes.
Some nuances
Replacing sensors that are installed on the steering knuckles of the front wheels is much faster, since access to these parts is more convenient:
Attention! When installing a new sensor, you must ensure that no dirt gets into the place where it fits.
Before replacing the sensor, reasons that could cause it to malfunction should be eliminated. Particular attention should be paid to specific problem areas found in each car model. For example, all FORD cars manufactured before 2005 suffer from interruptions in the operation of electrical equipment that occur as a result of frequent short circuits, and the pain point of the ABS system of these cars is the quality of wiring insulation. In this case, it will be possible to repair the sensor instead of completely replacing it.
Standard sensor and ABS unit - article number and price
The anti-lock braking system operates the rear and front wheels. It contains several brackets, brackets, and other fasteners that ensure accurate operation of the ABS and hydraulic unit damper (article 11180353832400, price - about 30 rubles). But only three items are considered the main ones in ABS:
ABS control unit (“brain”) - article number 11180353801001, cost - about 10,000 rubles; Front wheel speed sensor - catalog number 11180353835000, cost - about 1,000 rubles; Rear wheel sensor - catalog number 11180353837000, cost - 1000-1200 rubles. Often, to solve the problem, you only need to buy an anti-lock sensor from Priora, so the scale of financial costs is not as huge as it seems at first.
Do-it-yourself replacement of brake fluid on a Lada Priora
To replace you will need:
- The brake fluid itself
- To remove old fluid syringe
- dry rag
- container for old liquid
- rubber hose, the diameter of which should be suitable for the bleed fittings on the wheels
- Special brake wrench 8 by 10 mm
Now fill the new brake fluid into the reservoir to the max level.
Now you need to completely remove the old fluid from the system by pumping it and filling it with new fluid.
Sequence of pumping brakes on Priora
- Rear right caliper
- Rear left caliper
- Front right caliper
- Front left caliper
This is the order in which you should bleed the brake system.
ABS device on Priora
The main task of ABS is to prevent the wheels from locking during braking. To fulfill its task in Priora, the anti-lock braking system works like this:
- At the moment of braking, the ECU receives data from ABS sensors that read the speed (they are located behind the hubs).
- The anti-lock braking system ECU is a unit with internal brake fluid pressure valves and an electric return pump. Its location is the front left side member.
- When the sensors transmit data about a sharp jump - instantaneous braking of the wheels - the fluid pressure is gradually released using valves.
- A malfunction of any system leads to the transmission of an error signal through the computer, which appears to the driver as a “burning ABS on the dashboard.”
How to modify the design
To protect the wiring harness from the environment, you can use a D-shaped seal. We lay the wires in it and wrap it with electrical tape. We put everything in the corrugation. We glue the cover covering the ABS sensor connector around the perimeter with the same sealant. This will prevent moisture and dirt from entering the area where the sensor and connector are located.
Attention! If the ABS fails, the brakes remain operational, but the braking efficiency is reduced, which is especially dangerous on some surfaces. See why.
Priora 2012: abs icon is on. ABS unit 8.1, 11183538010, version 01010000 Errors c0110
– malfunction of the return pump motor circuit.
c0121
– valve relay circuit malfunction. During the day it can drive normally, but sometimes it lights up and the error does not reset. Has anyone encountered this?
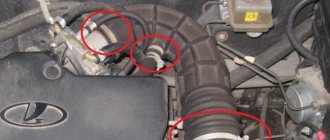
This problem occurred when the electrolyte from the battery ate the positive wire from the power fuse. It was not visible to the eye until everything around the hydraulic unit was unzipped.
I have come across such codes that arose due to the burnt-out contacts of the 40A power fuse near the battery. Also, replacing the unit did not help, but cleaning the contacts solved everything.
Basic malfunctions of the ABS system
Any driver who has ever had an ABS light come on in a Priora will tell you about the sensor. But it could be worse - if the ABS in Priora does not work. There are several options in which to look for the source of the problem:
- wiring damage;
- mechanical damage to the brake fluid pressure valve block;
- failure of speed sensors.
The first thing you need to do when you see the light (ABS lights up) is to read the error symbols using a special diagnostic scanner. Each item in the ECU is indicated by a corresponding code:
- C0040 – the speed sensor (DSC) of the right front wheel is faulty;
- C0035 – DSC of the left front wheel is faulty;
- C0050 – DSC of the rear right wheel is faulty;
- C0045 – DSC of the rear left wheel is faulty;
- C0065 – front left valve (intake);
- C0060 – front left valve (exhaust);
- C0075 – front right valve (intake);
- C0070 – front right valve (exhaust);
- C0085 – rear left valve (intake);
- C0080 – rear left valve (exhaust);
- C0095 – rear right valve (intake);
- C0090 – rear right valve (exhaust);
- C0161 – the braking signal does not turn off;
- C0121 – power to the valves does not turn on;
- C0110 – electric return pump.
- C0550 – error in the “brains” - ECU;
- C0245 – error in receiving data from sensors;
- C0800 – power surges.
The solution may be simpler: an ABS sensor is installed under the fender liner. Dirt often gets into this area; an unprotected piece of wiring near the DSC connector can be damaged. Replacing it will help.
Why does the ABS and ESC light come on?
ABS malfunction may be caused by:
If the ABS malfunction indicator light comes on, you must contact a service station as soon as possible for diagnostics (read error codes) and repairs.
The most common cause of ABS failure is damage to the wiring near the ABS sensor connector. It is located under the fender liner, but is still not well protected from moisture and dirt.
As a result, the wires oxidize and break, and the ABS lamp lights up.
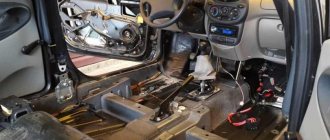
Replacing the ABS block
For repair you need to prepare:
The procedure for working with Priora is as follows:
- Stop the car and raise it. Disconnect the minus from the battery.
- Drain the brake fluid from the cylinder brake hose.
- Unscrew the brake pipes connected to the block. There are 6 of them in total.
- Unhook the power lock and disconnect the wires.
- Unscrew the nuts fastening to the car body.
- Slowly pull the block and remove it.
- Install the unit by connecting everything in reverse order. Don't forget to bleed the brake system.
Which brake fluid to choose for Priora
The manufacturer fills it with DOT 4. The most popular brake fluids among buyers are ROSDOT 4 and NEVA-M. The first option is more expensive, the second is cheaper. For cars with and without ABS, it is recommended to use different types of fluids.
- DOT-4 plus - for cars without ABS
- DOT-4 class 6 - designed for modern braking systems (ABS, ESP, VSA)
Depending on the capacity, the cost of the brake fluid indicated above is from 50 to 150 rubles.
You can also add DOT 5.1 fluid. It has a lower viscosity than the above samples, as well as a higher boiling point and, according to manufacturers, changes once every five years.
Replacing the ABS sensor
To replace the anti-lock braking system sensor on a Priora, do the following:
- Raise the car. Hang up the wheel. The ideal position is on a car lift. First remove the negative terminal from the battery.
- The wheel behind which the faulty sensor “hides” is removed. To do this, working in a circle, smoothly, one by one, unscrew all the bolts and pull the wheel towards you.
- Behind the hub you will see the DSC mount: unscrew the screw that secures it using Torx T30.
- Disconnect the wiring harness.
- Replace the ABS sensor and reassemble everything in reverse order.
Differences between ABS brakes
The main difficulty lies in ignorance of the nuances of operation and the main differences from the same procedure on conventional brakes.
Bleeding brakes with ABS has three main differences from conventional ones:
- the pipeline system in the presence of ABS is under increased pressure;
- During the procedure, constant monitoring of the brake fluid level will be required;
- the pump runs for no more than 10 minutes.
If you do not control the brake fluid level in the system, it will reach a critical minimum and the drive pump will begin to pump air.
If the pump runs longer than the set 10 minutes, turn off the ignition and allow the unit to cool for 10-15 minutes.
FAQ
One of the most common problems among motorists is the lack of effect from pumping the brakes. After the procedure, the pedal remains sluggish, and no improvements in the operation of the system are observed.
Two factors lead to this situation:
- lack of tightness of the system or any individual element;
- incorrect replacement of the master cylinder.
If all the air has not been removed from the cylinder during installation, it will subsequently be quite difficult to squeeze it out through the fitting.
Drivers are also interested in how much it is possible to bleed the brakes on their own, without the assistance of an assistant. To do this, purchase a special device that will make the procedure of bleeding the brakes easy and convenient without outside help.
You can bleed brakes with an ABS system at home without taking the car to a service station. The main thing is to follow all the basic rules of the procedure to prevent system breakdown.
Issues relating to motorists' rights are often more important than they appear at first glance. A driver may lose his license or suffer other severe penalties due to ignorance or misinterpretation of laws and regulations. Do not be lazy to dive deeply into the essence of the issue being studied, do not hesitate to ask advice from professionals.