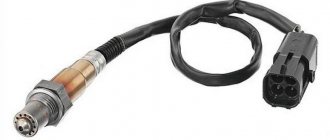
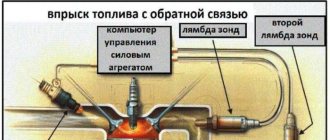
In order to reduce the amount of toxic emissions into the atmosphere, Lada Largus cars were equipped with two oxygen concentration sensors (hereinafter referred to as DCC).
The manager reads the quantitative composition of oxygen in the exhaust gases from the combustion chambers, the diagnostic one scans the exhaust gases coming out of the catalytic filler. The controllers are identical in shape and size, but perform different functions.
During the systematic operation of a technical device, parts wear out and become unsuitable for use, as evidenced by a number of signs. Replacing the DCC yourself is not at all difficult, but be extremely careful and do not make mistakes.
Control oxygen concentration sensor (“upper”) - removal and installation (replacement)
Note: Links to drawings with the location of sensors and their catalog numbers depending on the engine model: For the K7M engine For the K4M engine For the VAZ-11189, 21129 engine
Attention. Do not allow contact cleaner or other materials to come into contact with the oxygen sensor or sensor connector. These materials can get into the oxygen sensor and cause it to malfunction.
The car uses two oxygen sensors: a control sensor, the replacement of which is described on this page, and a diagnostic oxygen sensor, the replacement of which is described here.
The control oxygen concentration sensor (UDCC) is located in the threaded hole of the exhaust manifold.
For cars with K4M engine
Place the car in the workplace, brake with the parking brake, turn off the ignition and disconnect the earth wire terminal from the battery.
.
Remove the intake silencer and air filter housing (see here).
Figure 11-21 — Removing the control oxygen sensor of the K4M engine: 1 — block of the control oxygen sensor; 2 — mounting bracket; 3 - control oxygen sensor
Disconnect the wiring harness connector from connector 1, Figure 11-21, of the control oxygen sensor.
Disconnect the control oxygen sensor block from the 2nd mounting bracket.
Unscrew and remove control oxygen sensor 3 (key “22”).
For cars with K7M engine
Place the vehicle on a two-post lift, apply the parking brake, turn off the ignition and disconnect the ground cable from the battery.
.
If equipped: remove the mudguard (see here) and the engine crankcase protection (see here).
Note: The sensor can also be removed from the top, but in this case you will have to remove the thermal shield by unscrewing the three nuts that secure it.
Figure 11-22 — Removing the control oxygen sensor of the K7M engine: 1 — block of the control oxygen sensor; 2 — sensor wiring holder; 3 - control oxygen sensor
After releasing the latch, disconnect the ECM wiring connector from sensor wiring connector 1 .
Unfasten the plastic holder 2 and remove the sensor wiring from it.
Remove block 1, Figure 11-22, of the control oxygen sensor from the holder by sliding it.
Unscrew the control oxygen sensor 3 (key “22”).
We perform the installation in reverse order. Before installing the sensor, apply a thin layer of graphite grease to its threads, preventing it from getting into the sensor through the hole in its tip.
For cars with K4M engine
Replacing the lambda probe
In most cases, a part such as a lambda probe cannot be repaired, as evidenced by statements about the impossibility of repair from many automobile manufacturers. However, the inflated cost of such a unit from official dealers discourages anyone from purchasing it. The optimal way out of this situation could be a universal sensor, which costs much less than its native analogue and is suitable for almost all car brands. Also, as an alternative, you can purchase a used sensor, but with a warranty period, or a completely exhaust manifold with a lambda probe installed in it.
However, there are cases when the lambda probe operates with a certain error due to severe contamination as a result of combustion products deposited on it. In order to make sure that this is really the case, the sensor must be checked by specialists. After the lambda probe has been checked and its full functionality has been confirmed, it must be removed, cleaned and reinstalled.
In order to dismantle the oxygen level sensor, it is necessary to warm its surface to 50 degrees. After removal, the protective cap is removed from it and only after that you can start cleaning. It is recommended to use phosphoric acid as a highly effective cleaning agent, which can easily cope with even the most stubborn flammable deposits. At the end of the soaking procedure, the lambda probe is rinsed in clean water, thoroughly dried and installed in place. At the same time, do not forget about lubricating the threads with a special sealant, which will ensure complete tightness.
The structure of a car is very complex, so it needs constant maintenance and timely preventative maintenance. Therefore, if there is a suspicion that the lambda probe is faulty, it is necessary to immediately diagnose its performance and, if the fact of failure is confirmed, replace the lambda probe. Thus, all the most important functions of the vehicle will be maintained at the same level, which will guarantee the absence of further problems with the engine and other important elements of the car.
It's time to try out the Autoac-Express 2 ocilloscope and check the oxygen sensors.
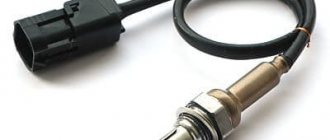
An oxygen sensor (lambda probe) is installed in the engine exhaust gas stream and measures the level of oxygen content in them.
There are: 1) based on zirconium oxide, it generates an output signal with a voltage from 40-100 MV to 0.7-1.0 V. 2) Based on titanium oxide, an output signal voltage from 10-100 MV to 4-5 V. 3) Broadband
The first oxygen sensor is installed in a threaded hole in the exhaust manifold. Second sensor after the catalytic converter. Based on the signal from the first sensor, the ECU adjusts the fuel supply. Based on the signal from the second sensor, the ECU evaluates the efficiency of the catalytic converter.
Constantly monitoring the voltage of the sensor signal, the control unit adjusts the amount of fuel injected by the injectors. When the sensor signal level is low (poor air-fuel mixture), the amount of fuel supplied increases; when the signal level is high (rich mixture), it decreases.
The first oxygen sensor has 4 wires. Two contacts are a heating element, they can be checked for resistance, the norm is 4-30 Ohms. It showed 3.5 ohms. The third wire is signal. The fourth mass.
We connect the oscilloscope needle adapter to the signal wire and ground to the battery. And we see the oscillogram. The oxygen sensor is checked at 2000-3000 engine speeds. On a working sensor, there should be at least 8 changes in readings in 10 seconds at 2000-3000 rpm.
The potential difference varies from approximately 0.1 V (high oxygen - lean mixture) to 0.9 V (low oxygen - rich mixture). That is, it should rise above 0.8 and fall below 0.2 Volts. If the signal is higher than 1 V, then an error will occur for the sensor, since a working sensor cannot physically give such a signal.
Second oxygen sensor, after the catalyst. When checking the performance of the catalytic converter, the data from the oxygen sensor before and after the catalytic converter is compared. The comparison is made based on the oxygen content in the chain and precious metals in the thin coating. In normal condition, with a closed control loop, high-performance neutralizers contain enough oxygen. As a result, compared with the frequency and amplitude of voltage fluctuations of the front heated oxygen sensor, the frequency and amplitude of voltage fluctuations of the rear heated oxygen sensor are reduced. As the performance of the catalytic converter deteriorates due to overheating and destruction due to chemical reactions, the amount of oxygen in it decreases. The rear oxygen sensor voltage begins to fluctuate with greater frequency and amplitude, the values of which approach those of the front sensor.
Today we will learn how to independently diagnose the serviceability of lambda probes. This is useful if the “Check Engine” signal appears on the dashboard and the scanner shows errors in the oxygen sensors. This can also be manifested by increased fuel consumption, an over-enriched fuel mixture, which will be evidenced by black carbon deposits on the spark plugs, I wrote about this in detail here.
Therefore, the serviceability of these sensors is important for stable and normal engine operation. If these symptoms occur, you can contact a specialist. But, like a real car enthusiast, you can check them yourself. To do this, you only need a multimeter - this is an inexpensive device that is always useful when diagnosing faults in the electrical equipment of a car.
There are several types of lambda probes. Each of them is diagnosed differently. Let's first look at the features of each type.
Oxygen sensor for Lada Largus
In order to reduce the amount of toxic emissions into the atmosphere, Lada Largus cars were equipped with two oxygen concentration sensors (hereinafter referred to as DCC).
The manager reads the quantitative composition of oxygen in the exhaust gases from the combustion chambers, the diagnostic one scans the exhaust gases coming out of the catalytic filler. The controllers are identical in shape and size, but perform different functions.
During the systematic operation of a technical device, parts wear out and become unsuitable for use, as evidenced by a number of signs. Replacing the DCC yourself is not at all difficult, but be extremely careful and do not make mistakes.
Testing a three- and four-wire sensor
These lambda probes use a heater. Therefore, additional white wires are added - plus and minus of the heating element. Checking the reference voltage and the active element of the sensor occurs in the same way as described above.
In our case, we need to check the performance of the heater. It is powered from the main relay with a voltage of “12 V”, the control unit is “ground”. We connect one multimeter probe to any of the white wires of the sensor, the second – to the second of the same color. Turn on the ignition, the device should have on-board voltage, that is, about 12 Volts.
How to check the lambda probe and signs of malfunction? Will a Bosch universal fit?
@andrienko.1966 —> Thank you! Everything is clear, I'll check.
The car jerks when you drive at low speeds. When the engine is not warmed up everything is fine. Spark plugs, explosive wires, MAF, DPZD, fuel filter, rail pressure, everything is normal. Feels like...
First of all, when the lambda fails and malfunctions, several tangible consequences appear in the car’s behavior:
Then, to check the lambda probe, you can first unscrew it and carry out a visual check (just as a visual check of the spark plugs can tell you a lot).
Visual inspection of the lambda probe
How to check the lambda probe. When you click on the image, it will open in full size
Several types of lambdas are installed on cars; the sensors can have one, 2, 3, 4, even five wires, but it is worth remembering that in any of the options, one of them is a signal (often black), and the rest are intended for heater (usually they are white).
Oxygen sensor for Lada Largus: original, analogues, price, catalog numbers
| Catalog article/marking | Price in rubles |
| Control 8200052063 (8 and 16 valves) | From 1600-1800 |
| Diagnostic 8201071311 (8 and 16 valves) | From 1600-1800 |
| NGK 95801 | From 1400-1500 |
| BOSCH 0 258 006537 | From 1400-1500 |
| ERA 570023 | From 1400-1500 |
| FENOX SD10100O7 | From 1400-1500 |
| BREMI 30223 | From 1400-1500 |
| DENSO DOX-0150 | From 1400-1500 |
| STELLOX 20-00028-SX | From 1400-1500 |
| PATRON HZ-30301006 | From 1400-1500 |
| *prices are as of May 2022 | |
The lambda probe (LPS) monitors the oxygen content in the exhaust gases. The excess of air in the mixture is called “enrichment”, and the reverse process is called “depletion”.
Both factors negatively affect the functionality of the motor. This leads to decreased power, unstable idling, and increased fuel consumption.
In order to save money, many car owners purchase low-quality spare parts, which accelerates premature wear of the equipment.
Operating principle of a lambda probe
The main task of the lambda probe is to determine the chemical composition of exhaust gases and the level of oxygen molecules in them. This figure should range from 0.1 to 0.3 percent. Uncontrolled excess of this standard value can lead to unpleasant consequences.
During a standard car assembly, the lambda probe is mounted in the exhaust manifold in the area where the pipes connect, however, sometimes there are other variations in its installation. In principle, a different arrangement does not affect the operating performance of this device.
Today you can find several variations of the lambda probe: with a two-channel layout and a broadband type. The first type is most often found on older cars produced in the 80s, as well as on new economy class models. A broadband sensor is typical for modern mid- and high-class cars. Such a sensor is capable of not only accurately determining the deviation from the norm of a certain element, but also promptly balancing the correct ratio.
Thanks to the hard work of such sensors, the vehicle's operating life is significantly increased, fuel consumption is reduced and the stability of idle speed is increased.
From an electrical engineering point of view, it is worth noting that the oxygen sensor is not capable of creating a uniform signal, since this is prevented by its location in the collector zone, because a certain number of operating cycles may pass in the process of reaching the device with exhaust gases. Thus, we can say that the lambda probe reacts rather to destabilization of the engine, which it subsequently notifies the central unit about and takes appropriate measures.
Where is the oxygen sensor located?
Lada Largus is equipped with two DKK: diagnostic and control. The first is installed on the exhaust manifold body, the second on the exhaust pipe, after the manifold coupling.
Access to equipment for preventive maintenance from under the bottom of the car, as well as through the top of the engine compartment. The average service life of the DCC is 85 thousand km. depending on the driver's compliance with the manufacturer's recommendations.
Signs of a malfunctioning oxygen sensor on a Lada Largus car
The symptoms are similar to other breakdowns, so at the initial stage, correctly identify the breakdown.
- Difficulty starting the engine;
- Increased fuel consumption;
- Power reduction;
- Passive acceleration dynamics;
- The engine is not running properly;
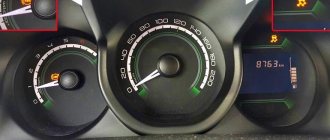
- An indicator on the instrument panel indicates the presence of ECU system errors;
- Periodic shooting sounds are heard from the exhaust pipe, which indicates an enrichment (leanness) of the combustible mixture;
- Blue, gray, black smoke from the exhaust pipe.
If one or more signs are detected, immediately contact a service station specialist to carry out
Checking the lambda probe with a tester
We take an electronic constant voltage millivoltmeter and connect it in parallel with the LZ (“+” “-” to the LZ, - to ground), and the lambda probe must be connected to the controller.
When the engine warms up (5-10 minutes), then you need to look at the voltmeter needle. It should periodically move between 0.2 and 0.8 V (i.e. 200 and 800 mV, and if less than 8 cycles occur in 10 seconds, it’s time to change the LZ. Also replace if the voltage “stands” at 0 .45 V.
When the voltage is always 0.2 or 0.9 V, then there is something wrong with the injection - the mixture is too lean or too rich. Since the oxygen sensor voltage should change all the time and jump from ≈0.2 to 0.9V.
There is another quick way to check the lambda probe. You should do this:
Carefully pierce the positive contact of the tester (black lambda wire), the other contact to ground. With the engine running, the readings should range from 0.1 to 0.9V. Constant readings (for example, 0.2 all the time) or readings that go beyond this range, or fluctuations with a smaller amplitude indicate a malfunction of the probe.
- all the time 0.1 - little oxygen
- all the time 0.9 - a lot of oxygen
- The probe is fine, the problem is something else.
If you have the time and desire to bother, you can conduct several tests for a rich and lean mixture and additionally check the lambda probe.
- Disconnect the oxygen sensor from the block and connect it to a digital voltmeter. Start the car and, by pressing the gas pedal, increase the engine speed to 2500 rpm. Using a device for enriching the fuel mixture, reduce the speed to 200 per minute.
- If your vehicle is equipped with an electronically controlled fuel system, remove the vacuum tube from the fuel pressure regulator. Look at the voltmeter reading. If the instrument needle approaches the 0.9 V mark, it means the lambda probe is in working condition. A malfunction of the sensor is indicated by the lack of response from the voltmeter, and its readings are less than 0.8 V.
- Do a lean mixture test. To do this, take a vacuum tube and provoke an air leak. If the oxygen sensor is working properly, the digital voltmeter reading will be 0.2 V or lower.
- Check the operation of the lambda probe in dynamics. To do this, connect the sensor to the connector of the fuel supply system, and install a voltmeter parallel to it. Increase engine speed to 1500 rpm. The voltmeter readings with a working sensor should be at the level of 0.5 V. Another value indicates a failure of the lambda probe.
Checking the voltage in the heating circuit
To check the presence of voltage in the circuit, you need a voltmeter. We turn on the ignition and connect it with probes to the heater wires (you cannot disconnect the connector, it is better to pierce it with sharp needles). Their voltage should be equal to what the battery produces when the engine is not running (about 12V).
If there is no plus, you need to go through the battery-fuse-sensor circuit, since it always goes directly, but the minus comes from the ECU, so if there is no minus, look at the circuit to the block.
Checking the lambda probe heater
In addition to measuring voltages with a multimeter, you can also measure resistances to check the serviceability of the heater (two white wires), but you will need to switch the tester to Ohms. The documentation for a particular sensor must indicate the nominal resistance (usually it is about 2-10 Ohms), your task is only to check it and draw a conclusion. The video shows this method:
Checking the oxygen sensor reference voltage
We switch the tester to voltmeter mode, then turn on the ignition and measure the voltage between the signal and ground wires. In most cases, the lambda probe reference voltage should be 0.45V.
And so I’ll summarize how you can check the lambda probe: external inspection, multimeter, warming up, oscilloscope, on-board system.
If you disconnect the lambda probe and perform the test without the car, you can only measure the reference resistance. With the element connected, you can measure the resistance and voltage on a warm engine.
How to check a lambda probe with a multimeter
The principle of checking the lambda probe is similar on all cars. The only differences are in the tension. Checking on different machines will help you understand in more detail.
For example, to check on a Skoda Octavia, we set the resistance on the multimeter to 200 Ohms. When the engine is cold, the optimal value will be 9 ohms. If you warm up the engine, the value will decrease due to conductive spraying.
After this, we measure the sensitivity of the sensor. Set the multimeter to DC mode. By connecting the red probe to the lambda probe and the black one to ground, you need to turn on the ignition. The indicators will be at the level of 0.45-0.47 V. After warming up the car, the indicators will jump from 0.1 to 0.9 V.
Checking the lambda probe on a Toyota Camry is also performed. When the ignition is on, it will show up to 0.5 V, and with constant engine operation at 2000 rpm - 0.1 - 0.9 V.
Approximately the same indicators will be found on the Ford Focus. Only if you press the gas pedal and then quickly release it, the multimeter will show 1 V. On Camry and Octavia, the value may be slightly lower - 0.8 V. This means that the lambda probe is working normally.
The manager reads the quantitative composition of oxygen in the exhaust gases from the combustion chambers, the diagnostic one scans the exhaust gases coming out of the catalytic filler. The controllers are identical in shape and size, but perform different functions.
During the systematic operation of a technical device, parts wear out and become unsuitable for use, as evidenced by a number of signs. Replacing the DCC yourself is not at all difficult, but be extremely careful and do not make mistakes.
Reasons for reducing the service life of equipment
- Violation of operating conditions for Lada Largus;
- Failure to comply with scheduled technical inspection deadlines;
- Refueling with low-quality fuel;
- Installation of non-original parts;
- Violation of installation technology;
- Defective parts during manufacturing;
- Damage due to an accident, collision, impact;
- Incorrect operation of the firmware of the electronic control unit.
Do-it-yourself controller diagnostics on Lada Largus
To carry out diagnostics we use a multimeter. If the owner does not have the device in stock, it can always be purchased at a car store or car market.
- We place the car above the inspection hole (roadside overpass);
- We remove the limit switches on one of the DCC;
- Connect the multimeter terminals;
- We activate the device to the “Resistance” position;
- We analyze the data;
- By analogy, we check the second (diagnostic) DCC.
The arrow tends to infinity - the lambda probe is working, the arrow points to zero - damage. The controller is non-separable and cannot be prevented.
In parallel with measuring the resistance at the end switches, inspect the integrity of the insulating layer on the wiring. If damaged, replace cable sections.
Electronic lambda probe test
You can find out about the condition of the lambda probe by checking it on professional equipment. An electronic oscilloscope is used for this. Some experts determine the performance of the oxygen sensor using a multimeter, however, it can only state or deny the fact of its failure.
The device is checked during full engine operation, since at rest the sensor will not be able to fully convey a picture of its performance. In case of even a slight deviation from the norm, it is recommended to replace the lambda probe.
Installing an oxygen sensor on Lada Largus
Required materials and tools:
- Key to "22";
- Rags, flashlight to improve visibility;
- Diagnostic and control controllers.
- We install the machine above the inspection hole. We use a hydraulic lift if there is no hole;
- We turn off the engine, open the hood;
- We wait until the exhaust circuit cools down to a safe temperature so as not to damage the skin of the hands;
- From under the bottom we unclip the terminals on the diagnostic controller. We unscrew it, replace it with a new one, put on the block with wires;
- By analogy, we replace the control sensor.
DIY replacement completed. All that remains is to start the engine and check the functionality of the controllers. Subject to compliance with the regulations, subsequent maintenance after 80 thousand km.
Source
Removing the control oxygen concentration sensor
We show operations on a 1.6 (16V) engine.
Remove the air filter housing (see “Removing the air filter housing”).
With the ignition off, press the lock of the engine control system wiring harness block...
...and disconnect the block from the wiring harness block of the control oxygen concentration sensor. We remove the sensor wiring harness block from the holder.
We pass the sensor wiring harness block through the ring of the “22” spanner wrench...
...put the key ring on the hexagon of the sensor...
...and unscrew the sensor from the exhaust manifold hole. To remove the oxygen concentration control sensor on the 1.6 (8V) engine, we perform similar operations (except for dismantling the air filter housing).
Using a 22 key, unscrew the sensor from the hole in the exhaust manifold of the 1.6 (8V) engine. We install the control oxygen concentration sensor in the reverse order. Before installing the sensor, apply a thin layer of graphite grease to its threads, preventing it from getting into the sensor through the hole in its tip. We tighten the sensor to the prescribed torque (see.
What and how can you check the lambda?
To check, you will need a digital voltmeter (preferably an analog voltmeter, since its “sampling” time is much shorter than that of a digital one) and an oscilloscope, if possible, the measurements will be more accurate. Before checking, you should warm up the car since lambda operates correctly at temperatures above 300C°.
First we look for the heating wire:
We start the engine, do not disconnect the lambda connector. We connect the negative probe of the voltmeter (ordinary gauge) to the car body. We “poke” the positive probe on each wire contact and observe the voltmeter reading. When the positive wire of the heater is detected, the voltmeter should show a constant 12 V. Next, using the negative probe of the voltmeter, we try to find the negative wire of the heater. We connect to the remaining contacts of the sensor connector. If a negative contact is detected, the voltmeter will again show 12 V. The remaining wires are signal wires.
Three-wire lambda probe. Clicking on the image will open it in full size
Four-wire lambda probe. Clicking on the image will open it in full size
Lambda wires. Clicking on the image will open it in full size
Removing the diagnostic oxygen concentration sensor
We carry out the work on an inspection ditch or overpass. From below the car with the ignition off, pressing the lock of the engine control system wiring harness block...
...disconnect the wiring harness block from the sensor wiring block.
We move the sensor wire block from the holder attached to the heat shield.
We pass the sensor wire block through the ring of the “22” spanner wrench and, putting the wrench ring on the hexagon of the sensor...
...we unscrew the sensor from the threaded hole of the pipe. We install the diagnostic oxygen concentration sensor in the reverse order.
Before installing the sensor, apply a thin layer of graphite grease to its threads, preventing it from getting into the sensor through the hole in its tip.
We tighten the sensor to the prescribed torque (see.
Sensor with one or two wires
The principle of their operation is the same, the only difference is the number of wires. In the first one, black is the signal one, and the mass is the lambda housing. For the second one, black is the signal, gray is the mass. Therefore, their test is the same, the only difference is where the multimeter probes are connected.
Checking the reference voltage
The black wire is responsible for it. We move the insulation on the “chip” on the side of the sensor a little to get to the wires and see their colors.
We insert the positive lead of the multimeter into the connector of the black wire. If the sensor has one wire, then connect the negative terminal of the device to the negative terminal of the battery. If two wires come from the lambda, then insert the negative probe into the connector of the gray wire.
We switch the multimeter mode to measuring constant voltage within the “20 V” range. We turn on the car's ignition, but do not start the engine. The device should show a value of “0.45 V”. This is a normal reading and the reference voltage is normal.
If it is absent or greatly underestimated, it means that the engine control unit does not provide the required reference voltage to the lambda sensor. It won't work correctly. You need to look for the problem in the engine ECU.
In the case of a two-wire lambda, there may be no ground on the gray wire. There may be a break on it or the control unit does not “send” a minus sign - there are problems in the electronics of the unit. To verify this, you can connect the negative probe of the multimeter to the negative of the battery. If the treasured “0.45 V” appears on the device, then there is no “ground” in the ECU.
We check the functionality of the active element of the lambda probe
We leave the probes of the device in the same position. We start the car engine and let it warm up a little. The multimeter reading should change within approximately 1 second from 0.1 to 0.9 V. If it does not change, then the sensor is faulty.
To further verify the functionality of the lambda, you can remove the vacuum hose from the receiver, that is, increase the amount of air in the intake manifold after the mass air flow sensor (mass air flow sensor), thereby leaning the mixture. The multimeter readings should change, that is, the boundaries of the amplitude of the voltage change will change.