The principle of operation of the fuel level sensor, why it does not show and how to check
The fuel level sensor (FLS), as the name suggests, performs a single function - it determines the amount of fuel in the vehicle’s fuel tank. It is placed directly inside the tank, and the readings are transmitted to the fuel level indicator located on the dashboard, which shows the remaining fuel.
There are several types of FLS, the most modern is ultrasonic, the most widespread is potentiometric. Domestic cars, in particular, VAZ-2107, VAZ-2109, VAZ-2110 and VAZ-2115, are equipped with potentiometric float-type fuel injection systems.
- Fuel level sensor device
- Other fuel level sensor options
- Description of the fuel level sensor operation
- Sensor malfunctions
- How to check the functionality of the sensor?
Purpose
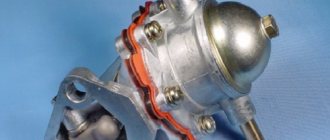
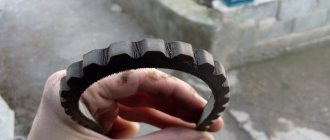
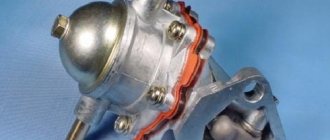
Gasoline filter for VAZ 2109
Functional purpose of the fuel filter.
This:
- cleaning from dirt and dust particles;
- condensate filtration;
- preventing resins from getting into the car engine;
- anti-corrosion protection;
- prevention and prevention of blockage of the fuel line, etc.
Reasons why you need to change your gasoline filter regularly:
- prevention of related malfunctions, since any breakdown in a car, as a rule, has a cascading nature;
- fuel overload of the current filter;
- the recommended service life has expired;
- the appearance of signs of malfunctions that indicate the use of low-quality fuel.
Motorists who drive a VAZ 2109 should know that the gasoline filter must be changed no later than after 20 thousand kilometers. It is also recommended to replace the internal cabin filter at the same frequency. As you know, the cabin filter performs the following functions:
- prevents fuel combustion products from entering the cabin;
- cleanses the circulating air, saturating it with necessary substances;
- directly affects the physical condition of the driver;
- is an effective remedy against drowsiness, as it supplies clean air, which is necessary for the human body.
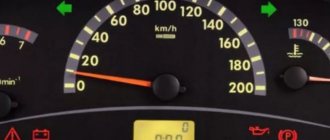
The fuel level indicator in the instrument panel of VAZ 2108, 2109, 21099 cars does not work
The fuel gauge needle is constantly deviated to the left, right, or shows incorrect information about the amount of fuel in the gas tank.
This situation on VAZ 2108, 2109, 21099 vehicles indicates, first of all, a malfunction of the fuel level sensor (FLS) in the gas tank or a malfunction of its electrical circuit, and, last of all, a malfunction of the fuel level dial indicator on the instrument panel. It is in this sequence that the malfunction follows.
The fuel level indicator in the instrument panel of a VAZ 2108, 2109, 21099 car does not work, a list of causes and recommendations for troubleshooting
The fuel level sensor in the fuel tank is faulty
If the indicator needle is constantly at zero, although there is enough fuel in the tank, most likely the float has become leaky and sank or is stuck in the lower position, or the rheostat winding of the fuel level sensor is faulty (perhaps the moving contact simply does not touch it). In this case, the fuel reserve warning lamp may or may not light up.
How to fix: the float is replaced with a new one or soldered, the movable contact is bent until it touches the winding. If the winding is damaged, replace the fuel level sensor with a new one.
If the arrow constantly shows a full tank, the sensor float lever is most likely stuck in the upper position. It is necessary to remove the fuel intake along with the sensor and determine the cause of the jamming of the float lever.
If the fuel level indicator on the instrument panel is otherwise incorrect or inaccurate, the cause of the malfunction will be a failed rheostat winding of the sensor. We replace the fuel level sensor with a new one.
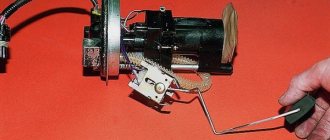
Fuel level sensor VAZ 2108, 2109, 21099
The electrical circuit connecting the fuel level sensor and the fuel level indicator is faulty
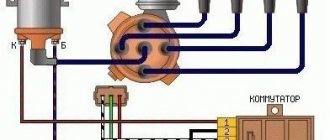
We look at the fuse in the mounting block (No. 5 or X11). If it burns out, we replace it with a working one, and then it is necessary to find out the cause of the burnout. In addition, we check the connecting blocks of the electrical circuit of the fuel level sensor for oxidation of the contacts and loose fit. First of all, this is a chip on the fuel intake, as well as pads in the fuse mounting block. We use the sensor connection diagram: “Connection diagram for the fuel level sensor of VAZ 2108, 2109, 21099 cars.”
The fuel level indicator in the instrument panel is faulty
The operating principle of the fuel level dial indicator in the instrument panel is based on changing the magnitude and direction of the magnetic flux in its windings according to a signal from the fuel level sensor. Therefore, if, after checking the sensor and its circuit, the suspicion of a malfunction falls on the pointer, then we can safely replace it with a new one or a known good one. Because it makes no sense to rewind its windings and change the magnets present in its design. Before replacing, we first check the reliability of the sensor’s “ground” and the contacts of the corresponding wire.
Operation of the VAZ 21083 fuel level sensor with an empty gas tank
Notes and additions
— Together with the pointer indicator, the fuel level warning lamp may or may not work. It lights up after the float is lowered to almost the lowest position, when the contacts of the control lamp in the sensor touch (one of which is continued by a wire). Therefore, if the warning lamp does not light up, it means that for some reason its contacts inside the fuel level sensor have not closed. If, on the contrary, the lamp is constantly on, it means that the contact with the wire is shorted to ground.
Individual situations
If the VAZ 21099 injector stops starting, you can try to close the contacts of the mechanism in a straight line.
But sometimes there are emergency situations when the device stops functioning, let’s consider a few of them:
- The injection engine does not start in cold weather, but all devices work normally, the battery is charged. If there is no click, you should first diagnose the safety components, electrical circuit, and also the solenoid relay. If the device clicks, the relay must be replaced.
- The starter turns all day, there is a spark, but in the evening the engine stops starting. Before checking the starter, it is necessary to fully charge the battery, and then clean the contacts on both the battery and the mechanism itself. If these steps did not help solve the problem, you need to check the battery itself more carefully - try closing the contacts with a wire, which may cause a spark to melt. If this does not help, try applying a positive charge from the battery directly to the relay. If there are no changes, the unit will have to be replaced.
- If the car was operated normally all day, but after parking for five minutes it stopped starting, you can try to close the mechanism. You need to directly close two bolts on the relay; if this helps, but later the problem reappears, then disassemble the unit completely. Most likely, the problem lies directly in the erasing of the brushes. In this case, they will need to be changed.
- The unit does not turn at all, but the car can be started from the pushrod. If the problem is not with the starter, then check the fuse box and ignition switch. But before this, you should check the wiring - the reason may lie in the oxidation of the contacts.
Functionality check
The VAZ 2109 fuel sensor can be checked for functionality using an ohmmeter or multimeter. After the device is removed from the gas tank, its contacts should be connected to the tester. We fix the float in one position and look at the indicators. The result should be 275-320 Ohms in the upper position of the float or 5-20 Ohms in the lower position. In the middle the resistance indicator is 100-130 Ohms. These figures are for a low instrument panel.
For a high panel these values are different:
- 260-280 Ohms in the lower position;
- 60-70 Ohm - average value;
- 15-20 Ohm is the upper limit position of the float.
If the device’s performance corresponds to the examples given, the device is working, everything is in order with the sensor, and it does not need repair or replacement. When significant deviations are present, it is worth checking the integrity of the wires. If they are ok, the sensor itself is faulty and needs to be replaced.
Principle of operation
The VAZ-2109 fuel level sensor is installed in the fuel tank and is called tubular because the contact is transmitted through pipes. Moreover, the installation of the FLS is always carried out in one place, no matter whether it is a carburetor or an injector. According to the principle of operation, the float creates contact and transmits information to the electronic control unit. After processing the received information about the amount of gasoline, the electronic control unit displays it on the dashboard.
The FLS is working properly. What to do?
Try the following activities.
- The sensor connector has a pair of wires - pink and blue;
- The pink one controls the arrow of the fuel level indicator in the tank, and the blue one is responsible for the critically low fuel level indicator;
- Take any jumper at hand, that is, a piece of any wire, and then use the jumper to short the pink wire to ground, while turning on the ignition. At this moment the arrow should be in the full tank position;
- Now, similarly, using a jumper, we connect the blue wire to ground. This should turn on a light that indicates on the dashboard that the fuel level inside the gas tank is low;
- If, when the jumper is shorted to ground, the indicator or lamp does not work, this indicates that the indicator itself is “covered”, or there is a problem with the condition of the wiring.
Reasons for replacement
You will definitely have to replace the sensor if the car starts to produce the following:
- The fuel level indicator needle “dances” or has fallen dead to the zero position;
- The indicator is constantly on, indicating a critical fuel level, although you have just filled the tank full.
FLS diagram
FLS on high and low panels
The differences in the sensors on the injectors and carburetors are minimal. Also, the fuel level sensors on VAZ 2109 cars equipped with a low and high panel are slightly different.
The difference lies in the resistance indicators. These parameters must be known when checking the condition of the sensor resistor.
| Panel type | Resistance readings |
| High panel |
|
| Low panel |
|
In this regard, when buying a new fuel level sensor, be sure to ask for a controller for a high or low panel, depending on what kind of car you have. It is also important to note that in the case of injection engines, the sensor is located inside the fuel pump, but it is based on the same operating principle as a carburetor one.
Repair of fuel level sensor VAZ-2109
If the gasoline readings are incorrectly displayed on the dashboard, then this is not yet a reason to purchase a new part. Sometimes it is enough just to adjust the operation of the old device. Initially, in order to check the functionality, we use a multimeter.
We bend the seat, get to the fuel hatch and unscrew it with a screwdriver. Disconnect the FLS from the connected wires and loosen the clamps on the hoses. We unscrew the tubes using a 10mm wrench and unscrew the 7 fasteners that secure the FLS. We take out the device, trying not to damage it.
We connect the device and look at the resistance. If you do not act on the float, the multimeter should show a resistance of 290–320 Ohms. Let's try to raise it up and look at the values. At this point they should show between 8 and 20 ohms.
We check the readings against the standards. If the readings have deviations, then we throw out the mechanism. It may be that the resistance remains at zero and the multimeter does not show it. In this case, the device is not suitable for use and must only be disposed of.
If the resistance is within normal limits, then the mechanism is working properly and the first thing we will look at is the wire that goes to the ground of the car. It is necessary to check its integrity and also inspect for the presence of rust. If the wire oxidizes, it also does not allow good contact. In this case, it must be cleaned. If stripping the ground wire was successful, but the situation has not changed, then we continue to look for the cause further.
Let's look at the wires that go to the FLS. One of them is red, the other is blue. Red is responsible for the indicator on the driver's dashboard, blue is responsible for the light on the dashboard.
Now let's take a regular wire and use it to connect the red wire to the ground of the car. We look at the readings on the dashboard, if when we close we see that the arrow has risen all the way, then everything should be so. If there is no reaction from the short circuit, then the problem may be in the arrow itself. Also, problems with the wiring cannot be ruled out, so it is recommended to ring each wire at the input and output.
After this, we carry out the same manipulations with the blue wire. If the light comes on at this time, the test is successful.
Signs of trouble
FLS failure does not happen often, but at some point it can take the driver by surprise. Incorrect gasoline readings can result in the car owner overfilling the car tank at a gas station or running dry on the road.
Although a breakdown is a rare occurrence for this device, it becomes immediately noticeable to the car owner. The appearance of problems with FLS manifests itself in a car as follows:
It is not necessary to get a new device if these problems arise. In some cases, it is possible to adjust it and resolve inaccuracies.
Functionality check
Do not rush to throw out the old sensor and replace it with a new regulator. First you can try to check if it really doesn't work.
To check, you will have to extract the “suspect” in any case.
- Inside the car, remove the lower part of the rear seat, remove the soundproofing material, if any. This will give you access to the inspection hatch in the floor of the car.
- Using a Phillips screwdriver, unscrew the four mounting screws that hold the hatch in place. Take it off. Under the hatch you will find a sealing gasket made of rubber. In any case, even if the old sensor works again for the benefit of your car, this gasket should be replaced.
- Disconnect the power supply block with wires from the sensor, and then unscrew the fastening nuts around the perimeter that hold the desired fuel level sensor on the tank body. Usually there are 6 of these nuts, and to dismantle them you will need an 8 socket socket or a regular wrench.
- Under one of the nuts there is a ground wire attached to a stud. Remove the wiring and put it aside for now. He shouldn't interfere.
- Carefully remove the sensor and do not forget to remove the rubber sealing gasket, which is located directly under the regulator. If there are signs of damage or defects on it, be sure to replace this component.
- When the sensor is removed, visually check its current condition. If there are mechanical damages, there is no point in further trying to repair it or restore its functionality. Change it right away.
- If there is no visual damage, check the condition of the float. It can be depressurized, that is, there is fuel inside it, cracks and various defects through which fuel has leaked are visible on the surface of the element. If all of this is present at the float, replace the entire sensor.
- Be sure to blow out the fuel filter with compressed air. A useful event that definitely will not harm your fuel system. Especially if the quality of gasoline with which you fill your VAZ 2109 leaves much to be desired.
- Check the condition of the resistor. To do this, you will need a multimeter in ohmmeter mode. Connect a measuring device to the sensor terminals and take readings. In the lowest position (empty tank), the resistance should be about 315-345 Ohms. If the tank is half full, the resistance will be 108-128 ohms. And when the tank is empty, the ohmmeter should show no more than 7 ohms. If the parameters differ from those specified, or there is no resistance at all, this indicates a malfunction of the controller. It must be replaced.
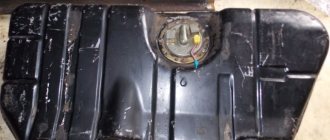
Location
If usually most repair work related to the engine and its system is carried out through the engine compartment, then in the case of the fuel level sensor everything is somewhat different.
The FLS is located under the rear seat. To access it, you need to remove the seat, bend back the soundproofing material, if any, and find the controller we need in the area above the fuel tank.
FLS location
DIY diagnostics
To find the reason why the fuel level sensor does not work, you will need a multimeter (we recommend reading,) and a control. The first step is to determine whether the cause of the breakdown is in the sensor located in the tank or in the indicator. To do this, remove the connector connected to the fuel section (located at the gas tank flap, which in most cases is accessible from the passenger compartment). Using the wiring diagram of your car model, determine which wire goes to the dashboard indicator. Turn on the ignition, then apply negative potential to the corresponding pin of the connector through the test lamp. If the pointer arrow quickly points upward, then the problem is in the sensor. For further diagnostics it is necessary to remove the fuel section. A multimeter will measure the resistance of the potentiometer.
Connection diagram for the instrument panel of VAZ 2110, VAZ 2111, VAZ 2112 (view from the back):
- Fuel reserve indicator lamp;
- Instrument cluster lighting lamps;
- Right turn indicator lamp;
- Left turn indicator lamp;
- Reserve warning lamp;
- Coolant temperature gauge;
- External lighting indicator lamp;
- Carburetor air damper warning lamp;
- Oil pressure warning lamp;
- Parking brake warning lamp;
- Battery charge indicator lamp;
- Tachometer;
- “CHECK ENGINE” indicator lamp;
- Speedometer;
- Brake fluid level warning lamp;
- Hazard warning lamp;
- Headlight high beam warning lamp;
- Fuel level indicator. Plugs 2, 3, 8, 9 in block X2 are speedometer pins 14
Temperature:
When the gauge needle is constantly at the beginning of the scale, with the ignition on, disconnect the wire from the temperature gauge sensor and connect the tip of the wire to ground.
If the arrow deviates, then, consequently, the temperature sensor of the VAZ 2110, VAZ 2111, VAZ 2112 is faulty and must be replaced. If the arrow does not deviate, remove the dashboard of the VAZ 2110, VAZ 2111, VAZ 2112 and, without disconnecting the wires from the panel, turn on the ignition and connect to ground the left terminal of the temperature indicator, which is connected to plug 5 (see Fig. 7-49 ) white block (X1). The deviation of the arrow in this case will indicate the serviceability of the device and damage to the wire connecting the sensor and the pointer. When the pointer needle is constantly in the red zone, with the ignition on, disconnect the wire from the temperature sensor of the VAZ 2110, VAZ 2111, VAZ 2112. If the arrow returns to the beginning of the scale, then the sensor is faulty. If the arrow remains in the red zone, then either the wire has a short to ground or the device is damaged. The serviceability of the device can be checked by disconnecting the white block (X1) of wires from the vehicle instrument cluster and connecting plug 1 to ground and connector 10 of the white block of the instrument cluster VAZ 2110, - 2111, - 2112 to the plus terminal of the battery. In this case For a working device, when the ignition is turned on, the arrow should be at the beginning of the scale. Fuel:
The testing procedure is similar to that described above. When the pointer needle of a VAZ 2110 - 2112 is constantly at the beginning of the scale and does not deviate after the tip of the pink wire disconnected from the fuel level sensor of the VAZ 2110, VAZ 2111, VAZ 2112 is shorted to ground, then it is necessary to check the device. To do this, remove the instrument cluster of the VAZ 2110, VAZ 2111, VAZ 2112 and, without disconnecting the wires from it, turn on the ignition and connect to ground the right terminal of the indicator, which is connected to plug 10 of the red block (X2) of the wires. If the device is working properly, the needle should deflect to the end of the scale. If the arrow of the fuel level indicator is constantly against o, then the serviceability of the device can be checked by disconnecting the red (X2) wire block from the dashboard of the VAZ 2110, VAZ 2111, VAZ 2112. In this case, with a working device, when the ignition is turned on, the arrow should be against the o.
Tachometer troubleshooting
In order to restore the functionality of the VAZ 21099 tachometer in each specific case, it is not at all necessary to seek the help of professional auto mechanics. All that is required of you at this stage: a minimum of tools and the will to win.
So, the tachometer needle of the VAZ 21099 twitches. Diagnostics showed that the regulator relay unit is faulty. Its replacement is carried out as follows:
- the vehicle's mass is switched off;
- the wiring block in the rear cover of the generator is disconnected;
- the protective cap is removed along with the supply terminal;
- unscrews the relay regulator.
The installation sequence of a working voltage regulator is performed in reverse order.
How to troubleshoot speed indicator problems caused by replacing high-voltage wires? To do this, it is necessary to slightly supplement the tachometer connection diagram. Namely, a capacitor with a capacity of no more than 900 pF must be connected to the instrument cluster board. It will help reduce the nominal resistance of the external resistor, and will significantly improve the performance of the tachometer.
It is worth noting that this method is applicable only when the tachometer does not work on the injection model VAZ 21099, but not on the carburetor modification, the distinguishing feature of which is a high dashboard.
If, due to any circumstances, the tachometer needs to be replaced, when dismantling it, you must adhere to the following sequence of actions:
- de-energize the engine;
- remove the left segment of the torpedo;
- dismantle the protective glass, evenly pressing it away from the surface of the shield;
- remove the decorative strip;
- unscrew the wires from the terminals of the device;
- Unscrew the tachometer mounting screws.
When dismantling the tachometer, do not forget to be careful
In this case, it is important not to damage the integrity of the remaining measuring instruments: speedometer, fuel and temperature gauges
There is an opinion that a faulty tachometer should not cause concern and such a “trifle” will in no way affect the operation of the car. Still, you should not adhere to this position, because incorrect readings of this device may be the result of a breakdown of much more significant components of your car.
Functionality check
The VAZ 2109 fuel sensor can be checked for functionality using an ohmmeter or multimeter. After the device is removed from the gas tank, its contacts should be connected to the tester. We fix the float in one position and look at the indicators. The result should be 275-320 Ohms in the upper position of the float or 5-20 Ohms in the lower position. In the middle the resistance indicator is 100-130 Ohms. These figures are for a low instrument panel.
For a high panel these values are different:
If the device’s performance corresponds to the examples given, the device is working, everything is in order with the sensor, and it does not need repair or replacement. When significant deviations are present, it is worth checking the integrity of the wires. If they are ok, the sensor itself is faulty and needs to be replaced.
Messages 11
1 Topic by Andrey08 2009-12-16 13:01:12
- Registered: 2010-08-11
- Posts: 91
- Reputation:
Topic: Not Working: All Tidy, Wipers, Fern Guard on VAZ 21099
My friend has a VAZ 21099 injector.
And recently the following happened: all the instrumentation stopped working (speedometer, tachometer, etc.), the wipers and ferns do not work. the headlights seem to come on
Today I talked to him, they say in the morning everything worked fine, but in the afternoon it immediately turned off right on the go.
I advised him to pay attention to the fuse box (they say the frost has hit, condensation is forming or it’s just wet). I would like to hear your opinion, what do you think about this? mb has this happened to anyone?
I would like to hear your opinion, what do you think about this? mb has this happened to anyone?
2 Reply from maik 2009-12-16 19:38:20
- maik
- User
- Offline
- Registered: 2008-11-25
- Posts: 187
- Reputation:
Re: Not working: All tidy, wipers, fern on VAZ 21099
My friend has a VAZ 21099 injector.
And recently the following happened: all the instrumentation stopped working (speedometer, tachometer, etc.), the wipers and ferns do not work. the headlights seem to come on
Today I talked to him, they say in the morning everything worked fine, but in the afternoon it immediately turned off right on the go.
I advised him to pay attention to the fuse box (they say the frost has hit, condensation is forming or it’s just wet). I would like to hear your opinion, what do you think about this? mb has this happened to anyone?
I would like to hear your opinion, what do you think about this? mb has this happened to anyone?
You can also check the ground on the tidy. (mass is strength))) all troubles come from it.
3 Reply from ils 2009-12-17 06:58:25
- ils
- User
- Offline
- Registered: 2009-06-16
- Posts: 540
- Reputation:
Re: Not working: All tidy, wipers, fern on VAZ 21099
I agree with maik - most likely the mass has moved away. It is attached under the dashboard above the place where the steering shaft is screwed to the body. The second place is the ignition switch relay. I’ve seen two types of such relays - some have a tongue that needs to be screwed to the body (there is one in the engine compartment - it looks like a starter relay), the second has a black wire - it should go somewhere to the body. I checked it on the pile - as soon as the mass disappeared from this relay, the entire tidy died, the wipers also did not work.
4 Reply from SokolOFF 2009-12-17 08:38:33 (2009-12-17 08:42:23 edited by SokolOFF)
- SokolOFF
- User
- Offline
- Registered: 2008-12-25
- Posts: 624
- Reputation:
Re: Not working: All tidy, wipers, fern on VAZ 21099
Judging by the quantity of everything at once, I dare to guess:
- ignition switch contact group
- one of the pads (it seems red) flew out of the block on the passenger compartment side
-a flooded block is also an option
PS I would check in just this order)) Well, first, of course, a visual inspection of the block. As for the mass, IMHO, it’s unlikely. After all, the headlight switch in the same place takes a lot of weight.
By the way, I just remembered another question: are “headlights” HEADLIGHTS (low beam, high beam) or dimensions? And does the car even start? Simply, if the lights are on, but the car does not start, then 90% of the ignition relay is either a contact group (or their wiring). I had such a case.
- Registered: 2010-08-11
- Posts: 91
- Reputation:
Errors on the panel
VAZ versions of on-board computers have a self-diagnosis option, which allows you to read codes yourself without the use of additional equipment. The following is a list of common problems encountered on cars.
| Number | Decoding |
| 1 | Motor control unit malfunction. |
| 2 | The voltage in the on-board circuit is too high. Usually occurs during short circuit. |
| 3 | Fuel level sensor - open circuit or damaged wiring. |
| 4 | The antifreeze level controller is faulty. |
| 5 | The external temperature controller is faulty. |
| 6 | The engine has overheated, you should stop and let the engine cool. |
| 7 | Engine oil pressure is less than minimum. There may be two reasons for this. Loss of lubricant level or pump failure. |
| 8 | Critical voltage drop in the on-board network. |
| 9 | The battery is low. The serviceability of the generator and its mains should be checked. |
| E | EEPROM data packet error |
| 12 | The diagnostic lamp is faulty. |
| 13 | Lambda probe circuit open. |
| 14 | Increased signal coming from the antirfiz temperature sensor. |
| 15 | The coolant temperature controller is faulty. |
| 16/17 | Incorrect voltage in the on-board network. |
| 19 | DPKV refused. |
| 21 | The throttle position control is faulty. |
| 24 | The speed sensor is faulty. |
| 27/28 | The exhaust gas system sensors are sending incorrect signals. |
| 35 | Idle speed is set incorrectly. |
| 41 | The phase regulator is not working correctly. |
| 44/45 | Excessively lean or rich mixture in the cylinders. |
| 49 | Loss of tightness in engine lines. |
| 61 | Lambda probe is faulty. |
Purchasing new equipment
Repairing old equipment is not difficult if it has become unusable due to oxidation or rust formation. Wiping the device can help restore contacts, but if the device is broken, even after restoration it may display incorrect data. If the error is more than 10%, then this can significantly affect the driver’s comfort behind the wheel, as well as the risk of being left with an empty tank on the road.
Therefore, if there is an error, it is recommended to replace it with a new device. Thus, the car owner can be confident in the accuracy of the data displayed on the dashboard. The cost of spare parts is relatively inexpensive; an injector can be found within 300 rubles. The part is easy to maintain and does not require replacement often, so it is recommended that if the data is inaccurate, replace it immediately.
Purchasing new equipment ensures that correct readings are displayed. By purchasing original spare parts, the car owner can forget about replacing them within 2-3 years.
Source
Idle speed adjustment
The second setting of the VAZ-2109 carburetor is idle speed, it can be partial or full. The first is for minor speed adjustments, the second is for adjusting the amount of air (setting CO emissions in the exhaust gases).
Partial adjustment is performed using the air-fuel mixture “amount” screw. This screw sets the opening angle of the throttle valves, which ensures that the air-fuel mixture enters the cylinders when the accelerator pedal is released. The “quantity” screw rests on the throttle valve control lever and when screwed in, it pushes the lever, causing the valves to open slightly.
Partial idle adjustment is performed with a warm engine and creating a load on the vehicle's on-board network by turning on the high beam headlights and the interior heater at full power. The adjustment is carried out with the engine running by screwing in/unscrewing the “quantity” screw until the optimal idle speed is established, which for the VAZ-2109 is 800-900 rpm (this can be tracked using a standard or plug-in tachometer).
If it is not possible to set the required speed or the motor operates unstably at it, a complete adjustment is made, which is made by two screws - “quantity” and “quality”.
The algorithm for this adjustment consists of the following stages:
- Warm up the engine and then turn it off;
- We find the quality screw (it may be closed with a plug that will have to be removed), screw it in until it stops, and then unscrew it 3-4 full turns;
- We start the engine, turn on electrical consumers (lighting and stove) to create a load in the on-board network;
- By rotating the “quantity” screw, we achieve 700-800 rpm on the tachometer;
- By turning the “quality” screw, we set the maximum possible speed (they will increase to a certain level, and then stop. The moment the speed increase stops is considered the maximum);
- We set the “quantity” screw to 900 rpm;
- Using the “quality” screw we lower them to 800 rpm;
- We slowly tighten the “quality” screw until interruptions appear in the operation of the power plant, after which we unscrew it back 1 turn;
- We adjust the speed with the “quantity” screw, bringing it to a normal value - 800-900 rpm;
After the adjustment operations, we check that they were carried out correctly. This is done by sharply pressing the gas pedal and then quickly releasing it. With a properly configured carburetor, the engine should respond quickly to pressure, without any failures or hesitations. And after releasing the pedal, the speed will drop to the idle level, without sags or instability of the engine.
Removing and installing the carburetor
Installation and dismantling is carried out in case of repair of this unit, its complete replacement, as well as for thorough washing and cleaning. The AHU can become clogged if the car is driven on dusty roads, as well as as a result of untimely replacement of the air filter element.
Removing and installing a VAZ-2109 carburetor is very simple; even with the initial skills of a car mechanic, almost any driver (car owner) can do such work with his own hands. We perform the dismantling operation as follows:
- turn off the ignition, open the hood, remove the top cover, the filter element, then unscrew the four nuts securing the air filter housing (AFC);
- loosening the clamps, disconnect the fuel hoses, unscrew the two fastenings of the choke cable, move the cable to the side, disconnect the wire chips of the solenoid valve and the throttle valve closing sensor;
- We also disconnect the throttle cable, having previously removed the return spring, the ignition angle advance hose, and unscrew the nuts securing the carburetor itself (also 4 pieces);
- in order not to lose antifreeze and not to disconnect the coolant pipes, it is easier to unscrew the screw securing the heating unit, but it is located at the back of the housing, not in the most accessible place;
- in this case, lift up the unscrewed carburetor, move it forward, find a position in which it would be convenient to dismantle this fastener;
- Now nothing prevents you from removing the entire assembly.
If the KU is thoroughly stuck to the studs and does not pull off, you can gently tap it at the base with a small hammer and shake it with your hands from side to side. As a rule, after several attempts the device gives in; after removing it, you can begin further planned operations; installation of the unit is carried out in the reverse order.
Disassembly of the unit, its reassembly
To check the functionality of the VAZ 2108, VAZ 2109 sensor, it is necessary to disassemble the unit. You will need the following set of tools:
The following actions are performed sequentially:
This completes all manipulations to disassemble the sensor assembly. Now the device can be cleaned, resistance checked or replaced. If there is external mechanical damage on the device body, you don’t even have to check it, but it is better to immediately replace it with a new one. The sensor cannot be repaired, just like its spare parts. Assembly is carried out in the reverse order, without any changes. Before connecting the wires, it is advisable to check their integrity. This is all that may be needed when dismantling the unit.