Print this article Font size 16
If the fuel pump on a VAZ 2109 malfunctions, the fuel supply to the carburetor is completely or partially stopped. Therefore, it is not possible to start the engine cold or hot. It will start at first, but then immediately die. Plus, instability at idle is often observed.
Before changing the fuel pump, it is recommended to first check the condition of the device. It is not uncommon for a breakdown to be corrected with minor repairs.
Checking and adjusting pump pressure
It's no secret that any car part has a certain resource. So the “nine” fuel pump, like any part, eventually stops pumping gasoline properly, our instructions will help you figure it out:
- Moreover, on the VAZ 2109 the problems with the fuel pump are always the same
- As a rule, the reasons are not tightness of the valves or housing, fuel wire, or diaphragm, perhaps the fuel filters are clogged, or the fuel supply lines are overheating
- The main problem is ultimately insufficient gasoline pressure at the outlet of the fuel pump.
- And in the case when your fuel pump initially could not show the appropriate (required) output pressure, then all the problems stated above only aggravate the situation
- You need to know exactly the output pressure (immediately before the carburetor) that the fuel pump should develop when the engine is idling.
- As a rule, all fuel pumps - both cars and trucks - must produce a pressure in the range from 0.20 atmospheres to 0.35 atmospheres. When your gas pump has a similar output pressure, then you should not have problems with gasoline supply
- The pressure is measured with a pressure gauge that has a scale with divisions of 1.6 atmospheres - on such a pressure gauge it will be possible to record the pressure of the fuel pump
- When the pressure is measured and it turns out to be below normal, you may just need to adjust the pump
- It is possible to adjust the fuel pump either by moving it closer or further from the engine block (by changing the thickness of the gasket)
- The second method is to strengthen the spring (washers are placed under it, the operation is performed taking into account the wear of existing parts and the strength of the spring)
- The third option is to change the length of the rod
- Any of the listed measures (or all in combination) make it possible to increase the pressure of the fuel pump to the level of 0.20 - 0.30 atmospheres
- The best thing, of course, is to bring the figure to 0.30-0.35 atmospheres at idle speed
- When the engine starts running at higher speeds, this figure will increase a little more.
Characteristics of the VAZ 2109 fuel pump
To understand how a working pump works and check its operation, it is important to know its operating characteristics:
- The length of its rod is 82.4 millimeters
- In this case, the rod protrudes above the gasket by 0.8 - 1.3 millimeters
- The thickness of the very first gasket is 0.3 millimeters
- And, the stroke of the rod is 2.5 - 2.8 millimeters
Useful tips
A couple of very useful recommendations for beginners on what to do if a fuel pump malfunction occurs on a VAZ 2109:
It is important to note that on machines that have a return line, the problem may arise due to the release hole being too large, then most of the pressure is relieved by the return line. In the event that the installed pump on your machine cannot be adjusted, you will have to replace it Today on the market Dozens of models of pumps for VAZ from different manufacturers are sold. In order not to buy a fake, you should approach the purchase very responsibly - choose a company store and a reputable manufacturing company, purchase exclusively models of gasoline pumps recommended by the VAZ plant. And the most ideal option is to contact an official dealer of VAZ spare parts in in your region, then you will receive the required part quickly, and you won’t worry about whether you got a bad quality fuel pump, and you won’t have to look for and buy a new pump a second time
Disassembling and replacing the fuel pump
So, now we’ll tell you specifically about how to properly disassemble, replace damaged elements of the fuel pump, or completely replace this device with a new one.
Hatch
- In any case, we recommend purchasing a repair kit. It doesn't cost much. But there is no need to rush into buying a fuel pump. Who knows, maybe a simple repair will bring the pump back to life.
- Remove the air filter along with its housing.
- Disconnect the fuel supply and return hoses from the fuel pump fittings.
- Unscrew the mounting nuts that hold the pump itself.
- Carefully remove the pump, being careful not to damage the gaskets.
- Inspect the pump parts for cracks or damage. Check the fuel pump valves for leaks and perform all the operations we described above.
- Assess the current condition of the suction and discharge fittings. When dismantling, they must remain motionless in their seats. They break extremely rarely, but nothing should be ruled out.
- Check the fuel pump diaphragm. The presence of ruptures and peelings indicates that it must be replaced.
- Look at the current filter. Damage and excessive contamination are clear signs of wear and warrant replacement.
- Treat the filter components with clean gasoline and blow with compressed air using a compressor.
- If you find damaged elements, replace them with new ones using a repair kit.
- Replace the pump gaskets if necessary.
- When installing new gaskets, be sure to first treat their surface with Litol 24.
- If the pump housing itself is damaged or there are other serious problems, you will have to completely replace the fuel pump. Repairs won't help him.
- Next, when partial repairs are completed or you decide to take a completely new pump, it’s time for reassembly.
- Be sure to adjust the feed using shims of the required thickness so that the pusher output has an optimal indicator. We talked about this above.
- If the pushrod protrudes too much, it will cause the fuel pressure to be too high, causing your carburetor check valve to break.
- If the distance is less than required, as the load increases and the vehicle speed increases, the engine will not be able to receive enough fuel.
- Reassemble by following the reverse sequence of dismantling the fuel pump.
- Make sure the arrow on the body points towards the carburetor.
- When installing the diaphragm pump assembly, the holes in the gasket are located away from the muffler pipe.
Well, you figured out how you can repair and replace the fuel pump yourself. The task is really not difficult, although this unit plays a very important role in the performance of the entire VAZ 2109 car.
A car fuel pump is a device designed to provide an uninterrupted supply of fuel to the installation in which the fuel mixture is formed. Even the slightest malfunction leads to interruptions in the operation of the engine, and in the event of more serious problems, you simply will not start it.
In this article we will look at situations where the gas pump does not pump fuel at all, or pumps it, but not in the amount required by the power unit for normal operation. We will also try to understand the possible causes of this or that malfunction of the fuel supply device and discuss methods for eliminating them independently using the example of domestically produced cars carburetor VAZ-2109 and injection VAZ-2114.
https://youtu.be/https://youtu.be/_UK2P4odfZ8
_
Malfunctions of VAZ 21099 - the injector also fails!
Regardless of the time of year outside, very often the car may simply stop starting, or begin to respond poorly to the gas pedal. In this case, all on-board computer sensors may not show errors. The causes of failure should be sought in the injector.
Usually the breakdown is associated with clogging of the fuel injector nozzles, which increases fuel consumption in the car and reduces traction. Due to the fact that the fuel does not enter in the quantity required for engine operation, the idle speed begins to float. For a VAZ, the normal value when the engine is idling in warm weather is 900 rpm. When starting in the cold season, the engine produces 1500 rpm; with proper operation, after 5–10 minutes they should drop to 900.
It is also worth paying attention to the throttle valve of the intake manifold - over time, black deposits appear on it, which prevents it from properly passing air. It is enough to clean the damper with a special spray and gently wipe with a cloth - the problem is eliminated!
Checking the performance of the fuel pump on injection VAZ 2108/2109
If in Sputniks and Samaras with carburetor engines, fuel pump malfunctions are associated only with its design, then in injection vehicles they can also be caused by problems with the power supply of the device.
Diagnostics of the electric circuit of the fuel pump
To check whether voltage is supplied to the fuel pump, turn on the ignition without starting the engine and listen. When you turn the key, you should first hear the click of the relay, and then the characteristic “squeal” that the electric motor of the fuel pump emits. If these sounds are absent, the search for the problem should begin with the pump circuit protection devices.
The fuel pump relay and fuse are located in an additional mounting block, which is located under the glove compartment. The pump relay (R2) is installed in the middle, and its fuse (F2) is located to the left of it.
The fuel pump relay and fuse are located in an additional mounting block under the glove compartment.
We check them in this order:
- Disconnect the negative terminal from the battery.
- We remove the fuse from the socket and test it with a tester. If it is faulty, we replace it.
- We connect the terminal to the battery and turn on the ignition without starting the engine. We switch the tester to voltmeter mode and measure the voltage between the relay output to which the pink wire fits and ground. The device should show 12 V. If there is no voltage, the problem must be looked for in the wiring or contact group of the ignition switch. If power is supplied to the relay, use a screwdriver to close the terminal to which the pink wire fits with the terminal connected to the gray wire. This way the pump circuit will be closed directly (bypassing the relay). The fuel pump is working - we change the relay, if not - we check whether voltage is supplied to the pump itself.
- We remove the back seat. We bend the carpet underneath and find the hatch. Unscrew the screws (2 pcs) securing it. There is an electrical connector under the hatch. Disconnect it from the pump. Turn on the ignition. Using a tester turned on in voltmeter mode, we measure the voltage between the “plus” (gray wire) of the pump and its “ground”. There is voltage - the problem is in the pump itself, if not - the reason should be sought in the wiring.
Checking the fuel pressure in the system
If the diagnostics show that the pump is working, but the above signs of its malfunction are observed, you need to check the fuel pressure in the system. For this you will need:
- a pressure gauge with a measurement limit of 5–7 atmospheres (a regular tire gauge will do);
- a piece of petrol-resistant hose with a length of 50 cm and an internal diameter of 10–12 mm;
- nipple cap;
- 2 hose clamps;
- dry rag.
We check the pressure in the following order:
- We find a special fitting on the fuel rail. It is located on the right side of the device (when viewed from inside the car).
- Remove the plastic plug from it.
- Using the nipple cap, unscrew the spool. Be prepared for gasoline to spray out of the nipple (use a rag).
- We connect one end of the gas-resistant hose to the pressure gauge tube, the other to the fitting on the ramp. We fix the connections with clamps.
- We turn on the ignition, but do not start the engine. We wait 3–5 seconds until the pump pumps fuel into the system.
- We look at the instrument readings. The pressure in the system should rise and stabilize at a level of 2.8–3.2 atmospheres. If it is below this indicator, it means that either the fuel line (pipes, filter) is clogged, or the pump itself is faulty.
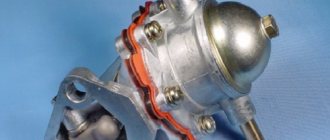
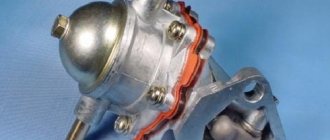
Design features of the fuel pump
On VAZ 2107 cars with a carburetor system, fuel pumps of a mechanical operating principle are installed. This product is located directly in the engine compartment on the side of the cylinder block.
The main structural elements of the fuel pump are the elements shown in the diagram.
The operating principle of the product is based on the movements of the pusher. Such movements occur due to the functioning of the fuel pump drive cam and the return mechanism. When the working membranes move, pressure and vacuum are created in the product chamber. When the pressure decreases, the exhaust valve closes and gasoline is supplied through the fuel line and the opening inlet valve. When the pressure rises, the intake valve closes, causing gasoline to flow through the exhaust valve, which leads to the carburetor. Through the inlet and outlet valves, gasoline is pumped from the tank and supplied to the carburetor.
Signs of fuel pump defects
The main types of fuel pump malfunction, which indicate a breakdown of the mechanism, are the following:
- inability to start the engine;
- when starting, the engine starts and stalls;
- the engine cannot reach full power.
- After some time after starting to move, the car stalls and stops starting. The reason for this on a carburetor seven may be overheating of the fuel pump. When overheating occurs, the intake and exhaust valves become misaligned, which leads to asymmetrical operation. To quickly cool it, owners of Soviet cars put a damp cloth on the product, after which they can continue driving.
These are the main signs indicating the need to diagnose the fuel pump. The presence of these factors leads to the fact that owners of the “Seven” and other cars of the Lada family think that the malfunction lies precisely in the fuel transfer device. To check the product for serviceability without removing it from the car, you need to perform the following steps:
- Loosen the hose that supplies gasoline to the carburetor, and then remove it.
- Plug the hose using an M8 bolt.
- After this, you should pump the device’s manual drive lever. If gasoline flows out of the outlet fitting in a stream, this indicates that the device is working properly.
- After this, you should also loosen the second clamp, then remove the hose and plug it.
- The inlet fitting must be plugged with a finger, and then the lever must be pumped several times. If there is a noticeable vacuum, we can say that the problem does not lie in the pump. If there is no vacuum, that is, the finger is not attracted to the fitting, then the pump must be repaired.
The pump creates appropriate pressure in the system, which will be absent if it breaks down. In order to repair the fuel pump, you will need to purchase a repair kit. But sometimes the causes of product malfunction are elements that are not included in the repair kit, so the device needs to be replaced.
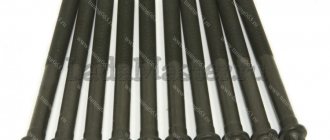
Symptoms indicating a faulty pump and rod
A fairly common cause of product failure is an element such as a rod. This is a steel shaft that was hardened back in the Soviet years, and now no one wants to spend money on this process in order to produce a part that costs 30 rubles. This is now called unprofitable, so modern parts wear out very quickly, as a result of which their length decreases.
It is important to know! If there is a gasket under the product body, you can remove it, which will allow you to lengthen the rod structure.
The main symptom of rod wear is the inability to accelerate the VAZ 2107 to the required speed. To do this, you need to drive out of town and then press the accelerator pedal. If the car accelerates, but at the same time, having picked up speed to a certain value, does not develop it, then the reason is precisely the worn-out fuel pump rod.
Replacing the fuel pump rod
In order to replace the rod on the fuel pump, you need to unscrew the 2 fastening nuts using a 13mm wrench, after which you need to remove the product. A new rod is being installed on a VAZ 2107.
It is important to know! Not many people know what a fuel pump rod is, but this is the main part of the membrane drive. It is through the rod that the pump operates.
After installation, it is necessary to adjust the rod, for which, using a ruler, you need to measure the protrusion of the device beyond the spacer. This protrusion should not be more than 1.3 cm, and also not less than 0.8 cm. After removing the pump, you can measure the old rod; if its length is less than 0.8 cm, then the part must be replaced. Once the fuel pump is set up correctly, the engine will function like a clock.
Before installing a new rod, it is recommended to harden it by holding it under a blowtorch until the part turns red, and then dip it in water.
In conclusion, it should be noted that even such a small part can cause inoperability or poor engine performance. Fix the problem and then evaluate the effect.
How to repair a fuel pump, or is it the fuel pump itself?
Gearbox Gearbox VAZ 2108, 2109, 21099
1) First, you need to remove the fuel pump itself from the car engine. (see “Removing the fuel pump”)
2) Next, when the pump is already removed, clamp it with a vice, and at this time unscrew all six screws that secure the lower and upper pump housings.
If you don’t have a vice nearby, then perform the entire operation while holding the pump in your hands!
3) After unscrewing all the screws, separate the upper pump housing from the lower one.
4) Then, pressing the central metal ring of the diaphragm assembly with three or four fingers, turn it clockwise 90°, and as a result, the diaphragm assembly will be removed.
5) After you have removed the diaphragm assembly, grasp it with your hand and then remove it from the lower pump housing.
After removing the diaphragm assembly, a small spring will remain on the lower pump housing, which also needs to be removed!
6) Next, visually inspect all the diaphragms of the “diaphragm assembly”; the presence of ruptures, various types of abrasions and hardening of the diaphragms is not allowed. (For clarity, the photo below shows all the components of the diaphragm assembly, and the diaphragms themselves are indicated under the number “4”)
If you find defects on at least one diaphragm, then it is recommended to replace it with a new one!
Replacing diaphragms in the diaphragm assembly of the fuel pump:
To repair the diaphragm assembly and replace the diaphragms in it, after removing it, perform the following operations with it:
1. First unscrew the top nut that secures the assembly stem.
2. After unscrewing the nut, remove the central metal ring of the diaphragm assembly.
3. Next, from the diaphragm assembly, remove the two diaphragms.
4. And then remove the inner and, together with it, the outer spacer.
5. At the very end of the operation, remove the last remaining diaphragm from the rod.
1) When reassembling, the first thing to do is check the functionality of both valves of the upper pump casing by pressing both valves lightly with a screwdriver; when pressing, there should be no jamming, the valves should work clearly, otherwise replace the valves, or upper pump housing for a new one.
The second valve is located on the other side of the pump housing!
2) Next, when you get to installing the diaphragm assembly, install it on the pump in such a way that the small protrusion that is located on the diaphragm is strictly oriented with the side of the pump, as shown in the figure:
3) Upon completion of the operation, always remember that all holes that are located in the remote gasket should be located as far as possible from the exhaust pipe of the vehicle muffler when installing the fuel pump in its place.
1) When assembling the diaphragm assembly, make sure that all the outer holes coincide with the holes on the lower pump housing!
2) Replace all metal parts of the fuel pump housing with new ones if chips and cracks appear on them!
Hello, I would like to know that my upper fuel pump housing has started to come apart at the seams, what should I do? Is it possible to drive like this?
In theory, you can drive, but it’s better to replace the upper housing of the fuel pump with a new one, because the fuel pump is the kind of thing that can cause anything to happen in the engine, including a fire!
Tell me, how important is the stroke of the pusher? I just have this situation: when the engine warms up well, the car starts to twitch and sometimes even stalls
Which pusher exactly are we talking about? If it’s about the one that is located in the heat-insulating spacer, then when fully protruding it should extend out of the spacer by 0.8-1.3 mm; if it does not reach the specified value, then everything is regulated by selecting the thickness of the outer spacer, otherwise the car will not develop full power and It may stall, depending on the engine temperature!
Assembly Features
When installing the drive belt, you must again make sure that all the marks match, otherwise the gas distribution and ignition system will be disrupted. After installing the tension roller back, it is important to properly tension the belt.
If the car does not start after complete assembly or starts poorly, it means that the belt on the camshaft gear is misaligned by one tooth. To eliminate such a malfunction, you will have to remove the belt from the gear again, turn the gear a little so that it moves relative to the belt by one tooth, and then put the belt back.
The operation of replacing the liquid pump is shown more clearly in the video:
Preventing fuel pump breakdowns
To extend the life of the fuel pump, you need to:
- Monitor the quality of fuel filled into the car.
- Completely eliminate even the possibility of water getting into the tank.
- During scheduled maintenance, be sure to change the fuel filters.
- In case of mechanical damage to the fuel tank, it is necessary to dismantle the fuel pump and check its condition.
- Periodically clean the fuel tank from possible accumulation of sediment, consisting of tiny solid particles found in gasoline.
Following these simple rules will have a beneficial effect not only on the fuel system, but also on the engine itself.
Source
Installing an additional pump
The disadvantage of the first front-wheel drive VAZ cars was the poor performance of the interior heater. Until the engine warms up to operating temperature, the cabin is cold. This is due to the design of the small circulation circuit, into which coolant enters in small quantities. The problem is solved by installing an additional electric pump from GAZelle.
An additional electric pump is installed in the stove pipeline
To install an electric pump, you must purchase:
- four-pin relay;
- multi-core wires and a two-pin connector;
- fuse socket;
- hoses and clamps for connection to the cooling system;
- electric pump from a GAZelle car.
The pump is placed on a homemade bracket, screwed to one of the bolts on the mounting flange of the gearbox. The antifreeze is first drained and the thermostat is removed, which will interfere with the installation of an additional pump. This is especially true for the injection model VAZ 21099.
To turn on the pump, a small circuit with a relay is assembled
The insertion is made into the return pipe coming from the cabin heater. In this case, the electric pump will create a vacuum in the heater radiator. To turn on the pump together with the ignition and from a separate button, a simple electrical circuit is assembled. A relay with a fuse is placed in the cabin under the dashboard, and any free button is selected as a switch.
Operating principle of a mechanical fuel pump
The fuel pump is driven by the camshaft cam, which moves the pusher in a horizontal direction, causing it to perform reciprocating movements. The pusher, in turn, acts on the mechanical pumping lever, and it already raises and lowers the membrane rod.
Thus, a certain pressure is created inside the fuel pump, which is maintained by the valves of the device cover. One of them lets fuel in without letting it back in, and the second pushes it into the fuel line going to the carburetor.
As you can see, the design is very simple, therefore, to determine the reason that the fuel pump does not pump, it is enough to disassemble it and check the condition of the main elements.
Since the housing does not affect the operation of the fuel pump in any way, unless it is damaged, of course, we will start with the pusher. This element is made of steel and cannot simply break. But wear and tear is welcome, especially if it is not original, but purchased as a separate spare part. As soon as its length decreases by a few millimeters, the fuel pump does not pump fuel.
Or rather, it pumps, but the amplitude of movement of the diaphragm is significantly reduced. This results in low fuel pressure in the system, and, as a result, interruptions in engine operation. The standard pusher length for DAAZ pumps is 84 mm. Measure its length and, if necessary, replace the worn part.
The most common malfunction of the diaphragm is its rupture. It also happens that it becomes deformed. Due to this damage, the diaphragm begins to leak fuel through itself, which also causes a drop in pressure in the system.
Such a malfunction can only be detected by disassembling the fuel supply device. If the diaphragm is to blame for the fuel pump not pumping, you will see it immediately. This problem is solved by replacing it.
Start with the relay and fuse
Considering that the fuel supply module is located in the car tank, and it is not so easy to get to it, it is better to start diagnostics with the relay and fuse:
- Unscrew the screws securing the cover of the mounting block located to the left of the steering column.
- Underneath it, find fuse F3 (15 A) and relay R2. These are the elements that we need to check.
- As for the fuse, it needs to be “ringed” with a tester. If unusable, replace it.
Checking the relay in a garage is quite difficult. But you can take a similar one (from an adjacent socket), a known good relay, and install it instead of the one being diagnosed. Now turn on the ignition. Is the fuel pump pumping? The reason has been found! Well, if nothing has changed, move on.
Checking the general condition of the fuel pump
First of all, let’s check whether the supply system of your VAZ 2109 is working at all. To do this, you need to take the following steps:
- Remove the pump fuel hose from the source or discharge fitting;
- Manually press the fuel pump lever several times;
- If the pump is operational, a strong stream of fuel will immediately flow through the fitting;
- If there is no jet or it is very weak, it will be necessary to carry out other checks.
Intake Valve Check
- Disconnect the hose from the suction fitting so that both hoses are eventually removed, each from its own fitting.
- Simply plug the suction fitting with your finger, then pull the lever several times to manually pump fuel. If everything works fine, your finger will begin to be sucked into the fitting. This effect indicates that the pump is working properly. Therefore, we look for the problem in the tank or lines.
- If there is no suction, you will have to disassemble the device to replace the inlet valve. Its tightness is most likely broken.
Buying a new fuel pump will not cost that much - up to 1000 rubles. However, such costs are also high for many. And for some, their conscience simply will not allow them to buy a new pump right away, if it is possible to get by with a repair kit and return the pump to functionality for literally pennies and a couple of hours of work in your own garage.
Replacing the device
VAZ car repair
As mentioned earlier about the fuel system, the fuel pump of the VAZ 2101 car is a diaphragm type, its installation location is the left side of the block. For pumping fuel and starting a cold engine, there is a manual pumping lever.
New cars and foreign cars use electric fuel pumps, usually installed on the tank itself, but now we are talking about domestic cars like the Zhiguli.
Design and arrangement of the VAZ 2101 fuel pump
Scheme for monitoring and adjusting the output of the fuel pump drive pusher VAZ 2101
A – gasket with a thickness of 0.27–0.33 mm;
B – gasket with a thickness of 0.70–0.80 mm;
d – protrusion of the pusher.
Checking the correct installation of the fuel pump
If there is not enough gasoline entering the carburetor, the reason for this may be a failure of the fuel pump or problems with the system piping.
how to replace it yourself
Fuel pump "nine"
Probably all owners of domestic cars have encountered a situation where the car cannot be started after some inactivity. The battery is working properly, the starter vigorously cranks the crankshaft, but the engine does not want to start.
This can happen for 2 main reasons: either there is no spark, which means that the ignition system does not work, or the combustible mixture is not supplied and, accordingly, the engine power system does not work.
We will talk about malfunctions of the fuel supply system. Let's consider a situation when the engine does not start because the VAZ 2108-15 fuel pump does not work. We will also learn how to replace the fuel pump of a VAZ 21099 car with your own hands.
Malfunctions, removal and repair of a mechanical fuel pump
On VAZ 21099 cars, the carburetor was equipped with mechanical diaphragm-type fuel pumps by the manufacturer. The main malfunctions of this type of pump are associated with rupture of diaphragms, breakage of the rod, spring and depressurization of valves.
The main advantage of mechanical fuel pumps is that they are easy to repair. If any element fails, you can buy a domestic repair kit at the nearest spare parts store and replace all faulty parts within an hour. The fuel pump on VAZ 2108-99 cars with a carburetor fuel supply system is located in the engine compartment, in the same place where the ignition distributor is located.
Removing the mechanical fuel pump.
First, open the hood and remove the negative terminal from the battery.
Then loosen the clamps and disconnect the fuel hoses from the pump pipes
After this, unscrew the 2 nuts securing the fuel pump and carefully, so as not to damage the gaskets, remove it
Pump device
Now it needs to be disassembled.
Unscrew the bolt on the top of the pump cover and remove it along with the strainer. Unscrew the 6 screws and separate the upper and lower parts of the case
Carefully remove the diaphragms along with the spring and rod, turning them 90°
After disassembly, it is necessary to carefully inspect all parts and replace damaged ones. Reassemble and install the pump in reverse order.
Electrical faults and replacement
Submersible electric fuel pumps were installed by the manufacturer on VAZ 21099 injector cars. Unlike their mechanical counterparts, these units are not dismountable, so they cannot be repaired. Mostly, such fuel pumps break down due to overheating and the use of low-quality fuel. In addition, very often faults arise not in the unit itself, but in its wiring.
If the electric fuel pump on your car hums and stops pumping fuel, you first need to check the serviceability of the electrics. Perhaps the wiring has shorted, the fuel pump relay has broken, or the fuse has simply blown. If the electrical is OK, the fuel filter needs to be replaced. If this does not help, then you need to change the pump itself. Please note that the VAZ 2108-15 electric fuel pump is located in the fuel tank, so to replace it you will have to crawl under the car.
The procedure is as follows.
- First, drive the car onto a pit or lift.
- Then remove the negative terminal from the battery.
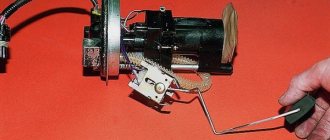
- Then remove the back seat and find the place where the inspection hatch is located. Unscrew the screws securing its cover and move it to the side.
- Disconnect all wiring terminals from the fuel pump and fuel sensor.
- Unscrew the nut securing the fuel supply pipe and move the pipe itself to the side.
- Find the drain pipe fitting under the bottom and unscrew it.
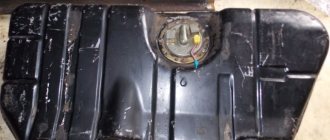
- Next, remove the gas tank.
- Unscrew the fuel line tip nut and disconnect it from the fuel pump.
- Unscrew all fastening nuts, remove the sealing ring and remove the electric fuel pump together with the storage cup from the fuel tank.
Reassembly must be done in reverse order.
Note: to prevent gasoline from spilling out of the fuel lines, after the 4th operation you can connect the battery and start the engine. After 4-5 minutes, the engine will exhaust all the gasoline remaining in the system.
Pump location
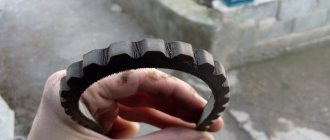
The water pump is installed on the right (in the direction of travel) side of the engine under a plastic cover. There is also a gas distribution mechanism that drives the pump toothed pulley through a belt. This arrangement creates a number of problems.
- To inspect the pump you have to remove the plastic casing.
- Due to a leaky seal and a small leak, antifreeze gets onto the belt, which quickly fails.
- If the bearing is severely worn, the shaft may jam, and the timing belt may jump off or break. In 90% of cases this leads to pistons hitting the valves, and subsequently to expensive repairs.
The cooling system pump is installed on the right side of the engine. For these reasons, it is necessary to periodically (every 10–15 thousand kilometers) inspect the gas distribution mechanism for belt tension and pump functionality.
Operating principle of a mechanical fuel pump
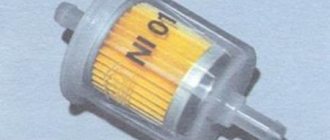
The first thing you will see when you disassemble the fuel supply device is the strainer. It is made of thin perforated plastic. The reason why the fuel pump does not pump can also be if it is deformed or severely contaminated.
In the first case, the filter must be replaced, in the second, it must be washed with carburetor cleaning fluid.
As already mentioned, pumps in carburetor and injection engines have different designs. In cars with forced fuel injection, all processes associated with its supply to the combustion chambers are controlled by an electronic control unit, so breakdowns of various types of electronic devices can occur here.
The main reasons why the fuel pump of an injection engine does not pump include:
- malfunction of the device's electric drive;
- pump filter clogged;
- relay failure;
- fuse blown.
Diagnosing problems with the fuel pump in a car with an injection engine is much easier than in a car with a carburetor engine. The fact is that when you turn on the ignition, you can clearly hear the sound of the electric motor of the fuel module. It lasts for several seconds. This sound indicates that the fuel pump is turning and pumping fuel.
If this happens when you turn the key, then there is nothing wrong with the device itself, and the cause needs to be looked for elsewhere. Well, if when you turn on the ignition you do not hear the characteristic sound of the pump, you can be sure that the problem is in it, or in the elements of its energy supply.
The fuel pump in the injection VAZ 2114 is an element of the fuel module, which is located in the car’s tank. It also includes:
- coarse filter;
- fuel level sensor;
- pipes for connection to the fuel line.
To test the electric motor, you will need to connect it directly to the battery terminals. If it is operating normally, “ring” the wiring and check the contact of the ground wire on the module cover. If the electric motor shows no signs of life, the question “why the fuel pump doesn’t pump” has finally found its solution.
It is not advisable to try to repair it yourself. Just buy a new motor and install it in place of the old one. And yet, you shouldn’t spend money on buying the entire module, which now costs about 3 thousand rubles. Buy the electric motor and a new filter separately. All this will cost you three times less.
Purpose and design of the pump
The water pump is the most important element of the engine cooling system.
Its main function is forced circulation of coolant through two circuits - small and large. On an unheated engine, antifreeze circulates in a small circle - from the water jacket of the engine to the radiator of the cabin heater and the carburetor cooling unit (or the throttle valve on the VAZ 21099 injector). When operating temperature is reached, the thermostat opens a large circuit and coolant begins to circulate through the main radiator. The water pump impeller, driven by the timing belt, forces antifreeze to circulate through the cooling system.
If the pump fails, the movement of coolant through the channels will stop, and the engine will inevitably overheat. Aluminum pistons expanding in volume will damage the cylinder walls and compression will be lost. In this case, a major overhaul of the engine will be required, which is several times more expensive than the cost of a new pump.
Why doesn't the fuel pump deliver gasoline?
One of the most important elements of the fuel injection system of a gasoline engine is the electric fuel pump, which is located in the fuel tank of the car. The fuel pump pumps fuel into the system from the gas tank, creating a certain pressure.
Auto repair experts identify the following common fuel system problems that are related to the fuel pump:
- The fuel pump pumps poorly and does not create the required pressure;
- the fuel pump does not pump when the ignition is turned on;
Considering that the fuel pump is an electromechanical device, the most common fuel pump malfunctions are related to both the mechanical and electrical parts. Next, we will look at what signs indicate a breakdown of the fuel pump and why the fuel pump stops pumping partially or completely.
Signs of fuel pump malfunctions
The main symptoms of fuel pump failure, as well as malfunctions in its operation, are:
- the car starts with difficulty, the engine runs unstable, there are dips, jerking when pressing the gas pedal, etc.;
- the pump does not pump after turning on the ignition, does not turn the starter and does not pump the fuel pump, the engine does not start;
There have also been cases when the fuel pump stops pumping while driving. In such a situation, the engine begins to malfunction and stalls immediately after the remaining gasoline in the fuel line is used up. The problem can occur either regularly or periodically.
The fuel pump does not pump: causes and diagnostics
Let's start with the fact that if the gas tank is full, the battery is charged, the spark plugs are dry and there is a spark, the starter turns the engine normally, but the engine does not seize, then you should pay attention to the gas pump. A common problem is that there is no power to the fuel pump after the ignition is turned on.
In a similar way, the malfunction manifests itself in motion, when the power to the fuel pump is lost and the engine suddenly stalls.
An equally important point is how much the fuel pump pumps. In other words, the pump may hum and buzz (power is being supplied), but not create the required pressure in the fuel line. The pressure in the fuel system with a working fuel pump must be more than 3 bar (which depends on the specific car model). The indicated pressure is accumulated in the fuel rail and has an indicator of 300 kPa and above.
To check, you need to measure the pressure in the fuel rail with a pressure gauge, taking into account the indicators that are the norm for a specific car model. Using the example of injection VAZs, the pressure when the ignition is turned on is 3 atmospheres, at idle the figure is 2.5 atmospheres, when you press the gas 2.5-3 atmospheres. This method will help you accurately determine:
- malfunction of the fuel pressure regulator in the rail;
- breakdown of the fuel pump or a noticeable decrease in its performance due to wear;
- severe contamination of filters (fuel filter and/or fuel pump mesh);
In the second case, when you press the gas, the pressure does not increase; in the latter case, the pressure gauge needle rises, but very slowly or jerkily.
A decrease in pressure below the norm will lead to the fact that the engine may not start or start with difficulty, stall, jerk, operate unstably and with failures. If this happens due to the fault of the pump and not the fuel filter, then there is a high probability that the coarse filter screen of the fuel pump is clogged. In this case, there is no need to change the fuel pump itself, since it will be enough to replace or even clean the mesh.
If you suspect that there is no voltage to the fuel pump, there is a quick way to check. It is enough to turn the ignition key and listen, as when you turn the key you should hear a slight hum from the fuel pump. If such a buzzing noise is not heard, it means there is no power to the fuel pump, there are problems with the wiring, etc.
We add that this method of determining the operation of the pump by sound is not suitable for all cars. On some models (especially premium ones), sound insulation is at a high level and the fuel pump turns on immediately after opening the driver's door, and not when turning the key in the lock. In this case, it may seem that the fuel pump does not work when the ignition is turned on, and the sound of the pump may simply not be heard.
Also in the general list of possible reasons why the fuel pump does not pump, the following are noted:
- failure of the fuel pump fuse;
- fuel pump relay failure;
- problems with the ground of the fuel pump;
- malfunction of the electric motor of the fuel pump;
- oxidation or damage to fuel pump contacts and terminals;
- the fuel pump itself is faulty;
When can fuel consumption increase?
It is worth paying special attention to such a sign of a regulator malfunction as increased fuel consumption. The car will require more gasoline to operate if the valve in the regulator is faulty or, conversely, it does not hold fuel. In the first case, excess fuel is not returned to the tank; the car owner may notice a pressure above 2.5 kg/cm2. As a result, more gasoline enters the combustion chamber of the engine, which is not completely consumed.
If the valve does not perform its functions, fuel “staggers” through the system. The pressure in the fuel system decreases, and as the speed increases, the engine feels a clear shortage of gasoline. The power unit becomes less responsive and powerful. A valve malfunction can be noticed when starting the car for a long time - during the process, the starter has to be turned for a long time until it creates the necessary pressure.
If the VAZ 2109 carburetor fuel pump does not work correctly, then this affects such an important process as the supply of fuel to the carburetor. Failures lead to a lack of fuel in this part of the car.
Now we will talk about such a procedure as replacing a VAZ 2109 fuel pump. But, before starting the process itself, let’s do primary diagnostics. To find out the reasons, perform the following steps:
• First, remove the hose from the discharge pipe. Using the pumping lever, you need to check the fuel supply. If gasoline does not enter the carburetor, the hose is removed from the suction pipe. Now you can find out if there is a vacuum. If it is not there, the fuel pump should be disassembled to check all parts.
Checking the condition of the fuel pump
First, we check whether the supply system of our car is functioning normally.
We carry out the following actions:
- Remove the fuel supply hose from the initial (discharge) fitting;
- Then you need to pump some fuel there; to do this, press the hose several times;
- If a copious stream of fuel flows through the fitting, we conclude that our pump is fully operational;
- Otherwise (the stream is very weak or not noticeable at all), the pump needs repair.
Preventative actions in case of pump malfunction
- We disconnect the hose from the swallowing fitting; it turns out that both hoses are disconnected from their fittings.
- We plug the fitting with our finger and pull the lever to autonomously pump fuel. If your finger begins to get sucked inside, then this mechanism is working normally and the problem should be looked for either in the tank or in the lines. If you do not feel suction, then the fault is in the fuel supply mechanism, and you will have to completely disassemble the device.
Leak test
- Place your index finger on the injection fitting and press the automatic fuel pumping lever two to three times.
- If the system is working properly, a sharp stream of air should push your finger away from the valve; if this does not happen, then the tightness of the hose is broken.
- There are two solutions to this breakdown: you can disassemble the pump and look for a problem in it, or buy a new unit. Fortunately, you can buy it at any specialized car parts store, and the price is quite reasonable.
What to do if the filter is damaged or foreign objects get into it
- Remove the protective cover from the fuel pump and remove the filter from there. We run clean fuel through it, then blow it with compressed air. If you are the owner of a Pekar pump and its modifications, then you do not need to remove the cover, you can only unscrew the suction fitting.
- After this, we check the filter for mechanical damage; if it is significant or the main components are damaged, then repair is not enough and you will have to replace the damaged filter with a new one.
Damage to the pump diaphragm
If fuel leaks are detected on the pump parts and a fuel smell in the engine oil, it clearly indicates a diaphragm failure. However, these signs may not be present, so you should check the diaphragm anyway, just in case. We do the following:
- We remove the upper part of the housing and remove the required unit.
- Unscrew the rod nut and remove 3 diaphragms.
- We check each of them for damage. If a faulty part is found, we replace the part.
- We assemble the diaphragms into the diaphragm assembly in the reverse order.
The Pekar pump is designed differently; it contains only one diaphragm. To dismantle it, open the outer cover and turn the diaphragm assembly exactly 90 degrees. It is advisable to check the condition of the sub-diaphragm spring; to do this, remove the upper part of the housing and remove the diaphragm. If you find that the spring is inoperative (that is, deformed or simply broken), be sure to replace it.
Problem with the intake or exhaust valve
- Remove the lid and take out the mesh filter.
- Visually assess the condition of the internal cavity of the pump and valves.
- If a leak is detected in at least one of the valves, it is worth replacing the entire pump, otherwise the efficiency of the car will drop significantly, and accordingly it will consume more fuel.
- If the valves are clogged, you can blow out the housing with a stream of compressed air.
Pusher failure
Often the cause of poor car performance is a faulty pusher; in this case, an experienced driver always has special instructions prepared:
- We remove the pump along with the stud, but first unscrew the nuts.
- We manually turn the crankshaft so that the pusher is in the maximum extended position.
- We measure the distance from the top point of the pusher to the gasket. The optimal value for this indicator is 0.8-1.2 millimeters. We adjust the protrusion to this value by laying a spacer of a suitable height. As a rule, spare gaskets are found in repair kits, although it is not difficult to make them yourself. To make it, you only need a small piece of paronite.
Self-diagnosis
Based on indirect signs, one can guess whether the pump needs to be replaced, but this issue can only be more accurately understood by removing and inspecting this unit from all sides. You can preliminary judge the condition of the pump only by some indirect signs. For example, when the engine is operating in normal mode, a pump malfunction may be indicated by the temperature of the upper radiator hose and the presence of liquid in it. The hose must be warm. This can be determined by touch.
An external inspection can easily determine the condition of the oil seal. To do this, just remove the timing cover and inspect the oil seal hole. If there were leaks, deposits of a characteristic color will tell you about it.