Owners of old cars often ask how to make a multifunction steering wheel with your own hands. This does not happen on old cars or even on new inexpensive foreign cars. However, it is a convenient steering wheel attachment. Many drivers don’t even know why a multifunction steering wheel is needed. Let's figure out why such an interesting steering wheel is made, and how to make a multi-function steering wheel with your own hands. It differs from a simple steering wheel by having control buttons for different systems. Typically, control of the radio, cruise control, and climate system is connected to the multifunction steering wheel.
Recommendations from experienced
The process of replacing the steering wheel is simple, but requires attention on the part of the repairman. A car enthusiast without basic skills in servicing a technical device is better off turning to service station specialists for help.
Sequence of actions when removing the steering wheel on a Lada Vesta:
- Remove the block - airbag module.
- Unscrew the central bolt - clamp.
- Remove the steering wheel.
- After maintenance, install the steering wheel again.
Stages of self-installation of the steering wheel
- ratchet;
- extension;
- Torx head T50;
- two-fingered puller;
- rags, gloves;
- additional lighting as needed;
- torque wrench.
Algorithm of actions for withdrawal:
- We place the car on a flat platform, provide safety measures, fix the rear wheels, and squeeze the parking brake.
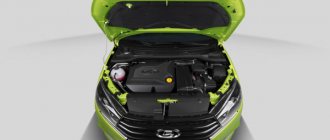
- Open the hood.
- Remove both terminals from the battery.
- Open the driver's door.
- We set the steering wheel to the position of linear movement of the technical device.
- We move the metal latches on the steering wheel.
- We remove the airbag module.
- Disconnect the connectors with wires from the airbag and the transport fuse.
- Unscrew the steering wheel retaining bolt.
- We remove the steering wheel from the splines.
Then we carry out preventive maintenance and replacement as necessary. We install the steering wheel (hereinafter referred to as the steering wheel) again. Tightening torque 3.8-5.0 kgf/m (38-50 Nm) with a torque wrench.
Note to the driver!
After removing the steering wheel, do not violate the angle of rotation of the wheels or rotate the column shaft. With such actions, you run the risk of disrupting the wheel alignment angle; another diagnostic will be required at a stand at a service station.
Product delivery options
Note! Below are the shipping methods available specifically for this product. Payment options may vary depending on the shipping method. Detailed information can be found on the “Delivery and Payment” page.
Parcel by Russian Post
| See all advertisements in the archive |
Available payment methods:
- Cash on delivery (payment upon receipt)
- Using cards Sberbank, VTB, Post Bank, Tinkoff
- Yandex money
- QIWI
- ROBOKASSA
Shipping throughout Russia. Delivery time is from 5 to 12 days.
Parcel by Russian Post 1st class
Available payment methods:
- Cash on delivery (payment upon receipt)
- Using cards Sberbank, VTB, Post Bank, Tinkoff
- Yandex money
- QIWI
- ROBOKASSA
Shipping throughout Russia. Delivery time – from 2 to 5 days. More expensive than regular delivery by Russian Post, approximately 50%. Parcel weight up to 2.5 kg
Express Parcel EMS
Available payment methods:
- Cash on delivery (payment upon receipt)
- Using cards Sberbank, VTB, Post Bank, Tinkoff
- Yandex money
- QIWI
- ROBOKASSA
Shipping throughout Russia. Delivery time – from 3 to 7 days. More expensive than regular delivery by Russian Post, approximately 100%.
Transport companies
Courier delivery in Togliatti
Available payment methods:
- Cash upon receipt
- Using cards Sberbank, VTB, Post Bank, Tinkoff
- Yandex money
- QIWI
- ROBOKASSA
Delivery time from 1 to 12 hours.
Connecting steering wheel buttons to the MMC radio
- After connecting the cruise control circuit, we connect the block with wires to the multimedia device (blue).
- If a freelance MMC is installed, you will need an adapter for this brand of radio.
- We insert the plastic cover and assemble the RC again.
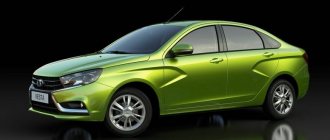
Review of Manufacturer Prices
The size of the steering wheel in the original version is 37-39 cm in internal and external diameters, respectively.
| Name/article | Price in rubles |
| Original steering wheel 8450009837 (18 years old) | From 5000 |
| Plastic cover with function keys 8450006832 | From 2500 – 3000 |
| Airbag module 8450149058 | From 4500 |
| Steering wheel complete with airbag 8450006832 | From 8500 |
How to remove the steering wheel cover on a Lada Vesta
- Carefully pry up the sides with a plastic spatula or something similar.
- Remove the latches from the grooves.
- After carrying out the preventive maintenance, guide the latches into the grooves and press them moderately.
Conclusion
Removing the steering wheel on your own is not difficult if you strictly follow the given algorithm. If difficulties arise, contact service station specialists for help.
As for installing a plastic cover on the steering wheel or buying a new original assembly, it is a personal matter for each car enthusiast. Based on the availability of funds, the size of the budget allocated for maintenance, and upgrading the machine. When purchasing, give preference to original products.
Types of steering wheels
There are two types:
- With keys in the center of the steering wheel.
- With buttons located on the rim.
These are the basic versions of the device. To know how to make a multifunction steering wheel, you need to decide what you want to get. A suitable steering wheel is required for the upgrade. Decide for yourself what you will connect to the multifunction steering wheel. The more systems are connected, the more difficult it will be to manufacture the panel.
Reviews
| № | Positive |
| 1. | Dmitry Vasilyevich , 43 years old (drive2.ru): Lada Vesta has basic equipment, steering wheel without functional buttons. I’m used to it, I’m not going to change it, and it’s expensive when buying a new original one. |
| 2. | Sasha , 48 years old (prom.ua): in the third year of operation of the car, I decided to replace the RK. I bought the original one with the factory part number, the price is 5600 rubles without the airbag module. |
| 3. | Ivan , 39 years old (autotoday.com): bought a plastic cover with buttons for 2,500 rubles. Although not original, it fit perfectly. I connected it myself, I didn’t contact the service. |
| 4. | Gennady Mikhailovich , 45 years old (rozetka.ua): on the advice of his comrades, he installed an overlay on the RK with buttons. I ordered the service at a service station. Satisfied with the quality of work, functionality, affordable price. |
| 5. | Nikolai Petrovich , 43 years old, (avtoflit.com): I bought the car second-hand, got it from the previous owner in good technical condition. The standard steering wheel has a plastic cover with buttons for adjusting speed and radio volume. |
| 6. | Semyon Vasilievich , 46 years old, (autotoday.com): I am satisfied with the quality and functionality of the remote control with buttons, it was not in vain that I paid over 6,000 rubles. I installed it myself, I didn’t go to a workshop. |
| 7. | Gennady Vasilyevich , 43 years old, (drive2.ru): two years after buying the car, he replaced the standard steering wheel with a new one with mechanical buttons. Now I’m less distracted by activating modes, switching, and watching the road situation more. |
| Negative | |
| 8. | Sergey Nikiforovich , 50 years old (prom.ua): installing a plastic cover on the steering wheel was not successful for me. The speed increase button in cruise control mode is inactive. I will contact the service station for diagnostics. Garage mates suggested that there was a defect in the mechanical key. |
| 9. | Georgy Semenovich , 47 years old, (avtoflit.com): I do not recommend buying plastic steering wheel covers for the Lada Vesta. It's better to pay more and buy a factory part. |
| 10. | Zhorik , 34 years old, (drive2.ru): twice contacted auto electricians at service stations to diagnose mechanical keys on the overlay. There are always some problems with non-original accessories. |
| 11. | Vasilyevich , 49 years old, (autotoday.com): The plastic cover served me for two years, after which the mechanical buttons began to fall out. The quality is very, very primitive. |
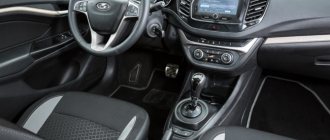
Lada Granta Liftback ≤Κατyuωα≥ › Logbook › Multiwheel Vesta in Granta. Part-3. Installation
Vesta steering wheel installed in Grant
Today, the epic with the steering wheel is finally over. Everything was not easy, but we are not looking for easy ways))) The first mistake was connecting the mass to the steering wheel. When you turned on the headlights or heater, the buttons started going crazy. But this is easily fixed. The left side of the buttons was connected to the right side through a resistor. The radio was retrained and everything worked as it should)
Updated connection diagram to the radio
The second mistake was that after installing the steering wheel, I didn’t drive it right away. As it turned out, the steering wheel was crooked. I had to take it off again and set the position while driving. When the dimensions are turned on, the button illumination also turns on.
I was pleased with the result. Everything worked out and fit into the interior very well. The tactile feel of the steering wheel is superb when compared to the stock one. The eye is happy)))
I recorded a short video of the steering wheel in action.
The steering wheel is being installed and the electrical connections are being made.
And now the long-awaited hour has come)))
View from the driver's side
PS. — various installation options, I described in more detail in my blog. entry: Multi-steering wheel - Granta/Kalina/Priora/2110
Previous stages: — Part-2. Splines and fitting - Part-1. Electrics - Part-0. Articles and - Part-4. Leather steering wheel
PSS - The question is often asked about why the Cruise control and Speed Limiter were not activated directly on the steering wheel. I'll try to explain as best I can below:
To activate CC and OS on the steering wheel, you will need an additional controller that will emulate button presses on the original steering column switch. That is, when we press the CC/OS button on the steering wheel, 3 commands should actually be sent: 1. enter the menu, 2. select between CC and OS, 3. set the speed of CC or OS. This is exactly the algorithm on the factory steering column switch. Do not forget that with the CC speed already set, to change the current speed, you will need to send 1 command, and when you click on the OS while the CC is running, you must first exit the CC and repeat the procedure of 3 commands, only for the OS. Don't forget that all this works via CAN. That is, the controller receives analog signals at the input, understands what needs to be done based on contacts or resistance, executes the commands we need, saves the current state and sends commands via CAN. I decided that I was happy with the original steering column switch)))
PSSY - Another question is the operation of the airbag. In order for the airbag to work, you need to purchase a new snail with 6 tracks. You can take only a cable, with a large number of tracks, if you want to have a heated steering wheel, and display a horn or something else directly on the steering wheel buttons. After purchasing the airbag connector from Vesta, turn off the power and connect it to the standard wiring of the airbag unit. There will be 100% no errors.
Good luck to everyone and smooth roads!
Recommendations in general
In general, it must be said that in order to completely install the multifunction steering wheel without problems, not only an installation specialist, but also a microelectronics specialist must be present during the installation.
Come to our installation center! We have everything, we successfully carry out this work!
What else do we do:
— Installation and SALE of radar detectors and recorders
— firmware for the Granta/Kalina instrument panel to indicate engine and ambient temperature
-sale and installation of parking radars
-installation of anti-theft lock "Garanta"
— installation of the “Dragon” lock on the gearbox
If we consider only externally, the steering wheel of the Lada Vesta and X-Ray are identical, but not everything is so simple. One of the significant differences between the steering wheels of both models is that the crossover does not have backlighting for the radio control keys. Therefore, in the dark, it is inconvenient to control the sound of music using the multifunction steering wheel.
However, you can solve this problem yourself by independently installing the backlight of the radio buttons on the steering wheel of the Lada X-Ray.
IMPORTANT! The owner of the SUV carries out all manipulations at his own peril and risk. Tampering with the car's electrical system may cause the dealership to refuse the warranty for the crossover.
Buy a kit or do it yourself?
The desire to retrofit your car with a heated steering wheel can be realized in 4 ways.
- Buy a kit ready for installation, which will include a thermal switch, heating element, button, relay, wires with a fuse holder. In some systems, a voltage converter with 12V ≥ 30V is included in the circuit to improve efficiency.
- Assemble the installation kit yourself. If you do not take into account the voltage converter, which is not available in all models, the kit consists of elements that are easily available for purchase.
- Install a standard heated steering wheel. You will need to buy a steering wheel, a button and possibly replace the steering column cable. But this is only provided that your car model of later years of production or in expensive trim levels had a heated steering wheel installed as standard.
- Make your own heating using MGTF wire as a heating element. Previously, along with nichrome wire, we considered making a heating element from MGTF wire for heating rear-view mirrors. The same element is often used in the design of heated seats.
To choose your own path, you just need to estimate the cost of the finished kit, the elements separately, and the time costs for installing a heated steering wheel using each method.
Braid
Advantages of installing heated braid:
- heating is powered from the cigarette lighter, so there is no need to interfere with the design of the vehicle’s on-board network;
- Removal and installation takes no more than 2-3 minutes.
For the apparent convenience you will have to pay with serious disadvantages:
- It is impossible to turn on the heated steering wheel while driving. The power cord going to the cigarette lighter will restrict the movements of the steering wheel, which makes it difficult to control the car and is fraught with an accident;
- minor effect. When turned on for a short time, the steering wheel will heat up very little and quickly release heat after removing the braid. We do not recommend driving constantly with this kind of accessory on the steering wheel. Due to its versatility and manufacturing features, the heated braid is poorly fixed to the steering wheel, which may prevent emergency steering in case of a skid;
- the braid, wire and adapter for powering the heated steering wheel will have to be constantly stored in the car.
Tools and materials
To install the heated steering wheel kit you will need:
soldering iron, flux and some solder;- tool for removing the steering column trim, steering wheel. You can find detailed removal instructions in the repair and operating manual for your vehicle;
- a feather drill for a hole in the steering wheel spoke for a thermal switch;
- universal glue "Moment". The glue will not allow the conductive fabric to wrinkle or peel off from the rim when connecting and re-stitching.
Setting the Keys
The work will require materials and tools.
Materials:
- SMD LEDs categories 0603 and 1104.
- SMD resistors types 0603 or 0805 - the resistor value should be 4-8 Ohms. A high rating means the diodes will last longer, but will produce dimmer light.
Tools:
After completing the preparation, the actual process of installing the backlight of the radio buttons on the steering wheel of the Lada X-Ray begins. Installation begins with identifying suitable areas on the board and gluing LEDs to these areas (everything is done through a contact rubber band).
Areas on the board
Limiting resistors are glued to the back side, which are then connected to the diodes through a drilled hole.
Everything is opened with varnish for greater reliability.
IMPORTANT! The Vesta radio control key block is not suitable for the Lada X-Ray.
Electric power steering EUR from Priora with a kit for installation on a VAZ 2101-2107 with a carburetor.
The kit will allow you to equip the “VAZ classic” with electric power steering from the official supplier to the main conveyor. EUR from Lada Priora is suitable for VAZ 2101-2107 with a carburetor engine. By installing such a kit, a significant increase in car controllability, comfort and feedback with the road is achieved.
Electric power steering equipment for VAZ 2101-2107 carburetor:
- Elektrosilitel (Lada Priora);
- Steering wheel (Lada Kalina);
- Steering casing;
- Steering column switches (left, right);
- Ignition switch with key (VAZ 2110 new model);
- Steering column wiring harness;
- Wiring harness for connecting electric power steering;
- Steering shaft for installing electric power steering;
- Bracket for installing electric power steering;
- Simulation of an electronic speed sensor for carburetor engines.
Applicability:
- VAZ 2101;
- VAZ 2102;
- VAZ 2103;
- VAZ 2104;
- VAZ 2105;
- VAZ 2106;
- VAZ 2107.
Connection
First you need to apply a voltage of +12V to pin 11 of the steering column switch. To add a contact to the plug, the connector must be disassembled, for which the white color retainer is first pryed off with a screwdriver.
As for +12V, you can get it from the steering angle sensor (pin 8), which is located under the steering wheel. But on X-Rays equipped with power units from Renault-Nissan, +12V can be taken from the plug plug, which is located between the headlight adjustment and mirror adjustment controls - pin 8 means +12V backlight, and pin 1 +12V from the ignition, respectively.
Next, you need to make sure that the necessary wiring is present on the steering wheel - from the block with the keys to the 11th contact. If there is none, you will need to run the wire yourself.
At this point, the actual installation of the backlighting of the radio buttons on the steering wheel of the Lada X-Ray is completed and you can put everything back together.
How to make a multifunction steering wheel - electronic filling
Connecting to the radio is quite simple. You will need a radio tape recorder equipped with a control panel. The remote control must be disassembled, and the multifunction steering wheel keys must be connected to the remote control buttons. The wiring will have to be changed. The new wiring harness must be made of thin conductors. The radio remote control must be carefully secured on the back side.
For the system to work reliably, the number of infrared diodes must be increased to 5 pieces. They are placed around the perimeter of the steering wheel at an equal distance. This modification of the steering wheel makes it possible to guarantee the operation of the steering system in any position. To make the buttons light up, connect them to the positive signal wire.
Why do experienced drivers put a mark on the steering wheel of their car?