If it’s time to change the clutch, then at a minimum you need to know what kind of clutch is on the Lada Vesta. Regardless of the type of gearbox, manual or robotic, it has a single-plate clutch with a dry-type central spring. The only differences are in the drive. Cars with an automatic transmission have an electromechanical drive, while cars with a manual transmission have a hydraulic drive.
The clutch installed in the first Vesta models was of poor design - the manufacturer admitted this. The warmed-up transmission began to work jerkily; many drivers noticed a delay in the car’s start after pressing the gas pedal for 2–4 seconds.
If you are the owner of just such a model, you can replace the clutch with a modernized one at any AvtoVAZ dealer under warranty. Or purchase it in the online store TopDetal.ru. Here you can also buy other spare parts for any VAZ models. Our website provides a convenient search for spare parts in the catalog by car model.
The clutch for Vesta, just like the clutch for the Lada X RAY, is manufactured in Ulyanovsk at the Schaeffler plant under the German brand LuK.
When to change the clutch on Vesta
If the car was purchased new and the warranty period has not expired, in the cases described, replacing the clutch under the Lada Vesta warranty will be mandatory.
- Jerking when starting off. Some drivers, when contacting an official dealer, indicate a similar problem. Indirectly, the factor indicates wear of the friction lining, and may also indicate problems with setting up the device.
- Delay in the car's response to a sharp press of the gas pedal. If the car stalls when accelerating, this is a clear reason for contacting service.
- When changing gears there are jerks and jams. If the clutch discs are initially installed misaligned, the friction lining will wear incorrectly.
- Device resource exhaustion. Each part on a car has a certain service life. Such a reason is not a reason for warranty replacement, since wear under natural conditions occurs quite slowly.
- Extraneous noise during acceleration and gear shifting, accompanied by jerking or jerking of the car.
Configurations and prices of Lada X-Ray and Lada Vesta
With similar levels of equipment, the Lada X-Ray is more expensive than the Vesta - the starting price for them is 589,000 rubles. and 529,000 rubles, respectively. At the top, the prices of Lada X-Ray and Lada Vesta differ in approximately the same range - 742,000 rubles. and 672,000 rubles. The surcharge for metallic color is the same - 10,000. But for 30,000 rubles. Vesta can be obtained at.
The signature color of the Lada Vesta “Lime” is very beautiful, but also expensive.
The sedan offers a wider range of trim levels. He has 7 of them, while X-Ray can only answer with 4. This means that it will be easier to choose an option from Vesta that is suitable in terms of options. However, 4 X-Ray configurations are also quite enough.
LADA VESTA
| Equipment | Specifications | Price, rub.) |
| Classic | 1.6 l 16 cl. (106 hp), 5MT | 584 900 |
| Classic/Start | 1.6 l 16 cl. (106 hp), 5MT | 609 900 |
| Classic/Start | 1.6 l 16 cl. (106 hp), 5AMT | 634 900 |
| Comfort | 1.6 l 16 cl. (106 hp), 5MT | 637 900 |
| Comfort/Image | 1.6 l 16 cl. (106 hp), 5MT | 660 900 |
| Comfort | 1.6 l 16 cl. (106 hp), 5AMT | 662 900 |
| Comfort / Multimedia | 1.6 l 16 cl. (106 hp), 5MT | 665 900 |
| Comfort | 1.8 l 16 cl. (122 hp), 5MT | 672 900 |
| Comfort/Image | 1.6 l 16 cl. (106 hp), 5AMT | 685 900 |
| Comfort / Multimedia | 1.6 l 16 cl. (106 hp), 5AMT | 690 900 |
| Comfort/Image | 1.8 l 16 cl. (122 hp), 5MT | 695 900 |
| Comfort | 1.8 l 16 cl. (122 hp), 5AMT | 697 900 |
| Luxe | 1.6 l 16 cl. (106 hp), 5MT | 700 900 |
| Comfort/Image | 1.8 l 16 cl. (122 hp), 5AMT | 720 900 |
| Luxe | 1.6 l 16 cl. (106 hp), 5AMT | 725 900 |
| Luxe / Multimedia | 1.6 l 16 cl. (106 hp), 5MT | 728 900 |
| Luxe | 1.8 l 16 cl. (122 hp), 5MT | 735 900 |
| Luxe / Prestige | 1.6 l 16 cl. (106 hp), 5MT | 746 900 |
| Luxe / Multimedia | 1.6 l 16 cl. (106 hp), 5AMT | 753 900 |
| Luxe / Multimedia | 1.8 l 16 cl. (122 hp), 5MT | 763 900 |
| Luxe / Prestige | 1.8 l 16 cl. (122 hp), 5MT | 781 900 |
| Luxe / Multimedia | 1.8 l 16 cl. (122 hp), 5AMT | 788 900 |
| Luxe / Prestige | 1.8 l 16 cl. (122 hp), 5AMT | 806 900 |
| Exclusive | 1.8 l 16 cl. (122 hp), 5MT | 814 400 |
| Exclusive | 1.8 l 16 cl. (122 hp), 5AMT | 839 400 |
LADA X RAY
| Equipment | Specifications | Price, rub.) |
| Optima | 1.6 l 16 cl. (106 hp), 5MT | 629 900 |
| Optima/Air conditioner | 1.6 l 16 cl. (106 hp), 5MT | 654 900 |
| Comfort | 1.6 l 16 cl. (106 hp), 5MT | 690 900 |
| Optima/Air conditioner | 1.8 l 16 cl. (122 hp), 5AMT | 704 900 |
| Optima/Air conditioner | 1.8 l 16 cl. (122 hp), 5MT | 739 900 |
| Luxe | 1.6 l 16 cl. (106 hp), 5MT | 740 900 |
| Comfort | 1.8 l 16 cl. (122 hp), 5AMT | 740 900 |
| Luxe / Prestige | 1.6 l 16 cl. (106 hp), 5MT | 769 900 |
| Comfort | 1.8 l 16 cl. (122 hp), 5MT | 775 900 |
| Luxe | 1.8 l 16 cl. (122 hp), 5AMT | 790 900 |
| Luxe | 1.8 l 16 cl. (122 hp), 5MT | 825 900 |
| Luxe / Prestige | 1.8 l 16 cl. (122 hp), 5AMT | 828 900 |
| Exclusive | 1.8 l 16 cl. (122 hp), 5AMT | 860 900 |
| Luxe / Prestige | 1.8 l 16 cl. (122 hp), 5MT | 863 900 |
| Exclusive | 1.8 l 16 cl. (122 hp), 5MT | 895 900 |
Based on the tables, it can be seen that the optional list is approximately the same. Vesta simply offers a fragmented list, when the same number of options is divided into a larger number of options
But the fact that with a price difference of 70,000 rubles, the Lada X-Ray offers a 122-horsepower engine is really important. So buying a Lada Xray is preferable - by giving up a seat in the back row and paying extra, the salon client will receive a more powerful engine and better cross-country ability, which is especially important if you have a dacha or a house in the village
Off-road, the tall X-Ray looks noticeably more confident!
On the other hand, not everyone is ready to pay 70,000 rubles for an additional 16 liters. With. and 17 mm ground clearance. Therefore, everything will depend on what the future owner needs more.
Journalists also did not fail to compare the Lada X-Ray and the Lada Vesta. What came of this can be seen in the presented stories.
Comparison from Autoclub:
Test from Peter Menshikh:
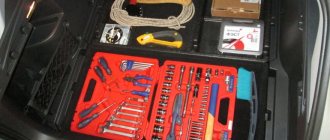
Required Tools
For the procedure you will need to prepare a certain kit.
- Set of wrenches from No. 10 to No. 24. You will also need socket heads.
- Screwdrivers – Phillips and flathead. Tools may be required in different sizes.
- Set of hex keys. Some bolts will have to be removed. Therefore, hexagons of normal quality will be required. When using a “disposable” tool, you can lick off the screw heads, which will result in their replacement.
- Rags – you will need a lot of rags, preferably clean ones.
- A torque wrench will be needed when reassembling the machine. It is strictly not recommended to tighten the bolts without it, by eye.
- A soft metal brush is needed to clean surfaces from dirt crusts.
- Clean containers for draining process fluids. If the car is still far from scheduled maintenance, it is not cost-effective to dump oils and other mixtures into scrap.
- A set of special plugs. If there are none, you can select a similar set of rubber plugs.
- Pliers with long and narrow pliers. You can use ordinary ones - it will be more convenient to carry out repairs with special ones.
Reviews
| № | Positive |
| 1. | Semyon (www.zr.ru): mileage 70,000 km without repairs or equipment replacement. |
| 2. | Andrey (autobann.su): the pedal travel is natural, not increased. |
| 3. | Georgy (lada-vesta.net): no comments, all nodes are working as normal. |
| 4. | Stepan (otzovik.com): I replaced the basket at 80,000 km, bought it from Renault. |
| 5. | Vladimir (www.zr.ru): installed a new clutch kit on the mechanics, chose a domestic product. |
| 6. | Alexander (autobann.su): 65,000 km, scheduled maintenance revealed no faults. |
| 7. | Mikhalych (https://forumvesta.ru): I’m happy with the car, of course, not without breakdowns. |
| 8. | Vitaly (lada-vesta.net): the car is assembled with high quality, no complaints. |
| 9. | Timofey (otzovik.com): There have been no repairs for three years, only scheduled maintenance and replacement of fluids. |
| 10. | Stanislav (www.zr.ru): my recommendations for motorists, finally a worthy competitor to their European counterparts. |
| 11. | Gennady (autobann.su): comrades recommended installing a kit from Renault, they say the workmanship is better and the service life is longer. |
| 12. | Alexey (vesta.ru): I’m happy with the car, good assembly, spare parts available, reasonable price. |
| Negative | |
| 13. | Konstantin (www.zr.ru): the clutch on the Vesta flies with a bang, it doesn’t last as long as it should. |
| 14. | Vitaly (otzovik.com): after 25,000 km, problems with the transmission began, I constantly go to the service station for diagnostics. |
| 15. | Grigory (autobann.su): the first year I drove normally, but after that the car fell apart. |
| 16. | Kirill (lada-vesta.net): dissatisfied with Vesta, a lot of things need to be improved at our own expense. |
Sequencing
The procedure for removing and reinstalling the clutch on different modifications of the machine is not fundamentally different. For convenience, the instructions are given using the example of repairing a car with a 21129 engine paired with a JH3 gearbox.
Step-by-step replacement of the Lada Vesta clutch looks like this.
- Place the car on a lift or drive it into a viewing hole. If similar ones are not available, you can make an analogue of the overpass.
- Disconnect the positive terminal of the battery.
- Get under the car and remove the engine protection. For this it is convenient to use heads No. 10. In some configurations, hexagons are used here.
- Next, the subframe is removed. The part can be easily unscrewed using a lever or extension.
- The next stage is dismantling the resonator. To do this, unscrew and remove the air intake pipes, then remove the resonator.
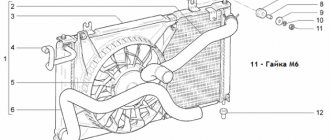
- Next you will need to loosen the clamp securing the upper ventilation pipe of the crankcase compartment from the cylinder head cover. In the figure, the elements are numbered 1 and 7, respectively. Perform a similar procedure with the throttle valve inlet pipe (No. 4).
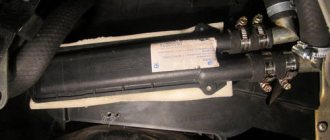
- The next step is to dismantle the air filter box. To do this, use a No. 10 wrench to unscrew the 4 mounting screws and remove the block along with the hoses. After this, you need to plug all the holes with a clean rag.
- Using a Phillips screwdriver, disconnect the oxygen sensor and other sensors that interfere with subsequent work. During work, extreme care must be taken. Sensitive sensors can be easily damaged. For convenience, the unscrewed parts on the wires can be wound with a piece of wire and unscrewed.
- Using a 10-mm open-end wrench, disconnect the drive cables from the transmission control element. Part of the procedure is relevant when replacing the clutch on a Lada Vesta mechanic. Next, you will need to release the cable sheaths and place them on the hanging elements.
- The next process is to disconnect the wiring of the reverse sensor. The contact terminal is disassembled by snapping off the clips. The sensor itself is unscrewed with an 18 mm wrench. The sensor body is quite fragile; if possible, it is recommended to use an oversized head to unscrew it.
- Remove the radiator outlet mounting bracket. Here you will need to use force and caution - the bolts are quite weak and often boil in their sockets. Usually VD 40 or its equivalent helps.
- Finally, the gearbox is removed and the manual transmission clutch is replaced on a Lada Vesta with your own hands. Further actions revolve around the hydraulic clutch engagement. To do this, the hose clamp is opened and the tube is removed from the seat of the working cylinder. To prevent dirt or air from entering the system, technological plugs should be placed on the torn end switches. If there are no such things, you can get by with rubber pegs.
- Using a T10 Torx, unscrew the bolts holding the starter. The assembly does not interfere with removing the box, but for convenience it is recommended to disconnect it.
- Next, unscrew the gearbox ground bolt. The highway is also moved to the side.
- Using sockets, remove the rear engine mount.
- Next you will need to drain the oil from the gearbox. Place a previously prepared container under the technological holes. First unscrew the filler plug, then release the drain hole. Before the procedure, you should make sure that the machine has completely cooled down - getting hot oil on your hands and clothes can cause a lot of trouble.
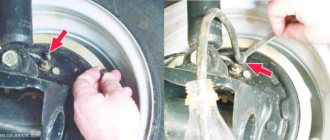
- The inner fasteners of the front wheels should be knocked out of the differential block. To do this, it is better to use a small hammer and a tool. If available, experienced specialists insist on using special squeezers and pullers. Thus, there is no risk of damage to the nodes due to an accidental mistake.
- You will also need to loosen the motor mounting screws.
- Now everything is ready to remove the engine from the car. Disconnect the upper thermostat mounting pin, remove the spring and install the eye in the vacant space.
- Next, secure a special crossbeam for hanging the power plant. If it is not there, you can use a standard lift. The only difference is that you will have to secure the motor with chains or belts using convenient protrusions. Before tearing off the engine, you should make sure that the fasteners are secure - often a broken suspension or a flying bracket becomes the reason for replacing the engine. An aluminum block can become deformed from a strong impact due to its own weight.
- 16 use a socket wrench to remove the motor bracket on the left side. Also, using wrench No. 18, you need to release the remaining fasteners.
- When the engine is raised and its supports are dismantled, you should unscrew and remove with all its giblets the two upper bolts securing the gearbox housing to the power unit. Then all other fasteners are unscrewed. To facilitate dismantling, it is recommended to fill all the screws with VD or diesel fuel.
- For the convenience of subsequent actions, you need to lower the engine so that the gearbox housing is 5 cm below the side members.
- Next, you need to carefully move the gearbox unit away from the internal combustion engine and disengage the drive shaft.
- The gearbox can be completely removed from the car. In this case, the help of a second person will be required. The box module is quite heavy, it will be difficult to hold it yourself.
- Next, the clutch disc is replaced on the Lada Vesta. To do this, a flywheel lock is installed on the power unit unit.
- Unscrew the fastening bolts of the release disk to the flywheel device. There are 6 screws in total; different types of motors have different screws.
- After troubleshooting and repairing the device, assembly is performed in the reverse order.
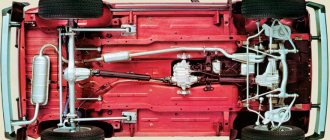
Transmission Lada Vesta and X-ray
Neither Vesta Cross nor XRAY differ from each other in their set of engines and gearboxes. But the hatchback has more trim levels and the price for the initial version is 579,900 rubles versus 763,900 for Vesta. However, the sedan has better handling and acceleration dynamics. But there are controversial points:
The top version of XRAY has a trump card hidden up its sleeve - “robot”! It is he who helps where it is difficult to travel. However, sometimes it is inadequate in choosing driving modes, so most owners prefer “mechanics”: nerves are more expensive.
The transmission of the Vesta Cross sedan is slightly different from that found on station wagons. According to the manufacturer, the robotic gearbox of the top-end Vesta now changes gears faster. True, journalists who could tell about the updated “robot” AMT 2.0 never got it. In this regard, you’ll have to take the marketers’ word for it... But no one has any complaints about the “mechanics”. It's probably a draw in this round between Cross and XRAY.
Removing the clutch cylinders
In the model under consideration, the clutch and brake drives are interconnected. Therefore, the repair procedure will affect both devices equally. On Lada Vesta, replacing the clutch master cylinder is carried out in the following sequence.
- Pump out the fluid from the brake reservoir, disconnect the hoses from the brake fluid and lower them into a prepared container for collecting brake fluid.
- Next you will need to unscrew the clamps of the clutch master cylinder line and drain the fluid into a prepared container.
- Then move the pressure line aside. If there is no need to replace it, the tube can be left in place.
- Using a 13 key, unscrew the two screws securing the working cylinder housing and remove it from the machine. When the part is removed, its seat must be covered with a rag to prevent dirt from entering.
- The GC is dismantled in a similar manner.
- Installation of parts is done in reverse order. After this, the replacement of the clutch cylinder on the Lada Vesta will be completed.
LADA XRAY_Zahod
This is the first photo of Xray without camouflage.
The photo was taken in the Pilot Production, where several dozen machines intended for testing and testing technological processes were assembled. We were asked to hold off on publishing other photos of finished cars. This is the first photo of Xray without camouflage. The photo was taken in the Pilot Production, where several dozen machines intended for testing and testing technological processes were assembled. We were asked to hold off on publishing other photos of finished cars. This is the first photo of Xray without camouflage. The photo was taken in the Pilot Production, where several dozen machines intended for testing and testing technological processes were assembled. We were asked to hold off on publishing other photos of finished cars.
I don’t know about anyone, but Boo Andersson hypnotizes me. Because you can look at three things endlessly - at fire, at water and at how Boo talks about his factory.
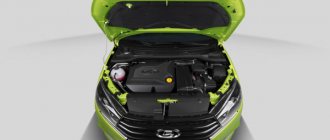
— This is our motor production. The assembly of Renault H4Mk engines (114 hp) began on June 24 - two thousand units have already been sent to Avtoframos, and by the end of the year we will make another nine thousand. We are also mastering the new 123-horsepower 1.8 VAZ-21179 engine, which will go primarily to the XRAY. Look how clean it is all around - Europe! We have invested millions of rubles in renovating toilets, changing rooms and workers' rest areas.
What does the president of AVTOVAZ care about toilets? Andersson cares about everything. And if one day it turns out that somewhere under his skin he has a powerful chip sewn in, I won’t be surprised: not one of the top managers, neither from ours nor from “theirs,” dumped so much information on me in a unit of time.
Jerks when starting off
If you notice that the movement is accompanied by twitching, this is a serious reason to seek help from specialists. The Lada Vesta can shake for various reasons (for example, ignition failures), but if it is the clutch mechanism that gives the effect, we are talking about scrap parts. Obsolescence will never be accompanied by jerks, but destruction, the breaking off of pieces of metal, manifests itself this way. The presence of freely moving debris can cause great damage to other Vesta nodes. It is recommended to carry out repairs immediately.
How they teach in driving schools
In driving schools, instructors often teach novice drivers to depress the clutch pedal without fail, which will prevent the car from jerking forward if the driver has not engaged neutral and is trying to start the car. This prevents minor accidents when, in a tight parking lot, newcomers try to start the car in gear, the car jerks sharply, hitting the car in front.
More advanced experts tell newcomers to driving schools that pressing the clutch is necessary not so much to prevent slipping into gear, but to simplify starting the engine. The fact is that in cold weather the oil thickens, making it difficult for the starter to crank the crankshaft, which prevents the engine from starting. If you squeeze the clutch, the load from the gearbox is removed, so the engine can be started in cold weather, with a worn starter or a weak battery.