Installation of a new element is carried out in the reverse order.
If it is necessary to install a new element, the plastic line plugs are removed only immediately before installing it on the machine.
On Lada Kalina, replacing the radiator is quite simple. The procedure does not require highly specialized tools or special pullers. Also, there is no need for deep knowledge of the design of the car - for the whole process, it is enough to have “direct hands” and an understanding of the principles of car design.
Before dismantling
In any car, including the Lada Kalina, replacing the cooling radiator implies that all the antifreeze has been drained from the system. How exactly you can get rid of old antifreeze was discussed in detail earlier. Well, now let us note once again that any manipulations can be performed after disconnecting the battery. It’s easier to unscrew and remove the “negative” terminal, which is what is done in practice.
It turns out that you first need to open the hood and disconnect the terminal, and only then can you proceed with subsequent operations. One of them will be removing the antifreeze, the other will be dismantling the fan.
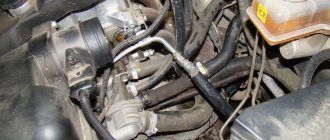
Look again at exactly what the unit called “radiator” looks like. Before dismantling it, it is necessary to remove the fan with the casing.
The main thing is not to forget to disconnect the electrical connector. Also, you need to disconnect the pipes (two large and one thin). Of course, all this is done when there is no longer any antifreeze.
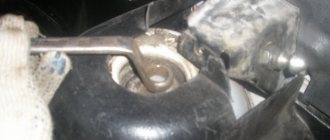
Tighten the battery terminal with a 10mm wrench
Owners of cars with 8-valve engines are a little luckier than everyone else. For them there is no need to remove the decorative trim that limits access to the engine. The plastic cover must be completely removed:
- Having pressed the latch lever, disconnect the wire loop from the connector of the adsorber purge valve;
- The metal plate fixing the valve is pryed with a screwdriver and removed;
- The valve module, together with the attached hoses, is moved to the side;
- You need to unscrew the oil filler plug;
- The cover is dismantled as follows: by carefully pulling the part up, it is disconnected along with the fasteners.
The actions listed in the list are illustrated in the photo.
Lada Kalina wagon » Logbook » Replacing the radiator Kalina-conditioned
Struck radiator. Traveled half a year, noticed that the summer is flowing out of the radiator, drops a little, well topped up until it was time to leave when it became liters per day. I'd just changed the main radiator, but the problem is that in Kalina complete with air conditioning is a special radiator marked 01182b, if not installed and put on a simple snowball, the car in the summer will be paired with Conder overheat. The main surprise is that the radiator price is through the roof, according to the standards for parts Vase — it 4000rubley Lyzar. And b/y is not found on the disassembly is not something that the radiator 01182b, viburnum often do not even understand. Well that did not go bankrupt in the antifreeze went out and bought the radiator. The service changed for 600r, despite the fact that I was still standing, and prompted how to remove the radiator. Removed it from the bottom, you need to unscrew the radiator mount, remove the fan, well protected and vozduhan itself - more nothing special. Photos potekshego and a new radiator below
The design of the radiator of the Lada Kalina cooling system and methods for its modernization
The engine cooling system, or engine cooling system, is designed to remove excess heat generated from the combustion of the air-fuel mixture from the cylinders of the power plant. This system is necessary for the normal functioning of the motor, since its parts come into contact with hot gases and are exposed to high temperatures. Without cooling, the lubricant between the rubbing elements will simply burn out. As a result of increased friction, the metal will begin to break down and the engine will seize. One of the important components of the SOD is the radiator, with the help of which hot antifreeze is cooled.
Cooling system diagram
Carrying out preparatory work
Any repair of the cooling system of a Lada Kalina car is accompanied by its partial or complete emptying. To dismantle the radiator, you will have to drain all the coolant. First you need to place the car on a level surface.
Armed with a 10 mm open-end wrench, you need to remove the metal mudguard installed under the engine. Do not ignore this operation, otherwise, when emptying, some of the antifreeze from the engine cooling system will flow past your container.
The antifreeze is drained after the Kalina engine has cooled, otherwise there is a risk of getting burns to the skin of your hands. Operations are carried out in the following sequence:
- Remove the air filter.
- To get to the drain plug of the cylinder block water jacket, remove the ignition coil, having first disconnected the high-voltage wires from it and the negative terminal from the battery. The coil is unscrewed with a 5 mm hexagon.
- Place a container under the neck, use a spanner wrench (13 mm) to unscrew the plug on the block, and drain the liquid from it.
- Wait until the engine cooling system is completely empty by moving a container under the radiator and unscrewing the drain plug on it. Do not forget to unscrew the cap of the expansion tank.
At the end of the procedure, the drain plug of the power unit can be returned to its place and tightened with a wrench with little force. Then you should use a screwdriver to loosen the clamp and remove the pipe from the air damper heating unit; when filling antifreeze, air will escape through it.
How to choose a new radiator
Before changing the heat exchanger, you need to select a new one. Particular attention should be paid to the material.
Based on this feature, radiators are divided into two types:
- Aluminum. Has lower thermal conductivity. If damaged, it cannot be soldered, but it costs much less. The vast majority of experts advise choosing this one.
- Copper. It is generally accepted that this heat exchanger is better. Its advantages are high thermal conductivity and maintainability. There is only one drawback - the price.
The heat capacity of the model does not play a decisive role; aluminum is more than enough to heat the interior. Maintainability, in modern times, is a dubious advantage; hardly anyone will solder. The quality of the radiators is approximately the same, so there is no point in overpaying for copper.
Selection of spare parts
The choice of a stove radiator should be approached carefully, since changing it is quite inconvenient. The majority of motorists choose an original part that is available for sale. But few people know that there are several analogues.
Let's consider the heater radiator options for Kalina, their catalog numbers:
- 1118-8101060 is the article number of the original catalog number of the heater radiator for Kalina. It fits perfectly and does not require any modifications. Average
ODS device of Lada Kalina
Kalina 1 and Kalina 2 cars use a liquid cooling system. It consists of an engine jacket, radiator, electric fan, pump (water pump), expansion tank, thermostat and connecting hoses. The coolant moves through two circulation circuits. In a small circle, antifreeze circulates only through the engine jacket, while in a large circle, the liquid passes through the radiator.
Expansion tank
Used to pour liquid into the system. It is made of heat-resistant plastic of a translucent color to allow you to control the level of antifreeze. There is a special pipe on the top through which the tank is connected to the radiator steam outlet.
The tightness of the entire system is ensured by the valve cover, which has inlet and outlet valves. The latter is designed to maintain pressure in the SOD above atmospheric pressure. Due to this, losses in the form of steam are reduced, and the boiling point of the working fluid increases. The exhaust valve of the cover opens when the pressure rises to 1.1 bar, and the inlet valve opens when the pressure drops to 0.13 bar and the engine cools down.
water pump
This is a centrifugal pump with blades. It is belt driven from a crankshaft pulley and is included in the gas distribution system. The pump is made of aluminum. This unit cannot be repaired; if it fails, it can only be replaced. Rotation occurs due to a double-row non-separable bearing; its high-temperature lubricant is designed for the entire service life. There is a toothed pulley at the front and an impeller at the rear.
Thermostat
Designed to redistribute coolant flows, it contains a temperature-sensitive element and two valves. When the engine cools down, one of the thermostat valves is in the closed position, and fluid circulates through the motor jacket - only a small circuit is used. As the temperature reaches 85 degrees, the second valve begins to open slightly, allowing antifreeze into the radiator and closing the bypass channel. Full opening occurs at a temperature of 100 degrees. In this case, all the liquid begins to pass through the cooler.
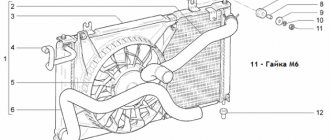
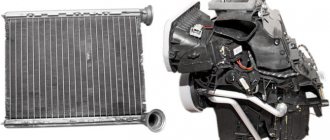
Engine radiator
The heat exchanger can be monolithic aluminum, tubular, or plate type. Its device uses two plastic tanks that are connected by tubes. The upper one is inlet, and the lower one is outlet, through which the cooled liquid is sent back to the engine. Near the first there is a steam outlet connected to the expansion tank. The radiator on Kalina is complemented by an electric fan. There is a drain plug at the bottom of the outlet tank.
An electric fan cools the liquid forcibly. It is turned on via a relay after a command from the ECU when the temperature reaches critical levels.
The cooling system is complemented by a heater radiator, which is integrated into the ODS and is used to heat the air in the cabin, since hot antifreeze also passes through it. The controller monitors the coolant temperature using a sensor that is installed in the cylinder head and transmits readings to the instrument panel. To transmit a signal to the controller, a sensor installed on the exhaust pipe, near the thermostat, is used.
Differences between modifications with air conditioning
Some configurations of the Lada Kalina are complemented by air conditioning, which is part of the climate control system and is used to cool the air in the cabin. The device cannot operate if the outside temperature is below 5 degrees, the engine is not running, or the heater fan is on. The air conditioning compressor is driven by the engine, and this is the main disadvantage of the installation.
The use of a cooler increases fuel consumption and negatively affects dynamic performance. The temperature is adjusted using the knob on the climate control unit in the cabin. In a car with air conditioning, the air flows first to the evaporator and then to the heater core.
Diagnosis and troubleshooting
The easiest way to resolve the issue is regarding the cabin filter. For the first time, thorough blowing of the element will be enough, but then it is better to replace it. The real problem is a leaking radiator or a broken fan; an expensive replacement of the unit cannot be avoided. An equally high price will have to be paid for a new control unit.
It will be somewhat cheaper to install a new temperature sensor, gearmotor or resistor for the Kalina heater. Moreover, the malfunction still needs to be correctly diagnosed, which can be quite difficult. A burnt resistor is easily identified - the fan only runs at maximum speed.
It is more difficult to check the sensor hidden in the lighting shade. Symptom of a malfunction - a hot or cold stream flows from one or more grilles, regardless of the position of the regulator handle.
It is more difficult to detect how well the mechanical heater regulator is functioning. To do this, you need to get to it by disassembling part of the front panel. In the same way, the proper operation of the air dampers is determined.
To carry out diagnostics, it is better to start searching for problems with the most accessible elements, and only then start disassembling.
Method without removing the dashboard
Replacing the heater radiator on a Lada Kalina without removing the panel has become popular due to its speed and the need to dismantle a minimum number of components. The algorithm has some differences from the classic one.
- We drain the coolant and remove everything unnecessary under the hood, unscrew the clamps that secure the hoses at the inlet and outlet of the stove.
- In the cabin, we begin to disassemble the steering column - dismantle the protective cover, steering column switches, and all the wiring to them. We free access to the steering column and pedal assembly.
- The steering column is removed at the location where the electric power steering is mounted. It is held on by 4 bolts and is detached from the cardan.
To disconnect the steering column, you need to unscrew four bolts
The decorative heater cover is held on by three screws
Carefully remove the stove
The advantages of this method are obvious: labor-intensive disassembly and disconnection of numerous connectors is not required. Crickets will not appear in the front panel after assembly, and later disassembling and replacing the heater radiator is much easier. This does not reduce the efficiency of the stove.
Video: Lada Kalina - replacing the heater radiator (without removing the panel)
As operating experience shows, a new radiator lasts for 3-5 years of operation, after which problems inevitably begin. The driver decides how to repair. Having the simplest car maintenance skills will be enough to replace it yourself in the garage. Otherwise, you should contact the service. “Kalina” with air conditioning has a more complex climate control system with two radiators, and replacing the interior heater involves disassembling the entire front panel.
Cylinder head repair
We mark all hydraulic compensators with numbers using an ordinary clerical touch and put them away. An ordinary magnet will help you pull them out. We dry out the valves and remove the oil seals (valve seals), the valves into scrap metal, the oil seals into the trash. We clean all channels. We take the head for grinding, just in case. After washing it again with kerosene after sanding and blowing it with air, we begin to assemble it.
We arrange the freshly purchased valves in the sequence in which they will stand in the cylinder head and begin to grind in one by one. Lubricate the valve stem with clean oil and apply lapping paste to the edge.
Step-by-step replacement instructions
- The first thing you need to do is remove the timing belt. How to do this can be studied in detail in our article “ Replacing the Timing Belt”. It is first recommended to loosen the camshaft pulley mounting bolt with a 17mm wrench, since this will be much more difficult to do after removing the belt.
- Remove the timing belt and unscrew the camshaft pulley. Be careful not to lose the key.
- Then pry up the old oil seal with a screwdriver and remove it.
- We wipe the seat and shaft from debris.
- We install a new oil seal, lubricating the shaft with clean engine oil. This will ensure easier sliding and movement of the oil seal along the shaft.
As a mandrel, you can use the head from the tool kit; you need to select the head in such a way that part of it rests against the metal part of the oil seal, but not against the working part.
- Using a hammer, lightly install the oil seal into its place.
- The replacement is completed, we carry out the assembly process in reverse order.
Sources:
https://gazykt.ru/drugoe/zamena-radiatora-pechki-lada-kalina-s-konditsionerom.html https://l2rv.ru/info/zamena-pompy-kalina-16-klapanov-s-konditsionerom/
Basic radiator malfunctions
Malfunctions of this Kalina unit do not occur so often and are the result of wear and tear due to natural causes of the car owner’s negligence. There are two most common types of problems:
Leaks are dangerous because a decrease in coolant level leads to an increase in engine temperature. This leads to overheating and jamming of the motor. A leak of hot antifreeze can be dangerous. The fluid in the system is under pressure, a leak can form a fountain, and contact of hot antifreeze on exposed skin will cause burns.
Coking disrupts the antifreeze circulation process. As a result, the lower part of the radiator begins to cool, and then the entire heat exchanger. The liquid will not cool, causing the engine to overheat. In most cases, the cause of coking is ordinary scale. This happens when tap water is poured into the SOD. Less commonly, blockages occur due to mixing oil and antifreeze. In this case, the reason is the loss of tightness of the cylinder head gasket.
At an early stage, coking is difficult to detect. In advanced cases, mixing oil and antifreeze forms a consistency similar to jelly, which makes the heat exchanger tubes difficult to pass or completely impassable.
Where is
The oil seal is located under the timing belt boot, behind the camshaft gear.
The oil seal must be replaced if engine oil leaks through it. This leak can lead to oil getting onto the timing belt, which is strictly prohibited. Oil can damage the belt and lead to its breakage, which on 16-valve engines can lead to valve bending.
What is a valve stem seal
Working title used by all repairmen. These are valve seals. These are special rings, rubber and metal belts that wear on the valve body. Their goal. prevent engine oil that lubricates the Priory engine from entering the service cylinders and the air supply system to the receiver. Therefore the oil scraper.
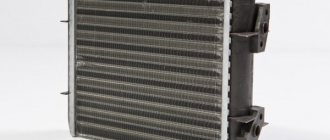
Stove radiator design
A car's heater consists of a housing with dampers and a metal radiator with pipes. Two types are installed: copper and aluminum. Each has its own advantages:
- Copper heaters have lower thermal conductivity, they heat up more slowly and also give off heat. Their reliability and maintainability are higher; the radiator can always be soldered.
- Aluminum is valued for its fast heating and good heat dissipation, low price and light weight. But if there is a leak, it is impossible to repair it.
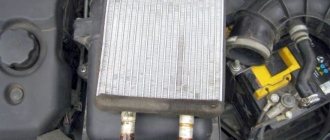
Freshly unpacked heater radiator for Lada Kalina
Important! In a good stove radiator, plastic swirlers or turbulators are installed; they increase efficiency by 20-25%.
Frequent unit malfunctions:
- heating deteriorates due to clogged tubes and honeycombs;
- antifreeze leak;
- damp fog in the cabin due to leaky joints;
- cracks in the supply pipes.
These malfunctions are accompanied by a drop in the coolant level in the car's expansion tank and an increase in engine temperature. Most often, a leak reveals itself in winter during sudden temperature changes. Ethylene glycol vapors are toxic, so repairs should not be delayed.
Finding the stove on the Kalina is not difficult - it is located immediately behind the center console, slightly below the radio. The radiator size is 24 by 20 cm, thickness 5 cm. Immediately below it is installed the engine ECU, which is often filled with antifreeze in case of a serious leak.
Reasons for radiator failure:
- low quality antifreeze, the formation of scale and solid sediments in it, clogging the stove tubes;
- cheap types of antifreeze are aggressive to aluminum and lead to corrosion and cracks;
- low-quality products or counterfeits of well-known brands;
- water use in winter;
- destruction due to long-term use.
Fan replacement
The most convenient way to get to the unit is from the passenger seat, which will have to be dismantled so that you don’t have to do acrobatics inside the cabin. The chair runners are held in place by 4 13 mm nuts; unscrewing them is not difficult. Further work on replacing the fan is carried out in the following sequence:
- Remove the cabin filter and remove dirt and dust from the opening.
- Unscrew 4 screws located on the back wall of the glove compartment, and another one under the right heater grille.
- Remove the plastic cover from the stand and unscrew the 2 screws that secure the panel and the blower unit.
- Remove the blower unit, lift the plastic panel and loosen the 2 fan mounting nuts underneath it.
- Move the dashboard as far back as possible and secure it. The turbine must be removed from below, from a lying position.
READ Repair of Fuel Equipment of Chinese Diesel Engines
You should not rush to change the fan when it only works at speed 1 and the heater switch is at maximum. This is a sure sign that the resistor located below the glove compartment has failed. The part is a small green plastic panel with a connection connector. Replacing the heater resistor is carried out without any disassembly; you just need to disconnect the connector and unscrew the 2 screws that secure it to the body.
Basically, troubleshooting the Kalina stove is not a difficult job, but very labor-intensive. To change a small part, you need to spend time disassembling to get to it.
If your LADA Kalina heater is blowing cold air, but all the equipment is working properly, there are no air locks and all sensors are normal, then you should think about the fact that most likely the problem lies in the dampers of the car’s heating system. It is quite difficult to identify this problem; usually it is discovered by the method of elimination, when all other elements of the heater have already been checked. In this article, we will talk about what usually precedes the identification of problems with the heater dampers, and also share information on how to correct such an unpleasant situation.
It is worth noting that on our website there is a publication Replacing the stove without removing the LADA Kalina panel, which describes in detail a method that will allow even a complete beginner to cope with the task.
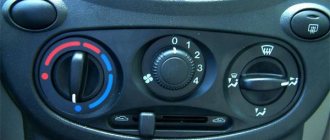
Signs of malfunction of the dampers of the LADA Kalina
Most owners of Lada Kalina cars note that even at a temperature of 25 degrees Celsius outside, it is enough to turn on the heater to first speed and the cabin becomes warm. At the same time, after a certain period of time, the heating intensity begins to drop, and it is no longer enough to start the heater at first speed; you have to switch to second, and sometimes even further.
The thing is that Kalina, like a number of other cars produced by VAZ, has a native “disease” - even in the most extreme position of the temperature control knob (as hot as possible), the damper does not open completely. As a result, with minimal wear of the heater elements, the heating of the interior begins to decrease. To make sure that your car has such a problem, just look at the heater housing from the driver's seat. You will be able to see the lever of this damper, which operates with incomplete amplitude, and the cable that goes to it.
Fortunately, there is a method to fix this problem, but you will need to make some adjustments yourself, which we will discuss in the following sections of this article, but first, we will explain how to make sure that this is the problem in your particular case.
We check for the presence of “disease” of the dampers on LADA Kalina
So, your stove is not heating well, you suspect that the problem is with the dampers, but how can you determine this for sure? To begin with, you must bring the multimeter temperature sensor to the central deflector and measure the temperature at the first speed of the heating system. With a cold car you should get a reading of at least 46 degrees Celsius.
The next step is to move the cabin air speed lever to the far right position. As a result, the temperature should rise. This will happen in any case, whether you have a problem with the dampers or not, but if there is a problem, the multimeter readings will increase slightly - no more than 10 degrees, and maybe even lower.
What will be required to restore normal operation of the stove?
If you have identified a situation with a slight increase in temperature when moving the lever from the first speed position to the maximum speed position, you will have to work on upgrading the damper system. To do this, you will need very little: – a spring of short length and medium stiffness – pliers, which will allow you, if necessary, to modify the length of the spring to the size you need
The procedure for upgrading the heater dampers of LADA Kalina
The upgrade procedure is quite simple, but requires care and concentration. You need to hook one end of the spring to the lever with which the dampers move, and the other to the protrusion that is on the body. That's all. As a result of the modification described above, the spring will begin to press the damper lever much more strongly, as a result, the amplitude of movement of the dampers will increase to the maximum, and the quality of operation of the car's heating system will significantly increase.
What to Expect After Upgrading Your Damper System
Quick replacement of the heater radiator in Kalina without damaging the car
After you have modified the damper system, you can forget about problems with them for a fairly long period, since their service life is very long. If after this, your stove stops working again, then you can no longer pay attention to the dampers and look for the problem in completely different elements of the car’s heating system: faucet, radiator, engine cooling system, and so on.
Sources:
https://carfrance.ru/zamena-radiatora-pechki-na-lada-kalina-osnovnoj-sposob-i-bez-snyatiya-paneli-fotootchet/ https://autoservice-mekona.ru/raznoe/kak-snyat- radiator-konditsionera-na-kaline.html https://o-ladagranta.ru/ustrojstvo-pechki-lada-kalina-1-bez-kondicionera/
Replacing a radiator on Kalina
There are two brands of heat exchangers on the automotive aftermarket:
- DAAZ is a standard radiator, the cost starts from 1,700 rubles.
- LUZAR is the second most popular after the factory one. Costs about 1800 rubles.
Foreign manufacturers can also offer good options at low prices: for example, Hofer.
Replacing the cooling radiator on Kalina begins with preparing the tool:
- set of socket heads;
- ratchet driver;
- extension;
- screwdrivers with shaped and flat blades;
- pliers.
Before you begin dismantling the radiator with your own hands, you need to drain all the antifreeze from the system into a suitable container. Before any manipulations, the on-board network must be de-energized; to do this, disconnect the “negative” terminal from the battery. The withdrawal process is as follows:
- The car is placed on a level surface.
- The engine protection is removed from below. This makes it easier to drain the coolant, otherwise it will spill over the metal sheet.
- After the engine has cooled down, you can begin draining the antifreeze.
- The air filter box is removed.
- The ignition coil is removed to facilitate access to the drain plug on the cylinder block. It is recommended to disconnect high-voltage wires.
- Use a 13 mm wrench to unscrew the drain plug on the block. Place a container under the drainage area.
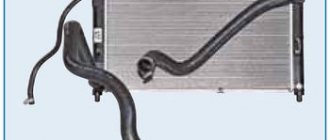
- The lower radiator hose is removed. The cap of the expansion tank must be unscrewed - the system will depressurize and the coolant will drain out faster.
- After all the liquid has poured out, the drain plug is screwed back on.
- Use a screwdriver to remove the clamp with the throttle valve heating pipe.
- The connector is disconnected from the fan.
- Unscrew the 4 frame bolts that hold the fan to the radiator. To remove the knot, you need to pull it up.
- All pipes should be removed from the radiator fittings by loosening the clamps.
- Unscrew the remaining 2 nuts with a 10 mm wrench, with the help of which the heat exchanger is attached to the body.
- Tilt the radiator towards the engine and pull it up to remove it.
This completes the dismantling of the heat exchanger. If the cause of the malfunction has not been established, then you need to check the radiator. To do this, plugs are installed in the outlets, and the heat exchanger is immersed in water. Air is pumped into the radiator through a small fitting by a car compressor. If fistulas are detected, it means that the node is broken and must be replaced. If the leaks are small, then you can try to solder the cracks, but for this you will have to contact a car service.
The radiator is installed in the reverse order of removal. During installation, it is better to use new clamps and carefully inspect the pipes. If there are cracks, these parts also need to be replaced.
After installing the radiator, fan and all pipes, you can fill in antifreeze until coolant flows from the throttle valve heating pipe. If the radiator is removed not for replacement with a new one, then it is recommended to clean it. To dismantle a unit equipped with an air conditioning unit, you will need to additionally remove some parts attached to the radiator. For these works you need a set of socket wrenches (stars).
About the oil seal
The oil seal is one of the most common and long-invented sealing devices for moving mechanisms. This part is widely used due to its simple design.
It should be noted that the oil seals used in VAZ cars have a direction and need to be installed only in the designated direction of shaft rotation.
Replacing the viburnum radiator. viburnum 2. granta! 16 valve engine and air conditioning and automatic transmission.
As you can see for yourself, there is nothing complicated about replacing the camshaft oil seal on a VAZ-2112. This work is not primitive, but does not require any special skills. You just need to carefully read this and all the supporting articles and then the repair will not become something unusual for you. After all, by doing such work yourself, you not only save your budget, but also significantly increase your experience in repairing your own car.
READ Replacing the Ford Focus 2 heater resistor
If you find traces of oil leakage through the camshaft seals, first check to see if the crankcase ventilation system is clogged and if its hoses are pinched, and if necessary, repair the faults.
If the oil leak does not stop, replace the seals.
Using a 10mm socket, unscrew the six bolts securing the front cover.
Using a 17mm spanner, loosen the bolt securing the exhaust camshaft toothed pulley.
By inserting a screwdriver into the pulley hole, we hold it from turning.
In the same way, loosen the bolt of the intake camshaft toothed pulley.
Oil seal catalog number – 2112-1006216
After unscrewing the fastening bolts, remove the camshaft pulleys.
Use a screwdriver to pry up the seals and remove them.
Lubricate the working edge of the oil seal with engine oil.
We press in new oil seals with a suitable piece of pipe
We assemble the timing drive in reverse order.
Where to buy and price for a new cooling radiator for Kalina
Regarding the purchase of a new part, you can consider various options, ranging from automobile markets, shops and ending with auto dismantling. I often install parts from my own disassembly on my Kalina, but in this case there was no radiator, so I had to buy a new one. Of the main manufacturers currently on the market, prices may be as follows:
- LUZAR - from 1800 rubles
- DAAZ (factory) from 1700 rubles
There are probably other manufacturers, but there were none in my city. I chose the factory version because I don’t see much difference, and this is my subjective opinion! If the article was useful, like VK, OK, share with friends, post on your page as a thank you to the author of this material and resource! If you have anything to add, let's discuss it in the comments below!
I’ll start with the fact that I finally decided to install an air conditioner, because another summer in Moscow traffic jams in the heat is not an option))) I took the air conditioner kit from disassembly, the only thing missing is a radiator fan and a compressor bracket. I plan to assemble a complete climate control, like a deluxe one, so I will slowly collect all the missing components, fortunately I have time before summer)
The other day, while topping up the washer fluid, I noticed that the coolant level was somehow lower than it was before. After examining all the joints, pipes and radiator, I saw this
Indeed, I was a little surprised, because the plug on the RB is adjusted, plus I don’t wrap it tightly for the winter, but apparently the time has come for the radiator. It leaked like everyone else, in the rolling of the main part with a plastic tank.
Well, okay, I thought, because the luxury units with air conditioning have a different radiator, 40-60% more productive than the usual one, so whatever is done is for the better)
The difference in radiators is visible to the naked eye:
As you can see from the photos, the radiator for viburnums with condom is denser and has a larger number of tubes, which inspires confidence. Having looked at the prices for the original Panasonic, I thought a little about this topic, but there is an alternative from Luzar, according to reviews, no one has any complaints, and the price is 4.3k. After googling spare parts stores, I found it in one and rushed off)
Once again I appreciated all the delights of repairing Kalina with an 8kL engine) I only removed the air filter housing, the upper pipe and the fan. I read that someone removed the generator and ignition coil, but I still don’t understand why, everything can be pulled out just fine.
An important step is removing the knot
The cooling radiator and related components are unscrewed using the following tools:
- socket wrench 10;
- pliers with cylindrical thin ends;
- Phillips screwdriver;
- when carrying out work on Kalina with air conditioning, use a set of TOPEX internal socket wrenches (star-shaped).
To dismantle the radiator, you must first remove the engine cooling fan, having first disconnected the power connector from it. The fan is attached to the radiator with 4 bolts. The bolts are unscrewed with a 10 mm socket wrench, after which the fan is removed through the top.
The next step is to remove the rubber pipes from the radiator: upper, lower and coming from the expansion tank. The pipe clamps are loosened using pliers or a screwdriver. Next, use the same key to unscrew the 2 nuts securing the unit. The cooler can now be tilted towards the engine and pulled out.
When working with an air conditioned Kalina, you will have to deal with an additional cooling device attached to the main radiator. To separate them, you need to unscrew 4 bolts with a star key.
When removing the radiator, pay attention to the lower support pads; they can be removed along with the unit or remain in the body holes. It is better to remove the pillows to examine them for functionality. The same applies to rubber-metal bushings installed on the cooler body. If necessary, these parts must also be replaced.
A radiator malfunction can be localized by plugging its large pipes, immersing it in a container of water and supplying air at a pressure of no higher than 1 bar through a small fitting. If there are many places where air breaks through, then the unit is replaced with a new one.
If you have 1-2 small fistulas, try to negotiate a repair at a service station; you should not undertake this yourself. The design of the aluminum radiator is such that careless movements can easily cause even more damage.
The new cooler is installed together with the cushions in place and screwed with nuts. Further assembly is carried out in the reverse order, and attention should be paid to the condition of the rubber pipes and clamps. It might be better to replace them too.
The system is filled with antifreeze until it flows from the small pipe going to the throttle valve.
Cooling system upgrade
The main disadvantage of the Lada Kalina SOD is the appearance of air locks, which can cause overheating and failure of the power plant. In order to avoid such situations, car owners upgrade the cooling system themselves. Several methods are used for improvement:
- installing a 6-hole thermostat;
- adding a coolant filter;
- installation of a shut-off valve for the antifreeze inlet pipe on the heater.
The system can also be supplemented with a button for turning on forced engine cooling with a fan, and tubes for steam removal can be added.
To prevent air locks, some car enthusiasts recommend removing the valve from the valve cover. But this can lead to overheating and jamming of the motor. The problem can be solved by making changes to the software, reducing the boiling point to 98 degrees.
The most effective way to modernize the SOD is considered to be modification of the steam outlet. A plug is installed in the branch pipe of the expansion tank connecting it to the large circuit. The fitting is released and connected to the lower hose of the stove through a tee. The thin hose from the throttle valve is plugged. The fitting is connected to the expansion tank, into the upper part of which an additional nipple is cut. You can use a tee instead. As a result, the steam removal is transferred to the small circle.
Installing a 6-hole thermostat allows you to maintain a stable temperature in the system and improve the performance of the interior heater. To prevent blockages, the SOD is equipped with a coolant filter. In the summer, installing an additional stove faucet will help. Some car enthusiasts install another pump. As a result, the fluid circulates faster, the engine warms up in a shorter period of time, and the risk of overheating of the power unit is reduced.
Eliminating air jams
The design of the cooling system in the VAZ-1118 has one unpleasant drawback - the tendency for the circuit to become airy. This can lead to overheating and engine damage. Here we recommend resorting to minor system upgrades. You need to act when the liquid is drained.
- First we replace the thermostat. Instead of a standard product with five holes, we install a component with six such holes.
- We add a refrigerant filter to the circuit.
- We install a shut-off valve on the pipe leading to the stove.
These actions are not capable of radically transforming the system. Experienced owners of LADA Kalina have moved further in this matter. They add steam exhaust pipes, install a forced fan activation button, etc. To install the designated outlet, the diagram looks like this: we cut a tee into the pipe leading to the expansion tank. It is connected through a separate hose to the pipe of the throttle body heating unit. We place the second tee in the return from the radiator of the heating system and connect it with an expansion tank. Now you know how to remove, as well as how to change the radiator, and fix other problems yourself.
Causes and symptoms of failure
In addition to the low quality of components and features of the car’s cooling system, the driver himself is often to blame for damage to the stove. Trying to save on consumables and operating materials, he significantly reduces the service life of the heater.
The main reasons for stove failure:
- Using low-quality antifreeze. This can lead to contamination of all channels, which will significantly reduce heat transfer and circulation.
- Faulty expansion tank cap. It causes increased pressure in the system, which will certainly lead to a “rupture” of the heat exchanger.
- Manufacturing defects.
- Using cheap antifreeze. Low-quality liquids are an aggressive environment for aluminum.
- Use in the cold season as a coolant (coolant), water or low-density antifreeze.
A number of symptoms can indicate the presence of a stove failure.
Signs of damage to the heating radiator:
- drops of coolant on the passenger seat mat;
- the smell of antifreeze in the cabin and a “greasy” coating on the glass;
- low heating of the radiator, provided that the remaining heater elements are in good working order.
Tools and materials for repairing the Kalina stove
Necessarily:
- Two screwdrivers: Phillips and flat (for unscrewing clamps)
- Ratchet wrench
- Heads 7 and 8 (for unscrewing clamps)
- Heads for 10, 13
- Long head 10 (5 cm long)
- Keys for 10, 13
- Long pliers or pliers (to break out the old radiator fittings)
- Metal file (carefully saw off the fittings of the new radiator)
- Sharp knife (for cutting foam rubber)
- Standard heater radiator Kalina 11183
- 3 meters of reinforced hose, internal diameter 20 mm
- Two corners made of tubes (D=18-20 mm, size 50x50 mm)
- Foam rubber 5 and 15 mm thick
Desirable:
- Lighting: carrying lamp or lantern
- A piece of coolant drain hose + adapter tube
- Needle-nose pliers (for unscrewing hard-to-reach clamps)
I draw your attention, dear readers, that for repairs, two tubular angles with a diameter of 18-20 mm (according to the hose diameter) measuring 50x50 mm , which will turn the fluid flow from the fittings upward (they are on the right in the photo):
You can try to do without these corners , but in this case the hoses will be very bent and it is possible that antifreeze will not be able to circulate freely through them. In addition, the load inevitably increases in places of fractures, therefore the risk of leaks increases, which are extremely undesirable in the car interior.
I bought the corners for 50 rubles. in the GAZ spare parts store. At the same time I grabbed a handful of clamps of the appropriate size
Reviews from Lada Kalina owners about the radiator
The opinions of car enthusiasts about the quality of the car’s ODS are basically the same:
- The standard heat exchanger is no worse than its analogues.
- Replacement takes only a few hours, and you can do the work yourself.
- When choosing an aluminum or copper radiator, preference is given to aluminum. This option is cheaper, and the characteristics are not inferior to copper.
- Modernization is possible if you install a more expensive double-row heat exchanger, but modifications to the body are required to install fasteners.
Whether to improve the cooling system or leave everything as is, everyone decides for themselves. If worn parts are replaced in a timely manner, the ODS works without any complaints. Periodic maintenance also helps extend the trouble-free operation of the engine cooling system.