Do you hear a characteristic crunch when turning? It's time to change the constant velocity joint(s) (CV joints, aka "grenades").
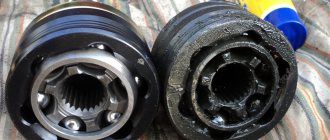
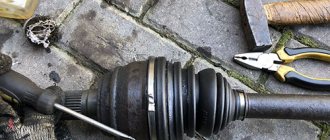
When performing any maintenance or during repair work on elements of the chassis, steering, as well as during a routine inspection, cracks were discovered on the boot of the outer CV joint (constant velocity joint, in everyday life - a “grenade”). After cracks, usually the boot breaks and dust and dirt gets into the CV joint housing, and this is a direct path to replacing the joint assembly, which is expensive and not justified. Therefore, to avoid this circumstance, it is necessary to replace the boot(s) in a timely manner.
To perform this operation you will need the following tools: a 17 mm wrench, a 30 mm wrench, a pry bar and a wheel wrench.
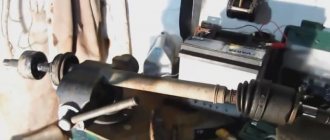
For clarity, as well as for simplicity, we replace the boot on the removed drive shaft. For this:
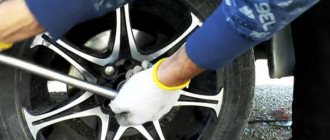
1. Install wheel chocks under the rear wheels and tighten the parking brake lever. We tear off the wheel mounting bolts, jack up the desired side and place a special support stand under the car. Finally unscrew the mounting bolts and remove the wheel.
CV joint (constant velocity joint) is a mechanism that allows you to transmit torque between misaligned shafts. The device is actively used on front-wheel drive vehicles. On each shaft coming out of the gearbox there are two of them - internal and external. Repair is impossible; if the unit breaks down, it is replaced as an assembly.
In what cases is it necessary to replace the inner CV joint?
Replacing the internal CV joint on front-wheel drive VAZ vehicles is required if the following symptoms are present:
- Crunching and knocking noises when driving and accelerating in a straight line;
- Vibration and shock when changing gears;
- Significant play when testing by hand;
- If the “grenade” fails completely, the vehicle cannot move further.
» alt=»»> The main reason for the malfunction of the VAZ “grenade” is the entry of water and dirt through the hole in the torn boot. The second possible cause of failure is a sharp press on the gas with the wheels fully turned, although in this case you risk killing the external rather than the internal grenade.
In addition to the above, replacing the internal CV joint on VAZ-2110 and other models may be necessary if the quality of the previously installed joint is poor.
How to check the CV joint for serviceability with your own hands, signs of failure and ways to solve the problem
A constant velocity joint (CV joint) is a component of a vehicle's transmission that transmits rotation from the gearbox to the drive wheels. The vehicle's controllability and traffic safety depend on its condition. You can check the CV joint for serviceability with your own hands. This is relevant for drivers of front- and all-wheel drive cars, because transmitting torque, this part fails relatively often. Signs and causes of CV joint failure on a car will help drivers find ways to solve the problem.
Hinge design
The transition from rear-wheel drive to front-wheel drive required automakers to develop new technical solutions. The transmission of rotation to the steered wheels is associated with large rotation angles. The driveshaft installed on rear-wheel drive cars could not cope with this task due to the limited turning angle and low efficiency. But, after changes were made to the design, it became the prototype of the modern constant velocity joint.
Automotive parts manufacturers produce two types of CV joints. The first is called "rtseppa" (better known as "six-ball"). It consists of two cages (inner and outer), steel balls and a separator separating them. Thanks to precision manufacturing and minimal clearances, the coupling can transmit high torque at high speeds and rotation angles of up to 60°.
The second type of CV joint is a “tripod”. Its design was developed in Japan, where it is used on some cars. Its structure is somewhat more complicated than that of a rzeppa, but it is capable of transmitting rotation at an angle and moving along its axis. The tripod consists of a body in which a three-rayed star with spherical rollers and a fork with profile grooves are fixedly fixed. The disadvantages of this design are the inability to work at angles exceeding 30°, the complexity of manufacturing and, as a consequence, the high price.
Regardless of the design and manufacturing technology, the drive components must be equipped with a boot secured with clamps and a locking ring to secure the part to the shaft.
Damage to one of them is a reason to check the CV joint (grenade) on the car. The entry of water, sand or dirt into the internal cavity is unacceptable. Foreign substances will cause intense wear on the working surfaces and damage the drive. For your information!
The appearance of traces of grease on the outer surfaces of the boot is one of the signs of a faulty CV joint.
The hinge, whether it be a hinge or a tripod, cannot itself transmit rotation to the wheel hub. It is an integral component of a drive consisting of a shaft and two CV joints (internal and external). The first is made of thick-walled pipe with a diameter of 25-35 mm. The internal one is installed on the gearbox, and the external one on the wheel hub. The first one works at rotation angles not exceeding 30°, which allows you to install a tripod there. A CV joint of the CV type is fixed on the outer side.
Boot replacement and repair
The boot can be changed without removing the grenade if you have special equipment. His work is demonstrated on video. » alt=»»> If you do not have such a device, to remove and replace it, you must perform the above-described procedure for removing the drive and dismantling the hinge. The procedure is necessary if there is even minor through damage on the boot.
Temporary repairs to the CV joint boot can be made without removing it from the vehicle. To do this, you need to thoroughly clean and degrease the damage, then seal it with a piece of rubber and cyanoacrylate-based glue (superglue).
An alternative repair method is to seal the holes with silicone caulk. It should be remembered that it takes a day to completely polymerize.
Note: express repair is a temporary measure. Replacing the inner joint boot may be delayed for a short time, but not completely cancelled. Typically, these types of repair methods are used to get to the point of repair.
Comments
TOP materials of the week
TOP products in the store (more)
Who services your Lada Priora?
Lada.Online
Lada (“Lada”) is a brand of cars produced by JSC AVTOVAZ. Previously, it was used only for export cars, and for the domestic market, cars were produced under the Zhiguli brand. In 2004, the management of AVTOVAZ announced the transition to the Latin alphabet for the official spelling of the names of all cars produced by the plant: Lada - instead of "VAZ" and "Lada".
Lada.Online is the largest Russian-language automotive resource with a daily audience of thousands, which is dedicated primarily to cars of this brand, the domestic automotive industry and the automotive world in general.
This site is not the official LADA website.
© 2022 Lada.Online. Copying of material is permitted only with a link to the source.
Source
CV joint repair
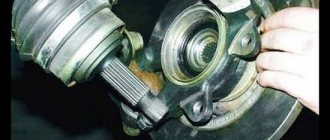
As mentioned above, the hinge cannot be repaired. Conventionally, one of the repair measures includes washing the “grenade” after driving with a damaged boot.
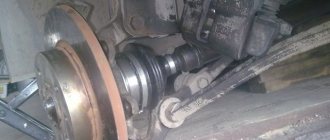
Washing is carried out at the same time when the damaged boot on the pomegranate is replaced. The hinge is carefully knocked off the shaft, inspected for damage and thoroughly washed to remove any dirt and grease in gasoline or kerosene.
After washing, the assembly is filled with lubricant and mounted in place, having previously installed the boot. The procedure makes sense only if there are no obvious signs of a joint malfunction.
A crunchy or knocking part definitely needs to be replaced, since wear forms on the working surfaces of the inner race, and it is no longer possible to stop the destruction. Continued operation of the vehicle may be dangerous for the driver and other road users.
How to extend the resource?
Typically, these bearings travel 250-300 thousand kilometers or more. They have a very durable construction. However, there are several factors that can significantly reduce their durability. This is the condition of the anther. It is because of this that water, dust, and sand get inside. As a result, the lubricant turns into a thick abrasive, which has a destructive effect on the bearing. How to prevent this? During operation, you should periodically check the condition of the boot on the CV joint. If it has cracks or tears, it needs to be replaced immediately.
When is replacement required?
The hinge mechanisms of the Lada Priora, which transmit rotation from the engine to the front wheels, are considered quite reliable and in some cases last 100-150 thousand km. Grenades should be replaced in the following cases:
- The car's mileage is more than 100 thousand km;
- the parts of the unit have become unusable, as evidenced by crunching sounds when turning the front wheels.
The first type of replacement is preventative. Recommended for motorists for whom a car is a tool for making money, which must be constantly in combat readiness and serve without fail. Replacement due to wear is a more common option; it is practiced by most Priora owners.
In order to change expensive CV joint parts as rarely as possible, it is important to promptly detect torn boots, through which dirt and dust enter the mechanism. Grenades cannot be repaired; they only need to be replaced. It is much easier and cheaper to replace leaky anthers so that the assembly lasts as long as possible.
How to check the CV joint? Signs of malfunctions and methods for checking the “grenade”
Front-wheel drive cars are very popular all over the world. Some motorists prefer front-wheel drive rather than rear-wheel drive cars, considering them more convenient and reliable. Front-wheel drive cars use MacPherson or multi-link suspension.
Both of them have a number of positive aspects, they are reliable and durable, and besides, they are not expensive to repair, what else do you need? However, like everything in this world, front-wheel drive is not without its drawbacks; owners of such cars have to more often change ball joints, front wheel bearings, as well as CV joints (constant velocity joints), which, by the way, will be discussed today in my article .
Preparing for work
To replace the grenades, you need a car lift or an inspection ditch, since some of the disassembly work is performed from below. The following tools and devices will be required:
- standard set of socket heads with a knob;
- mount;
- open-end wrenches;
- metalworking tools, which include screwdrivers, hammer and pliers;
- a device that helps press the steering rod ball pin out of its socket in the strut.
If you don’t have a steering rod puller, then it’s easy to find one from fellow car enthusiasts or just buy one; it’s inexpensive. This is a steel cylinder with a slot and a bottom into which an extrusion bolt is screwed. To carry out the replacement in the inspection hole, you will also need a jack with a wheel wrench to lift the car. To completely disassemble the unit, it is advisable to have a vice and purchase CV joint-4 thick lubricant.
Disassembly procedure
The first operation is not removing the wheel, but unscrewing the large wheel bearing nut. It is caulked, so it will be much more difficult to loosen when the car is raised. After this, the wheel bolts are loosened and the car is raised with a jack.
Do not forget to place reliable supports under the rear wheels to secure the car.
If the Priora has a metal sump protection installed, then it also needs to be removed in advance. In addition, it does not hurt to partially empty the gearbox oil sump to avoid liquid lubricant leaking through the open hole after removing the drive.
Installation of new hinges
After disassembling the drive, it is necessary to install new parts and reassemble the transmission in the reverse order. Replacement is done as follows:
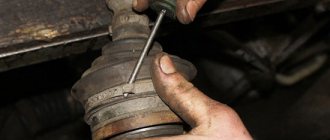
- The small clamp is put on the axle shaft first, followed by a new boot. The clamp must be placed around the end of the casing and tightened. It is better to turn the boot in the other direction so as not to interfere with the installation of the hinge.
- Add SHRUS-4 lubricant to the hinge mechanism. According to the instructions, there should be at least 40 cm³ in the outer grenade, and 80 cm³ of thick lubricant in the inner grenade.
- Place the grenade on the shaft, making sure the splines match. Using a wooden adapter, press it as far as possible with gentle hammer blows.
- Pull the boot onto the grenade, apply a large clamp and tighten it. In the same order, the operation is performed on the other side of the axle shaft.
Now the drive assembly can be put into place. In order not to confuse the hinges, you should follow the mark placed on the axle during disassembly. The assembly is mounted into place from the inspection ditch, the splined part of the internal grenade being inserted first. To seat it in the slots all the way, you will have to rest the axle on the lower lever and apply several blows with a hammer through a piece of wood from the other side. Further assembly proceeds in reverse order.
Removing the ball joint
It is necessary to disconnect the stand from the lever. To do this, you need to unscrew the ball joint. Either from the lever or from the stand. It is more convenient to unscrew the two bolts from the rack. Which secure the ball joint.
If you unscrew the nut from the lever, the ball joint will not come out. The finger is a cone. A puller is required for removal. Or you will have to apply strong blows to the junction of the lever and the finger. The boot may be damaged. After the bolts are unscrewed, it is imperative to pay attention to the ball joint. It shouldn't be loose. If you crank. It should sit tightly in the ball. If it dangles and there is play. The ball joint must be replaced immediately. To do this, unscrew the nut and use a puller to remove the ball joint pin. You can simply apply a few sharp blows with a hammer to the side of the lever. Where is the pale inserted?
Since the connection is conical. As a result of the impact, the hole will be deformed and the finger will be squeezed out. But this is a rough option. And it doesn’t always help to use a special puller. After the strut is disconnected from the lever, you can pull the CV joint out of the hub.