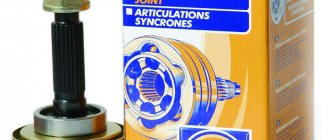
In front-wheel drive cars, one of the most problematic areas is the constant velocity joints. Abbreviated as CV joint or "grenade". The CV joint is a kind of ball bearing; its races have transverse grooves, which allows you to change the angle between the drive and driven axle shafts. All elements of the CV joint are made of ultra-strong alloys, the wear of which occurs extremely slowly, but, as practice shows, signs of a CV joint malfunction can appear even in a car that has recently left the assembly line of a car plant.
On cars of the VAZ family, it often becomes unusable after
55,000 km .
How to replace a VAZ-2115 CV joint
It's sad when something goes wrong with your car and it needs repairs.
Extra waste of time and money that does not fit into the schedule and budget only causes a feeling of annoyance. Few people will be happy that something has broken down in the car. Even if it was obvious that a breakdown was about to occur, there was no joy from this event. Sometimes you don’t understand: what’s wrong, what’s creating interference and obstacles? Interruptions in work are a signal for comprehensive diagnostics, but somehow everything is not on the way to the car service, and it would be nice not to forget, but it is forgotten. You have to take a risk, postponing a trip to a car service center until later, although it is known that a car in a faulty condition is dangerous to the life and health of the driver himself and the people around him. Driving carefully is perhaps the most important thing if any problem makes itself felt. Not everyone has the useful skill of self-diagnosis.
Negative emotions in connection with a car breakdown are a natural reaction. It’s still not worth following their lead. Wear and tear is inevitable. Constant care, attention, and careful attitude will allow you to delay this moment and drive more kilometers. A well-maintained car is a source of positive emotions, regardless of the brand.
Let's sum it up
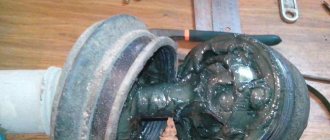
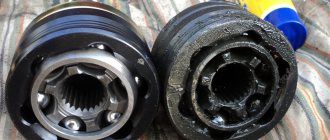
Taking into account the design of the CV joint and its purpose, it becomes clear that the grenade boot plays a vital role. This seemingly simple element protects the CV joint from water and dirt. In turn, damage to the integrity or slipping of the boot will cause the sand to act like an abrasive, and water will lead to corrosion, leaching of lubricant, etc.
The result is crunching, rapid wear and the need for premature replacement of the outer or inner grenade. Of course, in order for this element to serve as long as possible, the condition of the grenade anthers must be monitored at every maintenance. Even the slightest defects in the form of cracks, breaks, deformation, etc. are not allowed.
CV joint needs to be replaced
VAZ-2115 is a beautiful economy class car. Of course, many people dream of a luxurious and spectacular foreign car. The VAZ-2115 car may lack gloss and shine, but it is characterized by lightness and elegance. Good build is another feature. But not everything is so smooth. Nothing lasts forever, and this means of transportation begins to bother you over time.
A CV joint is a part whose load is high. This is a constant velocity joint, an element that is fragile and strong at the same time.
Sometimes it breaks and needs repairs. But how can you determine that it is he who is causing trouble? Millions of reasons sometimes provoke the same failure. Should a driver take on the job or is it better to go to a service station? In order to make the right decision, you need to carefully weigh the pros and cons.
Order of Operations
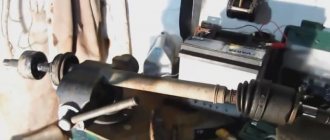
Replacing the outer CV joint of a VAZ 2114, 2113 or 2115 is similar to working with an internal grenade. They are located on the shaft drive, which must be reached by performing many operations:
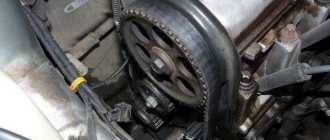
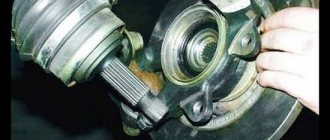
- To replace the outer CV joint of a VAZ 2114, if there is no inspection hole or overpass, you need to jack up the car and unscrew the bearing nut. IMG3
You need to remove the wheel; it can be used together with a jack for support.
Now you need to unscrew the 2 brake caliper bolts. One is located at the top, the other at the bottom.
The next operation is to separate the brake pads. This can be done using a flat-head screwdriver.
You need to remove the brake caliper along with the caliper and pads. The entire knot needs to be tied so that it does not hang.
Now unscrew the steering end nut and press it out using a puller.
Unscrew the two ball joint bolts, remove the wheel bearing nut, and remove the washer.
Now you need to unscrew the ball joint fastening in the direction of the steering knuckle, remove the grenade from the bearing hole, and pull out the shaft. If jerking doesn’t work, we help with a screwdriver. If the oil is not drained before work, the hole can be plugged with a rag.
The shaft needs to be carefully cleaned of the old grease, remove the old ring, put on a new boot, a new retaining ring.
Take a new grenade, squeeze new lubricant into its cavity, spread it over the surface, and install the hinge on the shaft.
Now you need to hammer the grenade onto the shaft. This is done using a punch. You need to pull the boot onto the CV joint, fix the clamp against the direction of movement of the car, and compress it using pliers.
The small clamp is fixed identically. Now you need to install a new retaining ring on the hinge. The unit is ready for installation. The CV joint together with the shaft is inserted into the box. If you used a rag, you must first remove it.
Further steps are performed in reverse order. Also see the sequence of replacing the VAZ 2114, 2113 or 2115 CV joint in this video:
Symptoms of a problem
You can determine that a CV joint has broken based on certain signs. Diagnostics in this case does not cause problems. There are characteristic symptoms. If they appear, you need to look at the condition of this particular part.
The breakdown is accompanied by:
- crunching under the wheels;
- jerking when changing speed or starting to move.
It is the crunch that is easiest to notice, and it is this sign that you should focus on first when making a diagnosis. But how can you distinguish the sound emanating from the outer element from the sound made by the inner CV joint? You can check the condition of the external one by turning the steering wheel all the way and starting to drive. A crunching sound while driving in a straight line indicates a malfunction of the inner CV joint. You can also check the condition of this part by lifting the car and spinning the wheels idle. The sound that appears is a 100% guarantee. One of the CV joints is faulty.
If crunching or jerking occurs, you should also inspect the mechanism. The boot may have cracked. A visual inspection will allow you to find cracks, chips, deformation and it will become clear what is wrong and what to do.
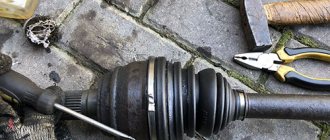
Removing the drive shaft
Next they move to the wheel arch and from there they take out the drive shaft, which already has an internal and external hinge. Using pliers, remove the clamps holding the boot from the parts. If the latter is destroyed, then it is torn apart. Otherwise, you can just move it to the center. If the boot is torn, the inner CV joint boot will need to be replaced. These parts are sold separately and are included with the spare part. To remove the joint from the drive shaft, you need to hit the inside with a hammer. After a few blows, the part will fly off the shaft. The same operation must be done on the other side.
Fix the breakdown without the help of a specialist
In order to determine whether it is worth going to a service station or doing it yourself, it would be good to know how to replace a CV joint on a VAZ-2115. What is better - to overestimate your strength or underestimate? Some people like to repair their cars; in the old fashioned way, they don’t trust this activity to anyone; others consider it a relic of past years. Many people used to understand mechanical engineering. Both adults and children wanted to create a robot. Having bought a car, we traditionally explored it with pleasure.
The CV joint is completely changed. So there’s not much to tinker with: you don’t need to take it apart, examine the device, or look for any element. Buying a CV joint, both external and internal, is not a problem. The boot is also easy to find, but that’s not what we’re talking about now.
The algorithm of actions is as follows:
- Secure the vehicle using the parking brake.
- Place locking bars under the rear wheels.
- Remove the protective cap and unscrew the hub nut.
- Loosen the wheel mounting bolts.
- Now the car should be raised with a jack.
- It is necessary to remove the bolts that secure the ball and steering knuckle.
- The drive must be pulled out of the hub; the steering wheel must first be turned to the left.
- Cut off the old boot and remove the CV joint.
- Put on a new CV joint, carefully treating it with lubricant, which will help extend the life of the part.
- Put all the parts back in the reverse order.
The procedure is not complicated. But physical strength is needed here. You will also need ingenuity - only an auto mechanic, to whom experienced craftsmen and teachers have revealed their secrets, knows how best to do all this. But if you repair a car for your own pleasure, without knowing absolutely anything about the CV joints and the nuts that hold them together, fantasy and imagination will come in handy, as well as confidence, clarity of movements, good emphasis, and reliable fixation of the car.
Damaging adjacent parts and aggravating the situation is difficult and yet real - we must remember the risks and potential threats. There is a possibility of injury. Caution comes in handy when repairing your car yourself, no matter how simple or complex the procedure. When replacing a CV joint, it is better not to rush, prepare for the fact that the process will take several hours, and have time. The replaced CV joint will work properly for a long time if you monitor the road and the condition of the boot.
About anthers
Their replacement is required much more often than the hinges themselves. The resource of the CV joint is about 150 thousand km. At best, a rubber product lasts no more than 30 thousand km. To replace the outer boot, it is not necessary to dismantle the drive. But if you need to replace the internal CV joint on a VAZ-2114, you will have to dismantle the entire drive.
11 Weird Signs That You're Good in Bed Do you also want to believe that you please your romantic partner in bed? At least you don't want to blush and apologize.
Contrary to all stereotypes: a girl with a rare genetic disorder conquers the fashion world. This girl's name is Melanie Gaydos, and she burst into the fashion world quickly, shocking, inspiring and destroying stupid stereotypes.
13 signs that you have the best husband Husbands are truly great people. What a pity that good spouses don't grow on trees. If your significant other does these 13 things, then you can s.
What is it like to be a virgin at 30? I wonder what it’s like for women who didn’t have sex until almost middle age.
Our ancestors slept differently than we do. What are we doing wrong? It’s hard to believe, but scientists and many historians are inclined to believe that modern man sleeps completely differently than his ancient ancestors. Initially.
7 Body Parts You Shouldn't Touch with Your Hands Think of your body as a temple: you can use it, but there are some sacred places that you shouldn't touch with your hands. Research showing.
How to understand that a grenade will soon break in a couple of interesting ways
Of course, the first sign of a malfunction of the external grenade is a crackling sound. If you hear a crackling noise while driving with the steering wheel turned, it is definitely a CV joint. The greater the angle of rotation of the wheel and the harder you press on the gas, the louder the clicks.
Another sign that does not always appear is vibration on the steering wheel at speeds greater than 80 km/h. The vibration is only slightly similar to the vibration from an unbalanced wheel. It usually manifests itself as a slight twitching of the steering wheel.
How to understand that the outer CV joint has broken.
If the CV joint breaks, the car will stop moving. In any gear engaged, press the gas, the speed increases, but the car does not move.
How to understand that it is the outer CV joint that has broken, and not the internal one or the clutch in general (the first signs of failure are similar to the signs of a clutch failure)? First of all, start the car and put it in any gear. Next, open the hood and look in turn at each of the shafts going from the box to the wheels (one short, the other long). If any shaft is spinning, it means that the CV joint has broken on this side.
I recommend not just visually looking at the shaft, but touching it with some long, hard object, such as a stick. The main thing is that there is nothing on it that can wrap around the shaft!!! When you touch the shaft with a stick, if it is spinning, you will feel a slight vibration. This is usually done in the dark, because it is difficult to understand whether a cylindrical object is spinning, especially in the dark.
Consider the device
The stable availability of spare parts for any domestic cars in stores, and their quite affordable price, makes the repair (replacement) of a CV joint not costly, both financially and in terms of time. However:
- You should take into account that replacing a boot in terms of the volume of work performed is no less than replacing a grenade on a VAZ 2115
- That is why in practice, due to the labor intensity, replacing the boot cannot be called easy, in addition, you will need skills in using metalwork tools and following the rules in accordance with safety requirements when starting to perform such work
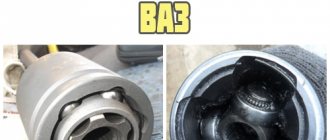
- CV joint, also called a “grenade” for its peculiar shape, its task is to transmit torque from the box to the wheels of the car, the design of the CV joint is not complicated, it consists of the main seven elements, photo below
The main elements of the CV joint and the CV boot (boot)
- However, although its service life is designed for a long time, replacing the VAZ 2115 CV joint is a procedure that has to be performed quite often and this largely depends on the intensity and operating conditions of the machine
- The need for replacement arises when play appears in any connections of the device, or when there is a characteristic crunch and crackling sound when turning the wheels.
- Replacement is usually carried out after checking and confirming the version of the CV joint malfunction, and you need to diagnose it to make sure that the whole problem really lies in it
How to remove a vaz shruz
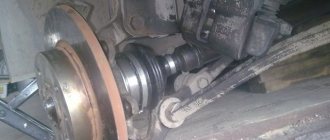
Having determined that it is the external grenade that is broken, we begin to remove it.
How to unscrew the hub nut on a VAZ?
First of all, unscrew the hub nut. To do this, take a 30mm head and a lever, the larger the better. We put bricks under the wheels to prevent the car from rolling (simply putting it in gear is not an option, the wheel will spin) and begin to unscrew the hub nut.
In this matter, the more you weigh, the better, since I very often lacked my weight and leverage of about one and a half meters. I got out of the situation in the following way: I stood completely on the lever, as close to the edge as possible, thereby giving maximum tension to the nut, and hit the lever with a hammer. Usually this method helped me unscrew even the most soured wheel nuts.
One more nuance: if the outer walls of the head come into contact with the walls of the hub, it is better to lubricate the head with mining or lithol, or, in extreme cases, with silicone grease. Thanks to this trick, the head will not bite in the hub.
How to remove a grenade?
The hub nut is unscrewed, now we remove the wheel, unscrew the two bolts that hold the ball joint, disconnect the suspension arm and the hub, move it to the side of the car while lightly tapping the grenade, remove it from the hub. At this point there are two options:
- The grenade is already broken.
- Replacing the grenade due to its crunching sound.
In the first case, you simply remove the outer part of the CV joint from the shaft, then the retaining ring from the drive shaft and knock off the cage with a hammer.
In the second case, removing the CV joint becomes more difficult. You need to deflect the grenade relative to the shaft at the maximum angle so that the bearing balls and their cage are visible.
Now use a hammer to break the jumpers of the cage between the bearing balls and take out the balls one by one. When you take out the last ball, you can remove the body of the grenade, and then its inner part sitting on the shaft, after first removing the locking ring from the shaft.
Of course, you can simply try to knock the grenade off the shaft, but due to the locking ring this will be problematic.
That's it, the CV joint is completely removed. Now let's start installing the new part.
Diagnostics
Before we start replacing the CV joint with our own hands, we usually carry out simple diagnostics by first checking for play in the shaft of our drive, and all we need are our hands, as well as an understanding of what play is. There are several ways to check:
- Method one - grab your drive shaft with your hand and swing it, when you feel a lot of free play or play - this means you need to replace the CV joint
- Method two - we go to the inspection hole and turn the steering wheel to the right as much as possible or to the left (as necessary), then we carefully look at the condition of the “grenade”, if there are cracks or visible breaks on its boot, traces of grease protruding, this means that the boot needs to be replaced, otherwise the entire CV joint will soon need to be replaced
- We buy a new “grenade”, the price is affordable