Print this article Font size 16
A CV joint is a constant velocity joint. It is a loaded, very significant element of the chassis for front-wheel drive VAZ 2109. Under ideal operating conditions, the resource of the element is designed for a long service life, almost equal to the service life of the car itself.
Causes and breakdowns
In reality, the resource of the CV joint turns out to be significantly less, which is caused by operating conditions, poor quality of roads, driving habits and other factors.
People usually call a CV joint a “grenade,” which is due to the external similarity of the element to this explosive device.
Here's what you should know about grenade malfunctions:
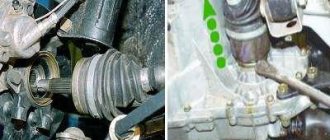
- Practice shows that the most common cause of CV joint failure is dirt, dust, and sand that enter the mechanism through a damaged boot;
- Sometimes the problem of a non-functioning grenade can be solved by replacing the boot. This is possible if the CV joint itself has not yet worn out due to exposure to contamination;
- If the damaged boot is not detected in time, the grenade will be completely worn out within literally 200 kilometers;
- If the CV joint fails, a strong crunching sound appears when cornering and accelerating. Such a symptom indicates the need to urgently replace the CV joint;
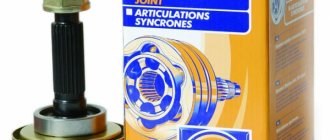
- The cost of new grenades is quite affordable; they are available at any auto parts store. But you should purchase those that meet the technical requirements of the VAZ 2109;
- If you have at least a little experience in repairing cars yourself, it is quite possible to replace a grenade with your own hands.
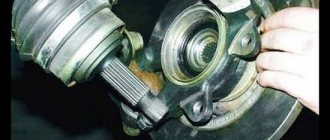
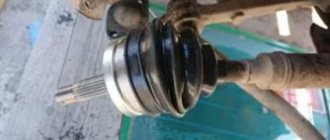
Old and new element
Shall we get started?
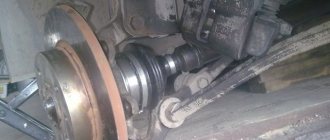
Before replacing the mechanism, you need to drain all the oil from the gearbox. Let's not touch the jack yet! You need to place a brick under the rear wheel of the car, after this procedure we take the 30 socket and, accordingly, loosen the nut. Don't be alarmed, you may need about a half meter long piece of pipe half a meter long as a lever. Remember, we only need to loosen the nut, not remove it yet!- Everything worked out? Go ahead! We lift the car with a jack, and only now completely remove the hub nut along with the washer. Now you can safely remove the wheel from the hub.
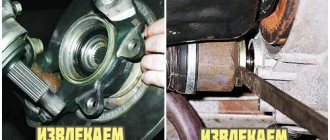
- Take the 13mm head and remove the two bolts that secure the ball to the hub. After this, we move the hub and remove the outer grenade from it. Then we attach a pry bar to the internal grenade and, using hammer blows, knock it out of the gearbox. By the way, if you still don’t have a pry bar at hand, a piece of pipe can replace it.
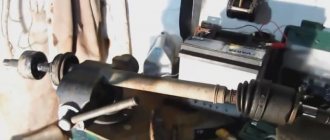
- When the grenade is removed, we clamp its shaft in a vice.
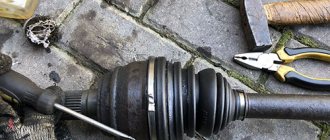
- We remove the clamps from the unusable boot. After that, we shoot down the outer grenade. Attention! In order not to damage it, you need to hit it along the edge. When this operation is completed, remove all old grease from the mechanism, wash it in gasoline or kerosene and wipe it well again, this way you can better remove traces of grease.
- Now we put a new boot on the drive shaft, and using a hammer we hammer the outer CV joint back, after thoroughly lubricating all the parts of the product. After that, we put it on and tighten it with a collar.
- Then we insert the grenade into the gearbox, driving it there. We place it in the hub and return the ball to its place. We put on the hub nut.
Attention! The hub nut does not need to be tightened with great force. After installing the wheels, tighten the bolts without applying much physical force.
- We remove the car from the jack, place a brick under the front wheel and tighten the nuts tightly.
- Well, now pour oil into the gearbox.
That's all. Congratulations! Replacing the boot on the VAZ-2109 is complete!
Types of CV joints
Before you begin repairs, you need to find out exactly how the unit is designed.
The pair of drives on the VAZ 2109 is equipped with a total of 4 CV joints.
| CV joint type | Peculiarities |
| Interior | There are 2 of them. They transmit torque to the axle shaft from the gearbox |
| Outer | There are also two of them. Installed on the ends of the axle shafts and transmit torque directly to the wheels |
Outer
This arrangement of grenades allows the wheels to rotate during turns and constant operation of the suspension system. To put it simply, the outer CV joints are responsible for transmitting torque when cornering, and the inner ones are responsible for the vertical movement of the wheels. These are collisions with bumps, holes, roll in turns, etc.
Interior
Drive shaft assembly process:
- take a new dust cover and put it on the shaft;
- we drive the CV joint onto the splines, after filling it with new lubricant;
- put the boot on the bearing and tighten the clamps;
- We install a plastic plug at the end of the inner CV joint shaft;
- Before mounting the drive in place, install a new retaining ring on the inside of the drive shaft;
- insert and snap the shaft into the gearbox by lightly tapping the shaft with a hammer, preferably through the spacer;
- We insert the outer side of the drive shaft into the splined joint of the hub. We put on the thrust washer;
- be sure to install a new hub nut;
- tighten the nut tightly. If you have a torque wrench, the tightening force should be 25 kg/cm;
- We tighten the nut with a chisel, jamming its edge. To prevent spontaneous unscrewing of the nut;
- reinstall the protective cap of the hub nut;
We carry out the entire procedure for replacing CV joint boots on a VAZ-2109 on the other side of the car, in the same sequence.
After installing the drives, you need to check the reliability of the connections by holding the drive with your hand and shaking it in different directions. In this case, no backlash should appear. Also, play is unacceptable in hub bearings. The wheel should rotate freely, without any difficulty.
With timely detection of defects and replacement of boots, the service life of components and drive mechanisms of your car increases.
Detailed video instructions:
Replacement
If problems arise with grenades, you should determine which ones have problems. Next we will look at how to change the drive and how to remove it. Additionally, we recommend watching the repair manual video.
The procedure for replacing inner and outer CV joints differs from each other, therefore each stage should be considered separately.
Let's start with the internal.
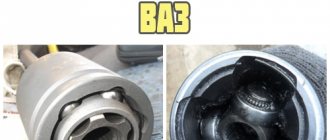
Inner CV joint
Rubber boots are a vulnerable element of the grenade design. It is not uncommon that by replacing the boot, washing the grenade with gasoline and applying new lubricant, it is possible to solve the problem. If the wear of the CV joint is insignificant, such measures can replace a full repair.
But if you discover the breakdown late, you will have to completely replace the inner CV joints.
- Apply the handbrake and install chocks under the wheels.
- Unscrew the hub nut using a wrench and a socket. Carefully remove the punching elements from the nut with a punch. This way you will be able to preserve the carving on the garnet. The nut itself will need to be replaced with a new one during reassembly.
- The main thing here is to unscrew the nut, lowering the wheels to the ground. Otherwise, you risk breaking the differential and other gearbox components.
- Raise the car using a jack on the desired side, first loosening the wheel nuts. Remove the wheel.
- Drain the gearbox oil. This can be done earlier, at your convenience.
- Release the steering knuckle from the ball joint at the bottom. To do this, unscrew a pair of mounting bolts.
- Since you have already removed the hub nut and unscrewed the ball joint from the steering knuckle, proceed to removing the splined part of the grenade. To do this, pull the brake disc and strut assembly towards you. She has a decent ride. Just remember to turn the steering wheel all the way so that the tip of the steering wheel extends as far as possible.
- Pry the inner grenade with a pry bar, which will allow you to remove the drive.
- Having taken out the CV joint, look at the condition of the oil seal in the gearbox. If you find traces of leaks, be sure to replace the element.
The internal drive (CV joint) is designed to work with smaller angles, its boot is less susceptible to negative influences. Therefore, the internal grenade is changed quite rarely.
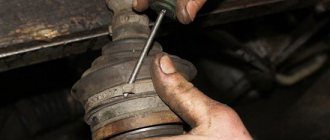
How to check the condition of the anthers yourself
This procedure is very simple and does not require special skills. A visual inspection for breaks, cracks and lubricant leaks is sufficient. To do this, you need to turn the front wheels of the car in either direction and carefully inspect the rubber dust covers.
If any damage or lubricant leakage is detected, the covers must be changed as soon as possible.
Otherwise, the drive shaft (CV joint) of the car will quickly fail.
This is interesting: How to properly charge a car battery with a charger
Preparation
So, damage to the boot on the VAZ 2199 has been identified. You can replace it and wash the CV joint itself in the garage, the main thing is that there is an inspection hole.
Tools you will need:
- Set of wrenches (socket wrenches, open-end wrenches);
- Set of heads and collars;
- Metal brush;
- WD-40;
- Mount;
- Hammer;
- Jack;
- Wheel chocks;
- Wooden coasters.
You will also need a new boot, CV joint grease-4, a container for collecting oil, a container with gasoline for washing the CV joint, and rags.
It is better to do all work together with an assistant.
For convenience, we will describe the process of replacing the external boot on the left side. The replacement work on the right side is identical.
The drive is removed, what next?
The drive surface is cleaned with a metal brush and rags.
Then the clamps securing the boot are removed, and it is cut or removed using a screwdriver.
The CV joint is wiped clean of grease and then becomes loose.
To do this, it can be clamped in a vice or held suspended with the outer “grenade” down, and an assistant knocks it down with a drift and hammer.
After this, you need to check the condition of the retaining ring at the end of the shaft and replace it if necessary.
The removed hinge is thoroughly wiped and placed in a container with gasoline for washing.
The new boot is placed on the shaft.
The washed CV joint sits on the shaft splines and is then driven onto the last one.
It needs to be hammered through a wooden spacer.
Don't forget about lubrication.
Before pulling the boot onto the CV joint, CV joint-4 lubricant is placed inside it, as well as inside the hinge. After this, the boot is put on the “grenade” and secured with clamps.
Then all that remains is to put everything back in place.
The drive is driven into the gearbox using a hammer and a wooden spacer.
The hub is put on the splines of the outer CV joint and the nut securing it is tightened.
The lower ball joint is screwed into place. The wheel is installed.
After this, you need to check the tightness of all the bolts and nuts that were unscrewed.
The crankcase protection is screwed on, the car is removed from the stands, and oil is poured into the gearbox.
The same sequence of work applies to the drive of the other side.
Where does the repair begin?
First, you need to drive the car onto a viewing hole or overpass, place safety chocks under the wheels and secure the hand brake. After this, unscrew the drain plug on the gearbox housing and drain the oil (a good reason to replace it) into a suitable container.
Tools and accessories
- a set of keys
- mount
- screwdrivers
- jack
- stops
- stand
- oil drain container
- vice
Removing the wheel and lower support
Before lifting the front of the car, you should remove the wheel bolts, since this will be quite problematic after lifting. Next, using a jack, raise one side or the entire front of the car.
Attention! Do not forget to place a reliable support under the body.
After this, unscrew the bolts and remove the wheel. Now you can begin dismantling the hub. To do this, carefully remove the protective cap with a screwdriver, unscrew the nut and remove the lock washer. To prevent the hub from turning, it is necessary to push the brake pedal all the way down and secure it with a block or get an assistant to do this.
Removing the support is quite simple: using a 17mm wrench, unscrew the two mounting bolts. It is recommended to use a spanner or socket wrench rather than an open-end wrench. Since the bolts can become very rusty during operation, you should use a “Vedashka”. After 5-10 minutes of treatment, they will turn away quite easily.