Hello everyone, today we’ll talk about CV joints. In this article I will tell you how to identify a problematic CV joint, as well as how to replace the CV joint boot on a Kalina at home.
I once already talked about how to replace the CV joint on a VAZ 2108. Today everything will be almost the same, only this time we will not change the CV joint, but only the boot, and not on the V8, but on the Kalina.
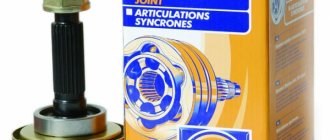
A few words about what a CV joint is. This abbreviation hides four words - constant velocity joint; people usually call it a “grenade” because of its external similarity. This clever mechanism is necessary in order to ensure the transmission of torque from the gearbox to the wheels. The CV joint design allows the wheels to rotate at different angles, up to 70°.
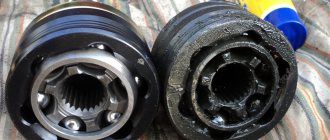
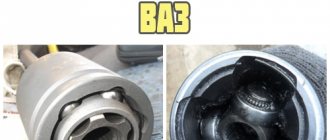
The “grenade” mechanism is carefully hidden under the boot, inside of which there is lubricant. After several years of operation, the rubber boot of the CV joint becomes unusable, cracks form on its surface, through which the lubricant leaks out, and instead of it, dirt and moisture get inside. If damage to the boot is not detected in time, you can “ruin” the constant velocity joint itself, which is very “afraid” of sand, dirt and water that gets on its rotating parts. Therefore, it is cheaper to replace the CV joint boot than to hold out until costly repairs are required.
What is CV joint
The abbreviation CV joint stands for constant velocity joint, which ensures the transmission of torque from the gearbox to the wheels. People call the CV joint a grenade because of its purely visual similarity.
Thanks to its design, the CV joint allows the wheels to rotate at different angles up to 70 degrees. The CV joint itself is protected by a boot. If the machine is used for a long time, for example, several years, the rubber boot of the CV joint becomes unusable, tears and cracks appear, the lubricant gradually leaks out and mixes with dirt. To prevent the CV joint itself from breaking, which simply cannot tolerate sand and dirt, it is necessary to check the condition of the boot from time to time, and, if damage is detected, replace it in time. Otherwise, this may lead to breakdown of the CV joint itself, and its replacement will be more expensive. For those who are going to replace the CV joint boot for the first time, I advise you to watch this video:
Basic information about LADA Kalina
LADA Kalina has been produced since 2004; production of the popular second-generation car began in 2013. Kalina-1 is available in three body types: hatchback (model 1119), sedan (model 1118), station wagon (model 1117). There are cars available with petrol engines of three modifications: a 1.4-liter 16-valve engine with a power of 89 hp. s., 1.6-liter 8-valve engine producing 81 hp. s., 1.6-liter 16-valve engine producing 98 hp. With. The LADA Kalina-1 has only a manual transmission with five gears. The front axle has a classic MacPherson suspension, the rear axle has a beam with stabilizer, springs, and shock absorbers.
Typical faults of LADA Kalina-1
Significant malfunctions with Kalina rarely occur, but there are a lot of various undesirable trifles. The car’s clutch is not very reliable and has an impressive service life, regardless of the type of engine, so it can malfunction after 40-50 thousand kilometers. The main source of malfunction is a broken clutch disc.
You need to constantly monitor the oil level in the engine - sometimes it leaks through the gaskets or burns through the piston rings. On the instrument panel there is only an oil pressure warning light, but there is no dial indicator. If the indicator lights up all the time, there is a possibility that the crankshaft is knocking.
A common malfunction of VAZ gearboxes is increased noise. It is difficult to get rid of the humming of the gearbox; sometimes neither replacing the bearings nor refilling with first-class transmission oil comes to the rescue. The transmission is noisy even in new cars, because of this the Volzhsky Automobile Plant has repeatedly completed the transmission.
A problematic element since the days of the VAZ 2108 and VAZ 2109 has been the thermostat in the engine, moreover, the valve in the thermostat was capable of jamming in any position. It's annoying when the engine doesn't heat up to the required operating temperature, but if the engine overheats, it's more problematic.
Electrical problems on LADA Kalina appear mainly of three types:
- the ignition module is often damaged;
- very soon the bearings and diode bridge “die”;
- The window lift cable on the driver's door breaks.
When the ignition coil sparks, the first and fourth cylinders or the second and third cylinders stop functioning. The ESP cable breaks when it falls off the guides.
The main source of cracking noise in outer CV joints is insufficient lubrication; At the factory, in order to save money, they put it in sparingly. The consequence of this is severe wear of the hinges, and as a result, the “grenade” needs to be replaced.
A broken timing belt is a very annoying problem. And if on the 8-valve engine 21114 it is possible to change the belt drive and move on, then on engines 11194 or 21126 the valves bend from the oncoming push from the pistons, repairs will be quite expensive. In addition, a break can occur through a jammed water pump, because of this, if the pump begins to make noise, it must be replaced immediately.
How to determine that the CV joint boot needs to be replaced?
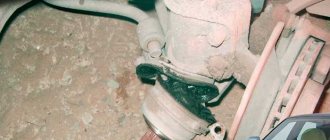
The method is simple: you need to go to the pit and inspect the boot; if it is dry and no traces of oil are visible, then everything is in order and replacement is not required yet.
If, after checking, you find that there is a malfunction and a replacement is needed, then you will need the following tools: 1. Jack, hammer, wooden block; 2. Keys for 17 and 30; 3. Mount, balloon; 4. Flat screwdriver, special pliers for installing clamps; 5. New boot + CV joint grease, graphite grease, kerosene or similar flushing fluid.
There is a situation when, during a sharp start, a single knock or crunch is heard in the area of the front wheels. Most likely, you are already too late and will have to change the CV joint itself.
Disassembly algorithm
When a decision is made to dismantle the outer CV joint for replacement, proceed according to the following scheme:
- Using a gate extension, the wheel bolts are torn off and the hub nut is unscrewed.
- The car is lifted off the floor with a jack.
- The wheel is dismantled.
- The fastener of the ball joint is unscrewed.
- Having turned the steering wheel as much as possible, you need to press the steering knuckle and remove the hub with the hinge. In this case, you can help yourself a little with a hammer.
- The damaged protective cover and clamps are removed from the grenade.
- To dismantle the CV joint, special equipment is used. If it is missing, the hinge can be knocked down with gentle blows of a hammer.
How to replace the CV joint boot on a Lada Kalina
In order to simplify the replacement of the CV joint boot, it is better to carry out the work on the removed axle shaft.
- Tighten the handbrake and place chocks under the rear wheels. It is very important that the machine is parked on a level surface.
- We take the balloon and begin to remove the wheel. Don't rush to jack up the car; remove the bolts while the car is standing on four wheels. After this, you can jack up one side on which the work will be done. It is dangerous to work on a jack, so be on the safe side and place a block or metal jack under the car.
- If there are wheel arch liners, use a screwdriver to pry up the protective cap and remove them.
- We place a container under the drain hole of the gearbox, unscrew the plug and drain the transmission oil.
- Now we unscrew the fastening bolts, thanks to which the ball is attached to the steering knuckle - there are two of them.
- Unscrew the hub nut. To do this, you need to fix the hub; to do this, just press the brake pedal. Here you need to ask someone to press the brake pedal.
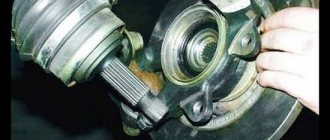
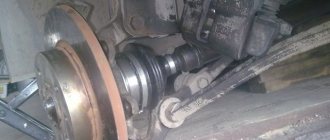
We need to get the thrust washer, this is not difficult to do, after which we turn the wheels to the extreme position (this depends on which side the replacement is happening from) and carefully squeeze the outer CV joint out of the hub. To prevent the drive shaft from falling, it is better to hang it with a piece of wire.
8. Using a pry bar, with one hand we press the inner CV joint out of the box, and with the other hand we hold the drive shaft itself.
Important note! If you need to remove both drive shafts, you should insert the old CV joint into the box before pressing the second shaft in its place. If you do not do this, the alignment of the side gears will be disrupted, after which you will not be able to install the drive shaft.
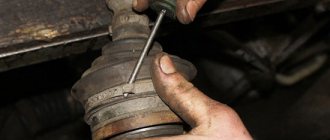
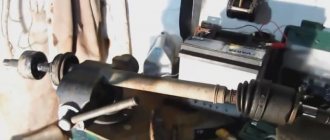
- Now comes the most painstaking work where we will need a vice. We take the drive shaft and fix it in a vice. Using a screwdriver, remove the old clamps and cut off the old anthers if they are damaged. If they are still suitable for use, there is no need to cut them.
- Next, using a hammer and a soft metal or wood socket, knock the outer and inner CV joints off the drive shaft.
Grenade
The Kalina CV joint or “grenade,” as car owners call this unit in driver’s slang, is a mechanism that transmits rotation to the wheels. Structurally, grenades are quite simple, while ensuring rotation of wheels that are not located parallel. The functional unit is securely covered under a ribbed cover containing lubricant inside. After several years of hard work, the rubber boot of the hinge exhausts its service life: its surface becomes covered with tears, allowing lubricant to seep out, and dust and water begin to actively penetrate into the unit from the external environment. If the defect that has arisen is not detected in a timely manner, the Lada Kalina grenade can very quickly fail, since the mechanism does not tolerate moisture, sand and dirt falling on the contacting surfaces. Prevention is always cheaper than treatment, so it will be much cheaper to change the boot than to wait for a breakdown and replace the entire device.
How do you understand that the CV joint boot needs to be replaced?
Well, let’s finish this brief excursion and move on directly to the troubleshooting process, but first, prepare the tool.
You will need:
- Jack, hammer, wooden block;
- Keys to “17”, “30”;
- Mount, spray can;
- Flat-head screwdriver, special pliers for installing clamps;
- New boot + CV joint grease, graphite grease, kerosene or similar flushing fluid.
Gearbox lever rattling
For LADA Kalina, a typical malfunction is rattling in the area of the gearshift lever, which mainly becomes noticeable when the engine is running at speeds of about 3000. The source of the side sound is the bushing, which is made a little thicker than necessary, and because of this, a gap appears in the mount. To resolve this problem you need to do the following:
- remove the handle cover, which is attached with latches;
- using two 13mm wrenches, unscrew the nut and bolt;
- remove washers and bushings;
- to eliminate rattling, the bushing in the middle needs to be slightly sharpened in width or the mount should be lubricated with sealant;
- Having done this, mount everything back. The sealant does not help out every time, but if you sharpen the bushing by 0.3 mm, the result is guaranteed.
It’s safe to say that repairing a Lada Kalina car yourself is not so scary. Every car enthusiast has the opportunity to eliminate minor malfunctions of this car. You just need to believe in yourself, follow our advice and everything will work out!
Driving type
It has been noticed that aggressive driving can finish off grenades much earlier than the allotted time. If careful drivers sometimes have grenade boots that last for 15 years, then a reckless driver will have to repair the unit after only 3 years. The service life of hinges and anthers can only be extended by periodic visual monitoring of the condition of the protective covers, as well as a quiet ride.
- Improving the hood of the Lada Kalina car
- We screw the fog lights on the Lada Kalina
- Selection of covers for Kalina
- Optimal tire pressure for Lada Kalina
- Spare parts and accessories for Kalina
- Guide to replacing Kalina brake pads
Repair methods
We have already found out that the main malfunction of the grenade is associated with a torn and damaged boot.
Accordingly, in order to fix the problem, you need to do something with this casing, which is shaped like a cone.
In the case of doing the repair yourself, there are 2 options:
- Emergency
. It is carried out when a breakdown catches you on the road. Literally in the field, it is necessary to partially reanimate the CV joint and its boot. In this case, the CV joint boot is not even fully replaced without removing the CV joint. But the method is still useful for emergency situations; - Garage
. Here you are already in the garage, you have a set of tools, a pit or even a lift at hand. Some are sure that there is no way to do without removing the hinge. It's a delusion.
Garage repair
Now let's get straight to replacing the boot without removing the hinge itself, that is, the CV joint.
It is quite possible to replace the anthers without dismantling the drive. After all, the main task is to release the outer end from the hub. Then all that remains is to simply pull the new seal, like a contraceptive (condom), across the entire shaft.
Before tightening, be sure to turn the boot inside out correctly.
After this, you will need to cut the old element, install new clamps, and add high-quality lubricant. Since the new boots are highly elastic, you can tighten them without any problems. In this case, reliability will not be affected.
Step-by-step instruction
If you decide to do everything yourself, then you need to follow a certain sequence and follow the instructions.
The whole process roughly looks like this. Here it is worth making allowances for design differences between different cars.
- First, place the car on a pit or lift. The vehicle must be securely secured and prepared for work;
- Unscrew the drive nut first. There is a possibility that it will have to be changed;
- If you have a MacPherson type suspension, you will need to unscrew the ball joint nut;
- After this, you can pull the hub to the side. This will allow you to pull out the outer part of the drive;
- Armed with a pry bar or large screwdriver, pry up the inner CV joint and pull out the drive;
- The drive is in front of you. Place it where it is convenient for you. Dismantle the old clamps, remove the retaining ring;
- Now carefully pull on the new boot;
- Connect the 2 parts of the drive until you hear a characteristic click;
- Return the locking ring to its place and fully tighten the fresh boot;
- All that remains is to tighten the clamp and return everything to its place.
The only problem is that this method is not suitable for everyone and not always. First you will need to purchase a special elastic boot. Many commercially available parts are extremely hard.
Therefore, in the case of their use, there is no need to talk about any possibilities of twisting and pulling, like a condom.
Special devices are also used to tighten the anthers. But they are not so easy to get, plus the price is high.
Installation of spare parts
Replacing the CV joint on a Kalina car is done as follows:
- A protective cover is put on the axle. To make work easier, the axle can be treated with lubricant.
- Lubricant is placed in the hinge.
- Lubricant is added inside the protective cover.
- With gentle blows using a wooden block, the grenade is mounted on the axle shaft.
- When the installation of the CV joint is completed, air is removed from the protective cover and fastening is carried out using clamps.
- The steering knuckle is mounted, the hub nut is fixed, and the wheel is mounted in place.
- All fasteners are securely tightened and the car is removed from the jack.
Procedure
To prevent the bearing from falling apart at high speed, the CV joint must be replaced. To do this you need the following tools:
- jack or block;
- extension;
- ratchet;
- balloon;
- socket heads (17 and 30);
- hammer;
- vice;
- a small block of wood.
First you need to put the car on the handbrake and remove the wheel bolts. In the same position, you need to remove the hub nut using an extension. Then you need to place the car on a jack on one side and remove the wheel. Be careful! Even if you know how to change the boot on Kalina quickly and easily, do not limit yourself to one jack, install an additional block.
Next, you should find the two bolts that secure the CV joint to the steering knuckle. They may not give in immediately; you will need an extension cord to remove them. Now you should unscrew the steering wheel to its extreme position, pull back the steering knuckle and remove the outer part of the hub along with the outer CV joint. A hammer will come to the rescue, but you need to hit not directly on the CV joint, but on a wooden block, so as not to inadvertently damage the part.
How to replace the inner CV joint boot on Kalina? This can be done in a similar way, but the CV joint is removed from the box using a pry bar. After the old element is dismantled, a new boot is installed. When replacing the hinge, the boot must also be removed. Even if the old dust cover is still quite good, you absolutely cannot put it back. It is already worn out enough and it will not be possible to screw it with the same tension.