Lada Priora Hatchback "Priorka" › Logbook › Replacing the boots of external CV joints
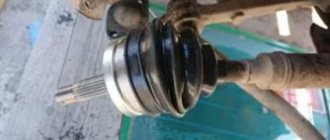
Even when replacing the right-hand drive oil seal in the gearbox, this picture appeared to my eyes. This is the right outer one.
I changed it today. 8 years and 128440 km. Quite a hemorrhoid task. I immediately bought original 154RU BRT kits in Avtopiter. Inside were truly original BRT 2110 anthers. They were glossy on both sides.
I didn’t use the lubricant from the kit - VMP-AUTO started putting its dubious slurry here too. And there’s not enough of it there.
I started with the right CV joint - the most problematic one.
Surprisingly, it was quite easy to remove with the remover.
When trying to gently pull off the original boot, it immediately tore at the site of the ring crack near the small clamp - which means it was just in time.
There was very little lubricant there from the factory.
I disassembled the CV joint and washed it in white spirit (I spent 1 liter in total) until the pig squealed. It also took a very long time to clean the CV joint from rye along the large diameter of the boot. The photo shows that moisture penetrated under the rubber. I used a file and a saw blade. It took me a long time to clean it to an acceptable condition.
We injected lubricant into the CV joint straight from the tube. I didn't regret it. And installed the home kit from the kit. I lightly lubricated the CV joint housing under the boot and the boot under the clamp with grease. At the same time, the clamp compressed the boot very well along its entire diameter.
I moved to the left side... Here the boot was a little better.
There was very little lubrication. The same rust on the CV joint body under the large boot diameter. And here the most interesting thing began - the CV joint did not want to be removed. I fooled around with him for an hour. At some point, one of the bolts on the puller simply broke off... That is. The CV joint has not yet come off the ring and the puller is hanging tightly on the drive...
When to change the CV joint, signs of malfunction
As was said, the external grenade fails after about 40 thousand mileage. This is evidenced by crunching, creaking and knocking sounds in the area of the drive shafts. To determine which side of the CV joint requires replacement, you need to turn the steering wheel all the way and drive off. In 90% of cases, a worn drive will manifest itself as a crunching sound. For control, you can turn it first in one direction, and then in the other direction, and turn it back. If the CV joint is worn out, a crunching sound will be heard immediately.
This is the case when there are no visual signs of wear:
- Lubricant leaks near the outer joint.
- Cracks, tears on the boot.
- Lost or misaligned clamps.
- There is obvious play when turning the suspended wheel.
If there are visual signs of wear, we replace the CV joint on the Grant as soon as possible.
Removing and replacing the Lada Priora CV joint
Good afternoon, today we will tell you how to remove and replace the Lada Priora CV joint. If, while driving, you begin to hear humming and knocking noises in the area of the front wheels, and a crunching sound when cornering, then it’s time to change the CV joints, that is, constant velocity joints that transmit torque to the wheels. Car enthusiasts also call this part a grenade.
Additional evidence of a grenade failure will be the formation of a backlash, which can be easily determined. In this case, it is enough to shake the front wheel drive shaft joint with your hand. Even its slight movement indicates the need for replacement.
Lada X-ray engines - detailed characteristics, power, features
The Lada XRAY, popular not only in Russia, is ready to conquer the global car market together. They became a new round of the evolutionary spiral. Engineers paid a lot of attention to the technical parameters and equipment of the Lada X-Ray. We took the engines especially seriously; many parameters of any car depend on this unit. Three powertrain options will be available for the Lada X-Ray engine.
The most “oil-eating” one will delight you with economical fuel consumption, but has the most modest power capabilities. For those who love high speeds, there is a more powerful option, but it will consume more fuel.
Removing and replacing the Lada Priora CV joint
Article: Outer CV joint – 77205S. Inner CV joint – FJ-228.
Tools: To remove and replace the inner and outer CV joints of the Lada Priora, you will need pliers, a hammer and a block or a wooden block.
Removal and replacement of the Lada Priora CV joint is carried out on a lift or inspection pit. In general, this procedure is the same for all domestic front-wheel drive cars, such as VAZ 2108, 2109, 2110, LADA Granta.
Repair or replacement of the Lada Priora CV joint is carried out with the front wheel drive removed. The first step is to remove the boot from the grenade by holding the removed drive shaft in a vice.
Replacing CV joints on Lada Priora
Using pliers, we bend the inner clamp and open the lock of the dirt cover, and do the same with the outer clamp.
Replacing the outer CV joint of Lada Priora
We move the boot along the shaft towards the center and turn it inside out.
Now you need to knock out the inner CV joint from the shaft. To do this, use a hammer and a soft metal drift. When manipulating with a hammer, forces are applied to the hinge cage.
We knock out the CV joint from the shaft
Installing a new joint will require plenty of lubrication. Drive in the SHARS using a hammer and a wooden plate, which is applied to the outer end of the shank, after which sharp blows are applied with the tool.
After installing a new grenade on the shaft, it is cleaned of dirt and thoroughly lubricated again. The lubricant has excellent sealing properties, which will provide friction units with reliable protection from moisture and dirt. Then put on the boot and secure it with clamps.
The outer or outer joint is replaced after both the outer and inner CV joints are removed. The dirt cover is also turned inside out, the shaft is clamped in a vice and the outer CV joint is knocked out of it.
Replacement of external CV joint of Lada Priora
Its installation is similar to the internal hinge. However, there is one important difference when using lubricant. It should be two times less than in the inner CV joint.
Finally, all removed parts are installed in the reverse order. After installing new grenades, the car goes through any turns smoothly and without unpleasant sounds, and the process of driving on a straight road becomes much quieter.
It is important to know that even minor damage to the drive boot requires its replacement. The fact is that the main and rapid wear of the grenade occurs when dust and dirt enter the drive through cracks in the boot.
To increase the service life of CV joints, it is recommended to periodically inspect the rubber dirt-proof covers on the shaft and replace them as soon as necessary.
Temporarily update the CV joint boot
The CV joint boot broke. Before replacing it, I wrapped it in film and secured it with electrical tape. I walked more than one thousand kilometers on duct tape until the long-awaited boot arrived and everything was “OK”.
For temporary use, enough to get to a workshop or garage.
You can use a bag or a glove instead of film. This makeshift is used to avoid losing the hub and bearing later.
In theory, if the boot is torn, there is already water and sand there. It is necessary to remove, wash, new grease and a new boot.
In general, the road repair of the boot is described. Only with cling film is it much more convenient, faster and, in principle, really lasts for a long time. Jeepers and ATV riders know.
How to replace a grenade on a Lada Priora car?
According to the manufacturer's recommendation, replacing a grenade on a Priora means installing a new front wheel drive assembly - 2 CV joints and an axle shaft on each side. Since a new unit costs a lot of money, the cost of the work is too large. Therefore, in practice, only the worn part of a given unit is replaced - the outer or inner grenade, or even both at once. If you know how to change these parts yourself, you can save a lot on car service costs.
How to replace a torn boot without removing the CV joint with a new one right in the garage
In general, boots on CV joints can be changed without removing the drive. The main thing is to free the outer end from the hub. And then, the new boot is put on like a condom across the entire shaft, the main thing is to turn it inside out correctly. Next, the old one is cut, the new one is put in place and new clamps are, and filled with fresh lubricant. New CV joint boots are very elastic even in a small hole.
Unscrew the drive nut (you may have to replace it). If there is a MacPherson strut (and it is almost always used on front-wheel drive, and it is also very common on small crossovers), then unscrew the ball nut (if it cannot be removed, then unscrew the nut not completely, then gently tap with a hammer so as not to damage the threads and remove the nut), pull the lever down (using a crowbar or a pry bar is approved).
When is replacement required?
The hinge mechanisms of the Lada Priora, which transmit rotation from the engine to the front wheels, are considered quite reliable and in some cases last 100-150 thousand km. Grenades should be replaced in the following cases:
- The car's mileage is more than 100 thousand km;
- the parts of the unit have become unusable, as evidenced by crunching sounds when turning the front wheels.
The first type of replacement is preventative. Recommended for motorists for whom a car is a tool for making money, which must be constantly in combat readiness and serve without fail. Replacement due to wear is a more common option; it is practiced by most Priora owners.
In order to change expensive CV joint parts as rarely as possible, it is important to promptly detect torn boots, through which dirt and dust enter the mechanism. Grenades cannot be repaired; they only need to be replaced. It is much easier and cheaper to replace leaky anthers so that the assembly lasts as long as possible.
Repair methods
We have already found out that the main malfunction of the grenade is associated with a torn and damaged boot.
Accordingly, in order to fix the problem, you need to do something with this casing, which is shaped like a cone.
In the case of doing the repair yourself, there are 2 options:
- Emergency
. It is carried out when a breakdown catches you on the road. Literally in the field, it is necessary to partially reanimate the CV joint and its boot. In this case, the CV joint boot is not even fully replaced without removing the CV joint. But the method is still useful for emergency situations; - Garage
. Here you are already in the garage, you have a set of tools, a pit or even a lift at hand. Some are sure that there is no way to do without removing the hinge. It's a delusion.
Now we will talk about each repair method separately.
Both options can be used on various vehicles, be it:
- VAZ 2110;
- Lada Kalina;
- Renault Logan;
- VAZ 2114;
- Lada Priora;
- Chevrolet Niva (Shniva);
- VAZ 2115;
- Lada Granta, etc.
Yes, it is generally better to conduct such experiments on domestic cars, as well as on budget foreign cars. Their design is simpler, and spare parts are not so expensive if you suddenly need to correct your own mistakes.
But the price of a professional service for replacing the boot is quite impressive. This is another reason to do everything yourself.
Preparing for work
To replace the grenades, you need a car lift or an inspection ditch, since some of the disassembly work is performed from below. The following tools and devices will be required:
- standard set of socket heads with a knob;
- mount;
- open-end wrenches;
- metalworking tools, which include screwdrivers, hammer and pliers;
- a device that helps press the steering rod ball pin out of its socket in the strut.
If you don’t have a steering rod puller, then it’s easy to find one from fellow car enthusiasts or just buy one; it’s inexpensive. This is a steel cylinder with a slot and a bottom into which an extrusion bolt is screwed. To carry out the replacement in the inspection hole, you will also need a jack with a wheel wrench to lift the car. To completely disassemble the unit, it is advisable to have a vice and purchase CV joint-4 thick lubricant.
Instructions for disassembling the unit
Before removing the wheel from the side of the faulty unit, it is necessary to loosen the hub nut using a 30 mm socket, having first pulled the metal boot out of the socket. Further steps according to the instructions:
- Use a wheel wrench to loosen the wheel bolts, jack up the car and remove the wheel. Unscrew the hub nut completely and remove the washer with a screwdriver. If your vehicle has engine oil pan protection installed, it will need to be removed. Some experts recommend draining some of the oil from the gearbox (1.5-2 liters) before removing the drive so that it does not start flowing through the spline hole when the unit is removed.
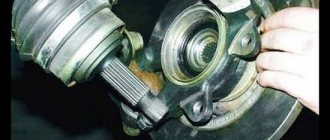
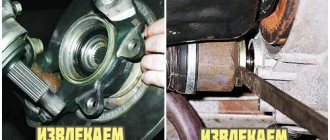
- Loosen and unscrew the tie rod ball pin nut and use a puller to press the pin out of the socket in the front suspension strut. Having turned the entire assembly by hand for convenience, unscrew the 2 bolts securing the ball joint. Holding the brake disc with both hands, carefully pull the CV joint shaft out of the mating splined part of the hub and move it to the side.
- The second end of the VAZ 14 CV joint must be removed from the splined part in the gearbox, being in the inspection ditch. To do this, you will need to place a mounting spade between the box body and the grenade, and then with a sharp jerk pull the assembly out of the socket, using the pry bar as a lever. If the part does not give in, it is allowed to tear it out of place with gentle blows of a hammer on the mounting blade. Before pulling it out, it is advisable to place a container under the gearbox, as some oil may leak out. Then the entire assembly is removed manually. A vice will be required for subsequent disassembly.
Dismantling the CV joint VAZ 2114
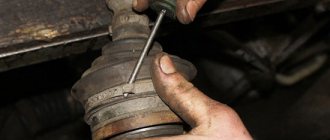
Then it is turned outward or simply moved so that it does not interfere. Next, holding the slotted part of the grenade with one hand, apply gentle blows with a hammer along its edge from the inside. In the case when the grenade needs to be replaced, there is nothing special to worry about; you can safely hit it until it comes off the shaft splines. The boot on which defects are found is turned back out, the second clamp is loosened and the part is removed from the shaft. The inner CV joint is disassembled in exactly the same way as the outer one, you just need to clamp the shaft in a vice near the grenade itself.
Disassembly procedure
The first operation is not removing the wheel, but unscrewing the large wheel bearing nut. It is caulked, so it will be much more difficult to loosen when the car is raised. After this, the wheel bolts are loosened and the car is raised with a jack.
Do not forget to place reliable supports under the rear wheels to secure the car.
If the Priora has a metal sump protection installed, then it also needs to be removed in advance. In addition, it does not hurt to partially empty the gearbox oil sump to avoid liquid lubricant leaking through the open hole after removing the drive.
Parts inspection and diagnostics
In order to inspect all components of the CV joint, they should be thoroughly rinsed with warm water. To do this, you should arm yourself with a basin and a soft brush.
New Lada: TechnoMaster generator support bracket with adjustment for Lada Granta, Kalina, Kalina 2
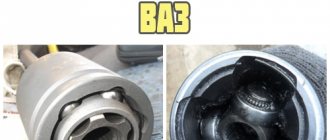
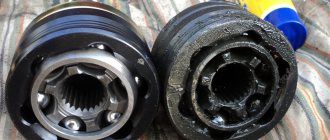
It is quite simple to identify faulty parts by visual inspection. Grooves larger than one mm, depressions, black spots - all these are signs of wear on the internal surfaces of the CV joint.
Particular attention should be paid to inspecting the separator. If there are chips or cracks between the ends and the windows, the CV joint definitely requires replacement
If there is no damage, the mechanism can be assembled. But first you need to fill the hinge with a special lubricant, this will prevent the possibility of premature wear of the component parts.
Installation of new hinges
After disassembling the drive, it is necessary to install new parts and reassemble the transmission in the reverse order. Replacement is done as follows:
- The small clamp is put on the axle shaft first, followed by a new boot. The clamp must be placed around the end of the casing and tightened. It is better to turn the boot in the other direction so as not to interfere with the installation of the hinge.
- Add SHRUS-4 lubricant to the hinge mechanism. According to the instructions, there should be at least 40 cm³ in the outer grenade, and 80 cm³ of thick lubricant in the inner grenade.
- Place the grenade on the shaft, making sure the splines match. Using a wooden adapter, press it as far as possible with gentle hammer blows.
- Pull the boot onto the grenade, apply a large clamp and tighten it. In the same order, the operation is performed on the other side of the axle shaft.
Now the drive assembly can be put into place. In order not to confuse the hinges, you should follow the mark placed on the axle during disassembly. The assembly is mounted into place from the inspection ditch, the splined part of the internal grenade being inserted first. To seat it in the slots all the way, you will have to rest the axle on the lower lever and apply several blows with a hammer through a piece of wood from the other side. Further assembly proceeds in reverse order.
Removing the ball joint
It is necessary to disconnect the stand from the lever. To do this, you need to unscrew the ball joint. Either from the lever or from the stand. It is more convenient to unscrew the two bolts from the rack. Which secure the ball joint.
If you unscrew the nut from the lever, the ball joint will not come out. The finger is a cone. A puller is required for removal. Or you will have to apply strong blows to the junction of the lever and the finger. The boot may be damaged. After the bolts are unscrewed, it is imperative to pay attention to the ball joint. It shouldn't be loose. If you crank. It should sit tightly in the ball. If it dangles and there is play. The ball joint must be replaced immediately. To do this, unscrew the nut and use a puller to remove the ball joint pin. You can simply apply a few sharp blows with a hammer to the side of the lever. Where is the pale inserted?
Since the connection is conical. As a result of the impact, the hole will be deformed and the finger will be squeezed out. But this is a rough option. And it doesn’t always help to use a special puller. After the strut is disconnected from the lever, you can pull the CV joint out of the hub.
Removing and replacing the Lada Priora CV joint
Article: Outer CV joint – 77205S. Inner CV joint – FJ-228.
Tools: To remove and replace the inner and outer CV joints of the Lada Priora, you will need pliers, a hammer and a block or a wooden block.
Removal and replacement of the Lada Priora CV joint is carried out on a lift or inspection pit. In general, this procedure is the same for all domestic front-wheel drive cars, such as VAZ 2108, 2109, 2110, LADA Granta.
Repair or replacement of the Lada Priora CV joint is carried out with the front wheel drive removed. The first step is to remove the boot from the grenade by holding the removed drive shaft in a vice.
Replacing CV joints on Lada Priora
Using pliers, we bend the inner clamp and open the lock of the dirt cover, and do the same with the outer clamp.
Replacing the outer CV joint of Lada Priora
We move the boot along the shaft towards the center and turn it inside out.
Now you need to knock out the inner CV joint from the shaft. To do this, use a hammer and a soft metal drift. When manipulating with a hammer, forces are applied to the hinge cage.
We knock out the CV joint from the shaft
Installing a new joint will require plenty of lubrication. Drive in the SHARS using a hammer and a wooden plate, which is applied to the outer end of the shank, after which sharp blows are applied with the tool.
After installing a new grenade on the shaft, it is cleaned of dirt and thoroughly lubricated again. The lubricant has excellent sealing properties, which will provide friction units with reliable protection from moisture and dirt. Then put on the boot and secure it with clamps.
The outer or outer joint is replaced after both the outer and inner CV joints are removed. The dirt cover is also turned inside out, the shaft is clamped in a vice and the outer CV joint is knocked out of it.
Replacement of external CV joint of Lada Priora
Its installation is similar to the internal hinge. However, there is one important difference when using lubricant. It should be two times less than in the inner CV joint.
Finally, all removed parts are installed in the reverse order. After installing new grenades, the car goes through any turns smoothly and without unpleasant sounds, and the process of driving on a straight road becomes much quieter.
It is important to know that even minor damage to the drive boot requires its replacement. The fact is that the main and rapid wear of the grenade occurs when dust and dirt enter the drive through cracks in the boot.
To increase the service life of CV joints, it is recommended to periodically inspect the rubber dirt-proof covers on the shaft and replace them as soon as necessary.
CV joint diagnostics
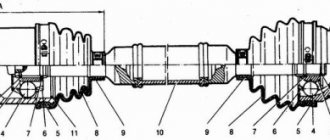
First, let's introduce a little theory and say that there are two types of CV joints - internal and external. The inner CV joint is located in the gearbox, from where the mechanism transmits rotating motion directly from the transmission to the outer CV joint. External is a mechanism whose elements are connected to the wheel hub, from where the process of transmitting rotational motion to the wheel from the hub itself is carried out.
External and internal CV joints
At first glance, it may seem that they have the same service life, but, despite the similarity in design and components, this is not the case. For example, the outer CV joint directly interacts with the wheel, from which it receives energy from impacts received during the trip. The CV boot, which is in “relative” safety, is made of soft rubber, to a greater extent than other elements of the unit, subject to wear from various climate influences, be it excessive dryness or humidity, temperature influences, contacts with processed petroleum products, etc. If the tightness of the rubber boot is broken, then sand and dirt that gets into it will quickly lead to a malfunction of the outer CV joint.
External CV joint with boot
A motorist can know that the CV joint is faulty by the following signs:
- A rich crunch heard at every turn of the car. At the same time, the crunching sound is not heard every time you turn the steering wheel, but only when you turn left or right during a trip;
- The sound of a “crunch” makes itself felt during the clutch. First of all, the sound appears when starting from a stationary state;
- If during diagnostics play was detected at the hinge joints. The play becomes clearly visible during the inspection of the CV joint when the wheel is in a suspended state;
- Presence of jerks during acceleration.
Diagnostics of CV joints is carried out in the following “simple” ways:
- Method number 1. The driver turns the steering wheel in one direction or another all the way, after which the gear is engaged and an attempt is made to quickly start from a place. The presence of a characteristic crunch during this operation indicates a significant degree of wear on the “grenade” as a whole, or its individual elements, or that it is already in a faulty state and requires replacement.
Method number 2. Using a special lift (sometimes this can be done with a jack), the car is raised on one side, or the wheel is hung from the side of the expected breakdown. In this condition, a visual inspection of the condition of the vehicle components is carried out, and the presence of possible play is also detected. Usually, play is not detected unless it is minor.
Method No. 3. Using a lift, the front of the car is raised. Next, the driver should go to first gear, or on some cars, turn on “D”. The manifestation of a CV joint malfunction in this condition will not take long to occur: a distinct crunching sound should be heard when the wheels rotate.
Even at the “initial inspection” stage, with the car raised, some conclusions can be drawn. For example, as soon as the CV joint becomes visible, you should pay attention to its appearance. The integrity of the corrugated rubber usually indicates the absence of malfunctions. If there is a violation of the tightness of the CV joint, and traces of leaked lubricant from the boot are visible everywhere, this indicates a missed moment for a possible repair, since dirt and sand could have already worn away the moving elements of the structure, which led to problems while driving.
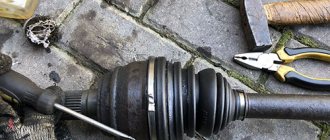
Torn CV boot
Sometimes you can only get by by replacing the boot, but, in any case, the best solution would be a trip to a car service center for a comprehensive diagnosis.