Print this article Font size 16
The CV joint is a constant velocity joint. People simply call it a grenade. This is due to the appearance of the device. Its task is to transmit rotational motion from one axle shaft to another, and they are at a constantly changing angle in relation to one another.
This element is always under load, which is why its failure is rather a matter of time. This is even despite the fact that high-quality carbon steel is used in the production of CV joints, which can withstand severe regular loads over a long period of time.
But the grenade on the VAZ 2110 still fails. The main reasons are pollution, sand that gets inside the structure, loss of lubrication, damage to elements, torn rubber boots.
Kinds
In a VAZ 2110 car, the CV joint may need to be replaced. But which one exactly? After all, in the “ten” there are two of them - internal and external. They are necessary in order to effectively overcome all obstacles. Here one CV joint will clearly not be enough.
Internal and external
- The first grenade is internal, and it transmits torque to the shaft from the transmission.
- The second grenade is external and engages with the car's wheel hub.
Despite the fact that their operating principle is the same, they differ in design and price.
Which one is better to choose anther?
When choosing a part, you should focus on the manufacturer and the material from which the case is made.
The quality of a product is usually clearly dependent on its price, unless, of course, it has been verified by several suppliers.
Some of the best and most widespread manufacturers in the spare parts markets are the brands GKN (Loebro, Spidan), Maruichi , SKF . They are also the most expensive, which indicates the best materials used. Such boots will never suddenly break, will last a long time, are very durable, and the repair kits contain everything you need, including high-quality specialized lubricant in the right quantity.
"Grenade" defects
Before replacing CV joints on a VAZ 2110, you need to make sure that they are made with high quality and can effectively perform their job in a new place.
Alas, sometimes replacing the inner CV joint on a VAZ 2110 does not give the expected result, since product defects .
The literature indicates that CV joints are made from special high-strength alloys that practically do not wear out. But in practice everything looks a little different. Whatever one may say, there are no eternal parts, and CV joints are no exception.
Defects may be as follows:
- Low quality of alloys used in manufacturing;
- Banal fakes and defective components;
- Poor quality or complete lack of lubricant, which leads to rapid failure of even a new grenade;
- Damaged anthers, due to which all kinds of debris get into the grenade.
Regarding the replacement of CV joint boots on a VAZ 2110, we recommend watching a video that will help you cope with the problem that has arisen. This issue should be approached thoroughly.
CV joint repair
As mentioned above, the hinge cannot be repaired. Conventionally, one of the repair measures includes washing the “grenade” after driving with a damaged boot.
Washing is carried out at the same time when the damaged boot on the pomegranate is replaced. The hinge is carefully knocked off the shaft, inspected for damage and thoroughly washed to remove any dirt and grease in gasoline or kerosene.
After washing, the assembly is filled with lubricant and mounted in place, having previously installed the boot. The procedure makes sense only if there are no obvious signs of a joint malfunction.
A crunchy or knocking part definitely needs to be replaced, since wear forms on the working surfaces of the inner race, and it is no longer possible to stop the destruction. Continued operation of the vehicle may be dangerous for the driver and other road users.
Functionality check
of the inner and outer CV joints should be examined separately , since the procedures and signs are somewhat different.
External grenade
The most obvious and main sign of wear of this element is the appearance of a sound similar to a crunch. It appears because the grooves have worn out and the balls do not move along them as well as before. The crunching becomes noticeable when entering turns, sharply pressing the gas pedal or passing difficult road sections.
Grenade
If you want to verify that the outer CV joint is faulty, do the following:
- When starting from a standstill, deliberately create jerks, but not strong ones;
- Try to accelerate sharply and slow down;
- Move the shaft transversely between the CV joints. If you feel any play, then the grenade is definitely worn out.
Internal grenade
It is noteworthy that the internal hinge is more durable and less subject to wear. Most often, the inner CV joint declares its malfunction when simply driving in a straight line or when passing through difficult sections. A check for play, similar to an external grenade, will allow you to verify problems.
But to understand whether an element really needs to be replaced, do this:
- Raise the drive wheels, which will allow you to bring the inner CV joint to its maximum angle;
- Start the engine;
- Turn on first speed;
- If the hinge is at the limit of wear, you will hear a characteristic crunch. This is a signal that you need to change the grenade.
How I gave a second life to the old CV joint, although it had already crunched. The easy way.
CV joint (Constant Velocity Joint) is an expensive element of a car’s suspension, which quite often fails. Some car owners continue to operate their car with a crisp CV joint, while others immediately replace it with a new one. I decided to try to restore the old element using a method I learned from a mechanic friend. I was pleased with the result, so I am sharing the information in this article.
Will the article be useful? Don't forget to give a thumbs up and subscribe to the channel!
The main symptom of a CV joint malfunction is the appearance of a crunching sound when turning. When braking, noticeable vibrations may occur. In some cases, you can continue to use the car, while in others it is better to go straight to the service station. I didn’t hesitate and went to a friend’s service center.
It is important to know: if the CV joint crunches not only when the wheels are turned out, but also on a straight line, it is better to start repairs at the first opportunity, otherwise you can “get up” right on the road.
CV joints can fail due to either natural wear or improper maintenance. It is recommended to at least occasionally inspect the anthers at the time of damage. If dust and dirt get inside the hinge, it will quickly fail.
First of all, we diagnosed which CV joint was faulty. To do this, the front wheels are hung alternately. It is important to determine not only the side on which there is a malfunction, but also the type of CV joint itself - external or internal. The right wheel had no problems, but after hanging the left one, we immediately identified a breakdown. With the wheel hanging, the driver needs to engage the gear, accelerate a little, and then begin to slow down slightly. If, when braking, a crunching sound occurs in any position of the steering wheel, then the inner CV joint is faulty. If the element crunches only in the extreme positions of the steering wheel, the problem is in the outer hinge.
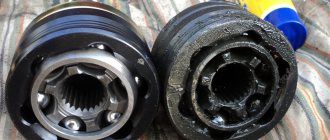
We removed the faulty CV joint and decided to disassemble it; this is done in just a few minutes. Troubleshooting made it possible to quickly determine why the hinge made a crunching sound and led to vibrations. Serious damage was observed on the inner race, and, in a good way, the CV joint needed to be replaced. But we decided to try the old method, which allows us to give the product a “second life”.
We completely removed the old lubricant and “heartily” added a new one, to which molybdenum disulfide was added. This material is a powder that performs anti-seize functions. But in our situation, it allowed us to extend the service life of the CV joint; after installation, the joint did not make unpleasant sounds.
Surprisingly, after the repair I drove 20,000 km until the CV joint on the other side crackled. At this point it was possible to change both hinges, which is what I did, although the restored one showed no signs of malfunction. As a temporary measure, I consider this method to be effective, and even if you have a CV joint puller, you can restore the structure with your own hands in half an hour.
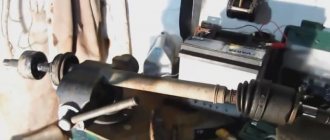
Replacement procedure
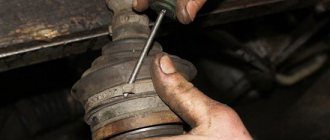
Let's say right away that it is impossible to repair the CV joint. So don't even try. The most correct and reasonable decision is to purchase a new grenade and install it in place of the failed one.
The first thing we recommend starting with is watching a video about replacing the CV joint on a VAZ 2110. This way you will clearly understand how the procedure is performed and in what sequence. Then, according to the instructions we have presented, you can get to work.
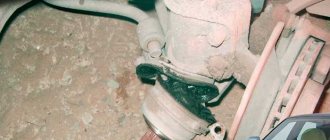
- Since the CV joint is located at the bottom of the car, you will need a lift or a pit in the garage from where you can begin replacing the element.
- Be sure to secure the car. To do this, you can engage fourth gear and tighten the handbrake all the way.
- If you have driven the car into a pit, place wedges or wooden blocks under the wheels to block the wheels.
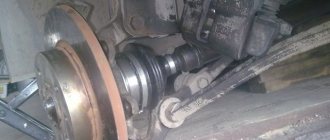
- Remove the protective cap and unscrew the nut on the hub.
- After removing the hub nut, unscrew the wheel fasteners.
- Raise the wheel that requires CV joint replacement using a jack.
- Now unscrew each of the six bolts of the part, after which only the flange will hold it.
- Remove two bolts from the lower knuckle support.
- Turn the steering wheel all the way, which will allow the element to fall out on its own.
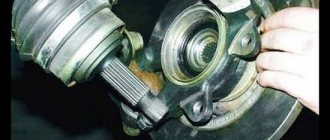
- Remove the boot, which is located in the grenade structure.
- Remove the retaining ring.
- Unscrew the hinge from the shaft spline to avoid damaging other components.
- Check the operation of the entire system to determine the causes of the breakdown.
- Install a new CV joint using the steps in reverse order.
What to do if the boot ruptures on the road
It is absolutely unacceptable to move with a torn boot. The hinge will not tolerate even the slightest contamination. Mixed with lubricant, these abrasives will quickly wear out its precision-made and polished grooves and render the CV joint unusable. But it is not always possible or willing to use a tow truck or carry out road repairs.
Temporary protection can be provided in a variety of ways, from wrapping the remaining boot with tape to cold vulcanizing holes and cracks.
Even a simple cloth wrapped and secured around the cover will help filter out dust. The main thing is to do this reliably and control the condition of the patch to the point of repair. And when replacing the cover, be sure to disassemble the hinge, rinse it thoroughly and fill it with new grease as required.
Dust will definitely get there, even if it is not visible. During operation, the temperature of the unit changes; it literally works like a pump for dirty air under the car. It is easy to check the tightness by simply squeezing the case with your hand. You can also check the condition in doubtful cases of the presence of surface cracks, although usually the problem area is immediately noticeable by the grease protruding outward.
Installation of new parts and assembly
First of all, the CV joint boot is replaced, if necessary. This is done in reverse order. The sequence is as follows: first, put a clamp on the shaft, tighten a new boot, and then move the clamp onto it and tighten it. You should not try to put the boot on the shaft together with the clamp, this is very inconvenient. It is also better to take new clamps for these purposes. The next step is to put a new grenade on the shaft so that the splines match.
Then, through a wooden spacer, with gentle blows of a hammer, the part is pushed onto the shaft until it stops.
Attention! Before assembly, you must make sure that there is lubricant inside the CV joint; as a rule, there is not enough of it there. According to the documentation for the VAZ 2114 car, the cavity of the internal grenade must contain at least 80 cm³ of lubricant, and the external one - at least 40 cm³
As a lubricant, you need to use a special thick lubricant “CV joint-4”.
After the grenade is mounted, the boot is pulled over its body and secured with a clamp. If necessary, the operation should be repeated with another grenade. Now the entire drive assembly can be put in place; to do this, one end of it is passed from the inspection hole into the opening above the lower lever and rested on the latter
It is important not to confuse the outer and inner ends. If you are performing the operation for the first time, then it will not be amiss to mark the outer CV joint when removing the unit
The other end of the drive is inserted into the splined part of the gearbox so that the splines coincide. Now you need to get out of the ditch, take a hammer and a wooden spacer and hammer the drive into the socket until it stops. You need to strike carefully, and in no case forcefully. In this case, you need to periodically look under the car, monitoring the process of the internal grenade shaft entering the gearbox.
After one end of the drive is installed in place, you can further assemble the mechanism in the reverse order. Before doing this, it is worth checking the technical condition of the ball joint and steering rod pin. When the finger can be easily twisted in the body by hand or it simply dangles, then the part must be replaced, taking advantage of the opportunity. If some of the oil was initially drained from the gearbox, then it must be poured back through the appropriate neck.
Anthers need to be changed more often than CV joints themselves, since the unit can last 100-150 thousand km, and tires - at best, 30 thousand. To replace the outer grenade boot, it is not necessary to remove the entire drive; you just need to pull the shaft out of the hub spline. But such a replacement is not only inconvenient, but also meaningless. The reason is that in the near future you will still have to disassemble the car and pull out the entire drive in order to replace the boot of the internal CV joint.
Sources
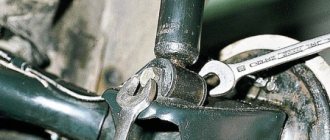
Tie rod boot
Anthers are also used in the steering. Their shape, as well as their fastening, are determined by the specific design. The difficulty of replacing the boot directly depends on where they are attached:
- If the boot is located in the place where the steering rods are attached to the rack, as, for example, in the “nine”, then you will have quite a difficult time, since to replace it you need to perform a number of procedures, which include disassembling the steering mechanism.
- In VAZ cars, the anthers are usually located at the ends of the rack. To replace any of them, you will only need to remove the clamps, then unscrew the nut that secures the rod, disconnect it and remove the boot.
- Among the many types of anthers you can find some very interesting ones. For example, in one of the Volkswagen models they are made in the form of elastic caps, which are put on the body and secured with clamps. Such boots protect the steering mechanism from dirt and are quite easy to change.
Tool for the job
Before you start working, you need to prepare all the tools.
- Jack.
- Wheel chocks.
- Set of keys and socket heads.
- Collar.
- WD-40.
- Hammer.
- Mount.
The process of replacing the CV boot
Before you get started, make sure the vehicle is parked on a level surface, the handbrake is on, and wheel chocks are installed under the rear wheels.
- While the car is fixed on the ground, we tear off the wheel bolts and hubs on the side where all the work will be done.
May require a long lever, a VERY long lever!
By disconnecting the cotter pin, the bolt will easily come out of its place of fixation.
Diagnostics of CV joint performance before installation
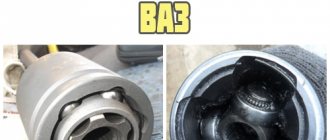
- The CV joint should be inspected visually, as well as by rotating it relative to the position of the bearings.
- If no crunching or crackling noises are detected when turning, and the presence of dirt and sand on the lubricant is minimal, then the joint can be cleaned in gasoline by soaking and cleaning.
We fill the grease into the CV joint
Replacing the outer CV joint of a VAZ 2110 video
External CV joints are a reliable element of a car if it is used properly. The drive can last 50 thousand km. and more, if you do not overload it (sharply, do not turn quickly with the wheels turned out) and monitor the condition of the rubber boot of the CV joint (boot). It must be sealed to prevent moisture and dirt from getting inside the hinge.
External CV joint
Signs of a faulty outer CV joint
- Perhaps the most noticeable sign is a crunching, crackling sound when turning the steering wheel or when the car is moving. If you hear a crunch or crack when turning left, then the right “grenade” is faulty and vice versa
- If play is felt when the drive shaft is rocked.
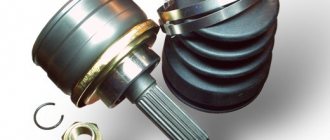
It is difficult to say how to choose a good, reliable CV joint in a store. Nowadays there are a lot of fakes and there is no need to say that parts from a foreign manufacturer will last a long time. From experience I can say that when buying a CV joint from one foreign manufacturer (1200 rubles), it only covered 5 thousand km. Then I bought the cheapest ones, which were in the store for 630 rubles and they have already covered 20 thousand km and I think they will still serve. The CV joint kit for the VAZ 2110 should include lubricant, two clamps, a boot and a retaining ring, and of course, the hinge itself.
Replacing a CV joint boot - the importance of the part and its serviceability
Basically, these joints are used in the steering wheel drive system of passenger cars with independent suspension, and less often in the front axles and rear wheels of SUVs.
A CV joint boot is a special protective cover made of rubber in the form of a corrugated pipe. From the name we can conclude that this element protects the unit from dust and dirt. Taking into account the fact that the CV joint is a rather complex part, which is many times more capricious than the same ball joint, it must be monitored much more carefully. If dust gets into it, it can lead to a so-called crunch, and then there is no turning back, since this part cannot be restored; the most that can be done is to slightly delay the time of its failure.