Valve seals prevent engine oil from entering the combustion chamber through special holes in which the valves of the gas distribution mechanism move. Installing the valve axis in a special hole that has a thermal gap may cause lubricant to appear in the combustion chamber environment.
For this reason, it is necessary to seal the holes, for which oil seals made of silicone are provided.
Necessary tools and accessories
Replacing the valve stem seals of a VAZ 2106 is done directly on the car, which significantly speeds up the work, since there is no need to remove and then reinstall the cylinder head. It is enough to place the car in a place protected from dust and precipitation. Apply the handbrake and place the gearshift knob in neutral. Replacing valve stem seals on a VAZ 2106 requires a set of caps and a new head cover gasket, standard tools, accessories:
- Carrying;
- Candle key;
- Spanners 17 mm., 13 mm.;
- Hexagonal internal heads 8 mm, 10 mm, 13 mm. with a collar;
- Pliers;
- Tweezers;
- Flat screwdriver;
- 8 mm thick soft metal rod;
- Torque wrench;
- Spring compression device
- Mandrel for installing caps
- Soft wire.
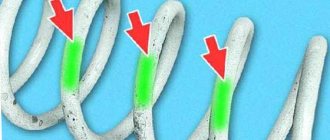
Different designs of special pullers for compressing springs
Signs of breakdown
To prevent serious problems in engine operation, it is necessary to promptly diagnose and correct oil seal failure.
You can judge the wear of valve stem seals on a VAZ 2107 by the following signs:
- There is an increased release of white or blue exhaust gases.
- Engine oil consumption increases significantly.
- The candles become covered with black soot.
If the problem is not diagnosed and corrected in time, the following consequences may occur:
- the motor will lose dynamics;
- it will begin to work unstably and will often stall at idle;
- the pressure in the cylinders will decrease;
- carbon deposits form not only on the valves, but also on the walls of the cylinders and pistons;
- the tightness of the system will be compromised.
When carbon deposits appear on the engine walls, its service life decreases sharply. If the problem is not corrected in time, the situation will lead to an expensive overhaul of the engine. But these difficulties can be avoided by simply replacing the oil seals on the VAZ 2107.
How to make your own devices
It is convenient to use a special device, since there is no need to hold it with your hands; it holds the springs compressed with a bolt. If you don’t have such a device, you can make it yourself. To do this, it is enough to have two steel square bars 10x10 mm, 300 mm long. They need to be fastened at three points, at the ends and in the middle, so that there is a gap of 12 mm between them, like rails, then the price will be much cheaper. So:
- You can attach it in any way; bolts, clamps, welding, in the fastening points between the rods you need to place metal plates 12 mm thick, which will provide the necessary gap between the rods.
- The valve stem will fit into the gap when the springs are released. To install valves, instead of a mandrel, you can use a steel tube 120 mm long, with an internal diameter of 14 mm, and a copper washer with a hole matched to the rim of the cap.
Preliminary preparation
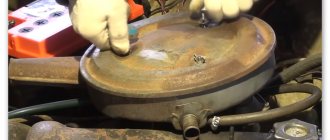
Before starting work, it is advisable to watch the video, replacing valve stem seals on a VAZ 2106; you definitely need to thoroughly wipe the surface of the upper part of the block and the head cover. For convenience, you need to remove the air filter housing. Cover the carburetor with film or cloth to prevent dirt from entering during operation. Unscrew the spark plugs, remove the cover with the gasket.
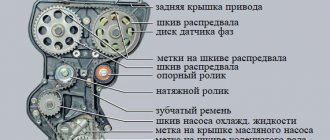
- Set the fourth cylinder to top dead center on the compression stroke. To do this, the crankshaft rotates to a position where the intake and exhaust valves of the fourth cylinder remain closed before and after the piston passes TDC. This is determined by the clearance between the valve and the rocker arm.
- The position of the piston is determined by measuring with any rod through the spark plug hole. Check the alignment of the marks on the sprocket and the housing.
Checking whether labels match
- Use a screwdriver to bend the lock washer using a 17 mm spanner. Loosen, but do not unscrew, the nut securing the sprocket to the camshaft.
- Using a 13 mm spanner, unscrew the cap nut securing the tensioner two turns.
- Free up the chain as much as possible.
- Unscrew the nut completely and carefully remove the sprocket from the camshaft axis.
- To prevent the chain from falling off the sprocket, you need to tie it with wire and hang it together with the sprocket on the edge of the cylinder block.
Disassembly sequence
So:
- Unscrew the nine nuts holding the camshaft housing and remove it along with the shaft.
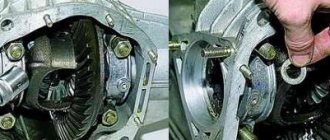
- Using a screwdriver, lift the pressure spring, pull out the pressure lever with a little force, push the spring out from under the stopper and pull it out.
- A soft wire is tightly inserted through the spark plug hole between the piston bottom and the valve so that the valve does not fall when the springs are pressed. The higher the part of the rod into which the fixing nuts are inserted, the less the springs will need to be pressed to install them.
Attention! It is not allowed to hold the valves with hard objects; there is a risk of scratching the piston or cylinder.
- A nut is screwed onto the camshaft housing mounting stud closest to the valve, as in the photo, to which a special puller or the end of a homemade device clings with a grip. It covers the stud on both sides, rests against the lower plane of the nut and rests on the upper plate of the springs.
- The valve stem with crackers is passed between the rods of the device.
Squeezing springs and removing crackers with tweezers
- We press the lever, the springs are compressed, the plate with crackers goes down, the crackers fall into the area of the narrower part of the rod, and are able to come out of the hole of the plate. You need to select them with tweezers or pliers.
Attention! It is forbidden to pull out the crackers with your hands, as you can get your fingers pinched.
- If the crackers are stuck and do not come out when the springs are significantly compressed, you need to knock them out with a weak hammer on the plate.
The device is released and removed sequentially:
- plate;
- outer spring;
- internal spring;
- inner spring lower washer;
- outer spring washer.
To remove the lower washers, you need to pry them off with a screwdriver.
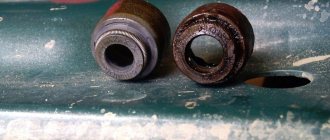
- The cap is grabbed with pliers, rocked, and rises along the valve stem.
- Then a new valve stem seal is installed and the valve is assembled in reverse order.
- They are sequentially disassembled and reassembled with new valve caps for the fourth and first cylinders.
- After this, holding the sprocket, the crankshaft rotates until the pistons of the second and third cylinders reach TDC. Consistently, similar work is carried out on their valves. We can assume that the oil caps on the VAZ 2106 have been replaced.
The final stage
Using a puller, remove the caps, pre-lubricate the new ones with oil, and then press them in.
We do this with each valve of the first and fourth cylinders. Then we rotate the crankshaft exactly 180 degrees and install the pistons of the second and third cylinders at TDC. All we have to do is dry out the remaining valves. After completing all the work, install the camshaft in place. We follow the regulated procedure for tightening the camshaft bolts. At the very end, if necessary, adjust the valves. That's all.
In the article we will talk about how to replace the oil seals of a VAZ 2106. Sometimes they are called valve seals, which is also true, like valve seals. These are small elements made of durable rubber and ceramics that can withstand high temperatures. They are used in the gas distribution system to prevent oil from entering the combustion chambers.
If you look at the design of an internal combustion engine, you can see that the valves are lubricated by engine oil at the top. From below, combustion of the fuel mixture occurs. Now imagine what will happen if oil starts leaking through one of the valves?
That's right, it will burn, leaving a lot of soot on the walls of the combustion chamber, and smoke may also appear from the muffler. Consequently, depending on the degree of destruction, oil consumption will also appear.
Assembly order
Pressing in valve stem seals using a bushing
- The valve stem, oil seal and cap are lubricated with engine oil; the valve cap corresponding to the valve is placed on the stem with the oil seal facing up. It descends down the stem, where it is pressed tightly against the hole with the valve guide.
- The end of the mandrel is pressed against the rim of the cap, by lightly tapping the top of the mandrel with a hammer, the cap is pushed into the hole until it stops. The cost of a mistake in case of strong impacts, damage to the oil seal or cap, will have to be replaced. The springs are installed in the reverse order of disassembly.
Attention! After installing the springs and removing the device for compressing the springs, you need to remove the plate from the spark plug hole and tap the end of the rod with a hammer so that the crackers sit in their place. This must be done carefully; if the crackers are positioned incorrectly, the springs may pop out.
Procedure for tightening the camshaft cover nuts
The camshaft cover, as required by the instructions, is pressed with a torque wrench with a force of 8 kg/m. tightening the nuts in the required sequence.
Installing a new cap
- Before installing it in place, the internal part is coated with engine oil, and the cap itself is advanced to the mentioned bushing along the valve stem;
- A press-fit mandrel is placed on the cap;
- With gentle blows on it, the part is pressed in all the way;
- Springs with crackers are returned to their place;
- A twig is removed from the spark plug hole, and light blows are applied to the end of the valve stem: they will fix the crackers in the groove;
- The caps on the intake valve of this 1st cylinder, and on both valves of the 4th cylinder paired to it, are changed in the same way. Then the crankshaft is turned another half a turn to bring cylinders 2 and 3 to the position required for replacement - and the procedure is repeated.
Repair procedure
- First of all, you need to get to the valve stem seals. We unscrew the cover nuts from the block head, do not forget to put the washers in a separate place so as not to lose them.
- We turn the crankshaft and carefully watch when the marks on the cover coincide with the marks on the camshaft sprocket. This position will ensure the safety of the valves after removing the crackers.
- Unscrew the camshaft bearings. Fixing the sprocket and chain can save you from a lot of problems, because they love to fall into the engine crankcase and ruin the rest of the day.
- The piston in the first cylinder has reached top dead center. Now is the time to dismantle the spark plug and remove the spring. After this, move the lever to the side.
- The adjusting bolt must be loosened, then a spring puller must be installed.
- We insert a rod or tube made of soft metal into the hole of the candle, this will protect the valves from falling.
- We take out the cracker and press the spring until the crackers appear. Sometimes they get stuck and need to be released by lightly tapping them.
- Remove the springs, valve plates and washers.
- We fix the valve with a clamp and remove the obsolete oil seal. You can help the process by lightly tapping the hammer.
- Before the procedure, lubricate the new valve stem seal with engine oil. We put protective caps on all new oil seals, which should be included in the kit. This will protect the valve surface from scratches during the pressing process. Pressing is done with the same desiccant, only on the other side.
- Repeat the same steps on the remaining valves. It is important to remember to crank the crankshaft before working on the second and third cylinders.
After installing the new, elastic and sealed valve stem seals, reassemble everything in the reverse order. If everything worked out correctly, you can be happy with yourself! The repair has been completed.
Source: https://ladaprofi.ru/vaz-2106/kak-osushhestvit-zamenu-maslosemnyh-kolpachkov-na-vaz-2106.html
Preparatory work
Before you begin any repairs, you need to wash the entire car as thoroughly as possible. Moreover, most of the attention should be paid to the engine compartment.
Be sure to follow safety precautions - do not flood the ignition system, electronic sensors, or wires. Before you start washing, you must completely disconnect the power supply system.
To do this, you need to disconnect the battery, preferably completely, and then remove it.
It is necessary to install wheel chocks under the rear wheels, then engage a lower gear and squeeze the handbrake. Since the car has rear-wheel drive, engaging the gear will prevent the car from rolling away. You definitely need to buy a set of valve stem seals. It is advisable to choose only those manufacturers recommended by AvtoVAZ.
see also
Doesn't start well after replacing valve seals
- 0 2 2k
Malfunctions arising from wear of the oil reflecting caps
- 13 0 20k
The VAZ 2106 and VAZ 2107 cars are equipped with an eight-valve internal combustion engine. During use, there is a need to eliminate and carry out repair work, without which, in principle, working with a short engine time is likely, but the consequences can be tragic and irreversible, and also financially expensive. These types of work also include replacing the oil seals (valve seals) of the VAZ 2106/2107.
Signs of failure of valve seals on VAZ 2107, VAZ 2106.
Typically, the oil seal replacement interval is 80,000 kilometers. Only timely identification of a malfunction and its elimination will prevent major repairs of the engine. Let's look at the main signs of wear on valve stem seals:
- High oil consumption and the subsequent need to add more than a liter of oil per 10,000 km is the first sign of wear on the oil scraper rings and/or valve stem seals. The limit is considered to be oil consumption from the “max” mark to the “min” mark per 1000 km for gasoline engines.
- Smoke exhaust color. Color serves as an important diagnostic sign and directly indicates malfunctions in the engine. Smoke from the exhaust pipe can be white, black, blue and other shades, depending on the additives in the fuel and the type of fuel itself. White smoke on a warm VAZ 2106/2107 engine is a reliable sign of wear on the valve stem seals or burnout of the engine piston oil rings.
- Carbon deposits on spark plugs. This sign determines that the oil seals have worn out and/or a “rich mixture” of air is being supplied to the carburetor. Eliminated by replacing valve seals and/or cleaning the carburetor and repairing the engine ECU.
- Sticking engine valves. Sticking engine valves can be caused by worn oil seals, low-quality fuel and oil, as well as irregular oil replacement. Another reason may be a long pause in engine operation and overheating.
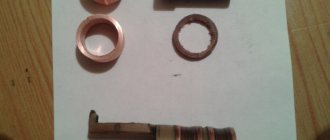
After conducting diagnostics and verifying the cause of the breakdown, it is necessary to replace the caps. If you have the right tools, you can handle the repair yourself; you will need the following for this:
- wrenches “10”, “13”, “17”;
- standard flat and Phillips screwdriver;
- head for unscrewing spark plugs;
- cap remover;
- spark plug wrench;
- desiccant for valves;
- tweezers or thin-lipped pliers;
- set of new valve stem seals for VAZ 2106/2107. The cost of a set of valve stem seals for a “classic” from VAZ with article number 21011007026 and from the manufacturer REINZ with article number 702273700 will be about 100 rubles.
The price is indicated for spring 2022 in Moscow and the region.
Tool necessary for replacing valve stem seals.
Replacing the valve cover gasket
The need to dismantle the cylinder head cover arises in the following situations:
- when tensioning the chain in the engine;
- when replacing the valve cover gasket;
- when adjusting valves;
- when replacing other engine parts.
The process is simple and will not take much time with minimal plumbing skills. To do this you will need:
- heads for 8 and 10;
- extension for keys;
- crank or ratchet;
- pliers.
Valve cover removal is carried out using a minimal set of tools
Valve cover gasket replacement procedure
The valve cover gasket is changed as follows:
- Unscrew the three nuts and remove the cover from the metal air filter housing.
- Remove the air filter from the housing.
- Unscrew the four nuts securing the filter housing to the top of the carburetor.
- Disconnect the hose leading from the breather to the air intake.
- We dismantle the carburetor damper drive rod by lifting it up and slightly moving it to the side. First remove the retaining ring (if it is provided for in the design).
- Loosen the nut and disconnect the air damper (choke) drive.
- Use pliers to slightly release the cable clamp.
- We remove the air damper drive cable.
- Unscrew the eight nuts securing the valve cover.
- Carefully remove the cover from the studs, having previously determined the position when it can be easily removed.
- Remove the remaining gasket on the cover and cylinder head.
- We carefully wipe the seats with a rag.
- We install a new gasket on the studs.
After replacing the gasket, assembly is performed in the reverse order.
Video: replacing the valve cover gasket
Procedure for tightening the nuts on the valve cover
The nuts on the valve cover should be tightened very carefully in a strictly defined sequence, as excessive force can strip the threads on the studs. First you need to tighten the nuts in the middle of the cover, and then gradually move to its edges.
The valve cover nuts must be tightened in a strictly defined sequence, indicated by numbers.
Correctly and timely adjusted valves will allow the owner of a VAZ 2106 to avoid much more serious problems. You can do this yourself, having a standard set of tools and devices and carefully studying the recommendations of professionals.
Purpose of VAZ 2106 engine valves
One of the most important systems that require adjustment during operation is the gas distribution mechanism (GDM). The design of this mechanism allows the fuel-air mixture to be supplied to the combustion chamber in a timely manner and exhaust gases to be removed from the engine cylinders.
The timing belt includes the camshaft and crankshaft and the chain connecting them. Due to the timing mechanism, synchronous rotation of two shafts occurs, which, in turn, makes it possible to strictly observe the sequence of opening and closing valves in all cylinders.
The timing chain ensures synchronous rotation of the two shafts
The camshaft lobes act on special levers that push the valve stems. As a result, the valves open. As the camshaft rotates further, the cams return to their original position and the valves close.
The camshaft is the main element of the gas distribution mechanism
Thus, the result of the operation of the gas distribution mechanism is the consistent and timely opening and closing of the valves.
There are two types of valves:
- Intake (open the fuel supply to the combustion chamber).
- Exhaust (provide removal of exhaust gases).
When is it time to replace
Over time, the sealing material of the valve stem seals becomes hard. As a result, it loses its elasticity, which leads to oil leakage into the cylinder. The same problem occurs when the piston rings are faulty.
The caps are changed in cases where oil leaks occur without visible places. Watch how the exhaust behaves while driving. Brake the car sharply with the engine, and then also sharply press the gas pedal. If this leads to the appearance of thick smoke from the muffler, then it is time to replace the seals.
Thick, bluish-colored smoke may appear on the car even after a long period of parking.
If, in addition to smoke, you observe an increase in fuel consumption, a decrease in engine dynamics and problems during startup, this may all be evidence of wear and tear on the mechanisms.
Replacing valve stem seals for VAZ 2106
You can tell that the valve stem seals have become unusable by increased fuel and oil consumption, smoking and a decrease in engine power. In your case, most likely, the correct installation of the MSC was violated, which is precisely why there is increased smoke from the exhaust pipe. Personally, I did the following during replacement:
- Remove the cover and unscrew the tension chains
- It is advisable to leave gear position marks on the chain so that you do not have to set them again later
- We carefully unscrew the gear so that it does not fall into the crankcase
- We unscrew the spark plugs, and then set the piston of the first cylinder to TDC
Without removing the cylinder head, the work goes quite quickly. At first I thought it was better to remove the cylinder head, but in practice I was convinced of the opposite. Now a desiccant is needed. To do this, install the cracker on one of the valves, take any rod, insert it and press. We carefully remove the crackers using tweezers, we try not to lose them, otherwise we will have to go buy new ones.
Causes and results of wear of valve stem seals on VAZ 2107/2106.
The purpose of the valve stem seals is to prevent excess engine oil from entering the engine combustion chamber. The cap should fit snugly against the valve and allow only the small amount of oil through that is necessary to lubricate it. The caps are made of special rubber, but over time, the edge of the valve stem cap wears out, deteriorates, the rubber ages, loses elasticity and peels off from the base. As a result, the cap begins to let oil through and it begins to get under the valve.
Leaking oil burns on hot valves, as a result of which carbon deposits build up on the internal walls of the engine, the cross-section of the intake and exhaust channels narrows, and the engine loses power. During active use of the engine, carbon deposits begin to fall off, its particles clog the seat and working chamfer of the valve, as a result, the fit of the valves is disrupted, the engine begins to operate intermittently and stalls. Another outcome is valve burnout, which leads to failure and replacement of VAZ 2107/2106 valves.
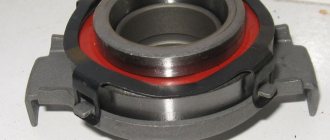
Removing old caps
desiccant
- The air filter is removed, followed by the cover from the cylinder head;
- The crankshaft is manually rotated until the mark on the camshaft sprocket aligns with the mark on its bearing housing. This manipulation puts the pistons of cylinders 1 and 4 in a position that ensures that the valve is held and prevents it from falling into the cylinder. At the same time, it will be easier to temporarily fix the valve;
- The tabs on the lock washer are pressed out, then the bolt that secures the camshaft sprocket is loosened (but not unscrewed at all);
- The cap nut on the tensioner is unscrewed approximately half a turn;
- His shoe is pressed out with a screwdriver, the driven branch of the chain is loosened, and the nut is tightened back;
- The loosened bolt is unscrewed completely, the camshaft sprocket is dismantled (hold the chain!), and secured together with the chain with wire so that they do not fall;
- 9 nuts are screwed onto the bearing housing, after which it is removed;
- The wire on the spark plug from cylinder 1 is disconnected; she cleans up;
- The lever from the valve drive is removed. This will require forces, since the spring will counteract this. Then it is removed from under the stopper plate and also removed;
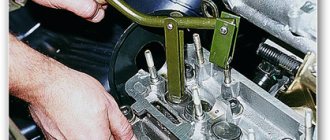
- The locknut on the adjusting bolt is released, the bolt itself is unscrewed, and a device for compressing the valve springs (depressurizer) is screwed in instead;
- A soft metal rod of suitable diameter is inserted into the hole from the candle - it will keep the valve closed after desiccation;
- The bolt on the device is tightened, it compresses the valve springs, and the crackers are released. If they are somewhat stuck inside, a light blow is applied through the mandrel to the plate;
- After drying, the following are removed in turn: the plate, both springs (external and internal), the washers from them (in reverse order, the inner one is removed first), and behind them - the worn oil seal;
- When removing the cap, do not pry it with screwdrivers or drag it. The sleeve it fits on is made of sintered metal, you can chip off the edge of it.