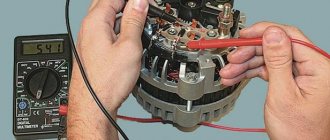
Slip rings
Replacing the slip rings of the VAZ 2110 generator is necessary if there are various types of defects on their surface. Because of them, the rings cannot efficiently perform their most important function - tightly connecting the parts to each other so that contact occurs between them. Very often, individual parts of the generator break. If you change it completely, you will have to spend a considerable amount of money. Therefore, you can repair it by replacing broken parts. On a VAZ 2110, replacing the slip rings of the generator is a simple procedure and you can handle it yourself.
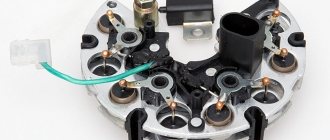
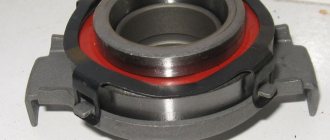
Slip ring block
ATTENTION! A completely simple way to reduce fuel consumption has been found! Don't believe me? An auto mechanic with 15 years of experience also didn’t believe it until he tried it. And now he saves 35,000 rubles a year on gasoline! Read more"
Disassembling the generator is the first thing to do. In order to see the rings, it is enough to remove the back cover of the gene from the side of the diode bridge. However, to replace it you will need to disassemble the entire device.
A block of rings is like this.
The rings, as you can see, come assembled. Factory rings have a decent thickness - 1-2 mm. Purchased analogues may be thinner. Blocks of rings “run” on generators, depending on operating conditions, for approximately 300 thousand vehicle kilometers. If the generating device did not fall into the area of primary concern of the car owner, and “lived out its life,” so to speak, in oil, the service life of the slip rings will decrease significantly.
The block is inexpensive. If you replace it along with the bearings and the tablet, you get an almost brand new generator.
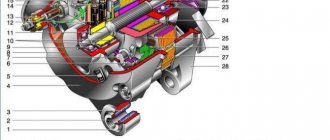
Disassembling the generating device
It is noteworthy that generators come in two types: old and new. The differences between them are in the diameter of the shaft. A 15 mm shaft is installed on old generators, 17 mm on new ones. This means that different bearings should be selected for replacement. The 302nd is suitable for a 15mm shaft, and the 303rd for a 17mm shaft. As for the rear bearing, it goes with all generators and is marked as 202.
So, disassembling the generator begins:
- First, remove the plastic cover;
- then the diode bridge is dismantled;
- remove the tablet (regulator with brushes);
- To unscrew the pulley nut, you will have to clamp the generator in a vice, and then use a 24mm socket.
Advice. The gene must be clamped in a vice very carefully so as not to damage its parts. To avoid damage, the pulley is clamped using rubber gaskets.
- the relative position of the covers of the generating device is marked;
- then the tightening screws are unscrewed.
Note. The fastening screws are tightened very tightly. They are made of soft metal, so the usual methods of turning out oxidized bolts will not work. Here you will need an impact screwdriver or a shaped one, but with a large tip. Fasteners must be pre-treated with WD-40 or brake fluid and wait a little.
It is also recommended to treat the joints of the covers with the device body with WD-40.
- take a mounting spatula or an ordinary, but flat screwdriver, and halve the gene.
We are sorting out the VAZ 2107 37.3701 generator
So in this article I will describe the generator overhaul. We will talk about the 37.3701 generator, although everything on the G-222 generator is almost identical and this article will be suitable for it with some adjustments. I bought for replacement: 1. Diode bridge - 190 rubles 2. Generator capacitor - 15 rubles 3. Bearings - I took Andycar - 65 rubles 4. four nuts for 8. The relay regulator on the generator is new, so I decided not to change it. We will also need a universal puller (I personally used a rod puller instead, it wasn’t very convenient, but after fiddling around I removed the bearing with it). It is very desirable to have a brush for metal; I bought a set of three brushes and some sandpaper.
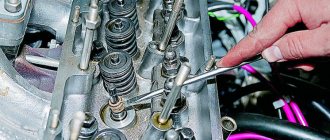
Clean the generator from dirt with a brush. And unscrew the pulley nut. We place the generator so that the pulley rests on the floor, put a 19mm wrench on the nut and, holding the pulley with one hand from turning it, apply strong and sharp blows to the wrench with a hammer. The pulley will of course turn, but the nut will eventually begin to unscrew, I knocked like this for 2-3 minutes
Using a 10mm wrench, unscrew the four bolts and remove the studs holding the generator together.
further, unfortunately, several photos were lost