Replacing the starter on a VAZ
Often, many motorists have to deal with replacing the starter on a VAZ 2105. In order to correctly perform all subsequent work that is associated with replacing the starter, you need to know something.
Firstly, the lion's part of the article should be devoted to dismantling the starter on a VAZ 2105. This procedure is not a pleasant one, since it is simply impossible to get to the starter without problems, not to mention if the starter is screwed to the car body with all three bolts.
The fastest and most cost-effective upgrade is installing coolers
The standard heater of the VAZ 2105 does not always cope with cold winter weather.
Do-it-yourself modification of the VAZ-2105 stove will not require too much labor and money if the car owner decides to modify the standard equipment by installing coolers on the side deflectors. It is worth noting that absolutely everyone should improve the heating equipment of the VAZ-2105, since due to the irrational design, all the air entering the cabin goes down. Thanks to the installation of coolers, which are usually included with PCs, you can adjust the air flow going to the sides. Experts recommend purchasing devices that can make at least 1500 revolutions per minute. Despite the fact that a do-it-yourself modification of the VAZ-2105 stove will not require much expense and time, it will help increase the level of comfort.
Mechanical problems
If you suspect that the problem is mechanical, you need to check spare parts such as the buffer spring, clutch ring, flywheel ring, lever. Typically, a driver can conclude that there has been a failure in the mechanical system if an unusual sound is heard while the starter is operating. Then it is recommended to look at it from the engine compartment. Such noise may indicate that the following elements have broken:
- bearing;
- starter mounting bolts;
- pole fastening.
In addition, the teeth may be damaged. A malfunction often occurs when the starter continues to spin without turning off. This occurs due to sticking of the traction relay drive lever or wear of the ignition switch return spring.
Removing the starter and connecting to the relay
To disassemble the starter you need to follow several simple steps:
- The car should be prepared for further work (washing, placing it in a stationary state).
- The negative terminal from the battery should be removed.
- The air filter housing is dismantled.
- The traction relay wire block is disconnected from the relay.
- Using a key with the number “13”, unscrew the nut securing the tip of the starter power drive.
A wrench with the number “15” is used to unscrew the two nuts that secure the starter.
Note: Please be advised that the bottom nut is quite difficult to access.
The starter (see VAZ 2110: replacing the starter yourself) is carefully removed from the car.
Assembling the starter and installing it in its original location occurs in the reverse order.
The main malfunctions of the traction relay are several important problems. If one of the reasons is present, then the traction relay should be replaced with a new one.
If you continue to use a damaged relay in your car, other parts may suffer:
- In the case when the anchor stops rotating. The relay stops working after connecting the starter when starting the car.
- The same armature continues to rotate, but its speed is significantly reduced. This happens after activating the starter and connecting the traction relay.
- The starter works flawlessly, the traction relay is connected, but after a few seconds, the car engine “stalls”.
The main reasons for these problems may be:
- Interturn closure of the relay.
- Breaks in the power supply circuit.
- Untimely operation of the armature or its idle operation.
- Oxidation of wires, connections, windings.
- The nuts that secure the wire lugs have loosened and loosened the contact.
- The traction relay is being replaced.
- Check and, if necessary, replace wires.
- The armature rotation must be returned to light operation.
- Clean the bolts and check the nuts for tightness.
Since the traction relay is part of the vehicle's electrical system, its repair or replacement must be carried out with care and special attention. This process can be dangerous to human health. The car can be entrusted to employees of service stations and repair shops
If you decide to carry out repairs yourself, you should follow all safety rules when working with electricity. Repair and replacement of equipment must be carried out on an observation platform or pit. A prerequisite is to remove the mudguard from the car engine. All the above steps must be carried out in strict order. After the process of dismantling the starter, you should perform a few more simple steps:
The car can be entrusted to employees of technological service stations and repair shops. If you decide to carry out repairs yourself, you should follow all safety rules when working with electricity. Repair and replacement of equipment must be carried out on an observation platform or pit. A prerequisite is to remove the mudguard from the car engine. All the above steps must be carried out in strict order. After the process of dismantling the starter, you should perform a few more simple steps:
- The lower terminal of the traction relay has a fastening in the form of a nut. It should be unscrewed using a 10 mm wrench.
- The wire is disconnected there.
- Use a wrench with a stroke of 8 millimeters to unscrew the mounting bolts.
- The traction relay is removed.
- The gasket located between the front cover and the relay itself is disconnected.
- The front cover has a spring, an armature and a traction relay. They must be carefully removed from it.
In most cases, if a starter malfunction occurs on VAZ 2110-2112 vehicles, it must be removed for repair or complete replacement. The removal procedure is quite simple and will not be difficult, especially for an 8-valve engine. And it is in this example that everything will be shown.
Firstly, it is worth noting that the starter is attached using 15mm nuts, so it is advisable to first ensure that all the necessary tools are at hand, namely:
- Socket head for 13 and 15 mm
- Ratchet handle
- Extension
Removing and replacing the starter on VAZ 2101, 2102, 2103, 2104, 2105, 2106, 2107 (video)
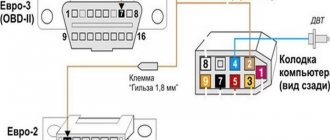
Hello, in this article you will learn how to remove and replace the starter on a VAZ 2101, 2102, 2103, 2104, 2105, 2106, 2107. A car needs a starter to start the engine. When you turn the key in the ignition switch, voltage is supplied to the starter, it spins and transmits torque to the engine through the gearbox, thereby starting the engine. Accordingly, if the starter fails, most often the starter solenoid relay fails, then the engine will not be able to start. Without a starter, the engine can only be started with a pusher, but this is inconvenient and there is not always an assistant nearby to push. To remove the starter you will need heads 13 and 10. The cost of a new starter is around 5,000 rubles, so it will be much cheaper to either repair the starter, or buy a solenoid relay, or buy a used one. starter.
First of all, we remove the terminal from the battery for safety reasons. Then use a 10mm head to unscrew the bolt securing the starter shield
The starter is secured with 3 bolts to the clutch housing, unscrew them with a 13mm head
We also use a 13mm head to unscrew 2 more bolts securing the starter shield.
Now unscrew the nut securing the positive wire of the starter and remove the block
Then we take out the starter up from the side of the engine compartment
Installation of the starter occurs in reverse order.
Source
Problems with the starter on the VAZ 2114 and their elimination
If the car does not start, the starter does not turn, and the traction relay characteristically clicks, then the problem should be looked for in the power circuit
First of all, attention should be paid to the battery. It should not be discharged. You also need to inspect the battery terminals
The presence of oxides can cause the starter connection circuit to have a voltage drop under load. If a discharged battery is detected, it must be charged using a charger. It is recommended to sand oxidized terminals and coat them with conductive lubricant.
You also need to inspect the battery terminals. The presence of oxides can cause the starter connection circuit to have a voltage drop under load. If a discharged battery is detected, it must be charged using a charger. It is recommended to sand oxidized terminals and coat them with conductive lubricant.
To find problems related to the starter, you need to disassemble it.
First of all, attention should be paid to the brush assembly. A large current flows through it, which leads to thermal damage
It is important to check that the brushes slide easily in the guides and do not jam
Springs must have sufficiently high elasticity
It is important to check that the brushes slide easily in the guides and do not jam. Springs must have sufficiently high elasticity. Any deformation of the brush holders is unacceptable.
Any deformation of the brush holders is unacceptable.
The weakest link of the VAZ 2114 starter is four brushes. They are highly susceptible to wear due to friction against the manifold.
Therefore, when visually inspecting them, it is important not only to control the absence of thermal and mechanical damage, but also to measure the remaining length. If the size is close to 4 mm, then the brushes must be replaced. The planetary gearbox is lubricated
Over time, it thickens and the starter begins to rotate the crankshaft less intensively
The planetary gearbox contains lubricant. Over time, it thickens and the starter begins to rotate the crankshaft less intensively
Therefore, when disassembling it is important to wash the gears. During assembly, the gearbox must be filled with fresh lubricant.
Diagnostics
To understand which part of the starter the breakdown occurred in, you should thoroughly clean it. First, the solenoid relay is checked. If it is working properly, a loud click will be heard. Another evidence of the serviceability of this mechanism is that the bendix moves slightly forward. The absence of a click indicates that the relay is broken and needs to be replaced with a new one.
If the problem is not in this part, then you need to make sure that all the insulation is in good condition. All damage can be restored with impregnating varnish and then checked with special electrical measuring instruments.
When, after a complete inspection, all parts are found to be in good condition, the rotor insulation must be checked. Traces of burning and soot on the anchor indicate that this device needs to be replaced. The collector must be clean, free of deposits, and if this defect is present, you can clean the element with sandpaper. After all procedures, the coupling is checked. It should spin freely in one direction and be locked in the other.
Removing the VAZ 2107 starter
If you are of a thin build, then you can complete all the work without much difficulty and without the use of a pit, overpass, or lift. On a VAZ 2107 car (especially if an injector is installed or even an LPG), removal is problematic. The lower nut is difficult to unscrew; even the service instructions for classic cars say that it is necessary to use a 13mm socket with a universal joint and an extension. But if this is not the first time you are removing it, then most likely the lowest nut was not tightened at all.
First, disconnect the negative terminal of the battery to de-energize the entire power supply system. As mentioned earlier, there is no short circuit protection in the power circuit. Now you can carry out repairs
Please note that it is advisable to do this on a cold engine - there is a risk of burns near the exhaust manifold. Then, using a key set to “13”, you need to unscrew the nut from the upper bolt of the solenoid relay and disconnect the power wire. That's all, now unscrew the three fastening nuts and carefully remove the starter to carry out its complete or partial disassembly
That's all, now unscrew the three fastening nuts and carefully remove the starter to carry out its complete or partial disassembly.
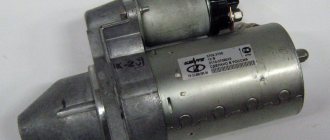
VAZ 2105 - removal and installation of starter
Removing the starter on a VAZ 2105 car is carried out for its repair, in order to replace failed elements, as well as when performing other work in which its presence will interfere with the progress of their work. Prepare a standard set of tools. Turn off the power to the car by disconnecting the negative terminal from the battery; on a car with an injection engine, remove the additional mudguard. Then do the following sequence of actions:
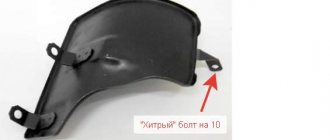
- Using a ten key, unscrew the lower bolt securing the starter shield.
- Next, unscrew the three nuts securing the starter itself to the clutch housing and move it forward on the studs.
- Now you need to remove the air filter housing in the case of a carburetor engine. If an injection system is used, then dismantle the two extensions of the inlet pipeline.
- Remove the starter shield. To do this, use a thirteen socket wrench to unscrew the second nut securing it. Then carefully remove it from its place.
- Also, using a thirteen key, unscrew and disconnect the positive wire connecting it to the battery from the solenoid relay.
- Disconnect the remaining wires from the solenoid relay.
- Then carefully remove the starter from the engine compartment.
At this point, the repair work to remove the starter on the VAZ 2105 car has been completed. Make the necessary repairs, then install in the reverse order.
Source
Checking status
Before changing the relay, make sure that the problem with starting the engine is related to this component.
To do this, consider two situations that indicate its malfunction.
| Situation | Your actions |
| The relay makes clicks, but the armature does not spin | If there are clicks from the relay, check the condition of the armature. To do this, the terminals of the retractor relay are bridged with a large screwdriver or a piece of welding cable to the terminals at the ends. Taking a thin wire or a screwdriver can easily burn the terminals. When the armature is working, after closing the terminals, the armature will spin, which can be determined by the sound. Consequently, the solenoid relay itself has failed and requires repair. |
| The relay is completely silent | Even if there is silence after closing the terminals, the problem should be looked for in the starter. The relay no longer plays any role here. |
Having discovered that the relay has served its purpose, it must be replaced or repaired, if possible.
How to remove the starter
First you need to disconnect this unit from the battery. All conductive cables and terminals are removed from the solenoid relay. Now you can unscrew the mounting bolts. Usually there are only 2 or 3 of them. For this, take a hinged extension. Removing the starter on a VAZ-2105 is carried out in an inspection hole, since only this method is the most convenient for removing all the parts covering the device. Among the blocks that will have to be dismantled is also the engine compartment protection trim.
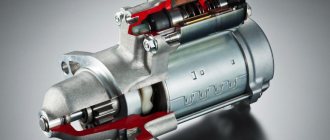
What is the difference between a gear starter and a regular one on a VAZ 2110?
Every driver wants to get more performance from their car. The question often arises: what differences are there between gearbox and conventional starters? Which engine starting device is better and more reliable? The gear starter on the VAZ ATEK differs in that the torque is transmitted through the gearbox, while in a simple starter it is transmitted through an overrunning clutch or Bendix.
The main differences between these devices
A regular starter is very large, but a classic gear starter is almost 50% smaller in size. Regarding the converter, it is located inside the housing between the armature and the bendix. Knowing the advantages and disadvantages of each unit will allow the car owner to analyze the performance of the car in all conditions, both weather and road.
Gear type starters have an electric motor, which is no different from a conventional one. But, the load on the electrics with this type is less, there is no load on the front hub. In addition, a car with a converter device will last longer since the energy consumption is much less.
Why do most people choose a gear device?
The VAZ 2110 gear starter is more convenient, reliable, and uses a low energy charge. Voltage surges during startup are much smaller than with a simple mechanism. The advantage of this device is also its small size, which allows it to fit into the engine compartment of the latest car brands.
Advantages of a gear starter:
- trouble-free operation in the cold season, quick engine starting is guaranteed;
- the presence of plastic protection for the traction relay;
- elimination of short circuits in places where power wires are attached;
- no moisture getting inside the mechanism due to installed rubber sealing rings;
- low power consumption;
- work safety;
- long-term operation.
The choice of starter device is quite important, since the correct operation of the entire engine system depends on it. Confidence in the manufacturer, reliability in operation, reliability - all this must be taken into account. The gear starter from TM “ATEK” on the website atek-avto.com meets all these criteria, it will provide you with a confident start of the car engine in any weather conditions and will serve faithfully for a long time. Belarusian quality at an affordable price!
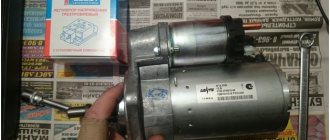
Replacing starter Lada 21053 (VAZ 21053)
The VAZ-2105 car is still popular among Russian drivers. It is distinguished by ease of operation and low cost of spare parts. However, if a car owner wants the car to work without problems, he must regularly check it for various malfunctions.
Breakdowns often occur unexpectedly. They may affect the operation of the vehicle. Such problems include a malfunction of the starter on the VAZ-2105. In order to quickly carry out repairs, you need to understand the structure and operating technology of this unit. Then it will be much easier to repair the starter.
How to repair a starter yourself
I'll tell you how to sort out and restore the starter using a specific example. I came across a sample with the following breakdown: the starter turns the crankshaft slowly, even with a high battery charge.
Having dismantled and disassembled the device with the connected starting wires, when it starts, it rotates quite confidently. After some time, the device stopped and smoke appeared.
When the back cover of the starter was removed, black dust fell out of it. This means that the brushes are worn out. After removing the brush mechanism, remove the housing with magnets and rotor.
In order to better examine the cause of the problems, you need to sort out the starter, blow out all the mechanisms with a compressed air cylinder and wash them in gasoline. After these manipulations, it becomes clear that the brushes have practically worn out, the springs that pressed them have weakened, the brush holders have turned blue due to overheating, and the coils have melted.
How to resuscitate and repair the starter in this case? You need to take the brush mechanism (assembly) and bring it to a company that repairs automotive electrical equipment. Ask for an analogue. Approximately this will cost you 450-500 rubles. And if you compare it with the price of a starter (5,000 rubles on average, it all depends on the brand), it turns out to be quite cheap.
Then we thoroughly clean the rotor and inspect the commutator, which is in constant communication with the brushes. It turns out that the collector is also worn out (marked with arrows in the picture), but it will be able to work for some time without re-grooving it. Therefore, we simply clean the collector using fine sandpaper. As a rule, a commutator can easily work through a couple of sets of brushes. But if the collector fails, then most likely the entire starter will have to be replaced.
Go ahead. Let's carefully examine the Bendix (overrunning clutch). Let's try to rotate its gear manually. It should spin one way, but not the other. Also, the bendix should move easily along the shaft axis. In my case, everything is fine with him. If there were problems with the overrunning clutch, it would also be quite difficult to find it on the market. Most often, the rollers and springs wear out in the Bendix, which is why the gear does not lock but slips during reverse rotation. As a result, the starter works, but the engine does not. In this case, it is best to replace the bendix or the entire device.
Then he inspects the condition of the gearbox itself. We remove the gears, then wash them with gasoline. If everything is fine, then we apply just a little CV joint or high-quality bearing grease to the bearings and gears.
Additionally, let's inspect the contacts of the retractor relay. To open it you will need a soldering iron. You need to unscrew two screws and solder solder on two contacts (indicated by arrows).
The contacts were in perfect order. Clean them with a piece of sandpaper. Then you need to heat up the pistons that go on the lid and slam the lid on the table with a sharp movement. Extra pieces of solder will come out of the pistons and the holes will become free. Then the cover can be put on the wires without any problems and soldered everything in place.
Under no circumstances should the core of the solenoid relay be lubricated with anything, because in the cold this will cause it to jam. To calm your soul, you can lightly apply motor oil and wipe everything dry.
Then we assemble the starter device in the reverse order. Be sure to apply some grease to the rear rotor hub.
Some people ask how to rewind the starter? If there is a problem with the winding of the device, then re-winding is not entirely effective. Here it is better to replace the entire part or device.
Before installing the repaired starter on the car, grind the brushes to the commutator. To do this, connect the device using battery cables. Let him work for a couple of minutes intermittently. Everything is ready, the starter can be installed on the engine and enjoy a confident start.
Starter repair
So, we have the starter in our hands and we can start disassembling it. The work area should be clean and there should be nothing unnecessary on it - there are many small parts in the starter. They are small, but very important! Don't lose them.
Disassembling the starter
Advice! Before disassembling the starter, be sure to clean it of dirt! It will be much more convenient this way.
- Remove the solenoid relay. To do this, use a 13mm wrench to unscrew the nut securing the stator winding output wires. Then unscrew the two screws securing it from the bottom of the relay and carefully remove the relay along with the spring and core, which must be disconnected from the plug.
- Now let's start disassembling the stator. It is secured with two studs. We unscrew them with a 10 mm socket or a regular wrench. Remove the stator from the studs.
- Now we are faced with a planetary mechanism, which also needs to be disassembled.
- First, pry off the main gear with a screwdriver, and then all the others. Pay attention to the degree of wear.
- Now you need to remove the starter drive. To do this, pry up the lever (fork) support and remove the drive, shaft, lever and outer gear assembly.
- We knock the retaining ring off the gear and remove it.
- Then the drive should be removed from the shaft. There is also a retaining ring there - remove that too.
- Let's return to disassembling the stator. The back cover is fastened with two screws made to look like a Phillips screwdriver. Unscrew them and remove the cover.
- The brush assembly can be removed quite simply - pry it up with a screwdriver and remove it.
- Next, the thrust washer is removed and the armature is removed from the stator.
As a matter of fact, disassembling the starter is completed.
Defective starter VAZ 2105
Now let’s turn our attention to what parts could have become unusable, and whether they are worth changing or are “still good”:
- Solenoid relay. Checked with a multimeter. The contacts of the device should be connected to the terminals of the solenoid relay and closed by pressing a coin.
- If the continuity test works or shows a resistance close to zero, then the relay is working. If not, the relay changes.
- The solenoid relay core must move freely in it. There should be no chips, scratches, nicks, etc. on the body. The ease of movement is checked by hand. If the requirements are not met, the core should be replaced.
- Windings Signs of burning are strictly prohibited. If the armature winding is burnt, then alas, it should be replaced. If traces of burning are found on the collector, then this can be cleaned with sandpaper.
- Chips and other mechanical damage are not allowed on the surface of the collector.
- Bendix starter. The description of its malfunction was stated above. Replace if necessary.
- The brushes (see Replacing the starter brush and all about it) should have a height of 12 mm - this is the minimum. If the brushes on your starter are more worn than acceptable (checked with a caliper), then they need to be replaced!
- Planetary mechanism. Carefully examine all gears - each of them for mechanical damage. Unusable gears should be replaced.
- And if they are all damaged, then the entire mechanism should be replaced. After assembly, check that the gears rotate easily.
- And the last thing is testing the armature and stator windings. The stator is checked as follows. One wire of the multimeter is connected to the body of the starter itself, the second to the terminal of the stator winding (alternately). Should show a resistance close to 10 kOhm.
- We connect the multimeter to the winding terminals and look at the readings - the resistance should not approach infinity.
- We connect one wire of the multimeter to the case, the second to the contact plates. The resistance in this case should also be about 10 kOhm.
- If something is not as described in these instructions, the part must be replaced.
Starter assembly
Everyone is familiar with the words - the order of assembly is the reverse of the order of disassembly. No matter how trivial it may sound, it really is so. And therefore, we will not go deeper into this process, but will pay attention only to some small points that should not be forgotten.
- Lubrication. Where should she be? Lubricate the armature shaft, armature holder half ring, overrunning clutch and bendix (drive gear). Oil should not get on the armature housing, stator and commutator. Be careful.
- Tighten all fasteners without fanaticism - do not look for unnecessary problems.
- The axial play of the armature shaft casing should not exceed 0.5 mm (checked with a vernier caliper). Adjustable with shims in case of deviation from normal.
- Install the retaining rings carefully, as they have a very bad tendency to fly off to that end of the garage, and you won’t find it later. And under no circumstances can you install it without it. So it would be better to at least place your hands so that, if something happens, you can hold this ring with your own hands.
Well, our starter is assembled and now you can install it on the car with a clear conscience.
Starter malfunctions
As you operate a vehicle with a starter, problems of various types may occur. Each breakdown manifests itself with its characteristic symptoms, which allow you to quickly and correctly identify the problem and eliminate it in a short time.
The starter works, but the engine does not start
If you hear that the starter is functioning, but the engine does not spin, then the problems may be of the following nature:
- Worn overrunning clutch gear teeth. This leads to the fact that there is no engagement with the flywheel teeth and rotation does not occur. Tooth wear is normal. However, the failure of this part can be accelerated by the use of thick motor oil, incorrect operation of the relay, or prolonged cranking of the starter after the engine has already started. When the teeth wear out, you will hear a characteristic buzzing sound from the device without any further action. Teeth can also wear out on the flywheel, which is quite rare. If the starter gear breaks, the Bendix will need to be replaced.
- The fork itself, which engages the gear with the flywheel, may fail. In such a situation, you will hear that the relay has activated, but the drive sprocket has not moved out of its place. With such a problem, the starter will turn, but without transmitting torque to the flywheel.
- It is possible that the Bendix drive gear may be misaligned, such that it will not fully engage with the flywheel. This happens when the Bendix spring supporting the gear is deformed. If in such a situation you try to continue to start the engine, the teeth on the bendix or on the flywheel itself may break off.
- It may be that the starter is unable to spin the crankshaft until the start occurs. The malfunction comes down to problems with power supply (wiring, brushes, oxidized battery terminals). In such a situation, the starter will simply not have enough voltage due to its drawdown.
The starter clicks but doesn't turn over
If the starter makes clicking noises, but nothing else happens, then the reasons should be looked for in the following:
- With one powerful click, you can judge that the retractor relay is working, but the force of this device is not enough to turn the motor. If several unsuccessful attempts have been made, the starter will need to be dismantled for further disassembly and troubleshooting of parts. The probable causes of this phenomenon may be wear of the starter brushes and bushings, short circuit or breakage of the coils, poor contact of the power wire, problems with the retractor or bendix.
- With several clicks, the fault lies in the solenoid relay, unreliable contact between the starter itself and the relay or ground. Before you begin repair work on the starter, you need to check the reliability of the connections, starting from the battery and ending with connecting the wires to the starter.
- Bendix malfunctions (breakage of teeth or fork).
Video: the starter clicks but does not rotate using the example of a VAZ 2110
https://youtube.com/watch?v=M4lhK1TG-ZM
Crackling sound when turning on the starter
There are situations when, when trying to start a car engine, the starter makes sounds in the form of a crackling or grinding sound. In this case, malfunctions may be of the following nature:
- The fastening of the starter to the power unit has become loose, resulting in vibration.
- The bendix is worn out.
- Lack or lack of lubricant on the shaft, which led to difficult movement of the bendix.
- Broken flywheel teeth.
The starter does not turn on
If the starter does not respond to turning the key in the ignition switch, then the reasons should be sought in the following:
- Problems with the solenoid relay. To determine that the problem is in this element, it is necessary to apply voltage directly from the battery to the starter power terminal. If the motor starts to crank, then the reason is obvious - the traction relay is faulty. The contact pads in it quite often burn out, which will require disassembling the device and cleaning the contact elements.
- Broken ignition switch. Sometimes the contact group fails, which can be replaced without completely replacing the lock.
- Problems with power supply. It is necessary to check the entire circuit from the voltage source to the consumer.
- There is a short circuit in the winding, which will be indicated by a characteristic burning smell and the appearance of smoke. In such a situation, the starter must be dismantled and the windings replaced or the old ones rewound.
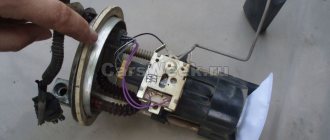
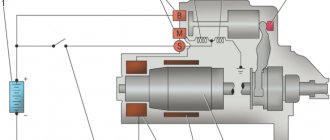
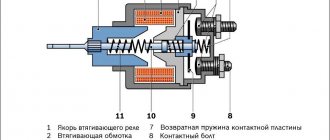
Principle of operation
The overrunning clutch is connected to the flywheel. It is secured in such a way that its movements are not limited. The VAZ-2105 starter relay, which produces pull-in and pull-out movements, is installed on the body. Power contacts are soldered inside this device, which drivers call nickels among themselves. This part consists of simple bolts pressed into the ebonite cover of the solenoid relay. There is also a moving contact in the form of a jumper.
All elements of the starter are connected to each other so that when torque is supplied to the overrunning clutch, the rollers of this element, which are located inside the separator, can fix the gear in the cage. The positive and negative contacts of the starter must be connected with the corresponding pole plates. As soon as the solenoid relay is activated, the core begins to push the bendix towards the flywheel. After this, the anchor spins the flywheel.
During the action of the core on the moving contact and the closure of the power pins, current is supplied from the battery. If the driver starts the engine by turning the key in the ignition switch, a moment may occur when the engine speed is higher than the starter speed. Then the Bendix overrunning mechanism will work.
Electrical causes of failure
If it is determined that the VAZ-2105 starter does not turn, or the speed is too low, then you must check the electrical circuit. Troubleshooting starts with the battery. The driver must ensure that:
- the battery is well charged;
- the wire connecting the terminals of the solenoid relay is securely fastened;
- the ignition switch contact group is not damaged;
- The wire between the starter and battery is good.
At this stage of identifying problems, you need to pay attention to how the retractor operates and the armature rotates. Sometimes the winding of the traction relay is damaged, at the same time a short circuit occurs between the turns
Then the VAZ-2105 does not start, but the starter turns. Another cause of starter failure, which is classified as electrical, is slow rotation of the flywheel.
If no visible problems are found, the starter will need to be removed for further inspection. Most likely, the commutator burned out due to the short circuit of the plates. Other electrical causes of starter failure are:
- failure of the traction relay;
- brushes that do not fit tightly to the commutator;
- armature commutator wear.
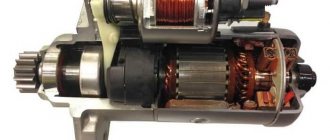
Device
A mechanism such as a starter plays a very important role in the starting system of the VAZ-2105. It is an electric motor with a voltage of 18 volts. The block consists of the following elements:
- starter anchor;
- collector plates;
- poles, or cores;
- overrunning clutch (Bendix);
- steel cylinder.
The device also includes 4 excitation windings located inside the walls of the block housing. The VAZ-2105 starter injector has a similar structure. The service life of this part may vary. Typically, breakdowns occur no earlier than the car has traveled 80-90 thousand km, and with regular maintenance this figure can be up to 150,000 km.
Setting the advance angle
If repair work was carried out on the VAZ 2105 ignition distributor or the device was replaced, adjustment is required after installing it on the car. This can be done in different ways, which depend on the conditions and the tool at your disposal. Before you begin the adjustment process, you need to know that the engine cylinders operate in the following order: 1–3–4–2, counting from the crankshaft pulley.
Control
This method will require the following tools and accessories:
- 12 V test lamp with two wires;
- key for 13 and 38 to turn the crankshaft.
The adjustment is made with the engine off and consists of the following steps:
- Remove the cover from the ignition distributor.
- Rotate the crankshaft until the mark on the pulley coincides with the middle mark on the front of the engine.
- Use a 13 key to loosen the fastening of the distributor.
- We connect one wire from the lamp to ground, the other to the low voltage circuit in the distributor.
- Turn on the ignition by turning the key in the lock and rotate the device left and right until the light bulb appears. When it lights up, fix the distributor with the appropriate fasteners.
Video: setting the ignition using a warning light
By hearsay
The simplest and most accessible option for setting the ignition is by ear. This method is especially indispensable in field conditions. The adjustment consists of the following steps:
- Let's start the engine.
- Lightly unscrew the distributor mount, holding the device from turning with your hand.
- We try to turn the distributor to one side.
- We find a position in which the engine operates at maximum speed.
- Turn the distributor slightly clockwise.
- We clamp the mechanism fastening.
Video: installing the Zhiguli ignition by ear
By spark
The sequence of actions when setting the spark advance angle consists of the following steps:
- We install the crankshaft according to the marks, as in step 2 when adjusting using a light bulb, while the distributor slider should be directed towards the first cylinder. If he is looking at the fourth cylinder, then he needs to crank the crankshaft some more.
- We remove the central cable from the distributor cover and place the contact near ground.
- We loosen the distributor fastening, turn on the ignition and turn the mechanism until a spark jumps between the explosive wire and the ground.
- We move the distributor little by little counterclockwise and find a position in which a spark will not appear, after which we secure the distributor.
By strobe
You can most accurately set the ignition timing on the “five” using a strobe light. The adjustment technique consists of the following steps:
- Lightly unscrew the distributor fasteners.
- We connect the negative contact of the device to ground, connect the plus one to the low-voltage part of the ignition coil, and attach the strobe clamp to the cable of the first cylinder.
- We start the engine and turn on the device, pointing it at the crankshaft pulley. With such actions, the mark will be visible.
- We turn the distributor and ensure that the mark from the strobe light matches the marks on the engine.
- We control the engine speed, which should be 800–900 rpm.
- We fix the adjustable mechanism.
Video: setting the lead angle using a strobe light
The serviceability of each element of the ignition system has a direct impact on the functioning of the engine.
Therefore, attention should be paid to checking them periodically. If malfunctions occur in the operation of the motor, you need to be able to find the cause of the malfunction and eliminate it. To do this, it is enough to prepare a minimum list of tools, familiarize yourself with the step-by-step actions and carry them out during the work
To do this, it is enough to prepare a minimum list of tools, familiarize yourself with the step-by-step actions and carry them out as you work.
Starter replacement rules
New equipment is installed in the reverse order. During installation, great attention should be paid to securely fixing the power wire of the VAZ 21053 starter relay. Disassembling this unit is considered a complex process. To do this, you will need keys for “13” and “10”. After unscrewing 3 screws, the starter relay is removed. The rod and spring are pulled out from the part body. For subsequent disassembly of the starter, a Phillips screwdriver is used. With its help, the screws are unscrewed and the cover is removed. The condition of the brushes can be checked after dismantling them.
The next step is to dismantle the rubber seal and remove the adjusting washer. The assembly process involves installing this element in its place. The anchor is removed along with the drive. When removing the lever, you need to take into account that the gear must rotate freely in a certain direction. The worn part is replaced with a new one.
Is it possible to fix it?
Relays for starters used in Zhiguli cars received identical parts in view of completely identical tasks. The only inconvenience is that, depending on the supplier manufacturer and the modification of the car itself, the attachment points of the units may differ slightly from each other, and some differences in internal components are allowed.
There is no point in repairing the devices; for VAZ-2107 and 2106 it is easier to purchase the entire starter assembly. But, if there are financial difficulties, you can only replace the relay. And this is the order in which you should proceed. Be sure to disconnect the battery first! The starter is installed in the car electrical network in such a way that shorting its contacts can lead to burnout of the entire car wiring.
Then remove and thoroughly clean the starter from dirt. This is necessary to ensure that random particles do not get into the electrical winding and prevent a short circuit. Now we disconnect the contact from the bolt of the traction relay, unscrew the tightening screws and remove the part.
First you need to find out where this device is located and how to remove it. The unit is cleaned from the outside. Next, find the starter relay on the VAZ 2107 and check its functionality.
Removing and replacing the starter on a VAZ 2107 - step by step... https://CarTore.ru/331-remont-startera-vaz-2107-snyatie-zamena.htmlRemoving the VAZ 2107 starter in the garage, with your own hands. Video tutorial on starter repair. As in most other cars, in the “seven” the starter is located at the bottom of the engine.
Starter activation relay VAZ 2107 https://avtoblokrele.ru/vaz/predohraniteli-vaz-2107.htmlWhere it is located. ... Cars VAZ 2107, VAZ 21047 carburetor, injector were considered. Location of the VAZ 2107 fuse box under the hood.
Starter relay in VAZ 2107, repair and its operation https://autodont.ru/jelektro/rabota-i-remont-rele-startera-na-avtomobile-vaz-2107 Car enthusiasts need to know that the starter traction relay of a VAZ 2107 car can be connected only through the on relay. It is located in the engine compartment, just where the right mudguard is.
VAZ-2107 starter relay - how to replace it? ”AutoNovator https://carnovato.ru/vtjagivajushhee-tjagovoe-rele-vkljuchenija-startera-vaz/The installed starters on the VAZ-2106 and 2107 starters are actually the same. ... The starter activation relay is located some distance from the starting mechanism itself, so you should look for it by wires.
Starter malfunctions of VAZ 2107, VAZ 2105, VAZ 2104… https://www.VazClub.com/vaz/2104-2105-2107/remont/elektrooborudovanie/starter/ustranenie-neispravnostei-startera.html7. The VAZ 2107 starter relay is faulty. 7. Clean the relay contacts. ... Disassembling the Lada 2107 starter with your own hands, checking the starter winding, removing and installing the starter on a VAZ 2104, VAZ 2105, VAZ 2107.
starter device for the VAZ 2107 car https://car-exotic.com/vaz-cars/vaz-2107-car-starter.htmlThe starter for the VAZ 2107 car is a four-brush, four-pole DC electric motor. The starter is installed on a VAZ 2107 car on the right side of the cylinder block and is secured with three bolts to...
Repair and replacement of the VAZ 2107 starter https://atlib.ru/video/remont-i-zamena-startera-vaz-2107-194 First of all, you need to figure out where the starter is located, how to get to it and how it is attached. After clarifying these important points and The starter on a VAZ 2107 is being replaced independently.
Starter relay VAZ 2107 photo https://photodomik.ru/rele-startera-vaz-2107-foto.htmlFind photo: list. You are interested in: VAZ 2107 starter relay photo. (Photos on this topic are selected here; full relevance is not guaranteed.)
Buy VAZ 2107 - Find your car on OLX! //www.google.com.ua/search?ie=UTF-8&hl=ru&q=%D0%B3%D0%B4%D0%B5%20%D0%BD%D0%B0%D1%85%D0%BE %D0%B4%D0%B8%D1%82%D1%81%D1%8F%20%D1%81%D1%82%D0%B0%D1%80%D1%82%D0%B5%D1%80 %20%D0%B2%20%D0%B2%D0%B0%D0%B7%D0%B5%202107Used cars at a low price.
Sources
- https://carnovato.ru/vtjagivajushhee-tjagovoe-rele-vkljuchenija-startera-vaz/
- https://auto-rx.ru/2016/05/14/gde-nahoditsya-starter-v-vaze-2107/
Starter - removal and installation
1. Place the car on an inspection hole or overpass (see “Preparing the car for maintenance and repair”).
2. Disconnect the wire from the negative terminal of the battery (see “Battery - removal and installation”).
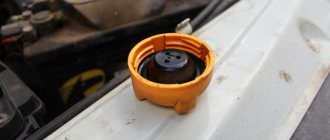
3. On a car with an injection system, remove the additional mud guard (see “Splash guard - removal and installation”).
10 mm socket wrench
Using an extension, unscrew the lower bolt securing the starter shield.
13 mm socket wrench
with the extension and cardan, unscrew the three bolts securing the starter to the clutch housing and move the starter forward. On the injection engine, the upper starter mounting bolt also secures the intake manifold extension, and the middle bolt secures the mounting bracket for the oxygen concentration sensor wiring harness.
6. On the carburetor engine, remove the air filter housing (see “Air filter housing - removal and installation”) and the warm air intake with an air duct (see “Intake pipe and exhaust manifold gaskets of a carburetor engine - replacement”).
7. On the injection engine, remove two stretchers of the intake pipe (see “Gaskets of the intake pipe and exhaust manifold of the injection engine - replacement”).
13
mm
socket wrench , unscrew the nut (there are two nuts on the injection engine) securing the starter shield and remove the shield.
13
mm
socket wrench, unscrew the nut securing the tip of the wire connecting the starter to the positive terminal of the battery, and remove the tip from the contact bolt.
10. Disconnect the wire from terminal “50” of the traction relay.
11. Remove the starter from the partition side of the engine compartment.
Installation of the starter is carried out in reverse order.
Features of battery operation
Successful engine starting will depend on the condition and power of the battery. Many people know that such indicators as capacity and cold cranking current are important for batteries. These parameters are indicated on the marking, for example, 60/450A. Capacity is measured in Amp-hours. The battery has low internal resistance, so it can deliver large currents for a short time, several times its capacity. The specified cold cranking current is 450A, but subject to certain conditions: +18C° for no more than 10 seconds.
However, the current supplied to the starter will still be less than the specified values, since the resistance of the starter itself and the power wires is not taken into account. This current is called inrush current.
The battery supplies starting current to the starter for 5-10 seconds. Then you need to pause for 5-10 seconds for the battery to “gain strength”.
If, after attempting to start, the voltage in the on-board network drops sharply or the starter cranks halfway, this indicates a deep discharge of the battery. If the starter makes characteristic clicks, then the battery is completely dead. Other reasons may include a broken starter.
Starter design and troubleshooting on your own VAZ 2104-2105-2107
Starter power and technical characteristics, consumption values
- Rated power, kW……..1.3
- Current consumption at rated power, no more, A……..290 (260*)
- Current consumption in the inhibited state, no more, A……..550 (500*)
- Current consumption at idle (without
Starter connection, checking with ammeter
- Connection diagram for checking the VAZ 2105 starter on a stand
- 1 - battery
- 2 - ammeter with 1000 A shunt
- 3 - switch
- 4 - rheostat
- 5 - voltmeter with a scale limit of at least 15 V
- 6 —
Closure and performance by duration
By closing switch 3, at a current source voltage of 12 V, turn on the starter three times with different braking conditions. For example, with braking torques 2; 6 and 10 N m (0.2, 0.6 and 1 kgf m). The duration of each starter activation should be no more than 5 s, and
Starter test mode, braking torque
Brake the ring gear of the stand, turn on the starter and measure the current, voltage and braking torque, which should be for starter 35.3708, respectively, no more than 550 A, no more than 7.5 V and no less than 13.7 Nm (1.4 kgf m). For the ST-221 starter, the current should not be
Unusual faults of the starter, traction relay
Cause of malfunction Method of elimination When the starter is turned on, the armature does not rotate, the traction relay does not operate 1. The battery is faulty or completely discharged 1. Charge the battery or replace it 2. Very
Starter idling, test
Remove the gear ring of the stand from engagement with the starter gear. Turn on the starter and measure the current consumed by it and the rotation speed of the starter armature, which should be respectively no more than 60 A (35 A for the ST-221 starter), and 5000±1000 min-1 at
Starter traction relay check switching on
- Starter VAZ 2107 - 35.3708
- 1 - armature shaft
- 2 — starter cover bushing
- 3 — restrictor ring for gear travel
- 4 — drive gear with the inner ring of the overrunning clutch
- 5 - thrust half-ring
- 6 — overrunning roller
Further disassembly of the starter with the manifold structure
Unscrew the nut on the lower contact bolt of the traction relay and disconnect the output of the VAZ 2107 stator windings from it. Unscrew the nuts securing the traction relay and remove it.
- Starter parts 35.3708
- 1 - cover
Core, checking the condition of the starter and ground winding closure
Check with a megger or using a lamp powered by 220 V to see if the armature winding is shorted to ground. Voltage is supplied through the lamp to the collector plates and to the armature core. Lighting of the lamp indicates
Assembling the starter, lubricating the armature shaft
Before assembly, lubricate the screw splines of the armature shaft and freewheel hub, gear and cover bushings with engine oil. Lubricate the drive ring of the drive with Litol-24 grease. Before assembly, check the axial free play of the armature shaft,
Differences between starter and relay failure
In order not to confuse what exactly has failed - the starter or the solenoid relay, there is an excellent method for recognizing the “culprit”.
- Remove the starter, connect the negative terminal of the battery to ground;
- The design of the device has copper bolts and a tongue-shaped element;
- The positive wire from the battery is connected to this “tongue”;
- If there is contact, the solenoid relay clicks and starts working;
- If not, then you will have to go to the store for a new relay.
But there is one more very important point. Even if all the facts indicate that the starter or retractor relay is not working, another unit - the ignition switch - may still be the cause of ignition problems. Take the time to check its serviceability before buying new parts.
Installation
- We insert the VAZ 2105 starter into the seat.
- Then secure it with three mounting bolts.
- Then you should reinstall the starter shield.
- Now the next step is to connect all the necessary wires back to the solenoid relay.
- Next, reinstall the braces (on an injection-powered car) or install the air filter housing (on a carburetor car).
- Connect the negative terminal back to the battery and you can try to start your favorite car.
Brief conclusion. Repairing a starter yourself is not a difficult task, but it is quite economical. The price of spare parts plus the price for work by craftsmen at the nearest service station is already good money. And so you will only have to spend money on spare parts. We hope this article helped you. Take care of your car, have it repaired on time, and when you really need it, it will serve you faithfully!
The starter relay engages the drive gear with the flywheel, activating the main unit. The VAZ 2105 starter relay is activated in a similar way. The mechanism is fixed with 3 bolts. The body of this unit and its cover are secured with 2 bolts.